The level viewport contains a selection of modes to choose from that allow for content to be interactively edited directly in the viewport. The Mesh Paint mode contains tools that allow for painting directly on a mesh’s vertices and textures within the viewport. You can paint multiple instances of a single mesh with colors and alpha values unique to each instance, enabling this data to be used however you want in a material you create. Color values can also be painted into the meshes' vertices or into its assigned textures. You can visualize this color data directly, so that you can edit multiple meshes at the same time.
Mesh Paint Workflow
Most painting features are designed to be intuitive enough for you to jump right into using them, with little to no setup required. The general workflow is:
- Select the type of mesh painting you want to perform.
- If using Vertex Color or Vertex Weights, you’ll need to set up a vertex color material.
- If using Texture Color, you’ll need to set up a texture color material and mesh.
- If using both, you’ll need to set up your a material that handles both vertex color and texture color.
- Activate Mesh Paint mode in the level editor and a painting method.
- Select a Paint Method tab.
- Select a mesh you want to paint.
- Select the Paint tool.
- Apply paint to the selected mesh.
Requirements for Mesh Painting
The following are additional requirements that must be met before you can use certain features of Mesh Paint mode:
- Texture Color painting requires Virtual Textures to be enabled for the project.
- You can enable Virtual Textures with the project setting Enable virtual texture support under the Engine - Rendering section.
- For more information, see Virtual Textures.
- Vertex Color painting with Nanite-enabled meshes.
- Per-instance vertex color data cannot be visualized for any Nanite-enabled mesh, even if the data exists. Nanite should be temporarily disabled to view and paint this type of data.
- For more information, see the Painting on Nanite Meshes section of this page.
Activating Mesh Paint Mode
In the main toolbar of the level viewport, use the Modes dropdown selection to select Mesh Paint to activate mesh painting in the level viewport.
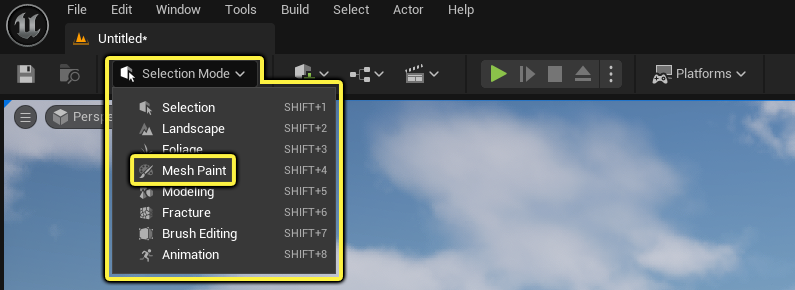
Once activated, the Mesh Paint panel opens to the left of the viewport. Selecting another mode from the dropdown menu automatically closes the Mesh Paint panel and opens (when applicable) the selected mode’s panel.
Mesh Paint Tab
While Mesh Paint mode is active, you can still perform the most common actions of the editor, such as camera movement and selection of some level actors. However, features such as translating and scaling are disabled. The Create toolbar menu remains available to add and place objects when Mesh Paint mode is active.
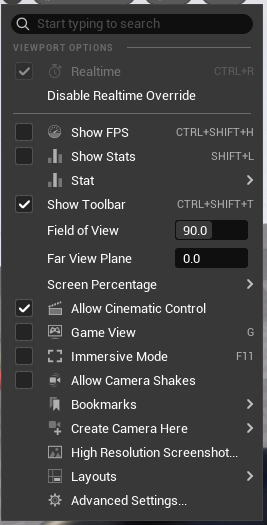
The Perspective viewport forces realtime mode by default when Mesh Paint mode is activated. You can change this, and other viewport settings, with Disable Realtime Override in the viewport settings.
Mesh Painting and its Tools
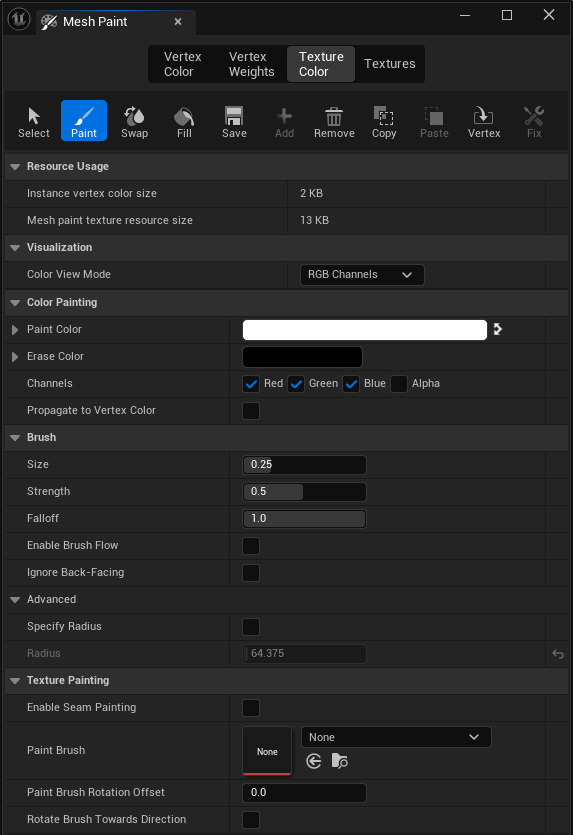
The Mesh Paint panel includes a selection of mesh painting methods that have their own tools and settings you can use to interactively paint a mesh within the level viewport.
The Mesh Paint panel is broken down into the following parts:

- Mesh Paint Methods
- Mesh Paint Tools for the selected mode
- Mesh Paint Tool Settings
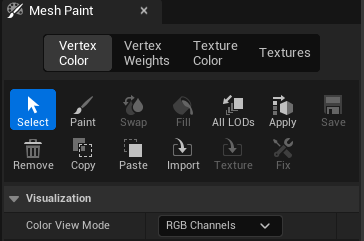
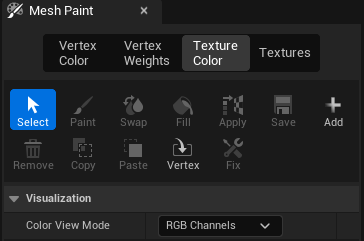
Mesh Paint Methods
The Mesh Paint mode contains a set of painting methods for how color can be painted onto a mesh to store color data on vertices or within textures. When one of these methods is selected, a set of tools (most being common between each painting method) is displayed just below.
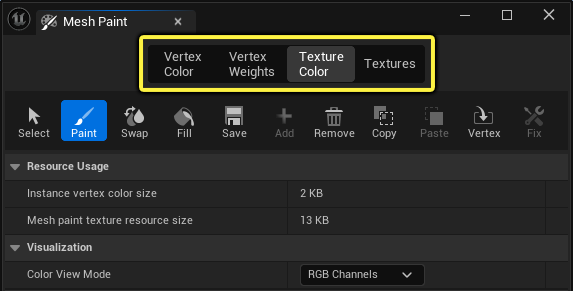
There are four mesh painting methods to choose from:
| Mesh Painting Methods | Description |
|---|---|
| Vertex Color | Paint vertex colors on a mesh. The vertex color data can either be stored on your mesh component, or applied to the shared mesh asset. |
| Vertex Weights | Paint vertex weights on mesh that can be used in a material to blend between texture layers. |
| Texture Color | Paint color on your mesh that is stored on the instance in a specialized texture asset called a mesh paint texture. |
| Textures | Paint on texture assets. You can cycle through the available textures assets of a mesh to paint on them individually. Only a single component can be selected for texture painting at a time. |
Mesh Paint Tools and Their Settings
Each mesh painting method includes a toolbar with a set of tools specific to that method. There are some common tools used between the different mesh painting methods. These tools include settings that may be specific to mesh painting methods.

When Paint is selected, the mesh painting method settings will populate the panel below the tool selection.
For more information on individual properties and settings of the mesh painting tools, see Mesh Paint Mode Tools and Settings.
Painting on Instances
When painting using vertex colors or texture colors, you are only painting on an individual instance of the mesh and not the actual mesh asset itself. Color data stored on the instance can be copied to another instance of the mesh using common functions of the Vertex Color and Texture Color tabs to copy and paste data between individual or multiple meshes.
 |
 |
| Vertex Color Painting Tools | Texture Color Painting Tools |
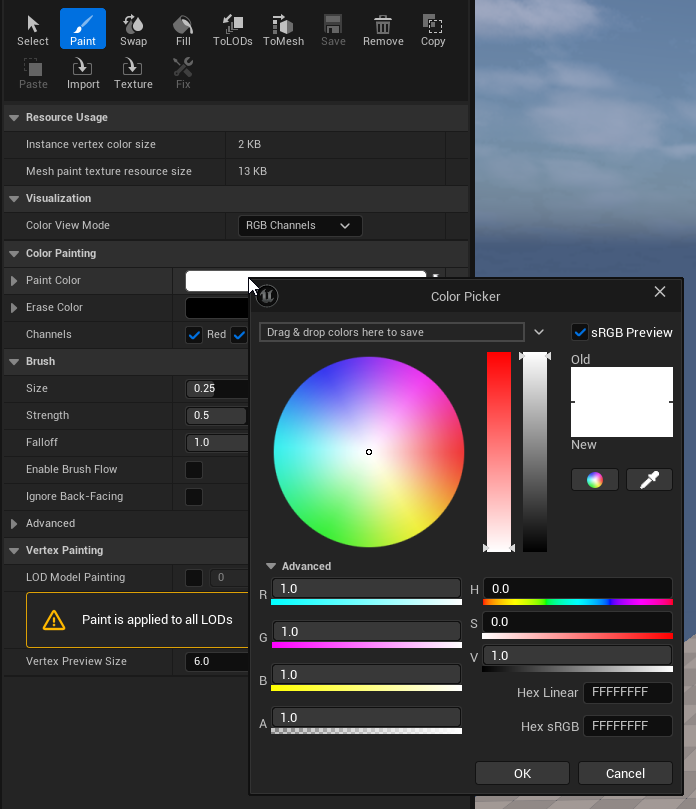
Each of the mesh paint tools display the size of the color and texture data being stored under the Resource Usage category of the details and settings.
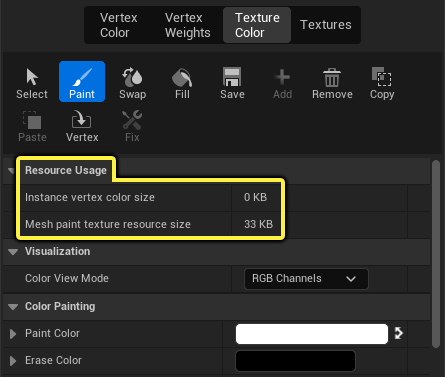
When painting vertex colors, the Instance Color Size field displays the number of bytes of memory used by the vertex color data. This value reflects the total for all instances currently selected.
When painting texture colors, the Mesh Paint Texture Resources Size field displays the size of the texture resource in bytes. This value reflects the total for all instances currently selected.
For texture colors, the Mesh Paint Texture Resource Size isn’t the final size in a staged package because it doesn’t take into account packaging compression that happens for all textures in the project. Also, this is not the size in memory because this mode uses virtual texturing, which has a fixed memory cost overhead defined by shared virtual texture pools.
Painting Controls
You can use the following hotkeys when painting on a mesh:
| Control | Description |
|---|---|
| Left Mouse Button | Applies paint color to the mesh. |
| [ | Reduces the size of the paint radius. |
| ] | Increases the size of the paint radius. |
| X | Swaps the Paint Color and Erase Colors. |
| Shift + Left Mouse Button | Applies the “erase” paint color to the mesh. This can be useful when needing to quickly swap between two different paints to apply to the mesh. |
Painting Colors and Weights
The Mesh Paint tool provides options for how colors and weights get applied to vertices and textures. Each tool selection shares similar properties for painting, and erasing.
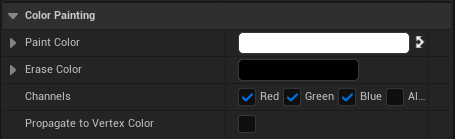
The Vertex Color, Texture Color, and Textures tools all share the following properties for Paint Color, Erase Color, and individual color Channel selection.
 |
 |
| Vertex Color, Texture Color, and Textures Color Painting Settings | Vertex Weights Weight Painting Settings |
The Vertex Color, Texture Color, and Textures tools include the the following properties:
| Property | Description |
|---|---|
| Paint Color | The color used for applying color painting. |
| Erase Color | The color used for erasing color painting. |
| Channels | The color channels which should be influenced during painting. |
| Propagate to Vertex Color | (Texture Color property only) Whether to copy all texture color painting to vertex colors. |
The Vertex Weights tool includes weighted options to paint and erase parts of blended layers setup in the material assigned to the mesh. The tool includes the following properties:
| Property | Description |
|---|---|
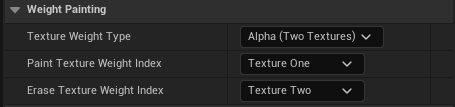
| Texture Weight Type | Choose the blend weight painting mode to use:
|
| Paint Texture Weight Index | The texture blend weight index (which texture) to apply painting to. |
| Erase Texture Weight Index | The texture blend weight index (which texture) should be erased during painting. |
For any of the tools that use color, you can use the Color Picker to select a specific Paint and Erase color.
For workflow purposes, you should think of the Paint Color and Erase Color as a foreground and background color. The Erase Color is just an alternative paint color and does not remove any previous painted strokes like an erase tool in another application might remove those strokes. Instead, you are just painting with a different color. For example, if your base is white, then you would use white as your erase color to overwrite the foreground paint color.
The Swap icon switches the locations of the paint and erases colors.This is useful when you need to jump back and forth between a pair of colors, or do touch-up on a misplaced brush stroke. Similarly, the Swap tool performs the same action.

Painting on Nanite Meshes
These are some things to consider when painting on Nanite-enabled meshes:
- Nanite meshes do not support Vertex Color painting:
- Nanite meshes should use Texture Color for mesh painting. This also requires that Virtual Textures be enabled for the project since Mesh Paint Textures of Texture Color are always virtual textures.
- If you’re using Vertex Color and Texture Color, you can set up some material logic to handle them both:
- For a simplified example of how to set this up, see the “Setting up a Material for both Vertex Color and Texture Color” section of Sharing Data between Vertex Color and Texture Color.
- Vertex Color cannot be visualized per-instance, even if the data exists, when Nanite is enabled:
- Nanite should be temporarily disabled in the editor to visualize any vertex color data. When disabled, the fallback mesh is used to visualize this color data. To disable Nanite temporarily:
- Use the console to set
r.Naniteto 0. Set it back to 1 to re-enable it. - On the mesh component under Rendering > Advanced settings, check the box for Disallow Nanite to use the fallback mesh for visualization.
- Use the console to set
- Nanite should be temporarily disabled in the editor to visualize any vertex color data. When disabled, the fallback mesh is used to visualize this color data. To disable Nanite temporarily: