
This document guides you through some example content in the Mover Examples plugin to introduce you to the Mover system.
The example content in the Mover Examples plugin is not intended to be used directly in a shipping product.
Prerequisites
You must enable the Mover and Mover Examples plugins and adjust your project settings before using the example content.
Enable Plugins
Enable the Mover and Mover Examples plugins in your project, by doing the following:
- Open the Plugin panel by selecting Edit > Plugins.
- In the Plugin panel, input "Mover" into the search bar.
- Enable the Mover and Mover Examples plugins.
- Restart Unreal Editor.
Adjust Project Settings
Make the following adjustments to your project settings:
- Open the Project Settings panel by selecting Edit > Project Settings.
- Select the Network Prediction filter under the Project heading or use the search bar to find the following settings and adjust their values:
- Set Preferred Ticking Policy to Fixed.
- Set Simulated Proxy Network LOD to Interpolated.
- Set Enable Fixed Tick Smoothing to True.
These settings are recommendations for general use. We encourage you to explore and review the tooltips on related settings.
Example Content Overview
The Mover Examples plugin contains a variety of valuable content for learning Mover, including levels and pawns.
Levels
The Mover Examples plugin provides several example levels that demonstrate Mover functionality, including the following:
- L_CharacterMovementBasics: Showcases various terrain features, movement, and an extended pawn with additional movement capabilities.
- L_PhysicsSimulatedCharacter: Provides an example implementation of a physics-based pawn. For more information, see Physics-Based Movement.
- L_LayeredMoves: Demonstrates many layered move types with a variety of options.
- L_PathfindingMovement: Focuses on demonstrating AI-driven movement methods with pathfinding, including a NavWalking mode.
You can find each level above and more in All/Engine/Plugins/Mover Examples Content/Maps.
Open each level and play around to get a better understanding of Mover's functionality. Each level is broken down into sections with notes to express the purpose of each area.

Pawns
The Mover Examples plugin provides several example pawn implementations that demonstrate Mover functionality, including the following:
- AnimatedMannyPawn: Designed to perform similarly to the default pawn used in project templates.
- AnimatedMannyPawnExtended: Provides an example of extending the default pawn implementation with additional movement capabilities, including dashing, multi-jump, vaulting, and ziplining. You can possess this pawn in the
L_CharacterMovementBasicslevel by moving into the Swap For Extended Pawn area. - PathFollowingMannyPawn: Demonstrates AI-driven path following as an example of nav-mesh movement.
- PhysicsMannyPawn: Implemented to use Chaos Networked Physics instead of Network Prediction. The associated movement modes are also customized to work within the constraints of the physics system. For more information, see Physics-Based Movement.
The pawns above and more are in All/Engine/Plugins/Mover Examples Content/Pawns.
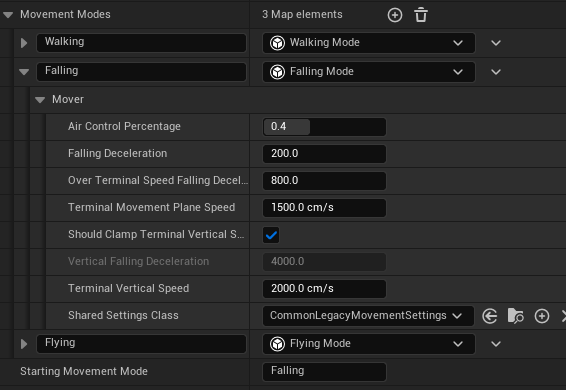
To familiarize yourself with an example pawn's movement modes and settings, you can do the following:
- In the Content Browser, double-click the desired pawn to open the Blueprint Editor.
- In the Components panel, select the Character Motion Component (MoverComponent).
- In the Details panel, review the pawn's properties. The Movement Modes and Shared Settings properties are good places to start.
The controls for player-controlled pawns will appear in the bottom-left corner of your viewport when playing a level.
Physics-Based Movement
The L_PhysicsSimulatedCharacter level showcases the PhysicsMannyPawn, which is driven by the Chaos Networked Physics system instead of the Network Prediction plugin.
In addition to the changes in Adjust Project Settings, you must make the following changes to your project settings:
- Enable Tick Physics Async.
- For network play, enable Enable Physics Prediction.
The physics simulation runs ahead of the game thread at a fixed tick rate. As the simulation progresses, the game thread's character representation smoothly interpolates towards the most recent physics state. However, this means there is some delay between player input and pawn movement.
Additional Considerations
- The Character Ground Constraint from the physics system handles performing the proposed motion that the Mover system generates.
- You need to set up replication for other interactable physics objects. Otherwise, the server and client will desync.
- Interactions with moving non-physics objects will produce poor results due to ticking differences between the physics simulation and the rest of the game world.
- Physics-driven Mover actors are not synchronized with those using Network Prediction.
- Gameplay Events are not connected to the Mover system.
Customization and Extension
You can customize Mover actors by changing the movement mode map on the MoverComponent to grant access to new ways of moving through the world. You can switch between these modes during runtime using the QueueNextMode function or, if using the default character input struct, by setting the SuggestedMovementMode. You can even add or remove modes during runtime.
There are known issues with removing and replacing elements of the movement mode map on instances of actors placed within levels, potentially preventing these pawns from moving.
The default character movement modes have various settings to tailor their behavior and feel. You can find the individual settings on the modes themselves and the settings shared by multiple modes under Shared Settings.
To define your own movement modes, follow UZipliningMode as an example. Following this example, you will override the following functions:
OnGenerateMove: Creates a proposed move.OnSimulationTick: Simulates the proposed move through the world to create the next state snapshot.
The zipline implementation adds some custom state data to track the character's progress along the line. FZipliningState defines the data, and UZipliningMode::OnSimulationTick adds and modifies it as part of the movement simulation state. The custom state data requires a native C++ definition, as does custom input data.
For inputs, the pawns in MoverExamples use a combination of C++ and Blueprint functions to author inputs for the movement simulation.
The common inputs (directional moving, jumping) for these pawns are authored in AMoverExamplesCharacter::OnProductInput with additional custom inputs authored in the OnProduceInput Blueprint function found in AnimatedMannyPawnExtended.
Although you can produce custom input in Blueprint, adding your own data requires C++. You can follow FMoverExampleAbilityInputs for an example of this. The type is defined in C++ but added to the simulation and authored in Blueprint.
The zipline example also demonstrates custom transitions and the modular addition of new movement mechanics in UZiplineStartTransition and UZiplineEndTransition.