
This quick start guide will teach you how to create three different camera rigs by using the Gameplay Camera System. These camera rigs will replicate the following camera setups from the templates that come with Unreal Engine:
- Third Person
- First Person
- Top Down
To learn more about the system, read the Gameplay Camera System Overview documentation.
Required Setup
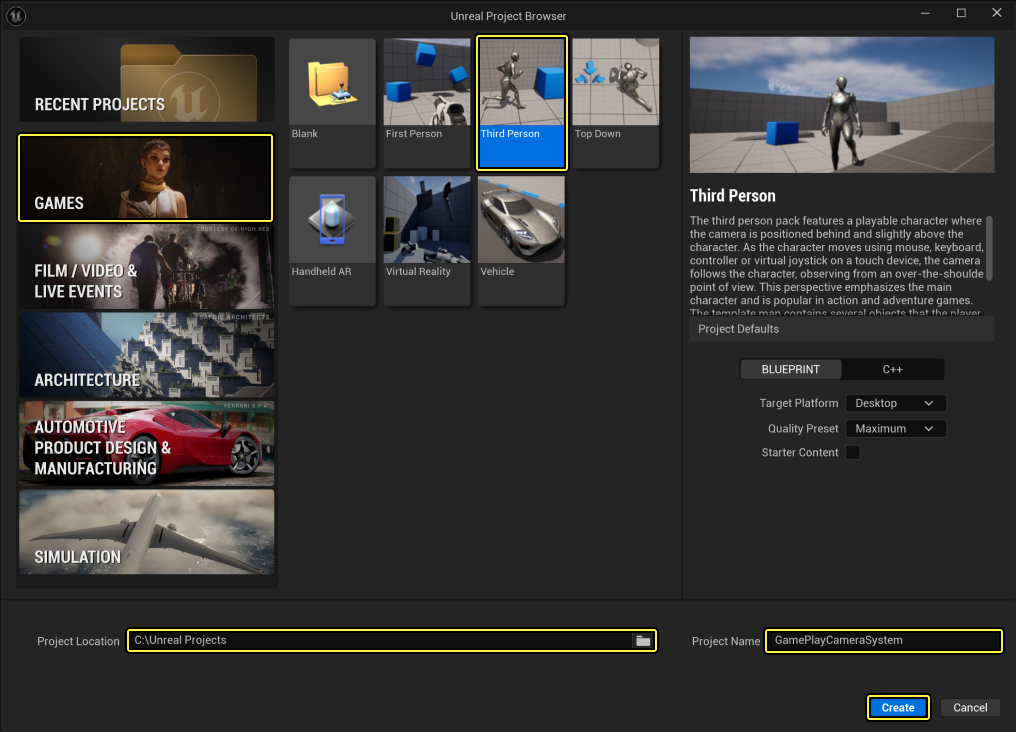
- Create a new project and select the Games category and the Third Person template.
- Enter your project's Location and name.
- Click Create.
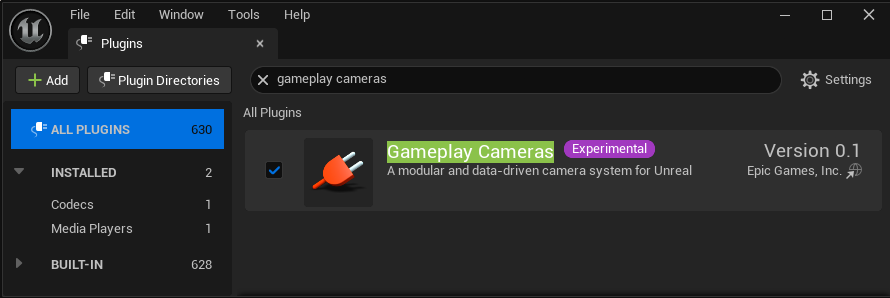
- Click Settings > Plugins to open the Plugins window.
- Search for and enable the Gameplay Cameras plugin. Restart the editor, if necessary.

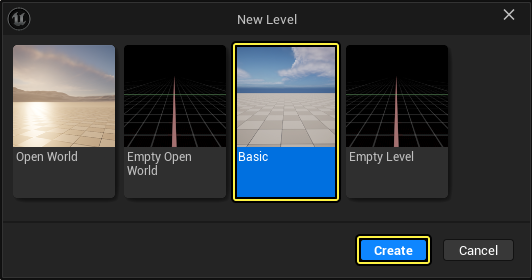
- In the editor, click File > New Level.
- Select the Basic template and click Create.
Section Results
In this section, you created a new project and set it up so you can use the Gameplay Camera System to create several camera setups for the player.
Creating the Camera Asset
The Camera Asset contains information about one or more Camera Rigs, transitions, and the Camera Director used to determine the active Camera Rig during gameplay.
To create a Camera Asset, follow these steps:
-
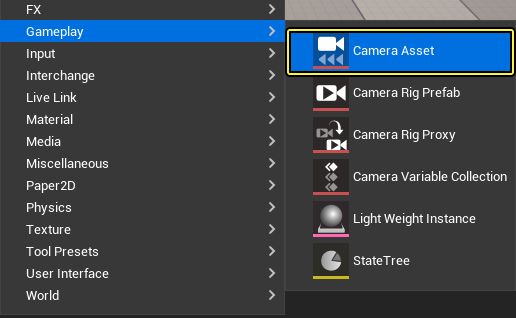
Right click in the Content Browser and select Gameplay > Camera Asset.
-
In the Pick Camera Director Type window, select the Blueprint Camera Director and click Select.

-
Name the asset CA_PlayerCameras.
First-Person Camera Rig
-
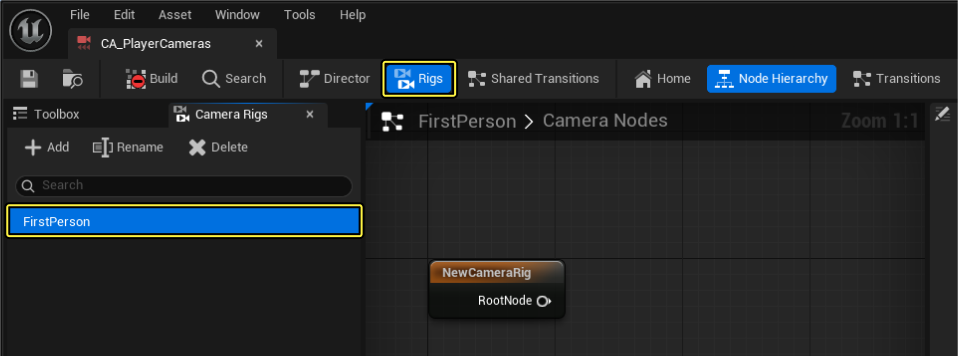
Open CA_PlayerCameras and click Rigs in the toolbar to see the available Camera Rigs.
-
Rename the default rig to FirstPerson.
-
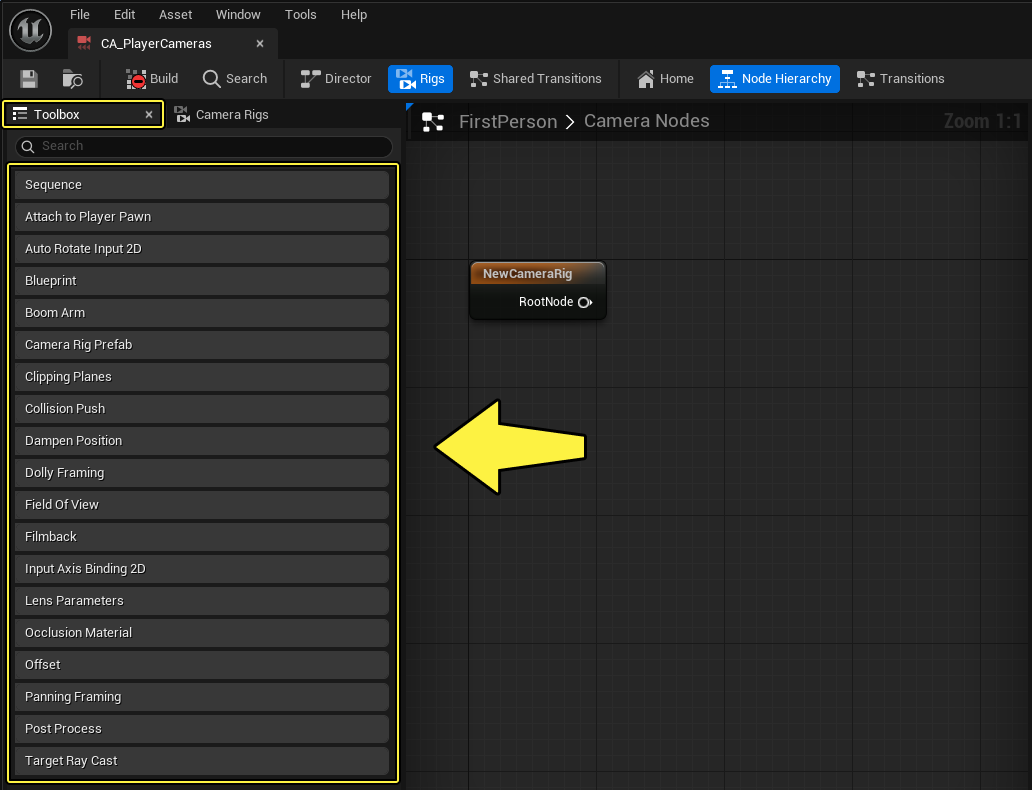
Click the Toolbox panel to see the available nodes.
-
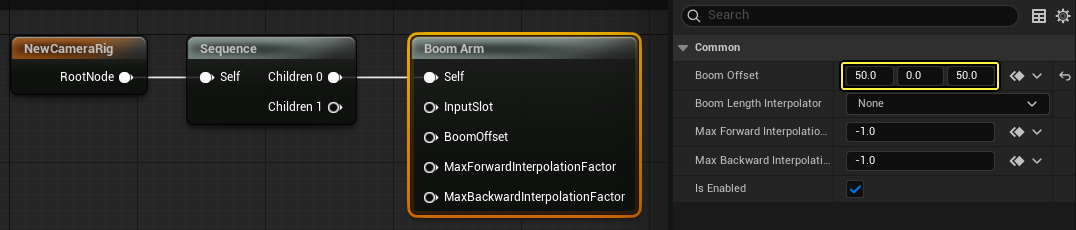
Add a Sequence node and a Boom Arm node as seen below.
-
With the Boom Arm node selected, go to the Details panel and set the Boom Offset to 50, 0, 50 for X, Y, Z, respectively.
-
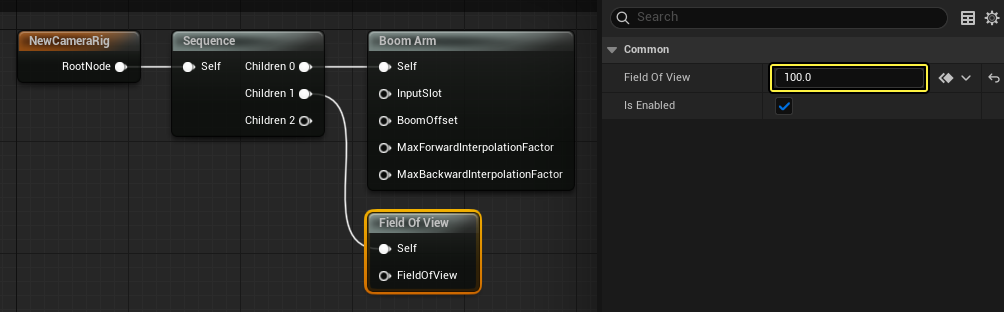
Add a Field of View node and go to the Details panel and set the Field of View to 100.
Third-Person Camera Rig
-
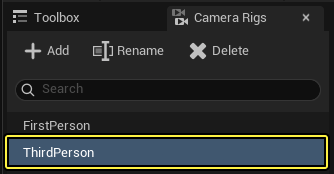
Create a new Camera Rig and name it ThirdPerson.
-
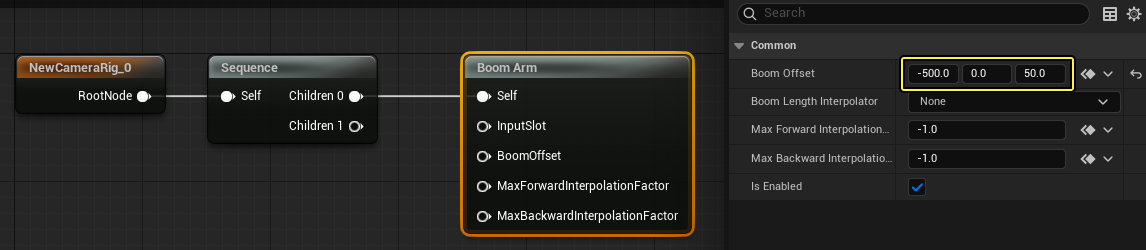
Add a Sequence node and a Boom Arm node as seen below.
-
With the Boom Arm node selected, go to the Details panel and set the Boom Offset to -500, 0, 50 for X, Y, Z, respectively.
-
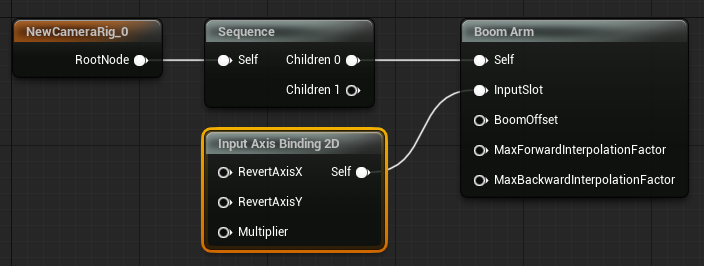
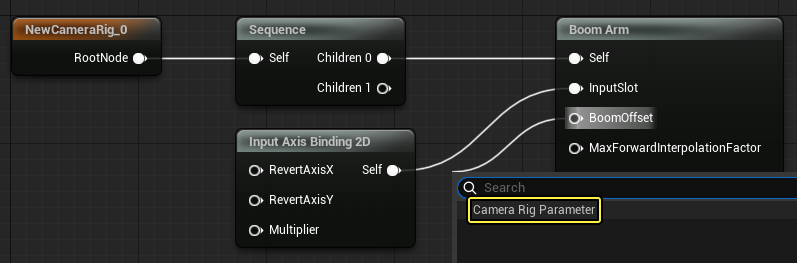
Drag from the Input Slot pin and select Input Axis Binding 2D. This exposes the InputSlot to Blueprints, which you will modify later.
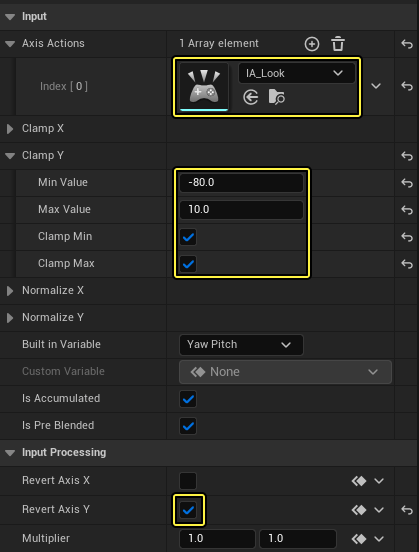
- Go to the Details panel and add the IA_Look Axis Action.
- Enable the Clamp Y Min and Max checkboxes and enter -80 and 10 for the Min Value and Max Value, respectively.
-
Enable the Revert Axis Y checkbox.
-
Drag from the BoomOffset pin and click Camera Rig Parameter to expose this variable to Blueprints.
-
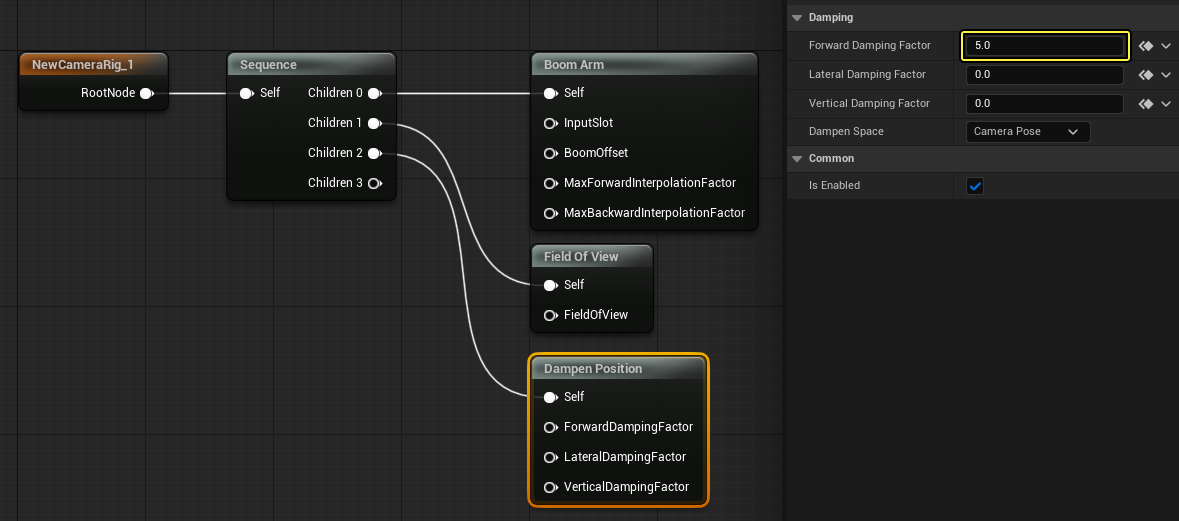
Add a Field of View node and a Dampen Position node. Then with the Dampen Position node selected, go to the Details panel and enter 5 for the Forward Damping Factor.

-
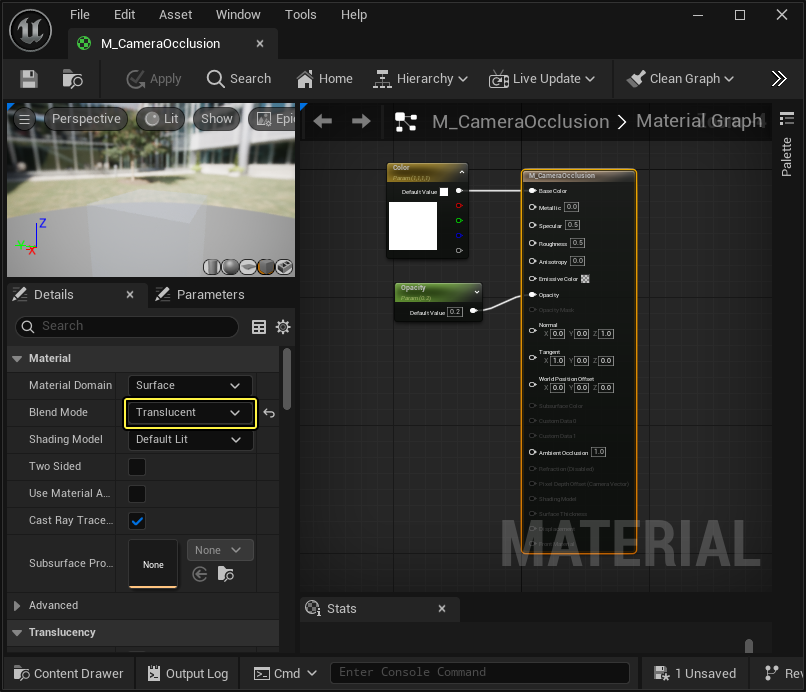
Add an Occlusion Material node and go to the Details panel and select a material from the Occlusion Transparency Material dropdown. In the example below, you can see the translucent material used for this example.

Top-Down Camera Rig
-
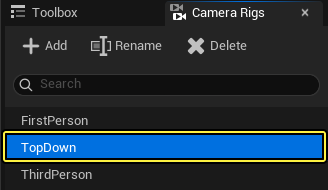
Create a new Camera Rig and name it TopDown.
-
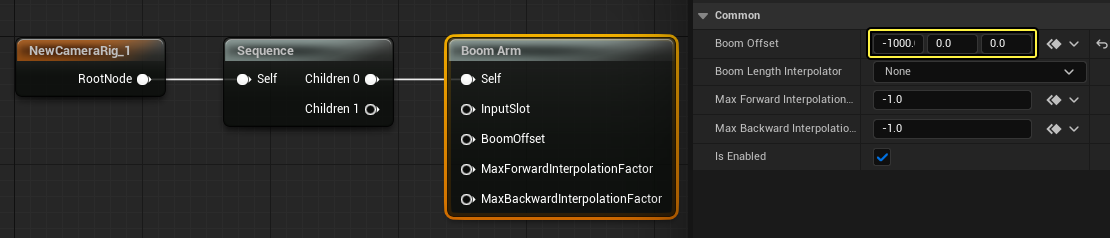
Add a Sequence node and a Boom Arm node as seen below. With the Boom Arm node selected, go to the Details panel and set the Boom Offset to -1000, 0, 0 for X, Y, Z, respectively.
-
Add a Field of View and a Dampen Position nodes. Then with the Dampen Position node selected, go to the Details panel and enter 5 for the Forward Damping Factor.
-
Add an Occlusion Material node and go to the Details panel and select a material from the Occlusion Transparency Material dropdown. Use the same material you used for the Third Person Camera Rig.

Camera Director
-
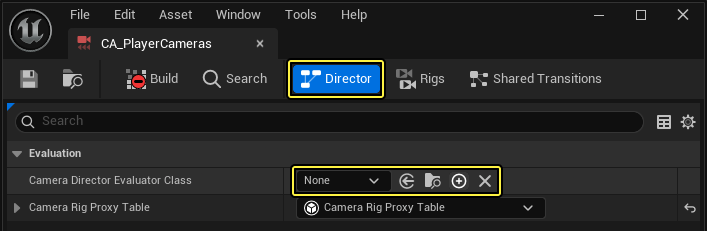
Click the Director button to navigate to the Director tab.
-
Click + to create a new Director Blueprint.
-
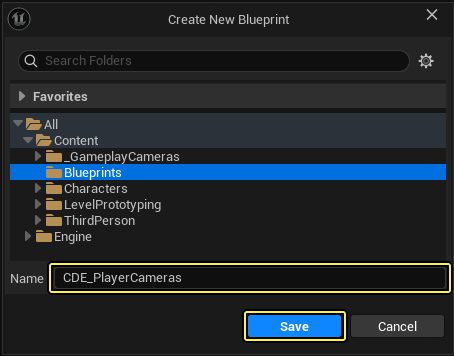
Select the destination folder, enter the name CDE_PlayerCameras and click Save.
-
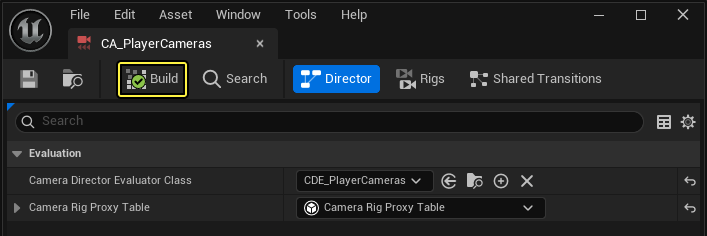
Click Build.
Section Results
In this section, you created three Camera Rigs that will be used by the player character Blueprint.
Creating the Camera Transitions
In this section you will create transitions for the Camera Rigs you created in the previous section.
Follow these steps to create Camera Rig transitions:
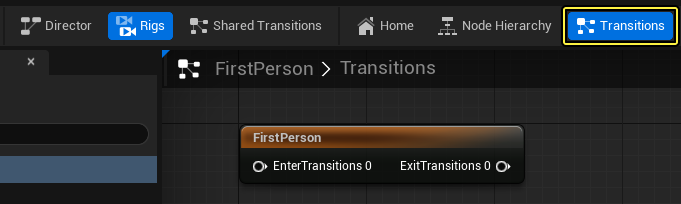
- Open the First Person Camera Rig and click Transitions.
- Drag from Exit Transitions 0 pin and select Exit Transition.
- Drag from the Blend pin of the Camera Rig Transition node and select Smooth Blend.

-
Repeat the steps above for the Third Person and Top Down Camera Rigs.


Section Results
In this section, you created transitions for the Camera Rigs.
In the next section, you will modify the player Blueprint so it can use the Camera Rigs during gameplay.
Adding the Gameplay Camera Component to the Player
To add the Gameplay Camera component to the player Blueprint, follow these steps:
-
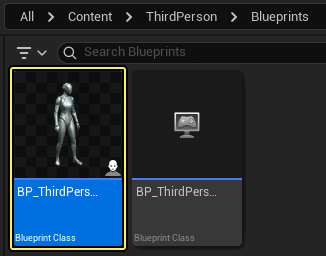
In the Content Browser, go to ThirdPerson > Blueprints and double click BP_ThirdPersonCharacter to open the Blueprint.
-
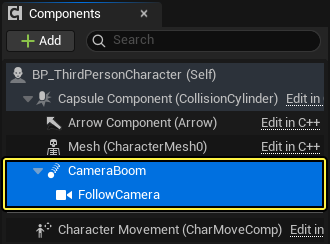
Go to the Components window and delete the CameraBoom and FollowCamera components.
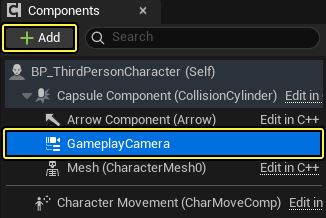
- Click +Add and select GameplayCamera to add the component.
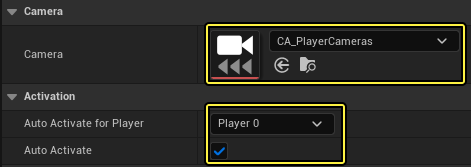
- Go to the Details panel and scroll down to the Camera section and add CA_PlayerCameras to the Camera dropdown.
- Go to the Activation section and enable the Auto Activate checkbox. Then select Player 0 from the Auto Activate for Player dropdown.
- Go to the Event Graph and add three input events for the numbers 1, 2, and 3 on your keyboard.
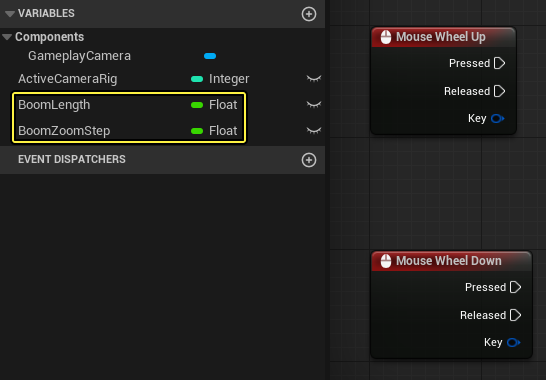
- Create a new Integer variable and call it ActiveCameraRig.
- Drag the variable to the Event Graph, select Set Active Camera Rig and connect it to the first keyboard event.
- Repeat this for the other two events and set their values to 0, 1, and 2, as shown below.
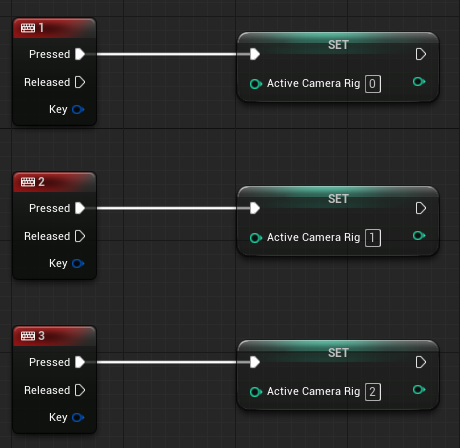
The value of this variable will be used later to determine which Camera Rig is active during gameplay.
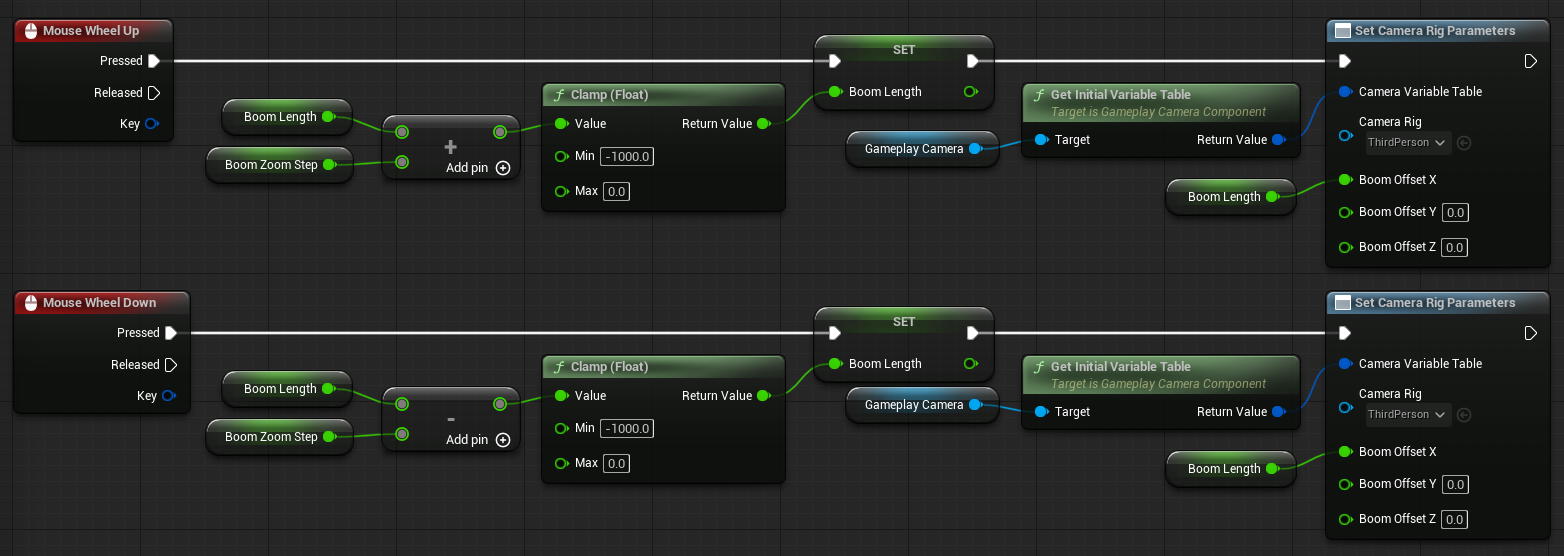
- Add a Mouse Wheel Up and Mouse Wheel Down input events in the Event Graph.
- Create a Float variable named BoomLength and set its default value to -500.
- Create a Float variable named BoomZoomStep and set its default value to 25.
-
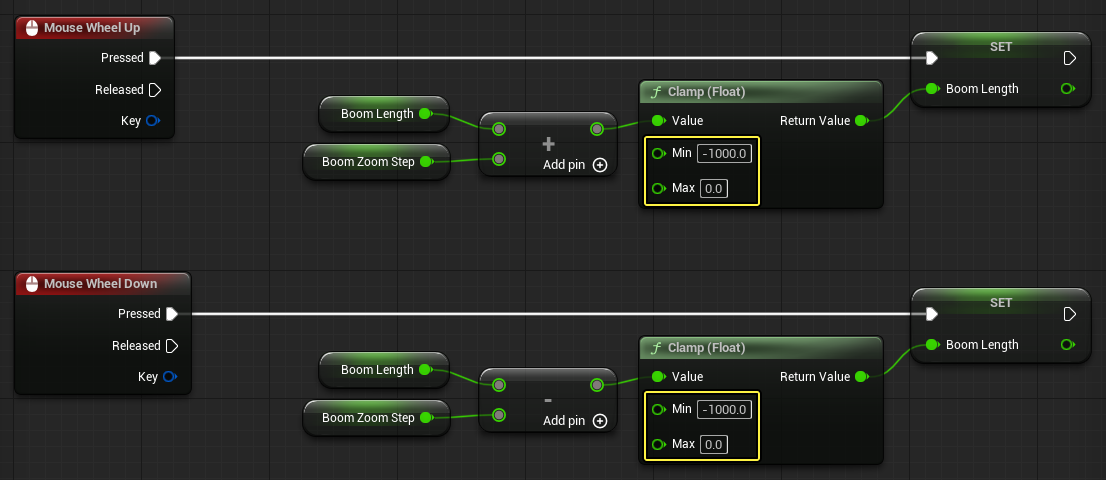
Add the BoomLength and BoomZoomStep nodes to the Event Graph as shown below.
- On Mouse Wheel Up add the Boom Zoom Step to the Boom Length.
- Conversely, on Mouse Wheel Down subtract the Boom Zoom Step to the Boom Length.
This will zoom in the camera on mouse wheel up and zoom out the camera on mouse wheel down.
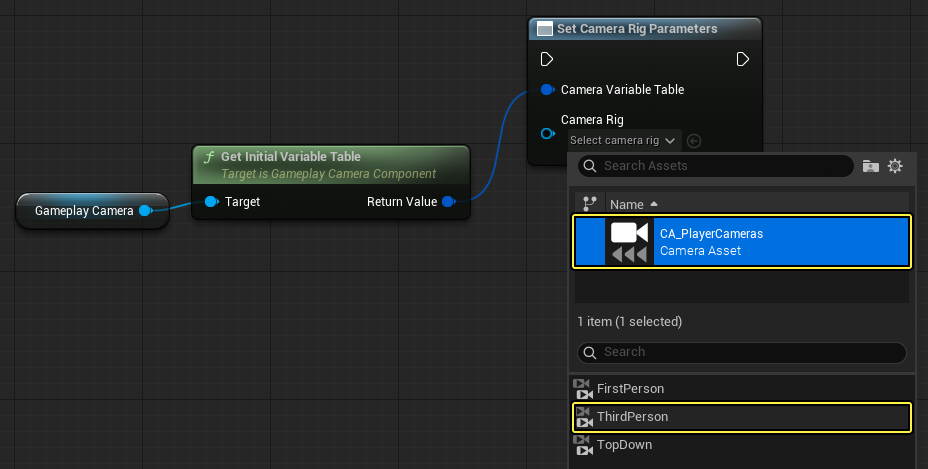
- Drag the GameplayCamera component to the Event Graph to create a node.
- Drag from the GameplayCamera node and search for then select Get Initial Variable Table.

- Drag from the Return Value pin of the Get Initial Variable Table node and search for then select Set Camera Rig Parameters.
- Select CA_PlayerCameras and click the ThirdPerson rig.
- Connect the Set BoomLength node to the Set Camera Rig Parameters node.
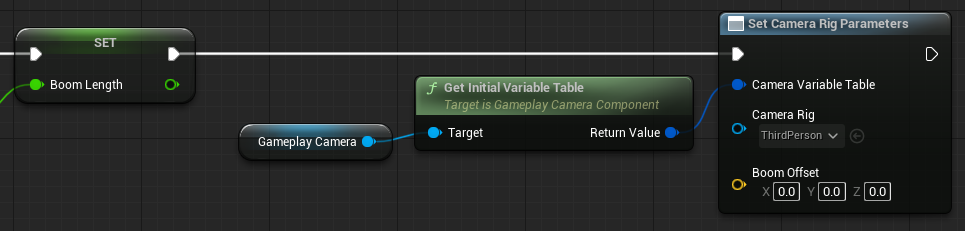
-
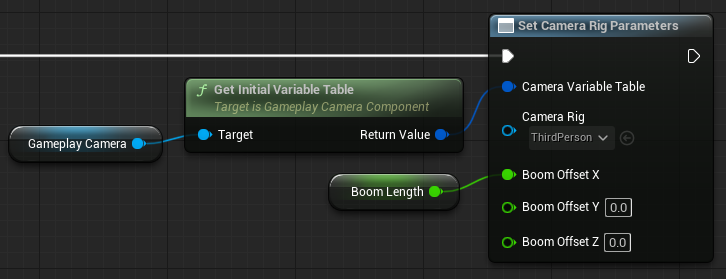
Right click the Boom Offset pin and select Split Struct Pin, then connect the Boom Length variable to the Boom Offset X pin.
-
Repeat the steps above for the Mouse Wheel Down input event. You can see the final Blueprint code below.
Section Results
In this section, you added the Gameplay Camera component to the player Blueprint. You also added scripting to switch between Camera Rigs and zoom in and out of the Third Person Camera Rig.
In the next section, you will configure the Camera Director Blueprint so it can switch between Camera Rigs when the player presses the 1 - 3 keys.
Configuring the Camera Director
In this section you will modify the Camera Director Evaluator Blueprint so the player can switch between Camera Rigs during gameplay.
Follow these steps to configure the Camera Director:
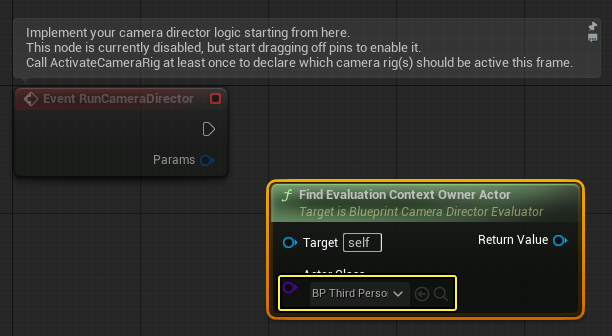
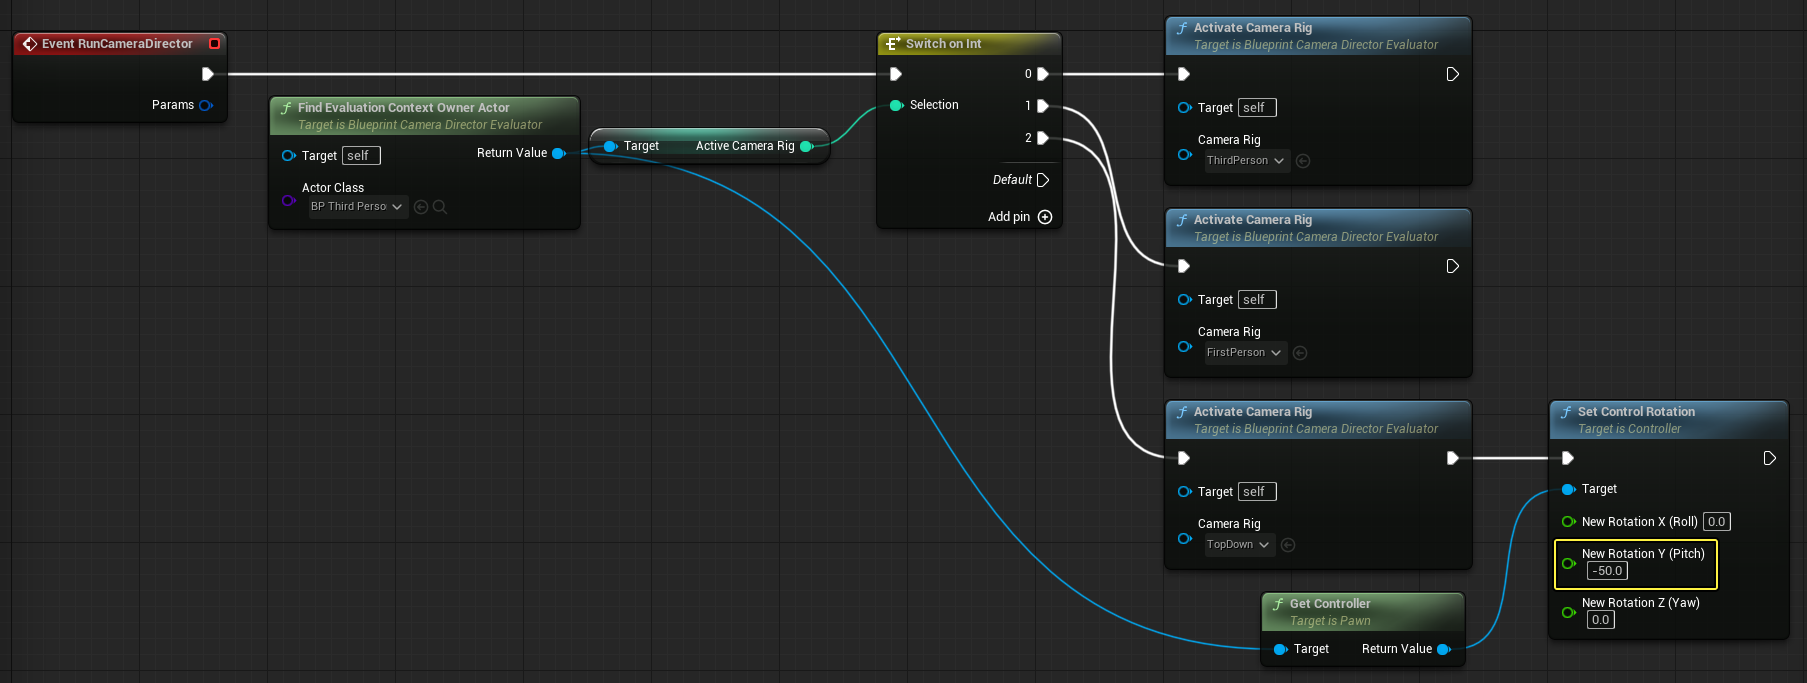
- Open CDE_PlayerCameras and right click in the Event Graph.
- Search for then select Find Evaluation Context Owner Actor.
- Click the dropdown and select BP_ThirdPersonCharacter.
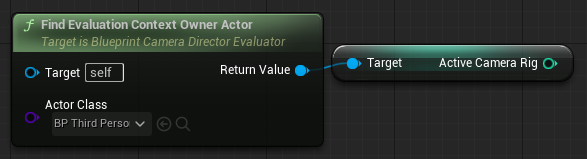
- Drag from the Return Value pin of the Find Evaluation Context Owner Actor node and search for then select Get Active Camera Rig.
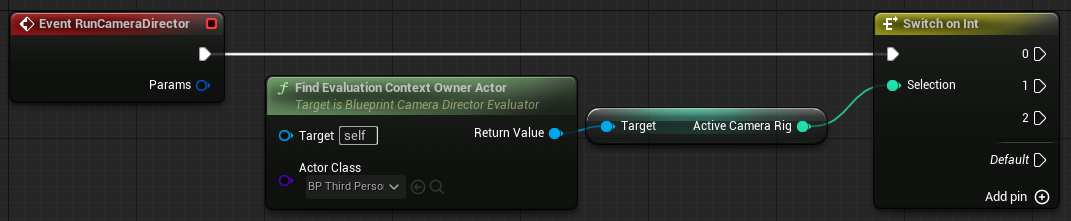
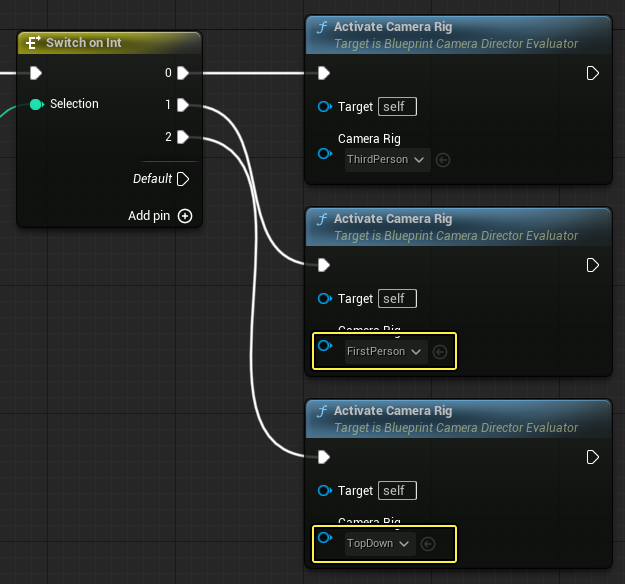
- Drag from the Active Camera Rig node and search for then select Switch on Int.
- Click Add Pin + three times to add pins 0, 1, and 2.
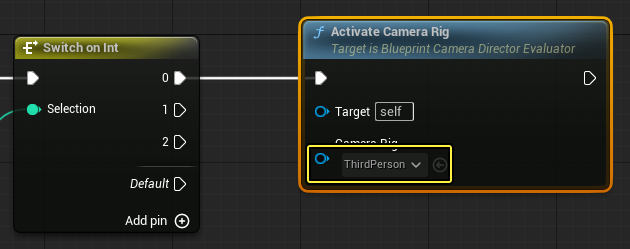
- Drag from the 0 pin of the Switch on Int node and search for then select Activate Camera Rig.
- Click the Camera Rig dropdown and select ThirdPerson.
- Add two more Activate Camera Rig nodes and connect them to the 1 and 2 pins of the Switch on Int node.
- Set the Camera Rig dropdowns to FirstPerson and TopDown, as shown below.
- Drag from the Find Evaluation Context Owner Actor node and search for then select Get Controller.
- Drag from the Get Controller node and search for then select Set Control Rotation.
- Right click the Rotation pin of the Set Control Rotation node and select Split Struct Pin.
- Set the New Rotation Y (Pitch) to -50.
- Connect the Activate Camera Rig node to the Set Control Rotation node, as seen below.
-
Press Play and test the Gameplay Camera System. Press the 1 - 3 keys to switch between Camera Rigs and use the mouse wheel to zoom in and out when using the Third Person Camera Rig.
Section Results
In this section you learned how to configure the Camera Director so it can switch between Camera Rigs during gameplay.
6 - On Your Own!
Now that you learned how to use the Gameplay Camera System, try experimenting by creating new Camera Rigs with different behaviors.