
Soundscape procedurally generates ambient sounds which are streamed as the player moves around the world. Once set up, the plugin manages and composes these sound systems autonomously and removes the need to manually create them.
In this guide, you'll learn how to set up a basic Soundscape of your own.
Prerequisites

- The Soundscape plugin is disabled by default. To enable it, open the Plugin panel by selecting Edit > Plugins, use the search bar to find the plugin, and then click the corresponding checkbox.
- A project with a Player Character that supports movement, such as the Third Person Template.
- This guide also requires you to have a Sound Wave asset in your project. See Importing Audio Files for information on how to create Sound Waves.
- (Optional) Because Soundscape composes sounds in 3D space, using the Attenuation Settings on your Sound Wave produces better spatialized results. For more information on spatialization, see Spatialization and Sound Attenuation.
1 - Create the Soundscape States Data Table
Soundscape uses Gameplay Tags as states. You can control these states using a Blueprint or C++ and Soundscape will respond automatically with the conditions you set.
-
Create a Data Table asset by clicking Add Content or right-clicking an empty space in the Content Browser and selecting Miscellaneous > Data Table. A Pick Row Structure window appears.

-
Select GameplayTagTableRow from the dropdown.

- Click Ok.
- Input "SoundscapeStates" as the name for the Data Table.
-
Right-click the new Data Table asset and select Edit… from the context menu. A new Data Table Editor window appears.

- Click Add to create a new Gameplay Tag.
- Change the Tag in the Row Editor panel to "Soundscape.Active".
- Save the Data Table.
2 - Add the Data Table to the Project Settings
You must add Gameplay Tags to the central tag dictionary in Project Settings for the engine to be aware of them. For more information about Gameplay Tags, see Gameplay Tags.
- Go to Edit > Project Settings… to open the Project Settings panel.
- On the left side of the panel, click GameplayTags under the Project heading.
- Click Add Element for the Gameplay Tag Table List.
-
Click the Index [0] dropdown and select the previously created SoundscapeStates Data Table. The Soundscape.Active state now displays in the Gameplay Tag List.

3 - Create a Soundscape Palette and Color
The Soundscape system is driven by two different asset types: Palettes and Colors. A Soundscape Color contains a sound asset reference and behavior properties which control how the sound plays. A Soundscape Palette contains references to Colors and playback conditions which control when the Palette is active.
- Create a Soundscape Palette asset by clicking Add Content or right-clicking an empty space in the Content Browser and selecting Audio > Soundscape > Soundscape Palette.
- Input any desired name for the Palette. In general, this name should reflect the condition which activates the Palette.
- Create a Soundscape Color asset by clicking Add Content or right-clicking an empty space in the Content Browser and selecting Audio > Soundscape > Soundscape Color.
- Input any desired name for the Color. In general, this name should reflect the content of the sound that the Color will play.
4 - Add the Palette to the Project Settings
You must add Soundscape Palettes to the Soundscape Palette Collection in Project Settings for the engine to be aware of them.
- Go to Edit > Project Settings… to open the Project Settings panel.
- On the left side of the panel, click Soundscape under the Game heading.
- Click Add Element for the Soundscape Palette Collection.
-
Click the dropdown to select the previously created Soundscape Palette.

5 - Set Up the Palette
Your Palette is in the Collection, but you still need to configure it.
- Double-click the Soundscape Palette in the Content Browser to open its Details panel.
- Click Edit… located beside Soundscape Palette Playback Conditions. A new Tag Editor window appears.
- Click the Root Expression dropdown and select All Tags Match. A new Tags entry appears.
- Click the Tags dropdown and select Soundscape.Active.
-
Click Save and Close at the top-left of the Tag Editor window.

- Click Add Element for the Colors.
- Click the arrow at the left of Index [0] to expand that section.
- Click the Soundscape Color dropdown and select the previously created Soundscape Palette for Index [0].
-
Save the Soundscape Palette.

6 - Set Up the Color
Now that your Color is in the Palette, add a sound and some behavior to your Color.
- Double-click the Soundscape Color in the Content Browser to open its Details panel.
-
Select the dropdown for Soundscape > Color > Sound and select the Sound Wave asset that you want to play.

- Enable the checkbox for Modulation Behavior > Randomize Pitch. This randomizes the pitch of the sound each time it plays.
- Enable the checkbox for Spawn Behavior > Continuously Respawn. This spawns the sound continuously.
- Enter 50.0 for Spawn Behavior > Max Spawn Distance. This spawns the sound closer to the listener.
-
Save the Soundscape Color.

7 - Place the Trigger Volume
The sound within your Color will play when your Palette's condition is met. That condition will be met when the GameplayTag Soundscape.Active is set. By using a Blueprint or C++, you can set the state however you want, but for this guide, use the Level Blueprint and a Trigger Volume to define a region of your level in which to play your Soundscape.
-
Place a Trigger Volume in your level by using the Place Actors panel or by clicking Quick Add in the Level Editor Toolbar and selecting Volumes > Trigger Volume.

-
Adjust the position, size, and shape of the Trigger Volume within the level so that your character can move into and out of it.

8 - Set Up the Blueprint
- Select the Trigger Volume.
-
Click the Blueprint button in the Level Editor Toolbar and select Open Level Blueprint.

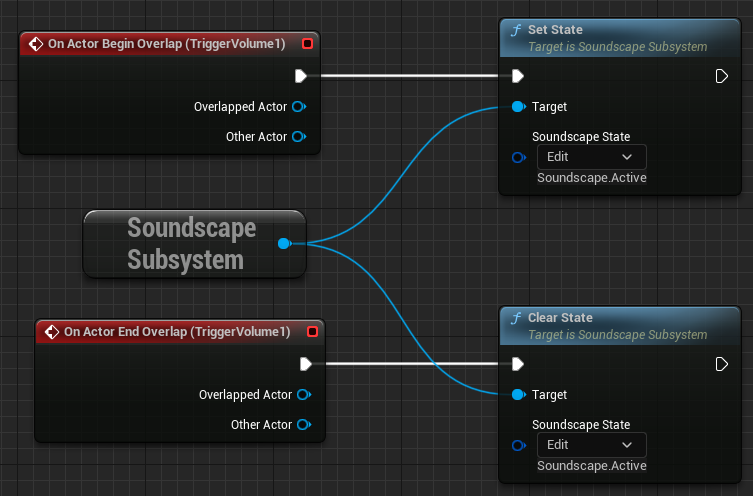
- Right-click an empty space on the graph and add an On Actor Begin Overlap node for the Trigger Volume.
- Right-click an empty space on the graph and add an On Actor End Overlap node for the Trigger Volume.
- Right-click an empty space on the graph and add a Get SoundscapeSubsystem node.
- Drag a pin connection from the Soundscape Subsystem to an empty space on the graph and add a connected Set State node.
- Drag a pin connection from the Soundscape Subsystem to an empty space on the graph and add a connected Clear State node.
- Connect the execution pin for the On Actor Begin Overlap node to the Set State node.
- Connect the execution pin for the On Actor End Overlap node to the Clear State node.
-
Save the Level Blueprint.
9 - Listen to the Results
- Click the Play Level button in the Level Editor Toolbar.
- Move your character into your Trigger Volume and stop.
- Listen to your new Soundscape!
The following console commands may be useful as you continue to develop your Soundscape:
au.debug.sounds 1: Displays a list of all of the active sounds in your level and related information in your viewport.au.3dVisualize.Enabled 1: Displays the location of active sounds in 3D space.
For more information on Audio Console Commands, see Audio Console Commands.

10 - On Your Own!
Now that you've finished creating a basic Soundscape, consider building it out even further.
Below are some suggestions you can explore on your own:
- Create more SoundscapeStates to support additional conditions within your level.
- Use Blueprints or C++ to script additional logic for other ambient situations, such as time of day.
- Play with the details of your Colors and Palettes to change their behaviors.
- Add more Colors to your Palette to layer additional sounds.
- Add more Palettes to your Soundscape to use on their own or to layer with your existing Palettes.
- Instead of a Sound Wave, use a MetaSound Source for your Color. See MetaSounds for more information.