
The Material Layers system in Unreal Engine is a powerful tool that allows you to layer and blend textures and properties together to create unique Materials for the objects in your levels. Material Layers are similar to the Layered Materials workflow using Material Functions, however this alternative approach simplifies the process and provides far more flexibility to artists.
Unlike traditional Layered Materials, which must be edited directly in the Material node graph, the Material Layers system provides a user interface tab in the Material Instance Editor. This interface allows artists to quickly and easily swap out layers in Material Instances. Because Material Layers are exposed in the Instance Editor, this workflow drastically reduces the technical knowledge and time required to customize a layered Material, leading to a more iterative user experience.
Key Benefits
One of the benefits to using Material Layers is the ability to create what would otherwise be an overly complicated Material, while keeping it much more manageable from a future editability standpoint. While it's possible to create the same type of Material using the Layered Materials workflow or in a conventional Material (without layers and Material Functions), the Material Layers workflow provides better control, flexibility, and reduced complexity.
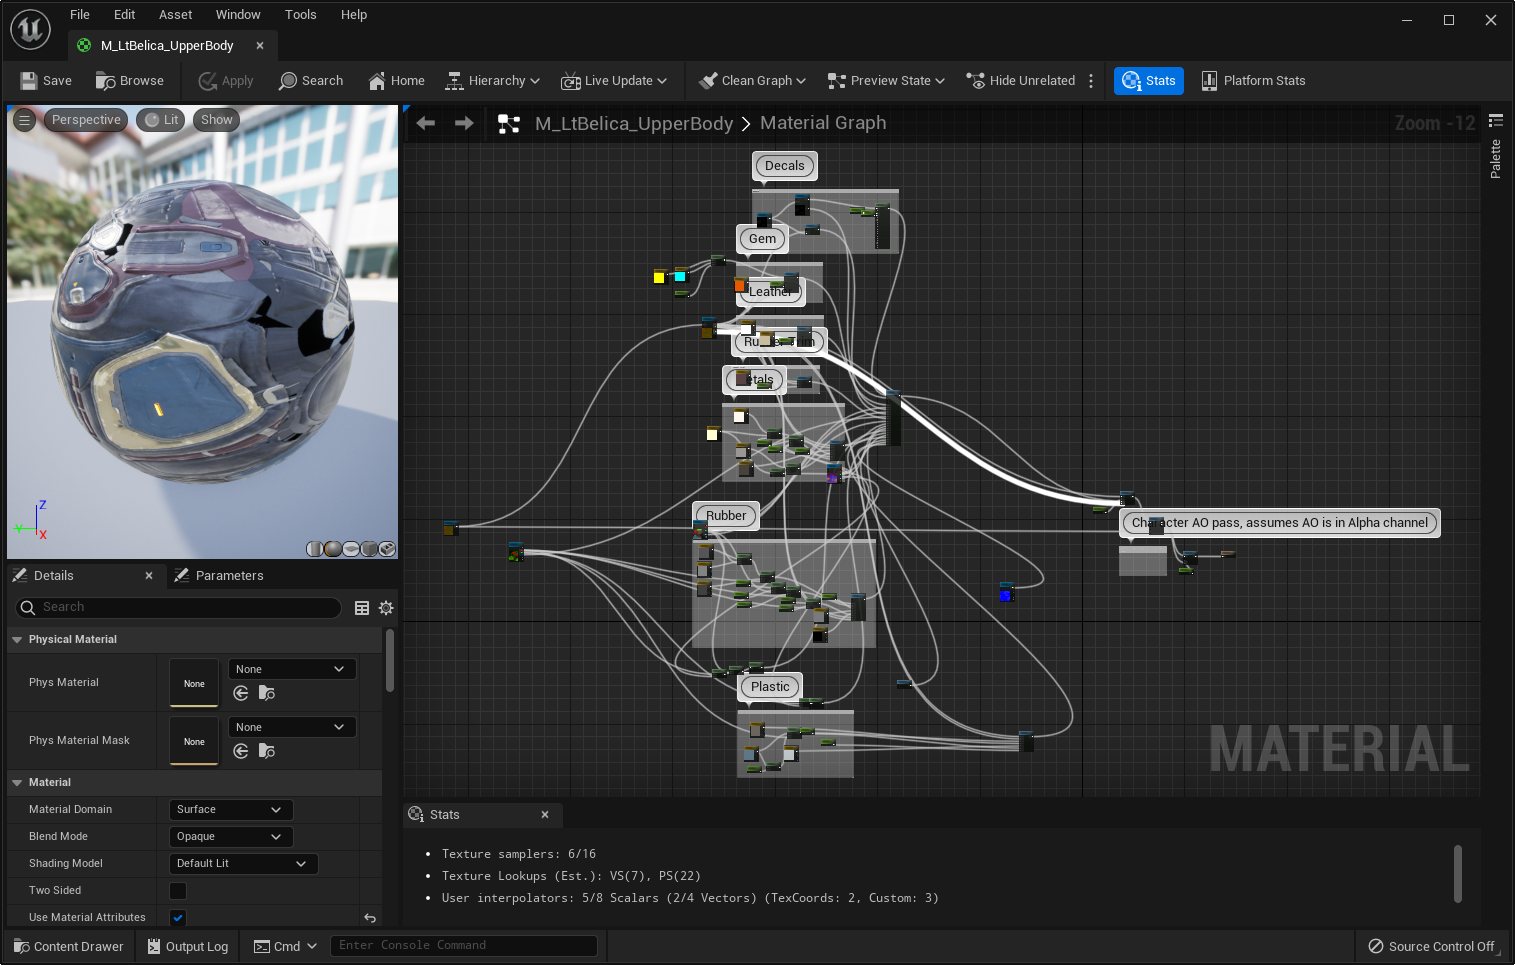
For instance, the images below show the difference between a traditional Layered Material using the graph-based approach, and one using GUI-based Material Layers (pictured right). It is readily apparent that using Material Layers reduces the amount of work required in the base Material, leaving the work and functionality to be done in the assets themselves.
 |
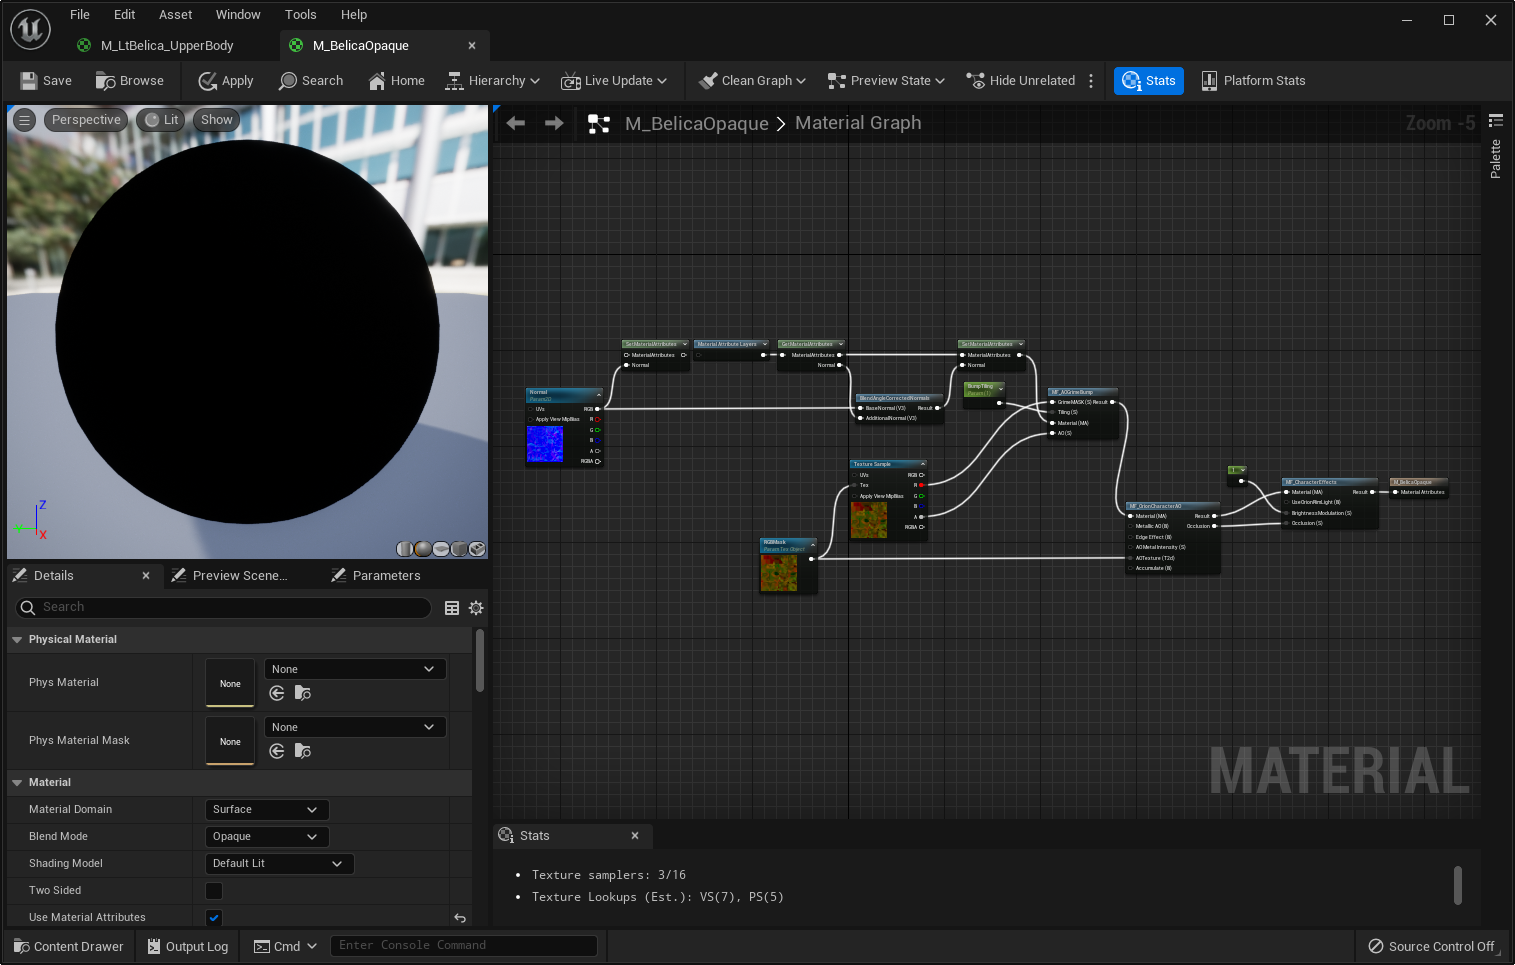 |
| Base Material using Material Function workflow | Base Material using Material Layers workflow |
Due to limitations in the way Material Functions work when creating Material Instances, parameters created in a Material Function cannot be referenced in an instanced Material without first being duplicated in the base Material. In contrast, you can instance any parameters set up in a Material Layer Asset, and only the base Material Layer needs to be referenced in the base Material for the input that it will affect.
When opening a Material Layer or Material Layer Blend Asset, the node graph is similar to the one in the Material Editor. This is where you can set up and employ all of the logic for this Material, including the parameterization of attributes. This allows you to control things such as texture inputs, vector and constant values, and more. Setting up your logic primarily in the Material Layer Asset means that it's less complicated to manage when making big or small changes in your Materials. It also means that you can use similar Material Layers across multiple Materials without duplicating your work. This is similar to how Material Functions work, but with much more flexibility in application and usage.
The Material Graph for a single Material Layer asset.
All of the parameters set up here are referenced in the Layers added to the stack in a Material Instance of a base Material that is using Material Layers. This means there is no need to duplicate any of these parameters in your base Material when creating its Material Instance. When you open the Material Instance, the Layer Parameters tab displays all the Material Layers and parameters that you have added to this instance.
Click image for full size.
The Material Layer Blend Asset is used to control masking for the Layers referenced in this Material Instance. Each Layer can have its own Material Layer Blend; you are not limited to a single blend asset for all layers in the stack. Without a blend asset assigned to a layer, the topmost layer without a blend asset will always override any layers below it. Like the Material Layer Asset, Material Layer Blends have their own node graph where you can set up your own blending and masking logic for defaults and parameterization, which you can instance and reuse across multiple Materials.
Click image for full size.
This workflow lets you simplify a portion of your material logic to a single asset while affording you the flexibility to reuse this for any other Materials you may create.
Using Material Layers
The following steps are the high-level procedure to create and use Material Layers for the Materials in your project.
- Create your Material Layer Asset(s).
- Create your Material Layer Blend Asset(s).
- Create a conventional Material Asset, which will act as your base Material.
- Add a Material Attribute Layers expression to evaluate the active Material Layer stack and output the merged attributes.
- Create a Material Instance of your base Material.
- Use the Layer Parameters tab to add, edit, and manage layers for your Material.
Material Layer Asset Types
The Material Layers system is composed of two asset types:
- A Material Layer Asset is used to create a layer that you can blend with other layers in the Material.
- A Material Layer Blend Asset is used to create a mask for blending two layers together.
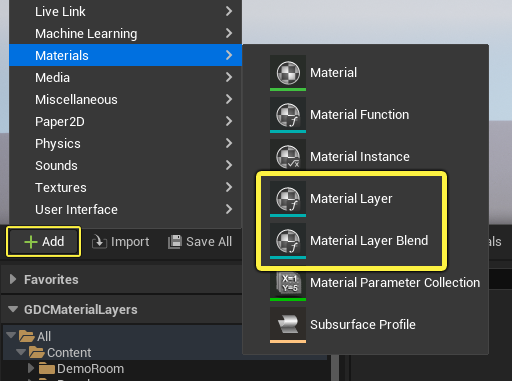
You can add both of these asset types to your project from the Content Browser. Click the Add button, or right-click in the Content Browser and expand the Materials sub-category under Create Advanced Assets. Choose Material Layer or Material Layer Blend from the context menu.
Material Layer Asset
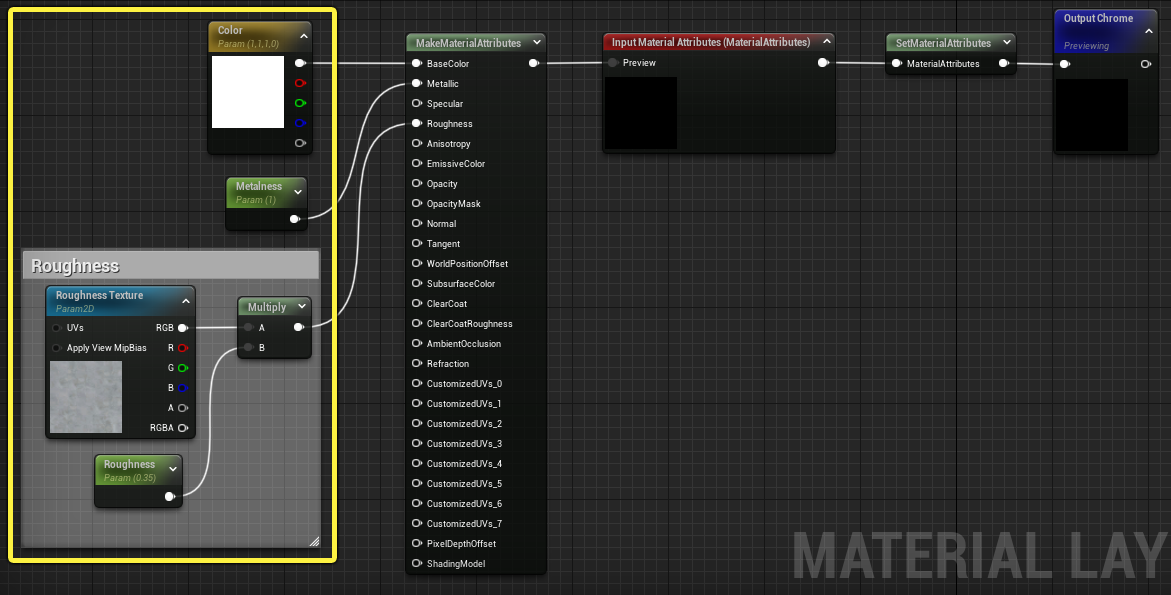
The Material Layer Asset, like a Material Function, has its own Material Graph where you can set up your node graph logic and preview it for the Material. For each type of Material that you want to create, you can use the Make or Set Material Attributes expresion to handle the logic and output that result. For instance, if you wanted to create a chrome or emissive Material, you'd set up your textures and parameters in this graph like you would in any normal base Material graph.
The Material Graph for a simple chrome-like Material Layer.
Material Layer Blend Asset
The Material Layer Blend Asset, like a Material Function, has its own graph where you can set up your node graph logic and preview it for the Material. Material Layer Blend assets automatically include an Input Bottom Layer and Input Top Layer setup with a BlendMaterialAttributes expression. You can apply additional logic for those inputs or simply use the Alpha input to drive your own masks and blends for the layers in the Material Instance layer stack.
A simple Material Graph using a mask to drive the alpha for the BlendMaterialAttributes expression in the Material Layer Blend graph.
Click image for full size.
Base Material Graph
When using the Material Layers system most of the node logic is handled in the Material Layer and Material Layer Blend assets. The graph of the base Material will usually contain relatively little Material logic, which reduces the amount of management required in your base Materials.
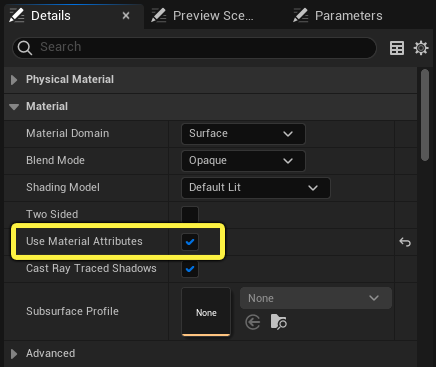
When using Material Layers, you must make sure you enable Use Material Attributes by selecting the Main Material Node and checking the box it in the Details panel.
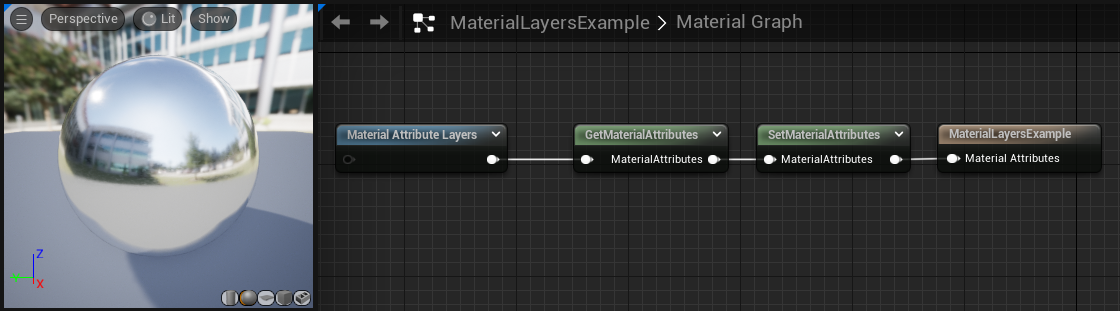
A Material Attribute Layer expression is used to reference the many Material attributes that can be associated with a particular Material layer. These are then used for your base Material's output. For example, you can have a chrome Material that gets and sets Material attributes when using a Material Attribute Layer expression.
Material Layer Expressions
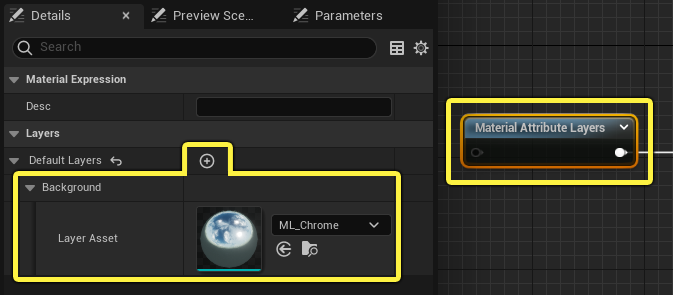
The Material Attributes Layer expression is used to evaluate the active Material Layer Stack. When you select the Material Attribute Layers expression, you can use the Details panel to set the default layers to be used with any Material Instance that is created. In this example there is only a Background Material, which references the Chrome Material Layer asset. You can add additonal layers by clicking the Add Element button (+).
When you create your Material Instance or apply this Material directly to an object in your project, the default Material Layers are used.
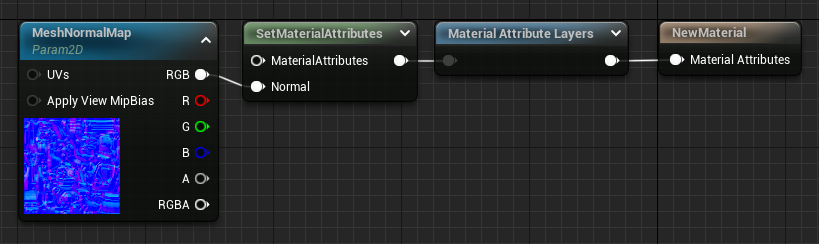
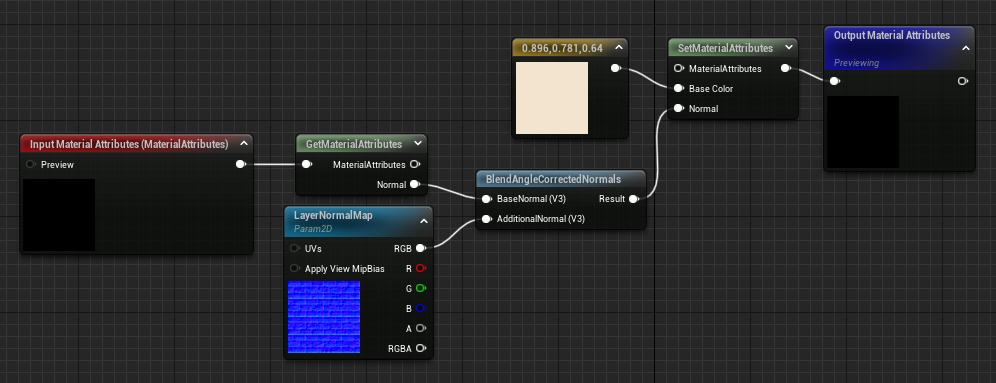
For more complex Materials that you set up, the Get Material Attributes and Set Material Attributes expressions can add and accept Material Attributes you want to set up in your base Material rather than setting it up specifically in the Material Layer. In this example, an additional Normal map is blended with the Normal Map from the Material Layer. The Set Material Attributes node accepts the new blended normals, and outputs the updated Material Attributes. Read more about Material Attribute expressions here.
Click image to enlarge.
Instancing Material Layers and Blends
Just like you can instance a Material to create unique Material instances from specified parameters, you can also instance Material Layers and Material Layer Blends. This provides access to any parameterized expressions in the node graph.
You can create an instance of a Material Layer or Material Layer Blend by right-clicking it in the Content Browser and selecting Create Layer Instance or Create Blend Instance, respectively.
Click image to enlarge.
When you parameterize nodes in your base Material Layer graph, those parameters become accessible to any child Material Instances you create. For Material Layers and Blends, you'll find you parameters listed in the Layer Parameters tab in the Material Instance Editor. All parameters for any given Material Layer are listed here.
Each layer's parameters are exclusive to that layer. If you have multiple layers in the stack using the same Material Layer, setting an overridden parameter value in one layer in the stack will not override that Material Layer's parameters elsewhere in the same layer stack.
Passing Parameters
There are multiple ways to pass parameters from your Material Layers and Blends into Materials and Material Instances. Most of these suggestions apply to both Material Layers and Blends.
Parameters Within a Material Layer behave similarly to existing Materials and Functions.
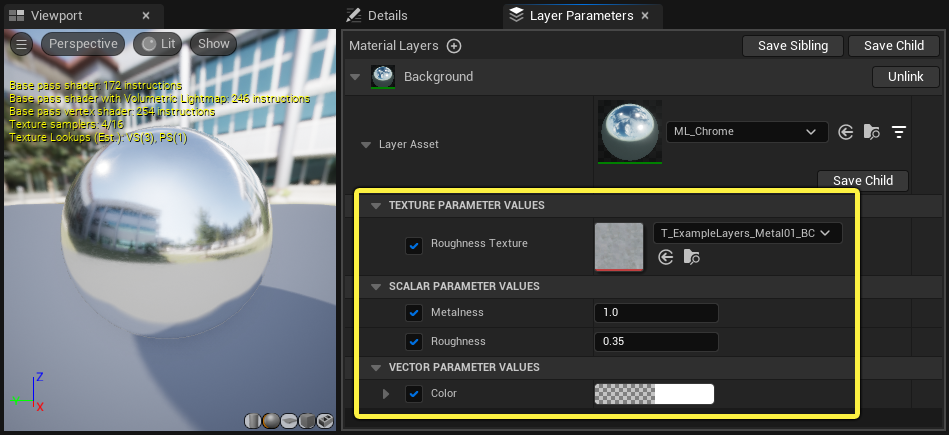
Parameters added within Material Layer and a Material Layer Blend graphs are unique to that layer or blend. For example, the Material Layer below is using a Vector Parameter, a Texture parameter for a roughness map, and two scalar parameters for metallic and roughness. These are set up just like they would be in a standard Material or Material Function.
When a standard Material that uses Material Layers is instanced, and this layer is added to the Layer Parameters tab of that Material Instance, you will find that all the parameters are available for editing.
Use the input pin to the Material Attributes Layers stack expression in your base Material.
In your standard Material graph, this takes another Material Attribute as input using the Set Material Attributes expression, which will be piped to every layer added to the Material Attribute Layers expression stack.
In this example, a base normal texture is passed into the Material Attribute Layers stack.
Then, within the Material Layer Asset, the input and blend in can be set using the Set Material Attributes expression. Additionally, each layer can use or ignore the base stack material attributes input
Layers Stack
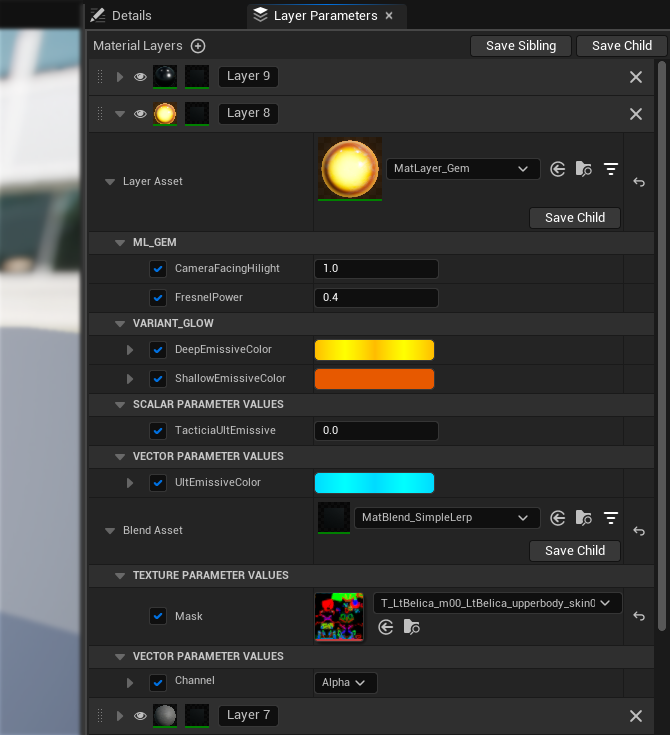
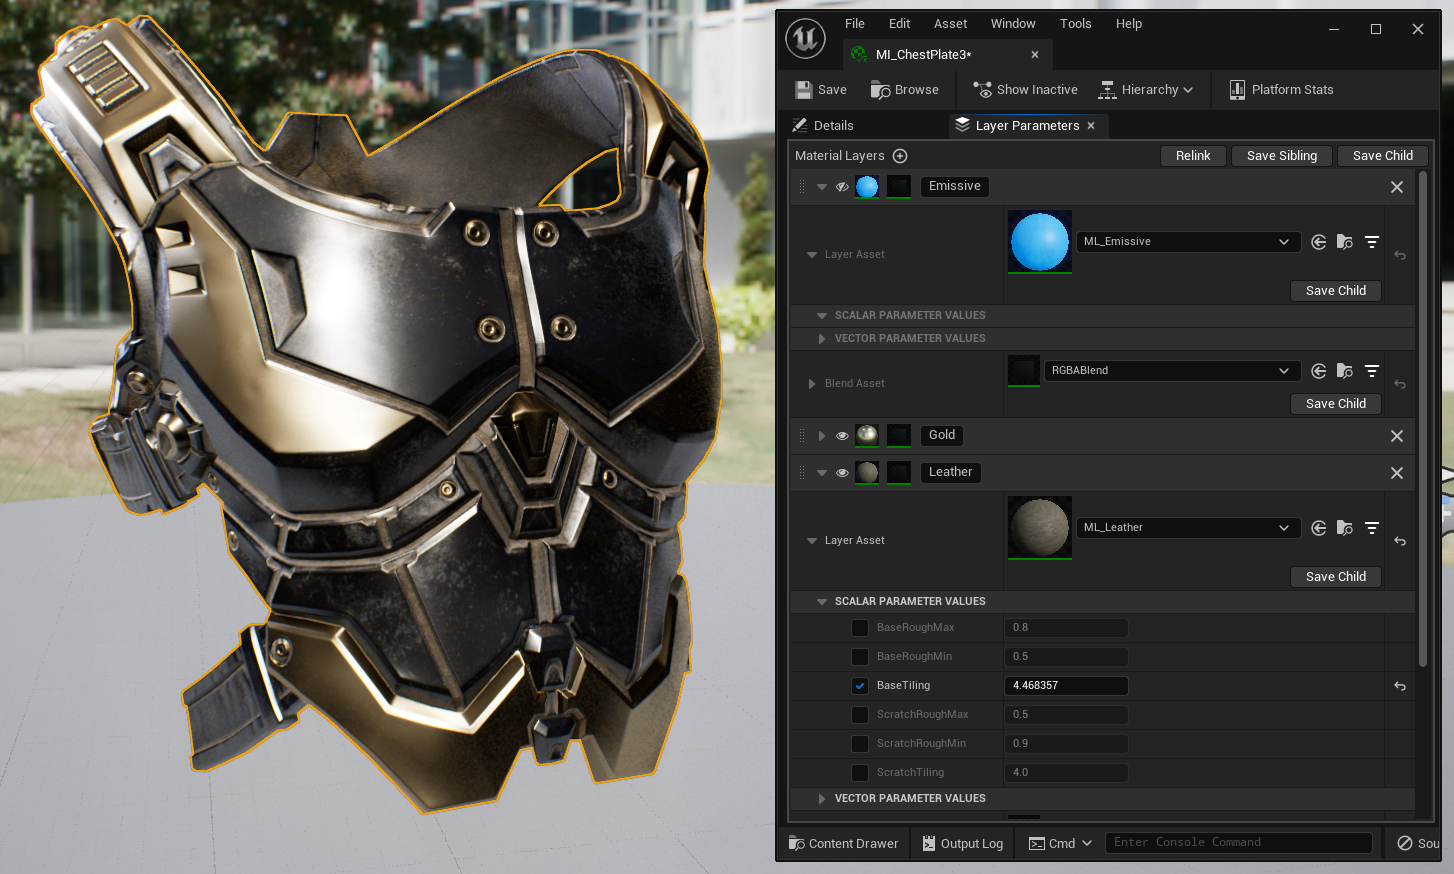
In the Layer Parameters tab of the Material Instance Editor, you can toggle the visibility of Material Layers, assign new Material Layer Blend Assets, or rearrange the layers in the stack for top-down dependency.
Click image for full size.
From the Layer Parameters tab, you can override and edit any parameters exposed for that Material Layer or Material Layer Blend. These parameters are exclusive to the layer. So, even if you were to add the same Material Layer to this layer stack multiple times, the parameters would be uniquely set for that layer in the panel.
Click image for full size.
Additionally, you can toggle visibility of each layer in the stack without removing or losing any work you've created. Click the Eye icon to toggle visibility of any layer in the stack.
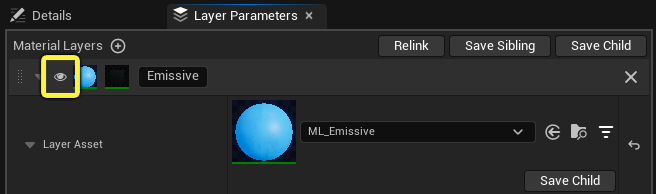
Toggling visibility of a layer disables it and displays the next layer in the stack based on layer blend and parameter settings already used in the stack by other layers. The example below disables a Material Layer with its own unique properties and blend mask for the sides of the chest plate. When disabled, the next layer displays the chrome material used by other parts of the chest plate.

You can drag and drop layers to arrange the order, with the top-most layer taking priority over any below it. Lastly, each layer in the stack can be dragged and dropped with the top-most layer taking priority over any below it. Note that you cannot move the Background layer. The Background layer is set in the base parent Material as the default material when no other Material Layers are present.