
The Virtual Camera Actor is a camera placed in your Unreal Engine scene used to stream data from a Live Link-connected device. The Live Link-connected device can be used to view and move around the scene and to set up and record shots. This user guide will go over using virtual cameras in your project and the different parts of the Live Link VCAM app.
Required Setup
In order to use virtual cameras with your project you'll first need to set up some things in your Unreal Engine project before setting up and connecting your Live Link-enabled device.
Unreal Engine Setup
Enable the following plugins from the Plugins browser found in the Edit menu:
- VirtualCamera
- This plugin allows for controlling and viewing of cameras with physical devices.
- Live Link
- This plugin allows streaming of animated data into Unreal Engine. For more information, see Live Link.
- Take Recorder
- This is a suite of tools and interfaces designed for recording, reviewing and playing back takes in a virtual production environment. For more information, see Take Recorder and Using Take Recorder.
Features such as Live Link and Take Recorder with Sequencer are larger topics than this page will cover. We suggest spending time familiarizing yourself with these features and their use cases. See their linked documentation above.
iOS Setup
Before you can start, you must have a compatible iOS device, and you must download the Live Link VCAM app from the App Store.
Recommended iOS Hardware:
- Must be ARKit-enabled
- iPad Mini 4 and later
- iPad Mini (5th generation and later)
- iPad Air (3rd generation and later)
- iPad Air 2 and later
- iPad (5th generation and later)
- iPad Pro
Device System Requirements:
- iOS 15.0 and later
- iPadOS 15.0 and later
- Support for ArKit
Download the Live Link VCAM app from the App Store to your ARKit-enabled iOS device.
When you open the app for the first time, you must accept the license agreement to use the app. No further setup is needed at this time.
Optional Prerequisite for this Guide
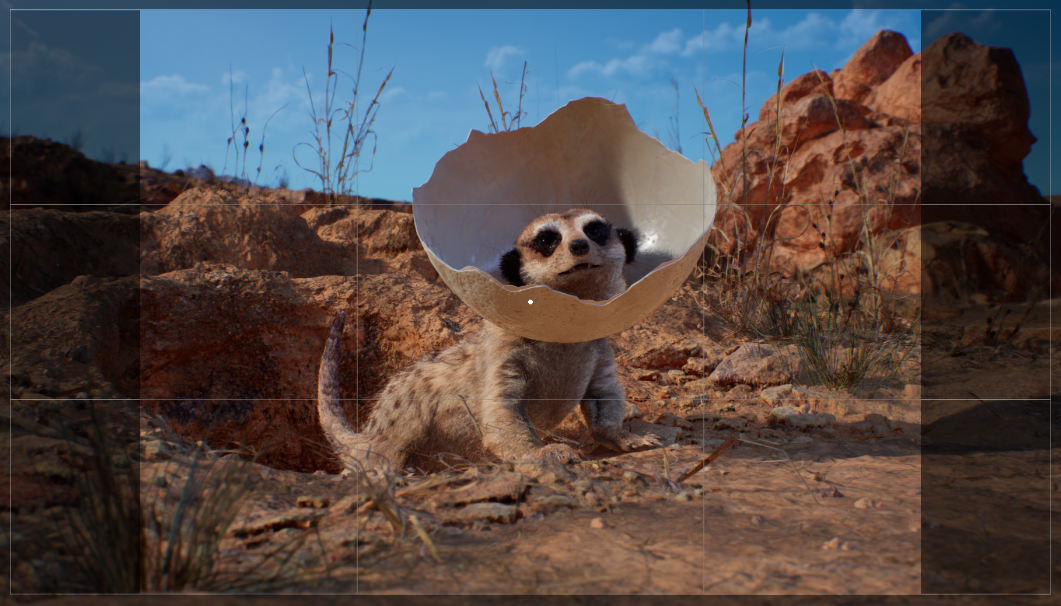
The Meerkat Demo sample project is a real-time short film developed by Weta Digital and rendered entirely in Unreal Engine. This is a project well-suited to test out some of the capabilities of using virtual cameras in a project. This guide uses the sample project for demonstration for setup and usage in a virtual production environment.
You can download the project from the Unreal Engine Marketplace or you can download it directly from the Epic Games Launcher in the Samples tab.
You can learn more specifics about the sample project by visiting the Meerkat Demo documentation.
Preparing a Scene for Virtual Cameras
In order to prepare your project to use a virtual camera setup, you must first prepare your scene in Unreal Engine and then set up your iOS device to interact with it.
Unreal Engine scene setup:
To set up your Unreal Engine scene:
-
Navigate to the Place Actors panel and enter "VCAM" into the search field, or select the Virtual Production icon.
For newly created projects, the Place Actors panel is not displayed by default in Unreal Engine. If you do not see one, navigate to the Windows menu and click on Place Actors to open one.
-
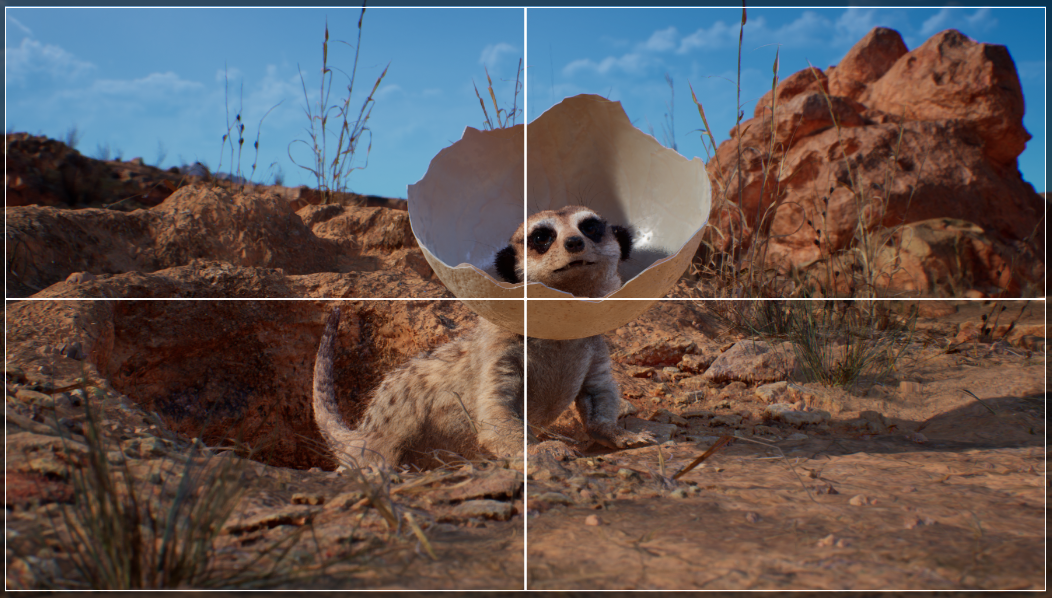
Click and drag a VCam Actor into the scene.
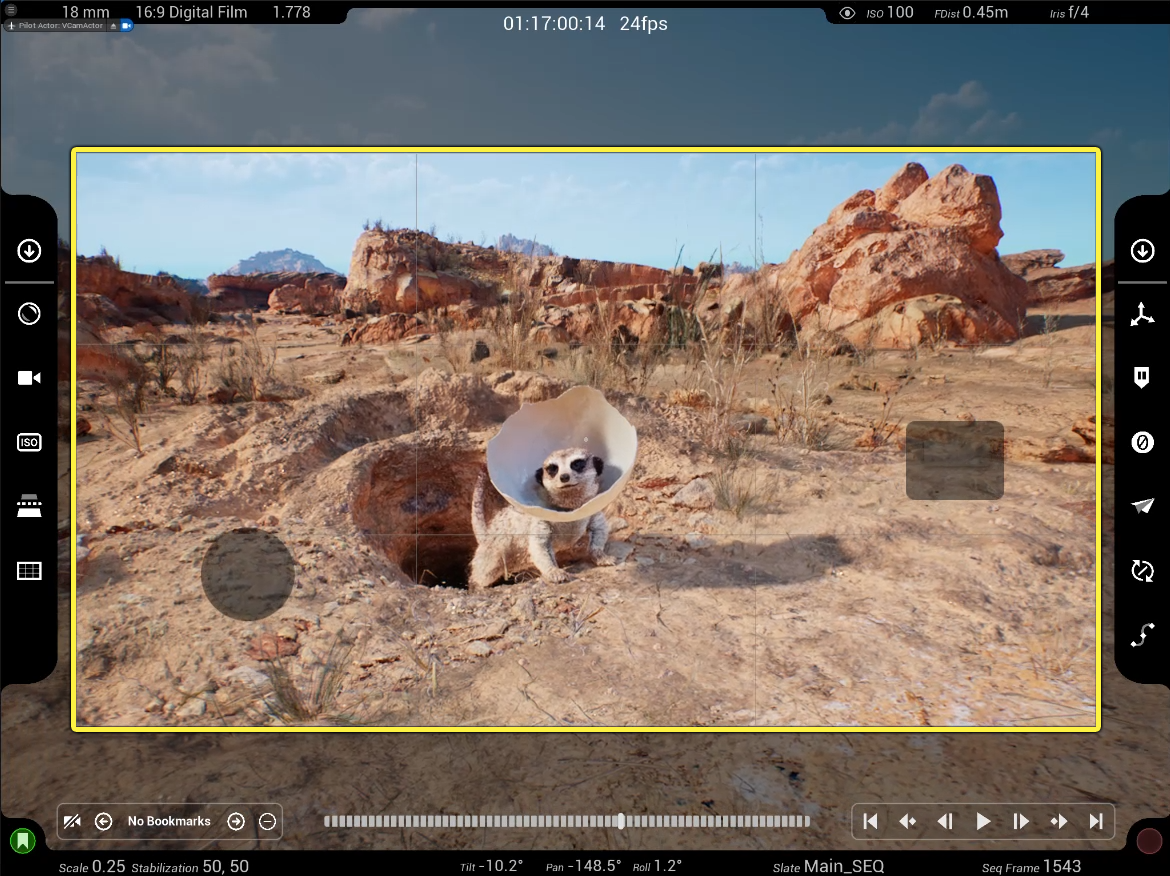
Immediately upon dragging a VCam Actor into the scene, the viewport changes to automatically pilot the virtual camera. Your viewport should look like the image below.
Next, you'll connect your iOS device to the Unreal Editor to drive a virtual camera placed in the scene.
iOS device setup:
To set up your iOS device:
- Connect to the same network your machine running your project is using.
- In the Unreal Editor, click the Pixel Streaming dropdown menu in the toolbar. Under the Signalling Server URLs section of the menu, you will see at least two IP addresses. Enter the one sharing the same network (for instance 192.x.x.x) as your iOS device into the Live Link VCAM app.
- On your iOS Device, open the Live Link VCAM app. Using the IP address that matches your shared network, enter the IP address into the text field in the app.
-
Click Connect.
If your scene has a single virtual camera, the iOS device will automatically connect to that VCam Actor. However, if you have multiple virtual cameras in the scene, you will need to select one to connect to. See Using Multiple Virtual Cameras for more information on setting up and using multiple cameras in your project.
Your iOS device should now be connected to a virtual camera placed in your Unreal Editor scene. You should also have control of the virtual camera from your device, and be able to move around to change the view. You will also have access to the Live Link VCAM interface on your iOS Device and from the Unreal Editor viewport. The VCam interface contains many controls for managing the look and behavior of virtual cameras in the scene. The remainder of this guide will explore and demonstrate these controls, settings, and actions you can do.
Controlling Inputs to Virtual Camera Controls
The Enhanced Input features of Unreal Engine makes managing a large number of actions and changing them dynamically possible. You can change how certain inputs behave depending on their current state. This enables more mappable keys to be used than there are buttons for in the user interface, which is ideal for mapping inputs of hardware devices to virtual camera controls in Unreal Engine.
Mapped inputs are added and configurable in the Project Settings under the VCam Input Settings.
For more information on setting up and using Enhanced Inputs, see Controlling Inputs to Virtual Camera Controls.
Virtual Camera Interface
The Virtual Camera's Controller Interface features a range of controls and settings you can use to modify the look and behavior of a virtual camera in Unreal Engine using an external device, such as an ARKit-enabled iOS device. The ARKit features enable physical position and rotation of your device to move and control the virtual camera's position and rotation in your project in real time.
The Virtual Camera Actor includes the following:
- Camera and Device Information
- Virtual Camera Settings
- Live Link VCAM App Settings
- Sequencer and Bookmarks Settings
Adjusting Settings Dials
The majority of configurable settings within the Live Link VCam app use radial dials. These dials can be located on either side of the interface and will sometimes include an inner and outer dial. To select an option, you can drag your finger along the dial in either direction and dial in your desired values. Changes made with the dials are reflected in real-time in Unreal Engine.
Navigating the Virtual Scene with Live Link VCAM App
The Live Link VCAM app provides a full range of motion tracking in a physical space using ARKit. ARKit does this by streaming out positional and rotational data live to an Unreal Engine instance with Live Link over a network. With it, you can drive the 3D camera within the real-time environment and visualize the shot on a supported iOS device.
Additionally, touch screen joysticks provide manual controls for navigating the scene using the Live Link VCAM app. Movement using the joysticks is layered on top of any motion tracked movement through ARKit.
Moving around with an ARKit-enabled Device
With an ARKit-enabled device, you can move freely within a space and that movement translates to the Unreal Engine instance running your project. Your tracked movements include being able to fully tilt, pan, and roll your device, and move around in the space in any direction.
Motion tracked through Live Link happens automatically and syncs with your 3D camera in Unreal Engine, allowing you to set up shots using the app whether its previs shots before a shoot, capturing real takes during principal photography, and creating a new shot in post production.
The Live Link VCAM app includes settings to scale how movement translates to the 3D scene with motion tracking.To learn about how you can adjust these settings, see the Adjusting Virtual Camera Movement section of this page.
Moving with Touch Screen Joysticks
You can manually move the Virtual Camera actors in the scene using touch screen joysticks on your Live Link-connected device for directional movement, vertical-only movement, and panning of the camera.
The Live Link VCAM app includes settings to adjust the sensitivity and scale of movement in the Live Link-connected device. To learn about how you can adjust these settings, see the Adjusting Virtual Camera Movement section of this page.
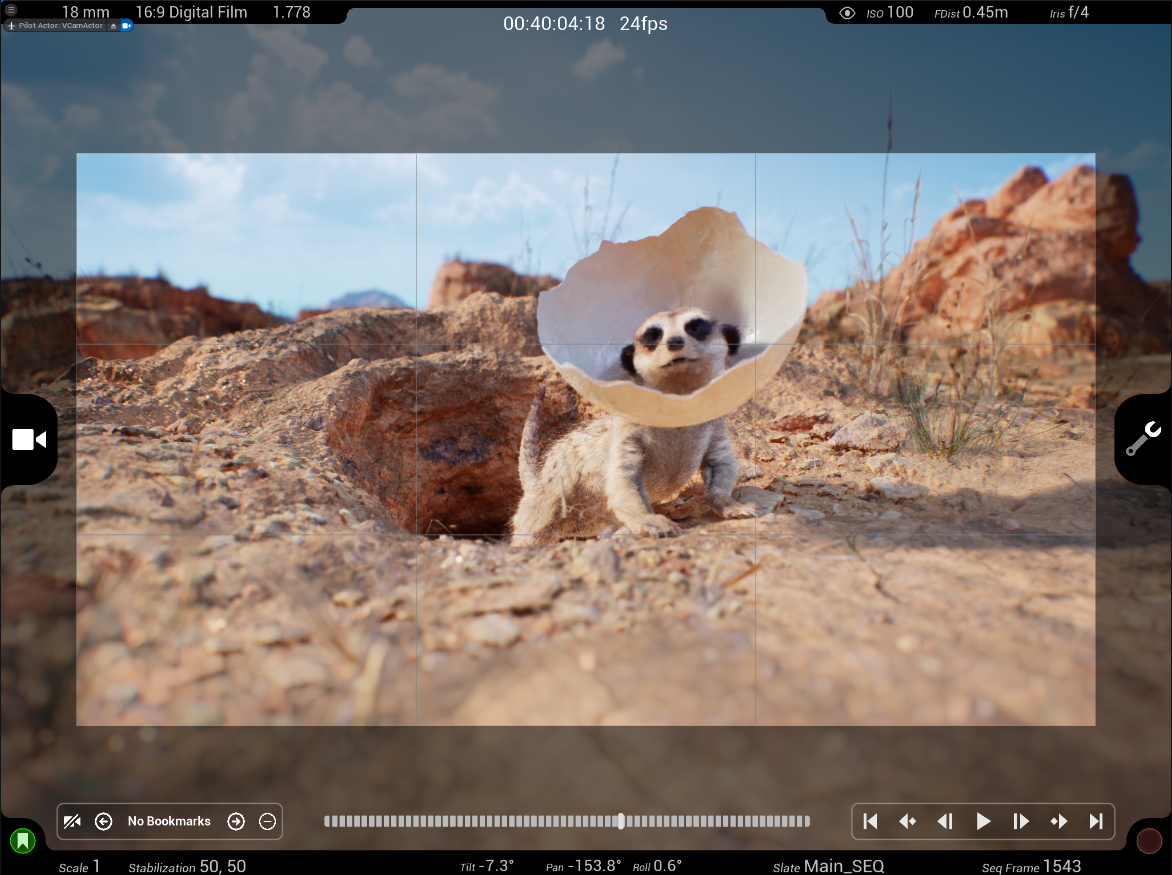
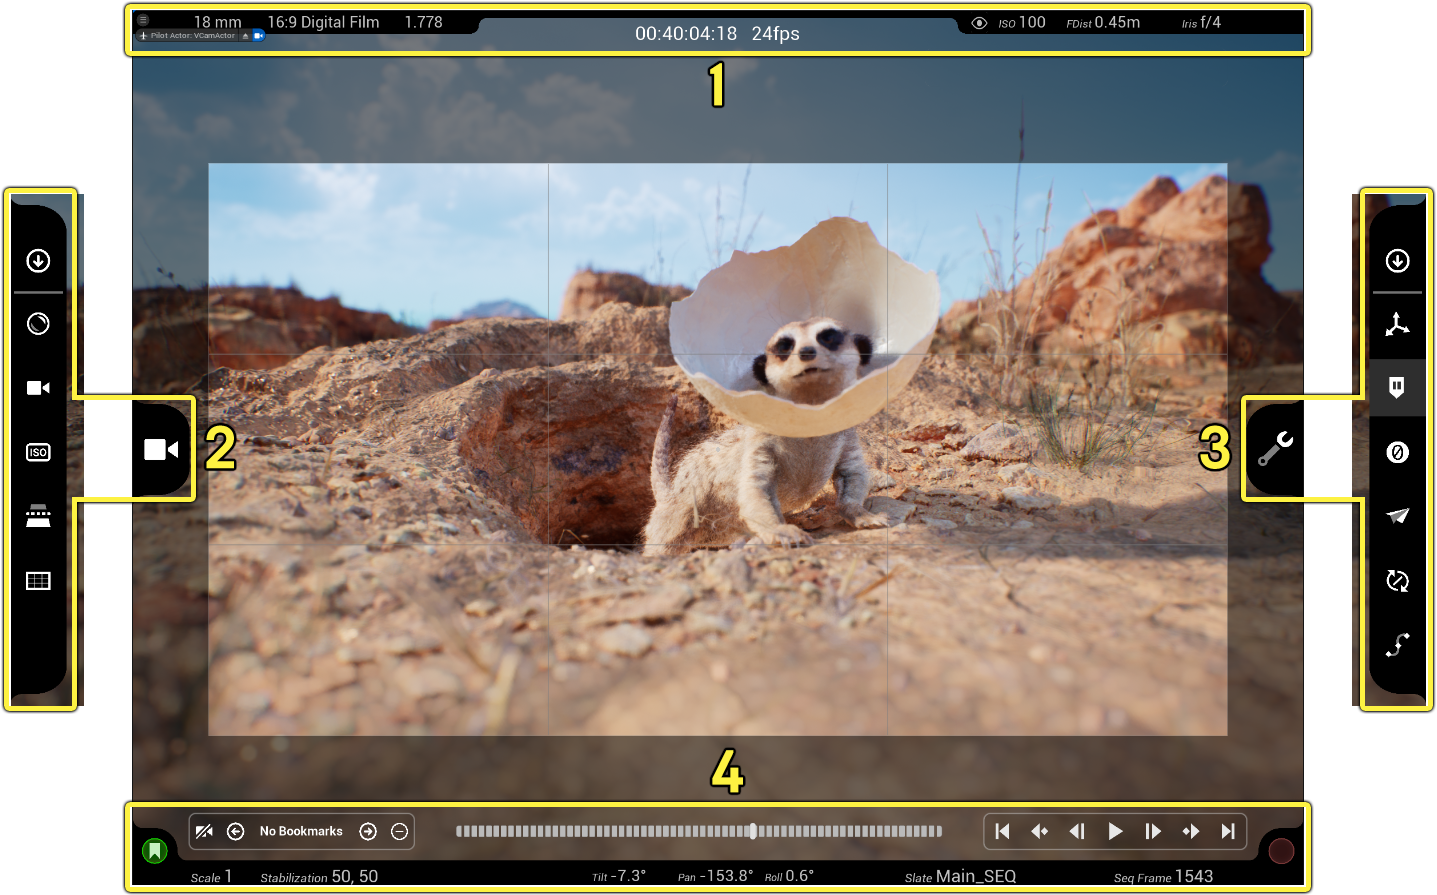
Camera and Device Information
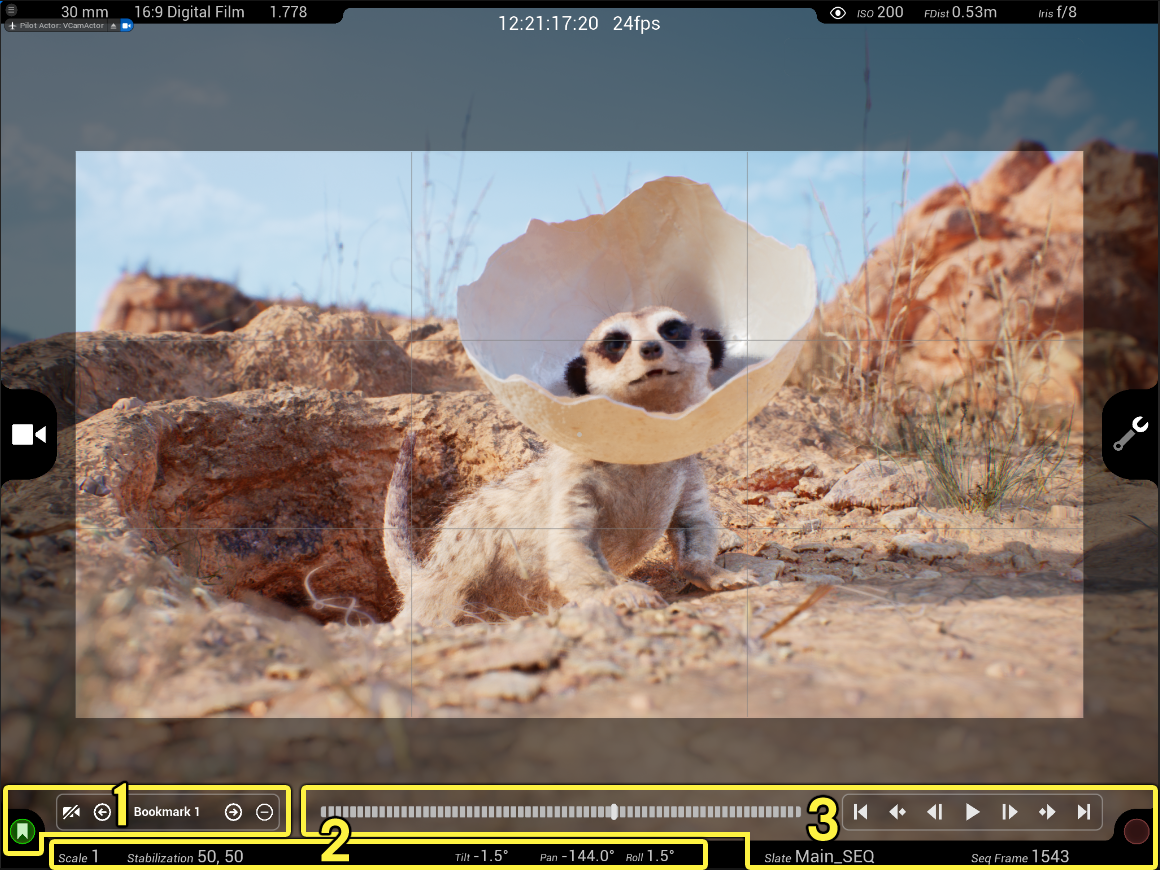
The top-most section of the Virtual Camera actor provides quick reference information on configured camera settings. In the Live Link VCam app, you also get additional information about the device being used, and access to the output log.

In the graphic above, the numbers correspond to the following:
- Live Link VCam App information and Actions.
- Quick reference and action for configured camera settings.
- Timestamp and film frames per second.
Quick Access to Virtual Camera Settings and Reference
On either side of the Virtual Camera actor is the configured settings for the camera. Tapping on any of these settings directly opens its adjustable dial within the Live Link VCam app.

The adjustable settings include:
- Lens Size
- FIlmback Size
- Mask Size
- Toggle Camera UI
- ISO
- Focus Distance
- Iris F-Stop
Accessing and Sharing the Output Log
To access the Output Log:
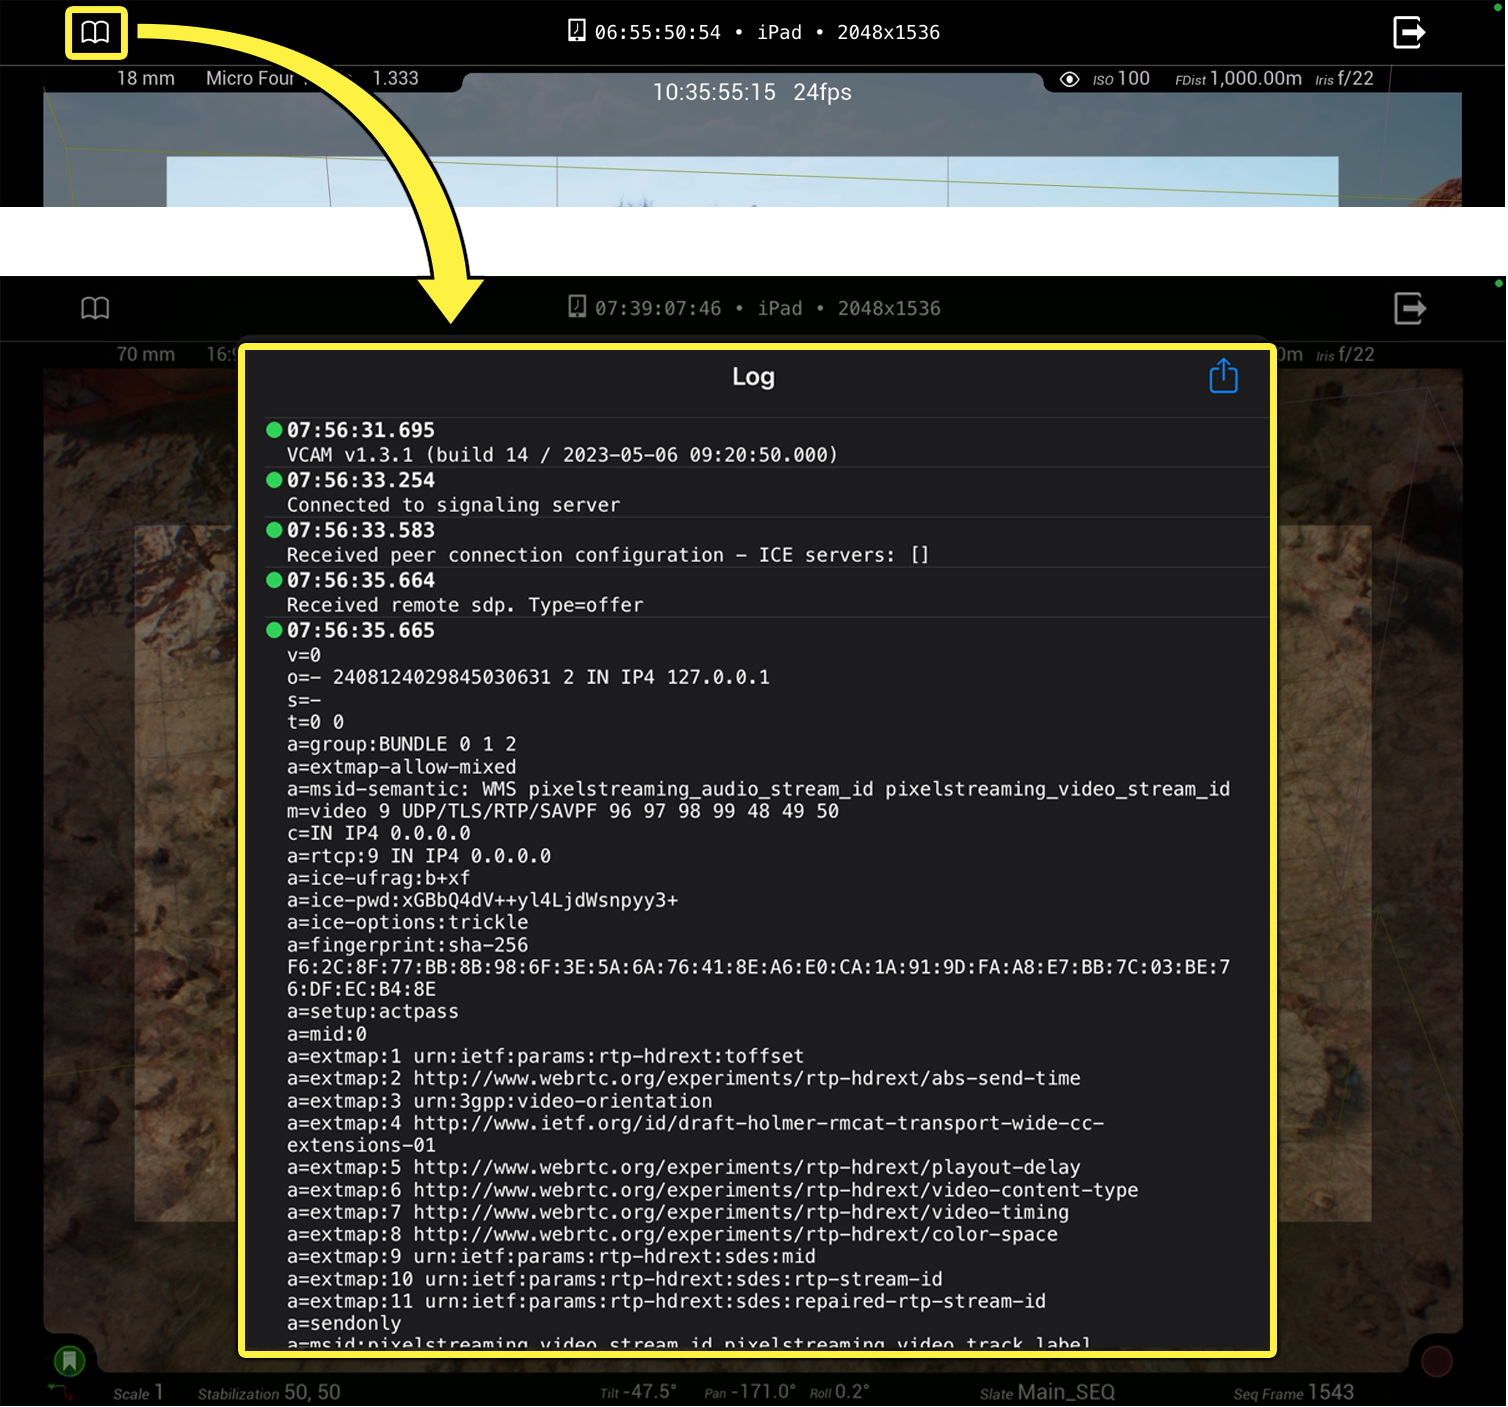
-
Click the Log icon in the top-left corner of the Live Link VCam app to open the output log.
To share the output log:
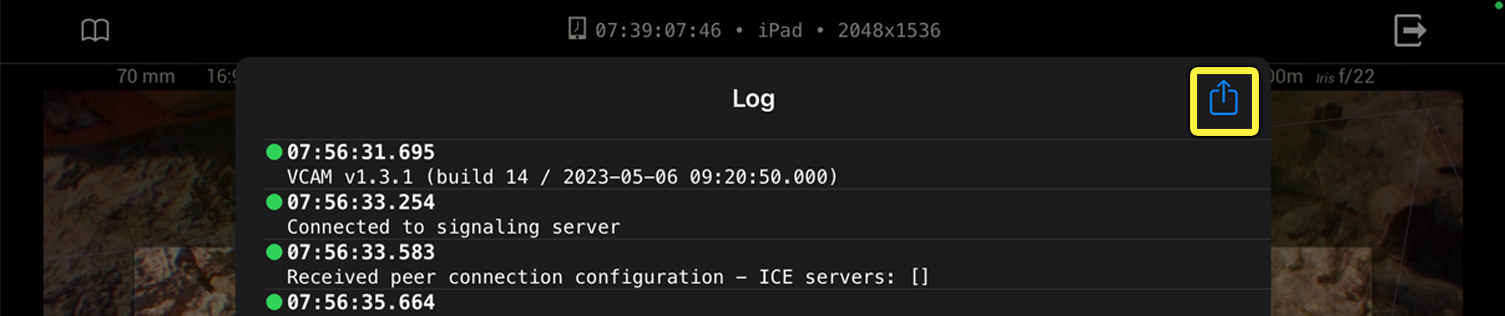
-
Click the Share icon in the Log to save and send the log.
Virtual Camera Settings
The Virtual Camera settings are located on the left side of the Live Link VCAM app. This menu includes options to control the different camera, lens, and exposure settings of the virtual camera in your scene.
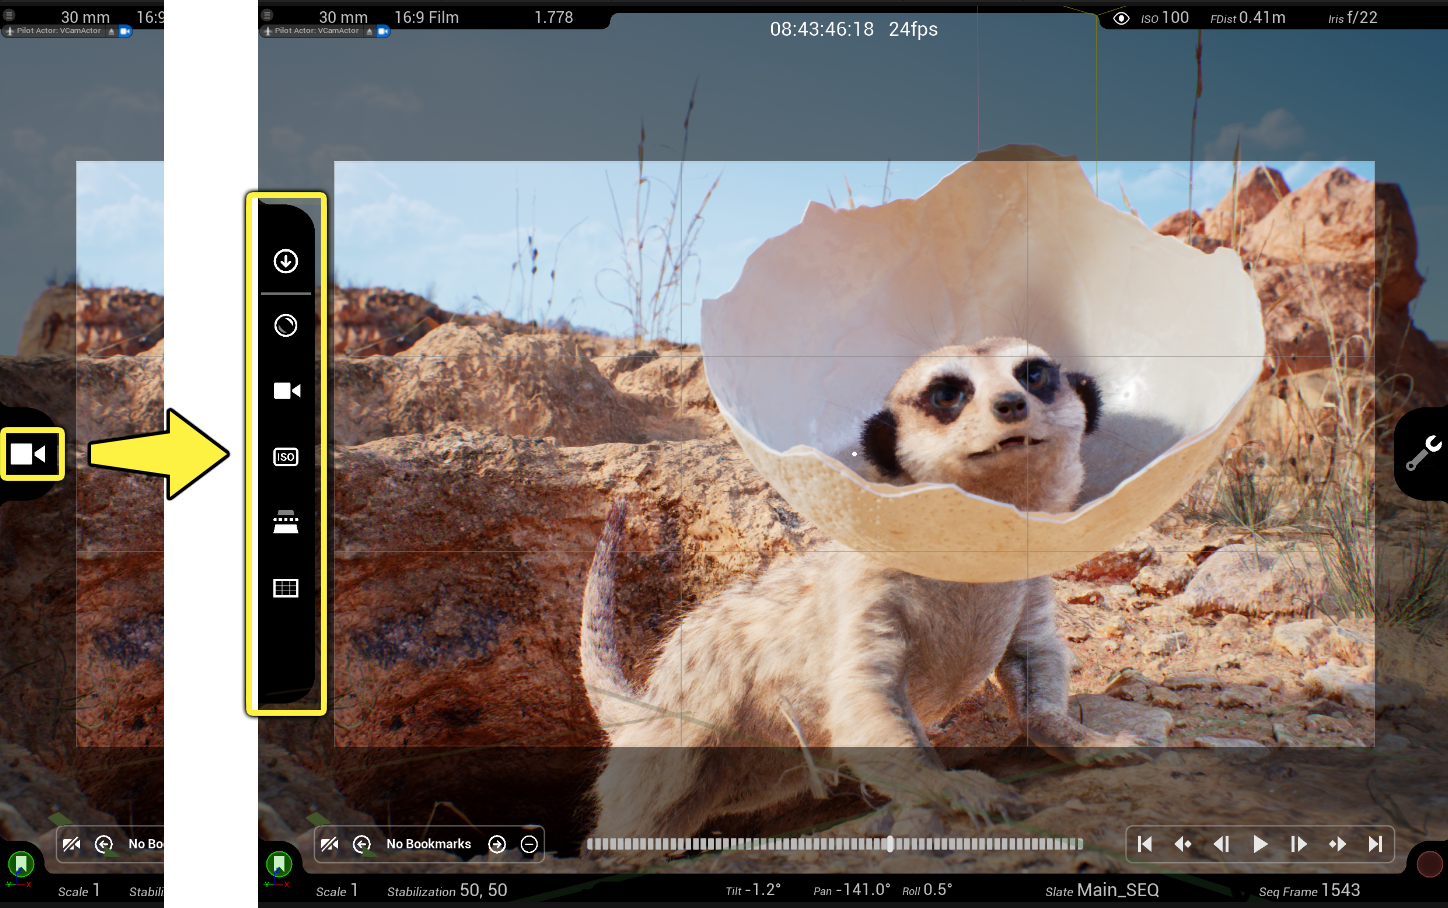
The menu includes the following settings:
| Icon | Dial Name / Action | Description |
|---|---|---|
 |
Lens Settings | Set virtual camera parameters such as lens size, focus, iris, and more. |
 |
Filmback Settings | Configurable settings for the virtual camera's image sensor. |
 |
ISO and Exposure Compensation Settings | Configurable settings for how the virtual camera's exposure is handled. |
 |
Near Clip Plane Settings | Set the distance from the camera where polygons will no longer render. |
 |
Mask / Overlay / Reticle Settings | Set what type of aspect ratio mask, grid overlay, and reticle are used with the virtual camera. |
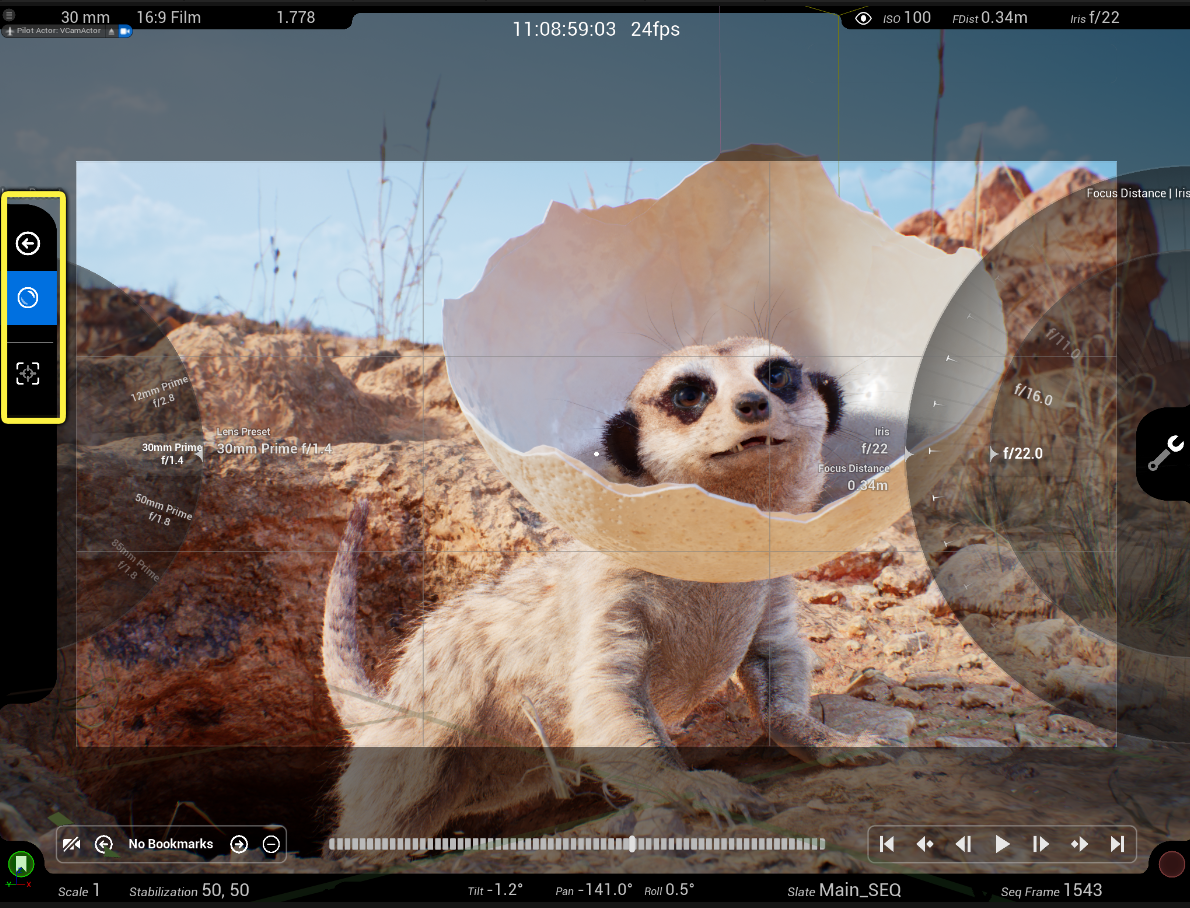
Lens Settings
The Lens settings include virtual camera presets for lenses, focus, and iris settings.
| Icon | Dial Name / Action | Description |
|---|---|---|
| Section 1 | ||
 |
Lens Preset / Focal Length / Focus Distance / Iris Settings | Options for configuring the type of lens with focal length the virtual camera uses, the size of the iris, and focus distance. |
 |
Focus Settings | Options to configure how the virtual camera's focus is being applied and whether to track a specific actor to keep it in focus. |
Lens Preset and Focal Length
With the Lens icon selected, you can adjust between some configurable presets for common focal lengths and iris. You can also set the iris and dial-in the focus distance manually.

| Dial Name / Action | Description |
|---|---|
| Left Dials | |
| Lens Preset | Select from a list of presets for focal lengths and irises. Some presets include the Focal Length dial. Lens presets include:
Lens presets are set up in the Project Settings in the Cinematic Camera category. You can add new presets and edit existing ones. |
| Focal Length | Sets the length of the lens (in millimeters). Longer lengths lead to higher magnification with a narrower angle of view, whereas shorter lengths have lower magnification and a wider angle of view. (Only available on some Lens Presets.) |
| Right Dials | |
| Focus Distance | Sets the distance (in meters) from the virtual camera lens where objects will be in focus. |
| Iris | Controls the amount of light (in f-stops) by making the aperture wider (low f-stop) or narrower (high f-stop). |
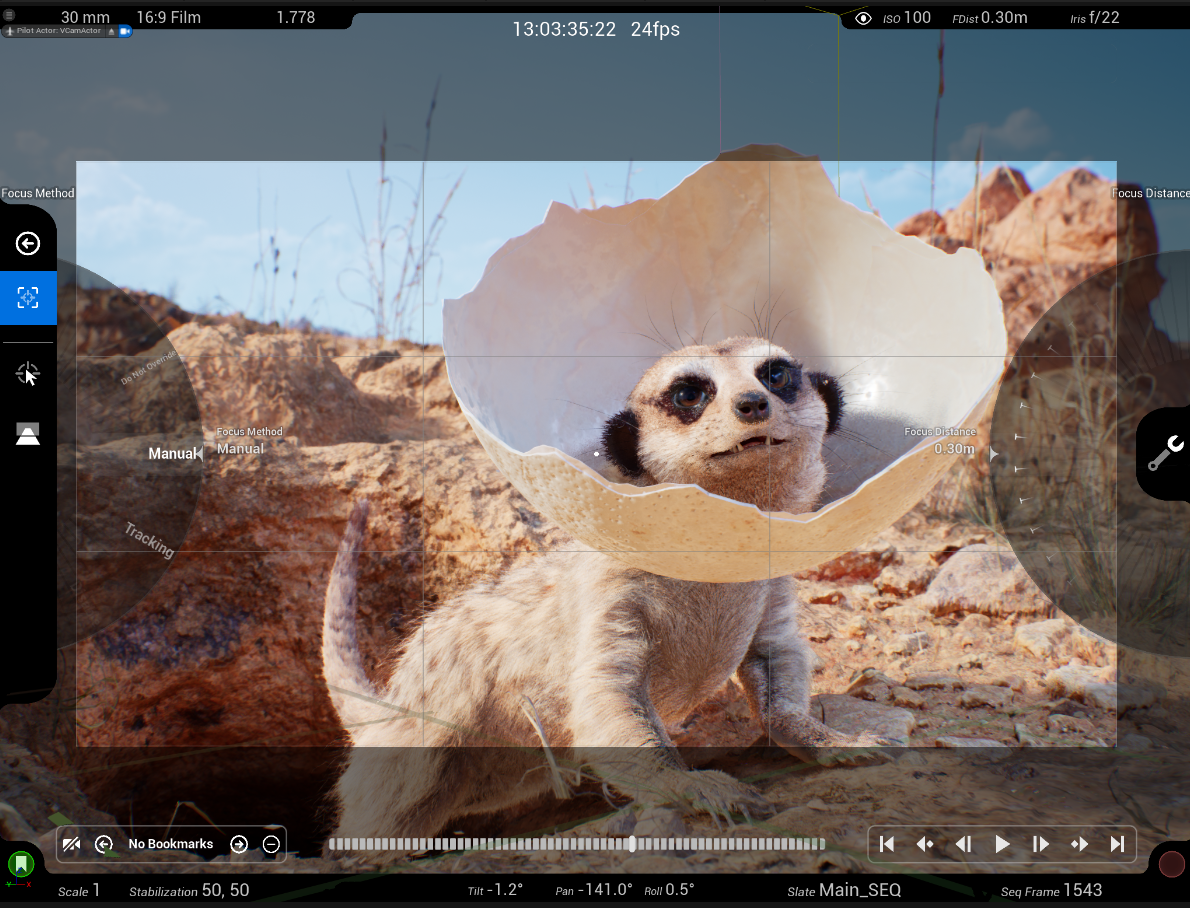
Focus Settings
The Focus settings icon opens a separate menu where you can configure how the virtual camera focuses on objects.
| Icon | Dial Name / Action | Description |
|---|---|---|
| Section 1 | ||
 |
Focus Method | Choose how you want the virtual camera to apply focus in the scene:
|
 |
Focus Distance | Specifies the distance (in meters) from the virtual camera lens to the point where objects will appear in focus. |
 |
Pick Actor to Track | Use this to pick an actor in the scene that will always remain in focus. This automatically adjusts the focus distance in relation to that actor rather than having a set distance that objects remain in focus. |
 |
Toggle Focus Plane | Toggles a visual reference in the scene where the focus distance is currently set. |
Using Tracking Focus
You can track an actor in the scene and maintain the virtual camera's focus on it by using the Pick Actor to Track option in the Live Link VCAM app.
To use Tracking Focus:
- In the Lens setting menu, navigate to the Focus settings. Here, Focus Method is selected by default with its adjustable dials present on screen.
-
Drag the left dial to Tracking.
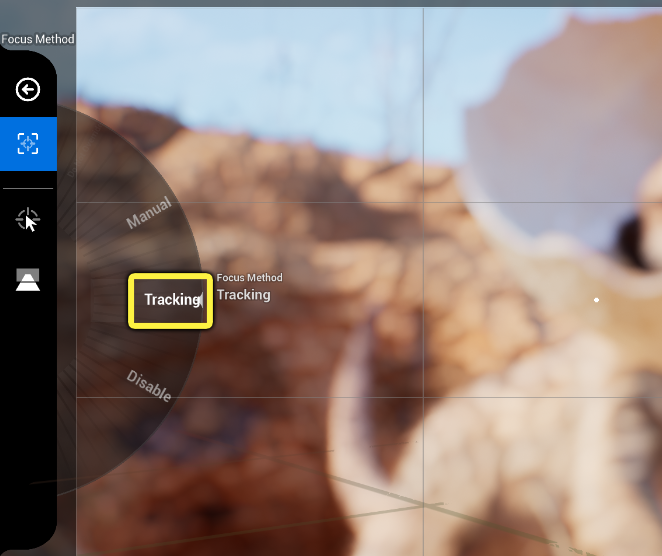
While holding and looking at your device, point the virtual camera Reticle at the object you want to keep focused on. Tap the Pick Actor to Track icon in the left menu. Once you've done this, look at the Right dial and you'll see the Tracking Offset along with the Name of the focused asset/skeletal mesh bone below.
When using the Tracking focus method, use the right dial for Tracking Focus Offset to dial-in the focus on the subject. When tracking a Skeletal Mesh actor, the target point moves to the closest socket for focus, which may not always be the exact spot you're wanting to focus on.
Using the Focus Plane
You can use the Focus Plane toggle to see exactly where the focus distance is in the scene. A darkened plane represents the focal distance. This is useful to quickly see where the focus distance is in the scene to dial it in. To dial in the focus, use the Focus Distance dial on the right side of the app.
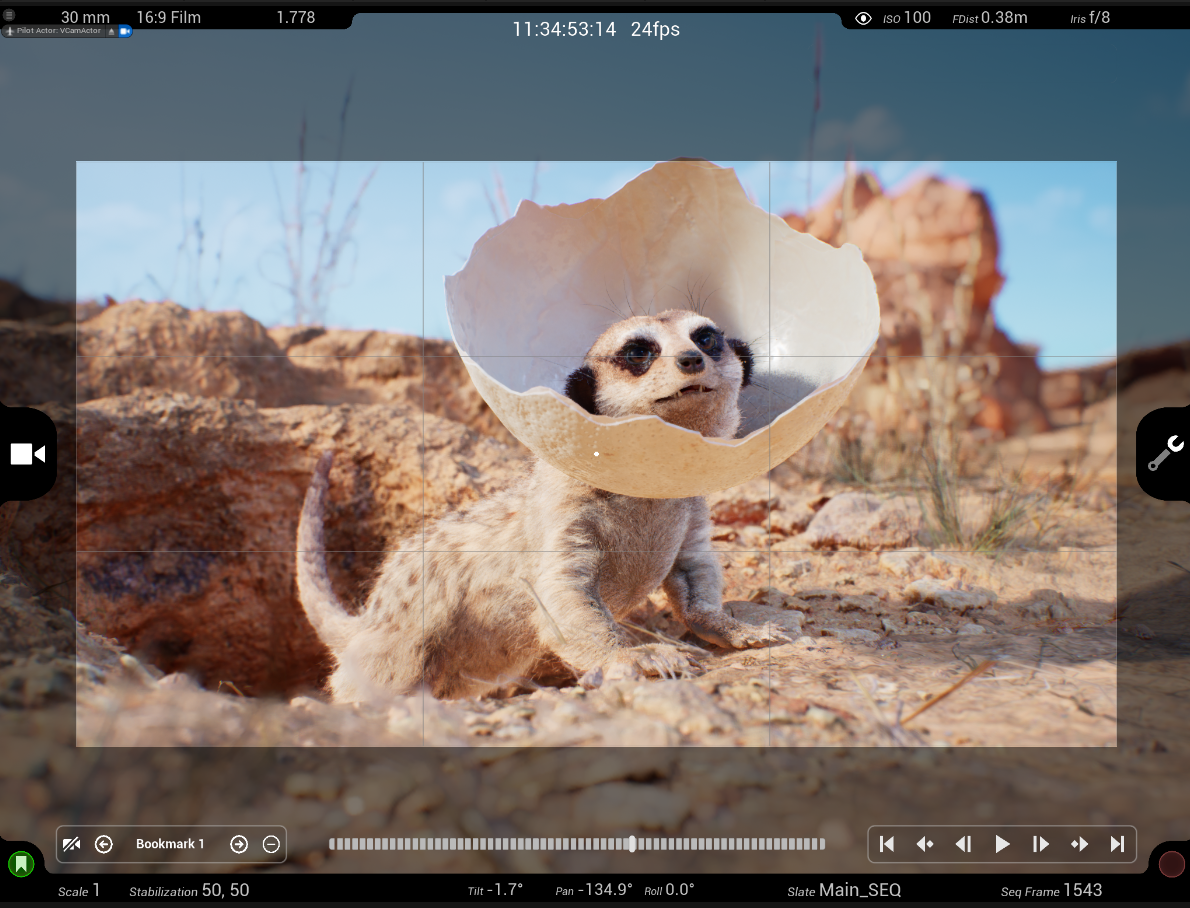
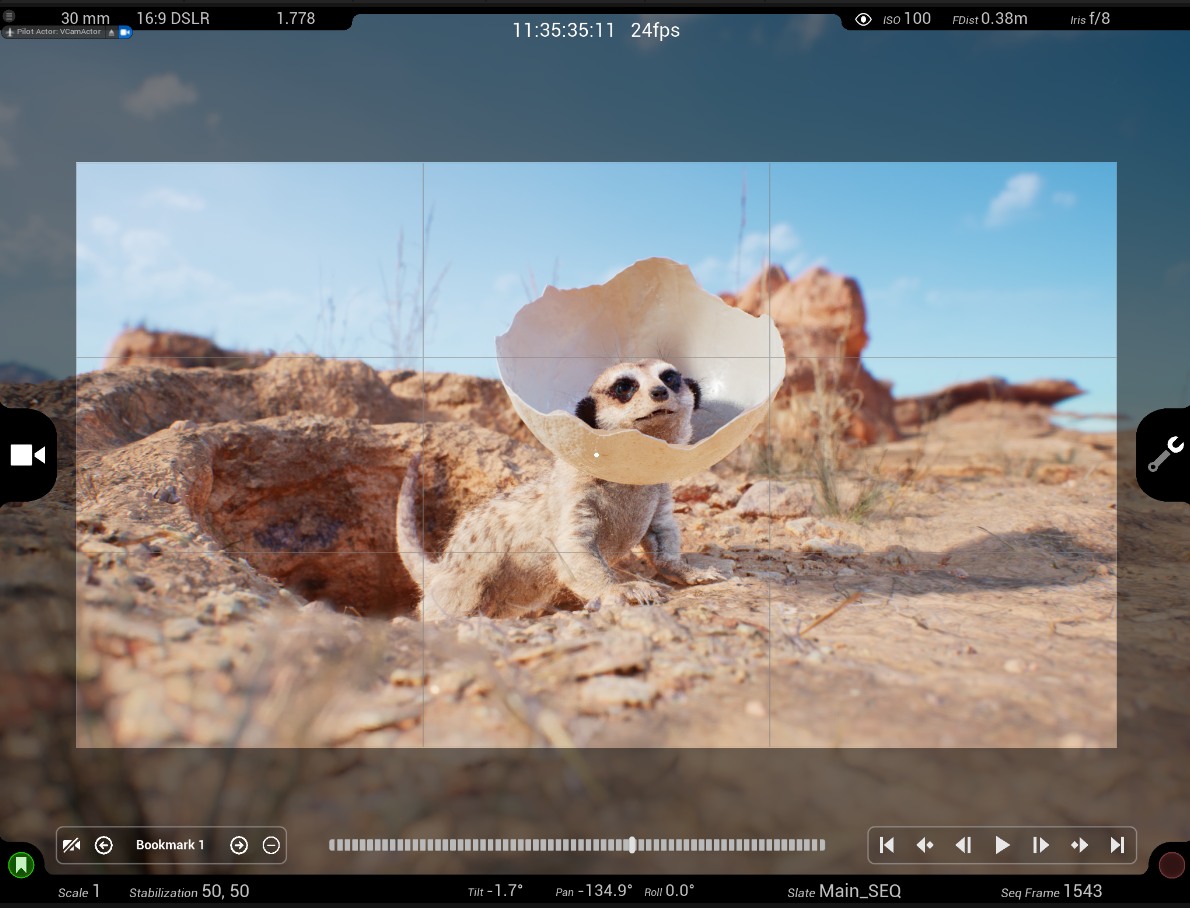
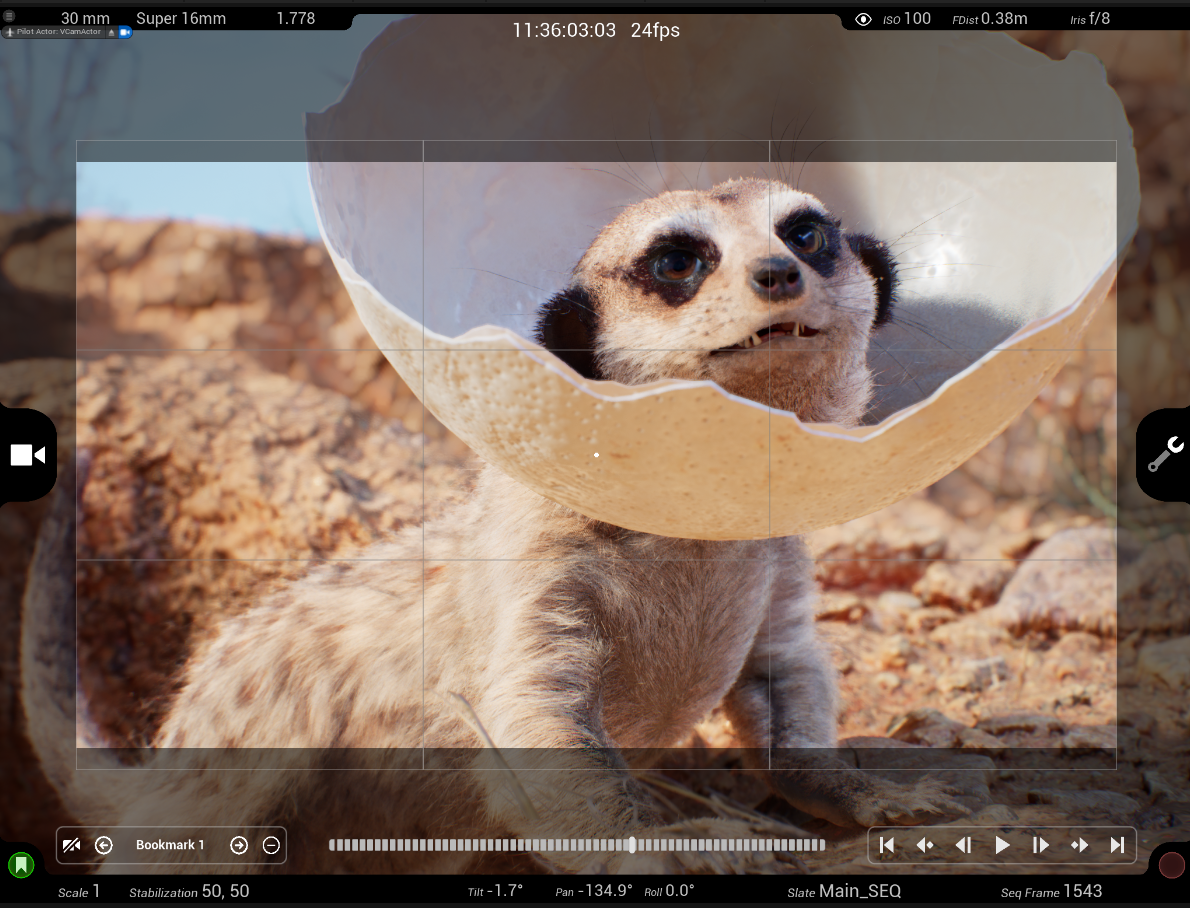
Filmback Settings
Filmback describes the dimensions of the frame for the digital imaging sensor. This size determines what the camera sees through its viewfinder. The filmback determines frame size, depth of field, resolution, and more.
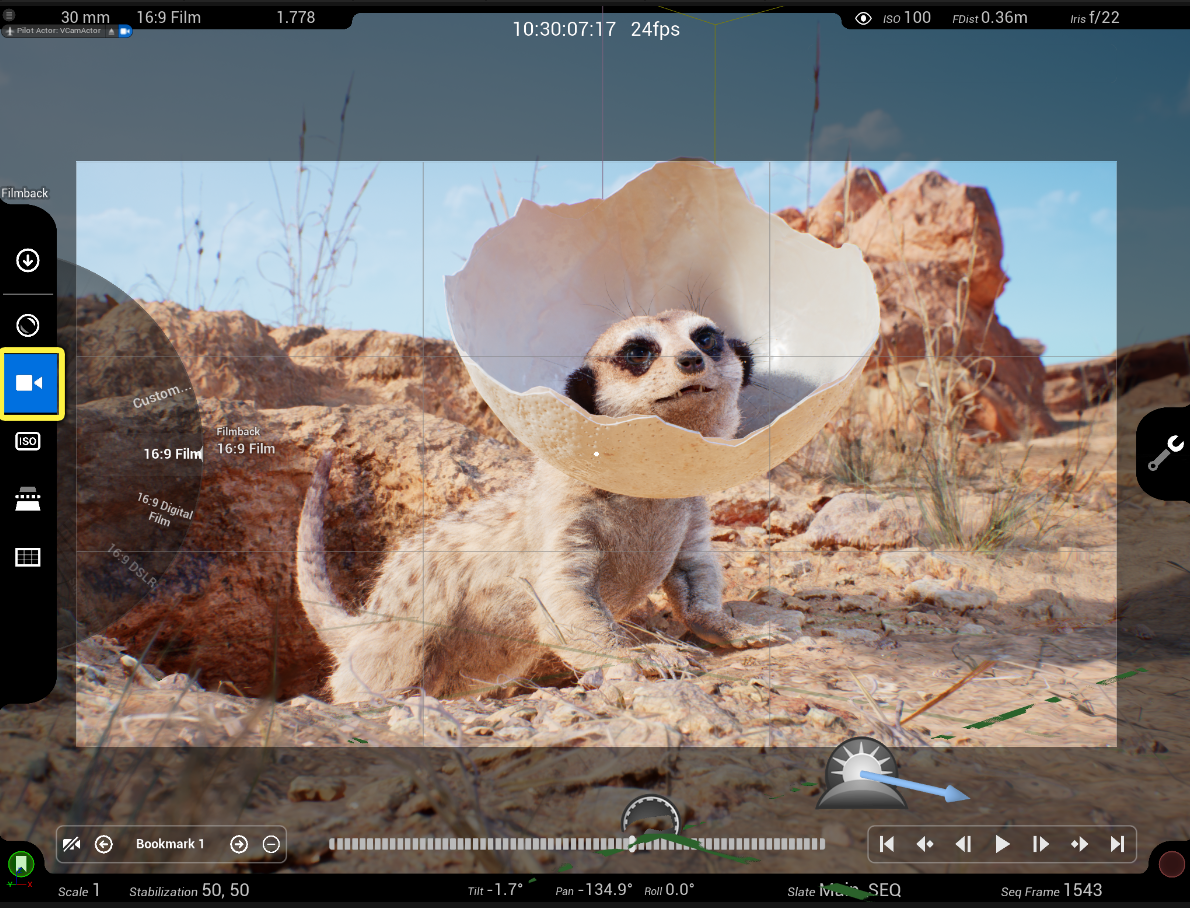
There are a number of standard presets available to choose from:
- 16:9 Film
- 16:9 Digital Film
- 16:9 DSLR
- Super 8mm
- Super 16mm
- Super 35mm
- 35mm Academy
- 35mm Full Aperture
- 35mm Vista Vision
- IMAX 70mm
- APS-C (Canon)
- Full Frame DSLR
- Micro Four Thirds
These are a selection of the Filmback presets you can choose from. These examples are using the 30mm Prime f/1.4 Lens Preset.
 |
 |
 |
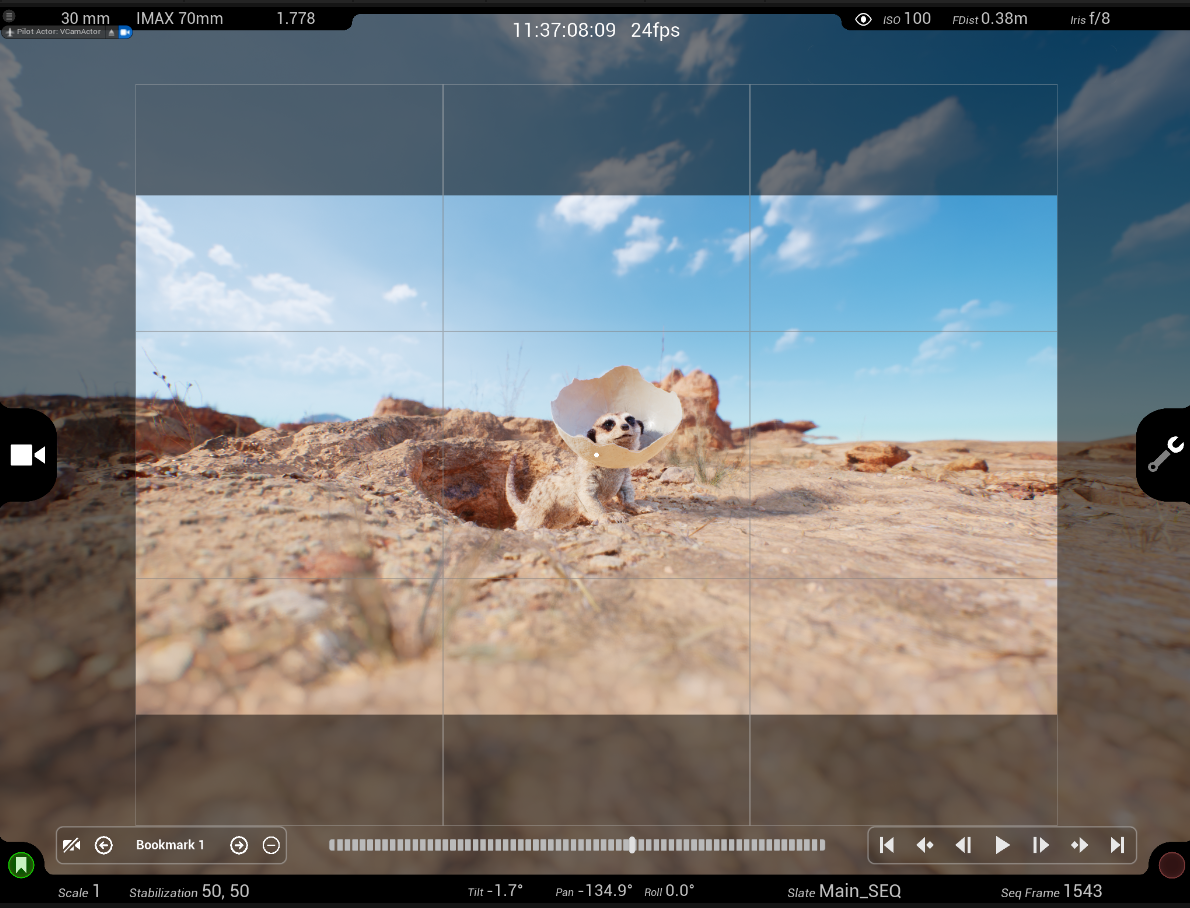 |
| 16:9 Film | 16:9 DLSR | Super 16mm | IMAX 70mm |
You can configure Filmback presets in the Project Settings under Cinematic Camera > Filmback Presets. Here, you can add your own, alter, or remove any existing presets.
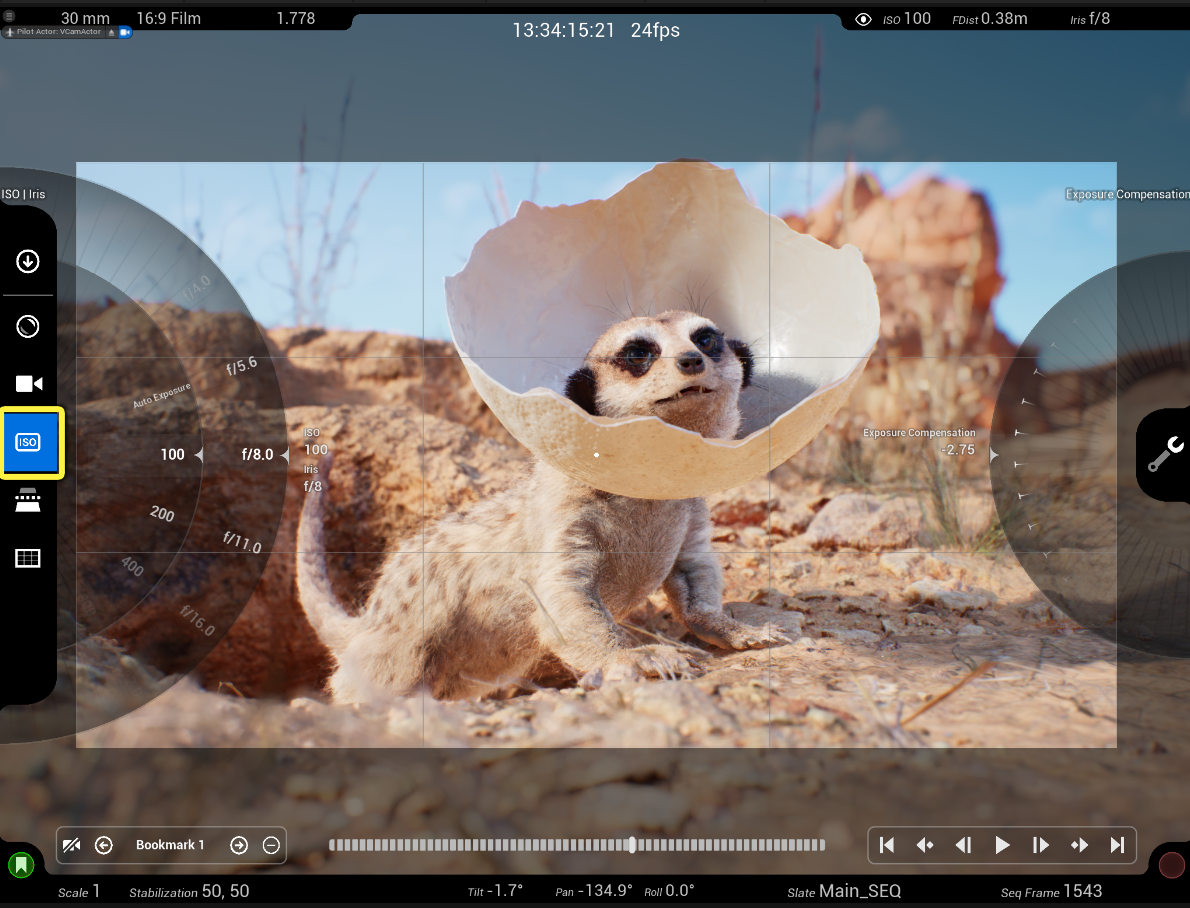
ISO, Iris, and Exposure Compensation Settings
The Exposure settings control how bright or dark the image is.
| Dial Name / Action | Description |
|---|---|
| Left Dials | |
| ISO | Sets the sensitivity of the camera's sensor. Lower numbers have a lower sensitivity to light, and higher numbers have a higher sensitivity to light. This has the effect of making the image darker or brighter. When not set to Auto Exposure, the ISO is dependent on what f-stop the camera iris is set to. |
| Iris | Sets the diameter (measured in f-stops) of the aperture's opening. This controls the amount of light that is allowed to pass through the lens of the camera. It also has an effect on depth of field. For more information, see Cinematic Depth of Field. |
| Right Dials | |
| Exposure Compensation | Applies a compensation (measured in stops) to override exposure to brighten or darken the frame. Lower numbers give a higher exposure, and higher numbers give a lower exposure, making the result brighter or darker respectively. |
Near Clip Plane
The Near Clip Plane sets the distance (measured in centimeters) from the camera that polygons no longer render. This option is useful when you want to not render objects blocking the view but also continue to render their shadows and interaction with the scene.
In the example below, the virtual camera is using a longer lens to capture the subject, but the view is partially obstructed by a plant. Using the near clip plane, Unreal doesn't render any geometry within the set distance from the camera.
Mask, Overlay, and Reticle Settings
The Mask / Overlay / Reticle settings include optional visual guides for the virtual camera viewfinder. This includes grids, safe zones, different reticles, and mattes to mask off different aspect ratios.
Each of the groups for overlays, reticles, and masks include their own Opacity dial. You can use this to set how opaque or transparent each is. At 0, they are not visible, at 0.5 they're partially transparent, and at 1.0 they're fully opaque.
 |
 |
 |
| Opacity = 0 (Overlay Grid Not Visible) | Opacity = 0.5 (Overlay Grid Partially Transparent) | Opacity = 1 (Overlay Grid Opaque) |
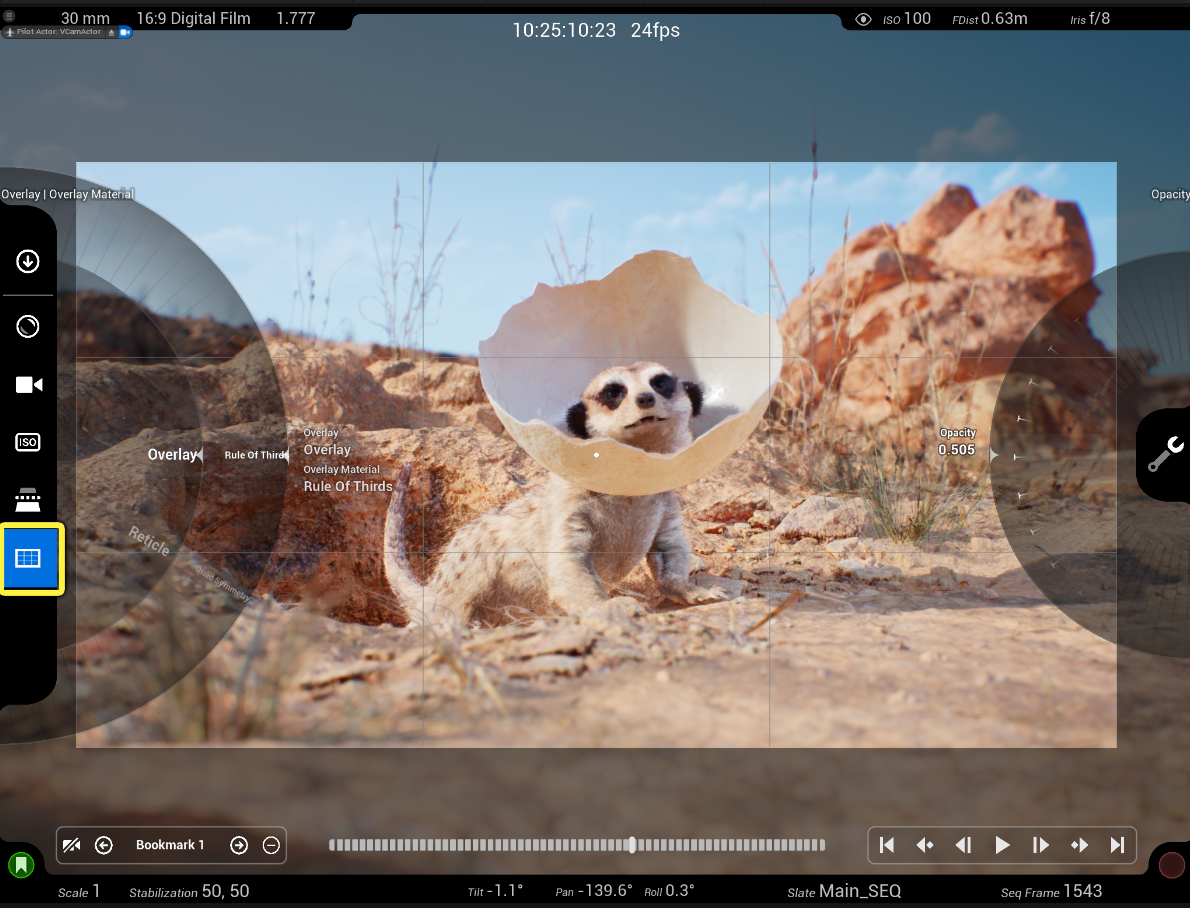
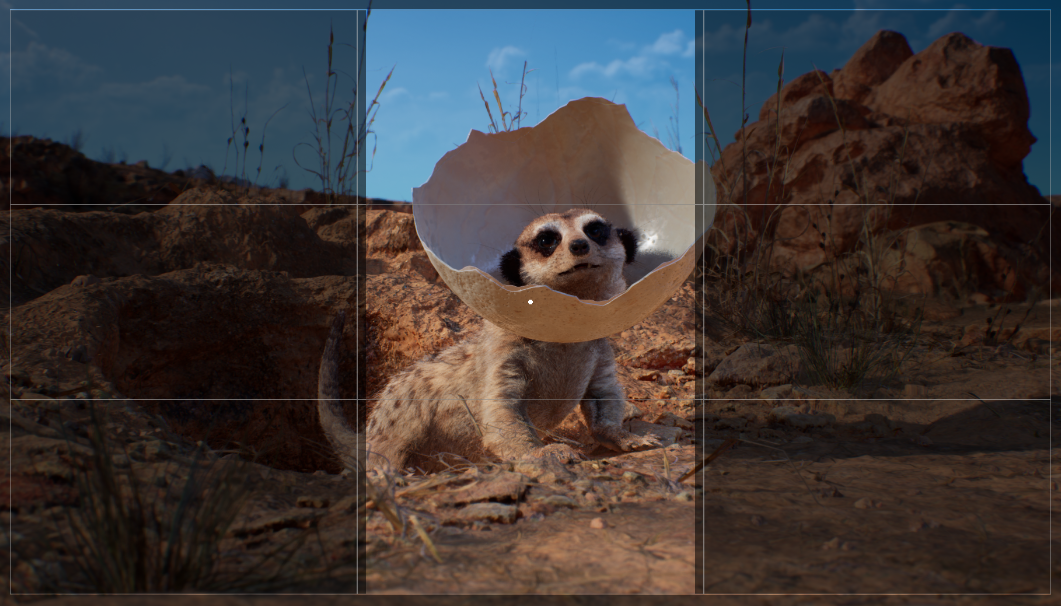
Overlay Selections
Use the Overlay dial to choose the type of grid to overlay on the virtual camera viewfinder.
You can choose from the following options:
 |
 |
 |
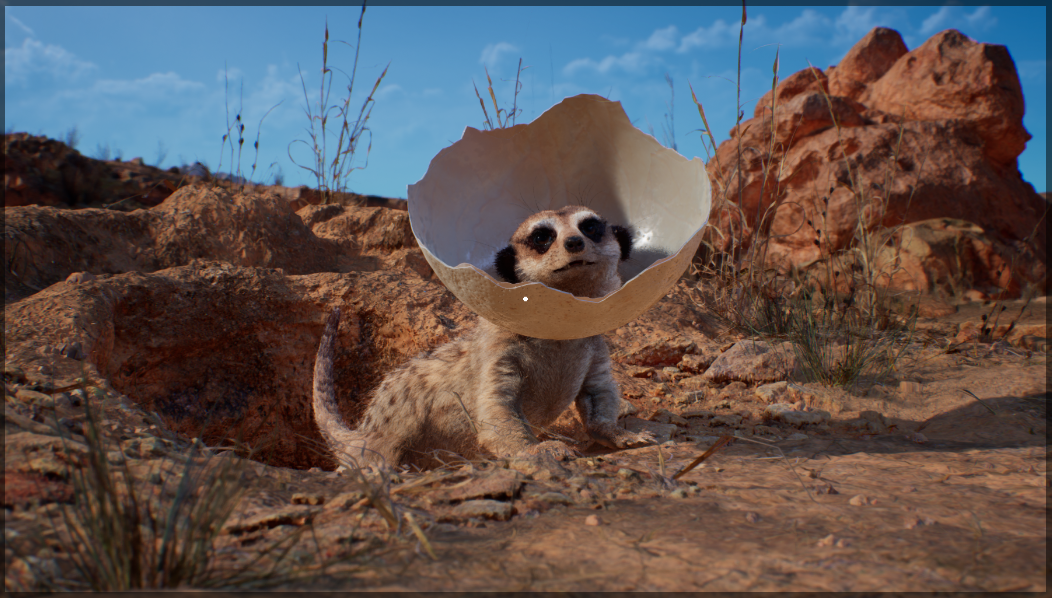 |
| Rule of Thirds | Quad Symmetry | Safe Zones | Hidden |
Reticle Selections
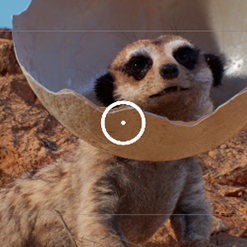
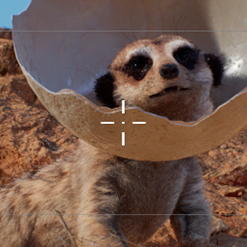
You can use the Reticle dial to choose the design for the center of the frame used to aim what the virtual camera is looking at.
You can choose from the following options:
 |
 |
 |
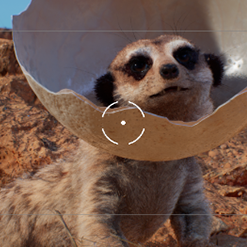 |
 |
| Dot | Circle | Cross | Split Cross | Hidden |
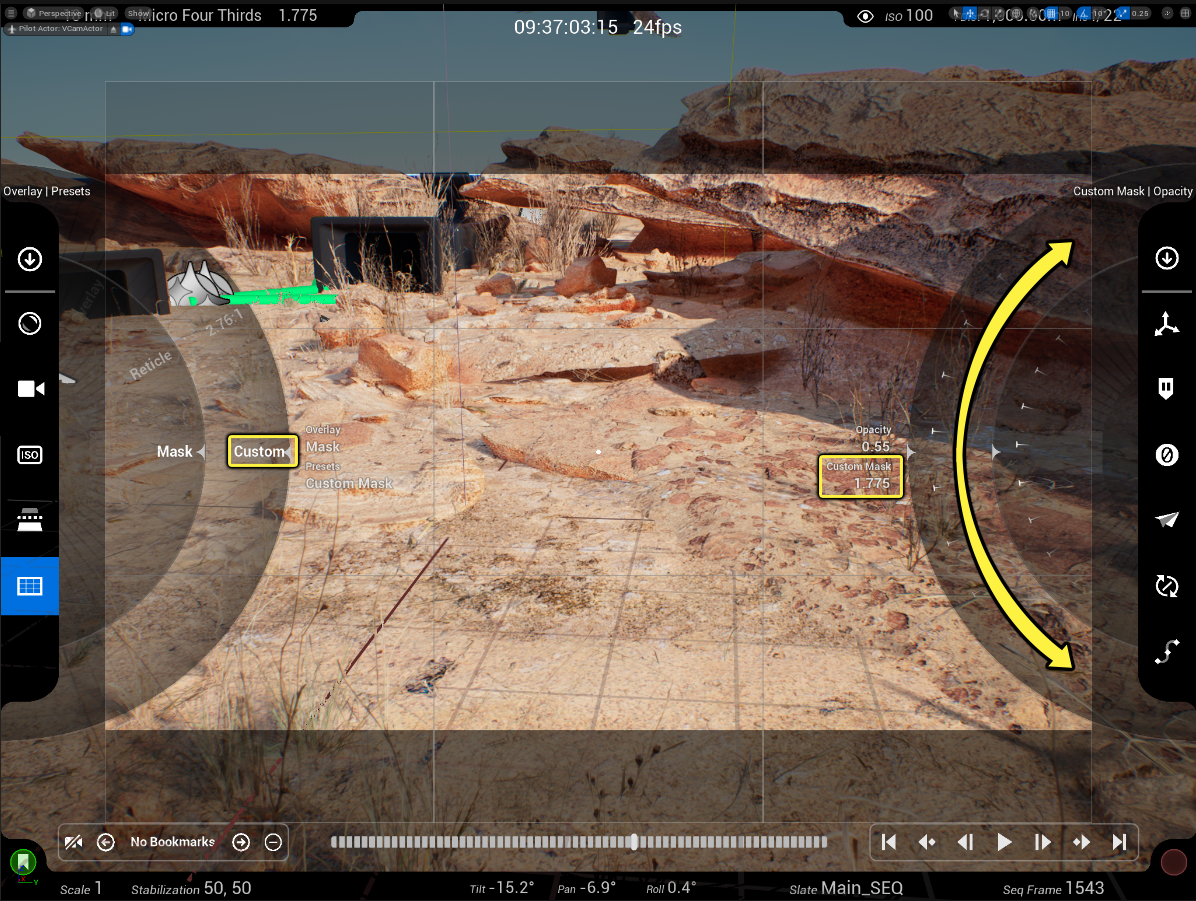
Mask Selections
You can use the Mask dial to choose from the presets for different size aspect ratio mattes in the virtual camera viewfinder. The mask presets include common industry standards.
You can choose from:
- 9:16 (0.562)
- 1:1
- 4:3 (1.333)
- 3:2 (1.5)
- 16:9 (1.778)
- 1.85:1 (1.85)
- 2:1
- 2.39:1 (2.39)
- 2.4:1 (2.4)
- 2.76:1 (2.76)
- Custom
Below are several examples of the mask presets overlaying the virtual camera viewfinder:
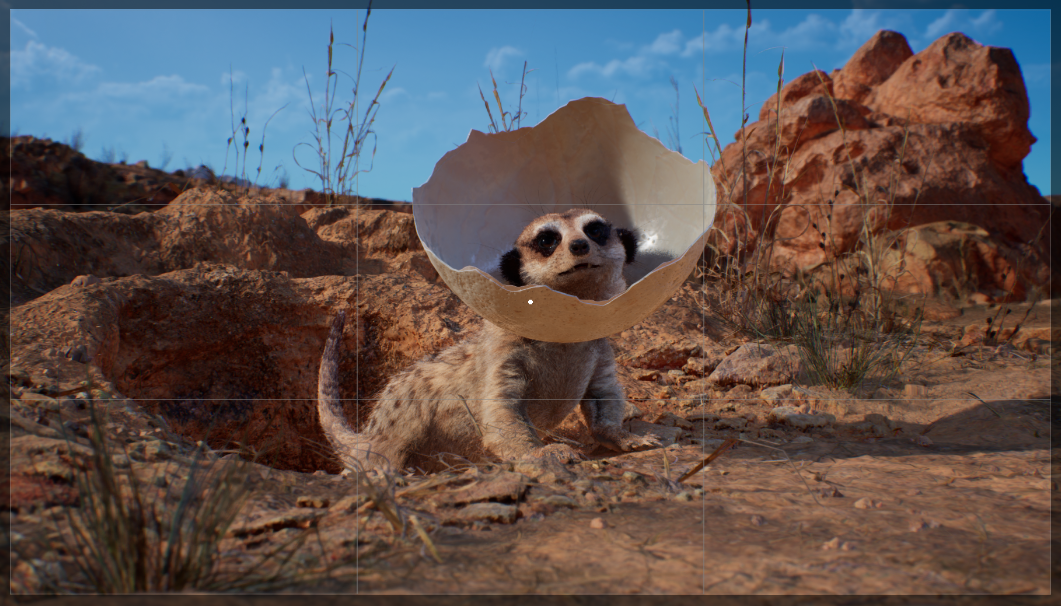 |
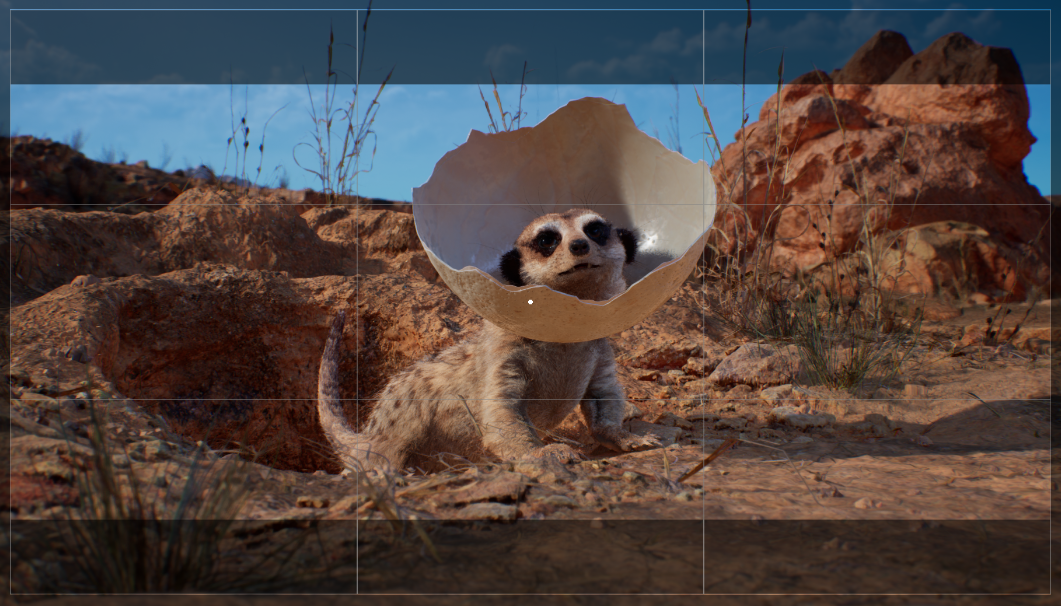 |
 |
 |
| 16:9 | 2.39:1 | 9:16 | 4:3 |
If none of the included presets fit your need, you can use the Custom option to define your own masked area. When selected, a new dial presented on the right side of the screen. Drag the dial in either direction to make the mask larger or smaller. The mask can fill the tops and bottom of the frame or the sides of the frame.
App Settings and Configuration
The Settings menu includes configurable settings and toggles for how you interact with the Live Link-enabled device and the virtual camera in the Unreal Engine scene.
This menu is found on the right side of the screen when clicking on the Wrench icon. It includes the following settings:
The menu includes the following settings:
| Icon | Dial Name / Action | Description |
|---|---|---|
| Section 1 | ||
 |
Scale and Gain Settings | Contains settings to configure how movement of the Live Link-enabled device works with the Unreal Engine scene. This includes how sensitive the movement of the device is in a physical space and sensitivity of the joystick movement. |
 |
Hold | Toggling this freezes the virtual camera's location and rotation until it is toggled again. This is useful for repositioning your physical live link-enabled devices without losing your virtual camera's position in the scene. |
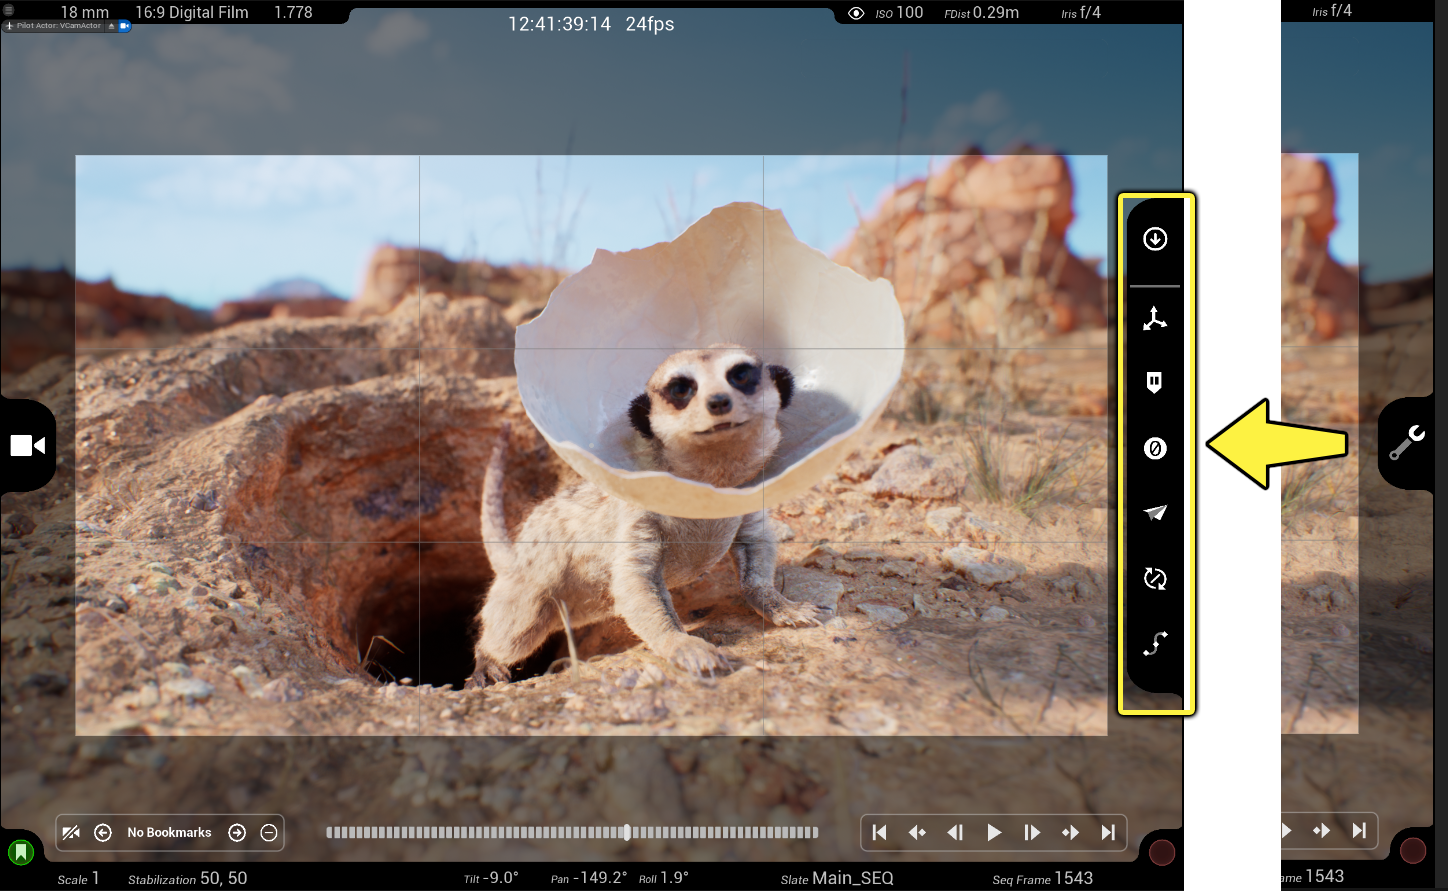
 |
Zero Out | Tapping this moves the virtual camera to the world origin (0,0,0) coordinates in the editor. |
 |
Flight Mode | Changes the forward joystick movement to follow the forward direction of the camera instead of the world. When in flight mode, looking up or down will move the camera in that direction when you push a joystick forward. When disabled, the camera can freely look around the scene but move forward without moving in the direction the camera is pointed. |
 |
Kill Roll | You can toggle this to disable virtual camera rotation along the X-axis, keeping the camera level when moving around while the Live Link-connected device is moving in a physical space. |
 |
Spline Mode | This mode enables you to create and edit your own Rig Rails from the Live Link VCAM app. |
Virtual Camera Movement with Scale and Gain Settings
Movement in the Live Link-enabled device is registered by tracking positional data from the device and through the use of touch-screen joysticks, includings tilt, pan, and roll movement. The touch-screen joysticks layer directional and rotational movement on top of the ARKit motion.
Virtual camera movement from a Live-Link-enabled device is controlled by:
- ARKit tracked axial and locomotor movement.
- Touch-screen Joysticks
- The Left joystick controls directional forward, backward, diagonal, and side-to-side movement.
- The Right joystick includes two separate movement controls.
- Rotational movement by dragging left and right on the screen.
- Vertical movement by dragging up and down on the screen.
Each type of movement can adjust its sensitivity so that small movements can have a bigger effect, or the opposite where bigger movements have smaller impact. You can find these controls under the Scale and Gain settings menu on the right side of the screen.
The menu includes the following settings:
| Dial Name / Action | Description |
|---|---|
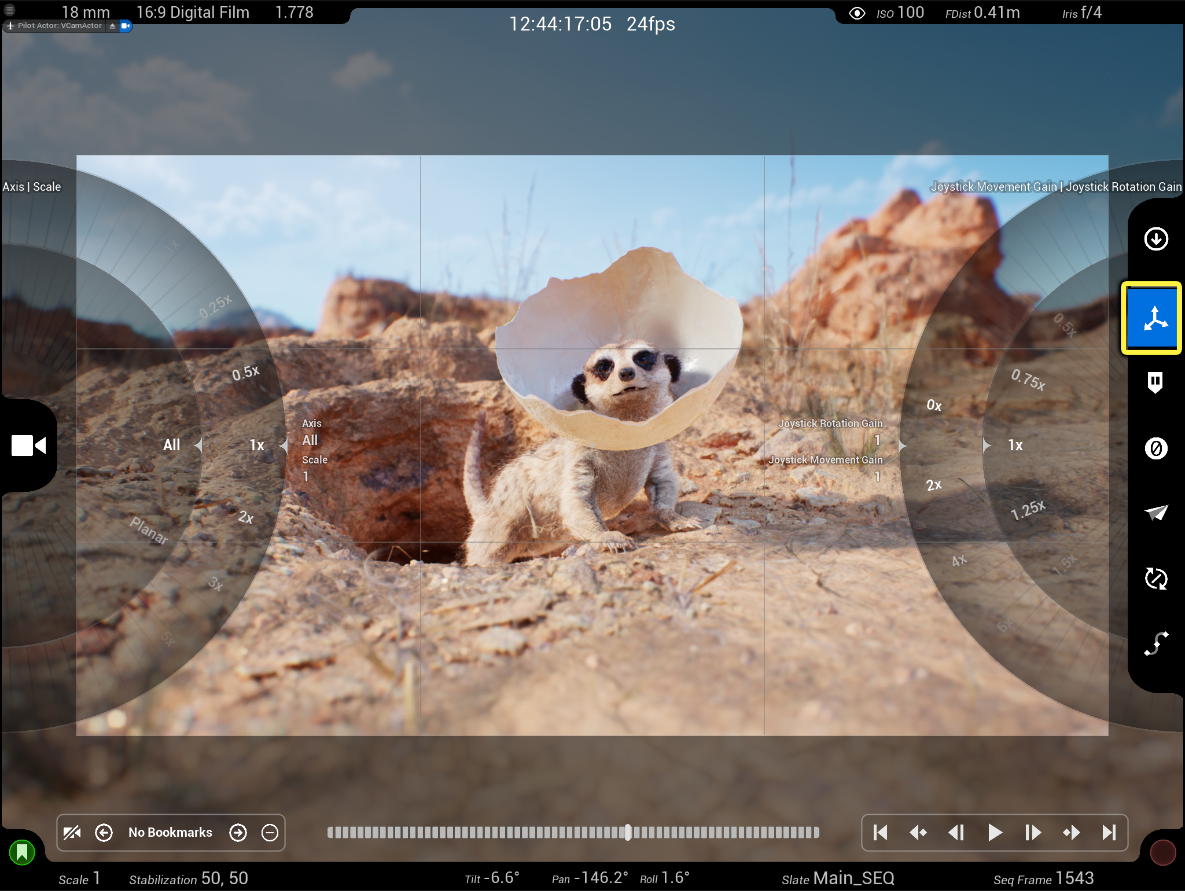
| Left Dials | |
| Axis | Sets the axis constraint for movement:
|
| Scale | Scales the ARKit tracked movement of the device in physical space. The scale adjusts how movements — big and small — are translated from real-world physical space to the virtual camera digital space through Live ink. Small scale values translate as larger physical space movement to smaller digital space movement. Larger scale values translate as smaller physical space movement to larger digital space movement. |
| Right Dials | |
| Joystick Movement Gain | Controls the speed of both the left directional joystick and the right vertical-only joystick movement. |
| Joystick Rotation Gain | Controls the speed of rotation when engaging the right joystick in left or right rotational movement. |
Setting any dial to Locked or 0 restricts movement for being tracked through Live Link or any engagements of the joystick. For example, setting the Axis to Vertical with a Scale set to Locked means that vertical movement cannot happen. Another example is setting the Joystick Rotation Gain to 0 restricts any rotation applied through the joystick.
Sequencer and Bookmarks Settings
The bottom-most section of the Virtual Camera actor includes quick reference to camera settings, camera bookmarks, and Sequencer playback and recording.
| Icon | Dial Name / Action | Description |
|---|---|---|
| Section 1 | ||
 |
Create Bookmark | Creates a bookmark of the current position and rotation and camera settings used by the virtual camera. |
 |
Re-inherit Camera Settings | Bookmarks store camera parameters (such as aperture and focal length). This controls whether you want to load those stored camera parameters or not when jumping to a bookmark. |
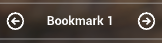 |
Bookmark Navigation | Navigational controls to cycle forward and backwards through any virtual camera bookmarks in the scene. |
 |
Remove Bookmark | Removes the currently selected bookmark from the Live Link VCAM app. The scene actor in your Unreal Engine project will not be removed using this button. |
| Section 2 | ||
 |
Scale | Displays the current scales applied to device movement. For more information, see Virtual Camera Movement with Scale and Gain Settings. |
 |
Stabilization | Displays the amount of stabilization applied to the virtual camera's rotation and location movement. Higher values give more stabilization to movement at the cost of responsiveness creating smoother camera movement. Lower values give less stabilization and are more responsive creating rougher camera movement. For more information, see Virtual Camera Stabilization. |
 |
Tilt, Pan, Roll Orientation | Displays the virtual camera's rotational position. For more information, see Virtual Camera Movement with Scale and Gain Settings. |
| Section 3 | ||
 |
Timeline | Displays the timeline for the currently loaded Sequence in the Unreal Editor. To move the slider to a different frame within the Sequence, drag your finger along the timeline. |
 |
Sequencer Playback Controls | The playback controls function similarly to standard media playback applications with play, skip frame, skip to beginning and end frames, and so on. For more information, see Sequencer Cinematic Editor. |
 |
Slate | Displays the name of the open Sequence. |
 |
Sequencer Frame Counter | Displays the current frame number the timeline is reading. |
 |
Take Recorder | Opens Take Recorder and starts recording of gameplay, live performance, and other sources directly into Unreal Engine. See Take Recorder and Using Take Recorder for more details. |
Virtual Camera Stabilization
You can tap on the Stabilization text to open the virtual camera stabilization dials. These dials affect how much the camera prevents or compensates for unwanted camera movement. Camera movement appears smoother and less responsive when using higher stabilization values. Lower values tend to be more responsive, causing a lot of shake and instability in camera movement.
The Left dial controls Rotation Stabilization, and the Right dial controls Location Stabilization. In the video below, you can see the difference between using a value of 0x, 50x (default), and 100x.
Virtual Camera Bookmarks
Pressing the green Bookmark icon in the bottom-left of the screen on your Live Link-enabled device creates a new VPBookmark Actor in the scene. This actor stores information about the virtual camera, such as its position and rotation. The bookmark also stores any settings that have been adjusted for the camera, such as exposure and lens settings.
You can reload any placed bookmark by using the Bookmark navigation controls in the bottom-left of the screen using the forward and backwards arrows. You can toggle the Camera icon to load the camera parameters stored with this bookmark, such as the aperture, filmback, and focus settings.
You can remove a currently referenced bookmark from the Live Link-enabled device by using the Minus (-) icon. Bookmarks are only removed from the device, not from the scene. Because bookmarks exist as an actor in your Unreal Engine scene, you can also add and remove them manually from the Editor using the Outliner panel.
Controlling a Sequence
When a Sequence is open in the Unreal Editor, you can control the timeline and playback of it using the Transport buttons on your Live Link-connected device. You can use the playback controls for Play, Pause, and the Scrub marker on the timeline to observe the current Sequence's data.
Using Take Recorder with Live Link VCAM App
Take Recorder enables you to record your own Sequences (or shots) of the scene and characters in your Unreal Engine project. These can be played back within Unreal Editor using the Take Recorder and Sequencer for review.
To start recording a shot, tap the Record button in the bottom-right of the Live Link VCAM app.
When you use Take Recorder with the Live Link VCAM app, be aware of these things:
- The Take Recorder window automatically opens in Unreal Engine (if not already open) when a recording is started.
- When you start a recording, the current Level Sequence plays automatically.
- After recording a take, you can click Review the last recording button in the Take Recorder window to see the shot. Reviewing the shot will play back the shot and hide the virtual camera HUD. Exiting review mode unhides the virtual camera HUD.
- All recorded takes are saved as Sequencer Clips. Saving the clip replaces the Virtual Camera actor with a Cine Camera actor since virtual cameras are used to animate the camera and record its settings and movements.
When the Virtual Camera is active, it displays the current Timecode, Slate, and Sequence Frame in the HUD. This data is derived from the Take Recorder window and displays the same information across the Unreal Editor and the Live Link-connected device.
For more information about using Take Recorder in a project, see: