
Movie Render Queue is Unreal Engine's image sequence and movie rendering solution. It is built for high-quality rendered images, simplified integration into production pipelines, and user extensibility.
Movie Render Queue supports several features for producing high-quality renders, such as its temporal subsampling feature which helps you produce high-quality radial motion blurs. You can also export images containing translucent pixel values (using appropriate project / scene settings), generate 16-bit HDR images with linear data, and save render configurations into assets that you can reuse and share. Multiple jobs and their settings can be managed at once using the render queue, which supports the running of batch rendering jobs.
Prerequisites
-
Movie Render Queue is a plugin that must be enabled prior to use. From the Unreal Engine main menu, go to Edit > Plugins, locate Movie Render Queue in the Rendering section, and enable it. You will need to restart the editor afterward.

- You have created a project with a Level Sequence for you to render. If you have not yet created a project, Samples and Tutorials and Meerkat Demo are also pre-made content examples that are available for use.
Opening Movie Render Queue
You can open the Movie Render Queue window two different ways:
- From Unreal Engine's main menu, go to Window > Cinematics > Movie Render Queue.
-
From Sequencer, click the vertical ellipsis next to the Render Movie button in the toolbar, then select Movie Render Queue from the dropdown and click the Render Movie button.

After following one of the two options above, the Movie Render Queue window will now be open.
Click the image for full size.
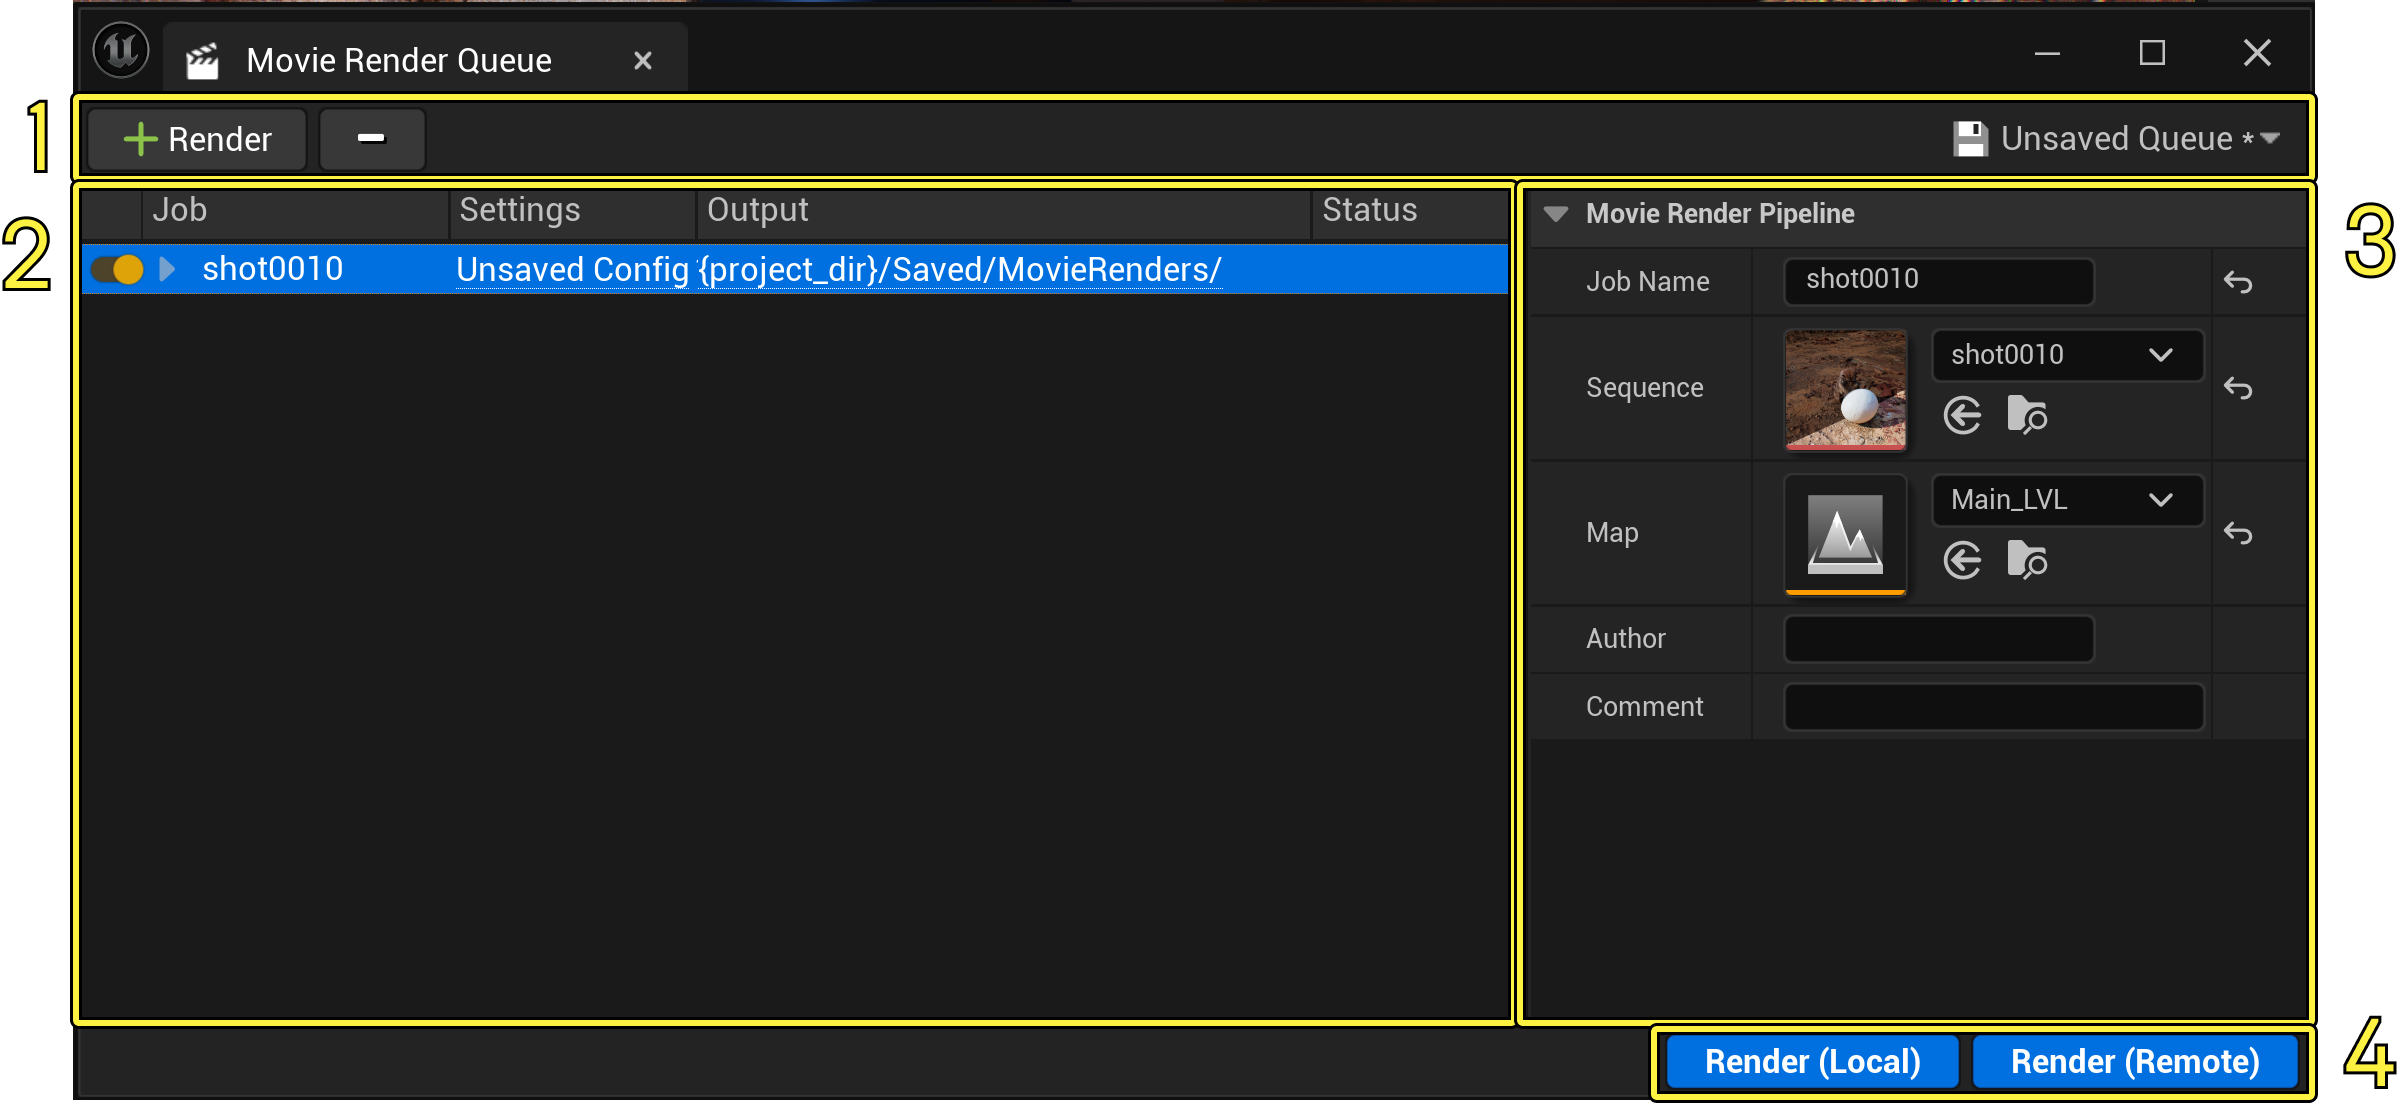
Interface Overview
The Movie Render Queue interface contains four main areas:
-
Toolbar: Contains a menu for adding or removing render jobs and loading or saving the current job list.
-
Jobs: Displays the sequences to render in the order in which they are queued. Each top-level item in the list is considered a job. These items also contain the configuration settings for each job.
-
Job Details: Details for the selected job. Lists the name, the level sequence asset, the level to run during the job, and the author of this job.
-
Start Render: Starts the render either locally on your machine, or in a separate process on your machine.
Toolbar
The toolbar contains the menu for adding and removing jobs. To add a new sequence to the render queue, click the + Render button and select a Level Sequence Asset. Sequences can also be added to your job list by dragging them from the Content Browser to the job region.

To remove a sequence from the job list, select the job, then click the - button on the toolbar or press the delete key on your keyboard
You can also save your current job list as a Queue Preset asset from the Toolbar. Click the Unsaved Queue button and, then select Save Queue As. You will then be prompted to name and save the Movie Pipeline Queue asset somewhere in your project.

The text of the Unsaved Queue button will now change to the name of your Movie Pipeline Queue asset.
All Movie Pipeline Queue assets you create are listed under this menu. Selecting a queue asset sets your job list to match the saved preset. This imports a copy of the queue into the jobs area. Changes made to the job list will not affect the asset unless you save them by selecting Save Queue in this menu.

Jobs
The jobs area contains a list of the Level sequences that will be rendered, along with their render settings and output directory.
Clicking the Settings entry for a job opens the settings window, where you can specify your render settings, output directory, and export format.

In the main toolbar of this window, click the + Setting button to open a list of settings. Click a setting to toggle it on or off for this render configuration. You will then be able to further configure this setting.
You can apply saved presets to your job by clicking the *Unsaved Config button and selecting a preset.
The Output entry for a job is a link to the folder where your images or videos will be rendered to, as set in the output setting. Clicking here will open a File Explorer window with this folder targeted.

Visit the Render Settings page for more information on customizing your renders.
Job Details
When a job is selected, you can view its details in the job details area.

This area lists the following fields for the selected job:
| Name | Description |
|---|---|
| Job Name | The name of the job. This is set to the name of the level sequence asset by default but can be modified. The Job Name field is also displayed in the default Burn In overlay. |
| Sequence | The sequence asset reference. You can change which sequence is referenced here if you want to specify a different sequence for the job. |
| Map | The level to run when rendering. If your sequence uses Spawnables, you can render the same scene in different Levels. |
| Author | The author of the job. This field is blank by default. |
| Comment | Optional field for comments. This field is blank by default. |
Start Render
There are two buttons you can click to start rendering:
-
Render (Local) renders in the same process as Unreal Engine and launches a Play in Editor session to render from. You do not need to save your changes when performing a local render.
-
Render (Remote) launches a separate process that renders your jobs. You must save your changes in the project so the external process can read the saved files from disk.
The Remote option can be used to implement a remote render farm. The default behaviors of the render options are determined by the Project Settings and can be adjusted to run your own code, which is helpful when using third party-render farm management software. Additionally, the command used to launch the remote render process is written to the Output Log, which can be used as reference when building your own automated render farms.
Because you specify the Level asset to render in the Job Details, you do not need to have that same Level open when rendering. Movie Render Queue will automatically open the specified Levels when running the render job.
Render Preview
When a render job is running, Movie Render Queue will display a render preview window showing you the current visual state of the render with relevant information. The preview window will automatically close when the render is complete.

-
Render Preview: This view shows the current visual status of the render. As each frame is displayed here, they are also being saved to your output directory. The preview here is based on the latest sample data from your GPU and may appear at a lower quality than the final render. If you have enabled Tiling for your render, then the preview will only display the bottom-right corner tile.
-
Overall Render Progress: These details show the current sequence that is being rendered, as well as the overall progress, elapsed time, and estimated time remaining.
-
Current Camera Cut Progress: These details show the current camera being rendered, as well as the progress for the current camera cut.
Creating a Basic Render
You can create a basic render of your cinematic sequence by following these steps.
Job Setup
-
Open the Movie Render Queue tool. From the main menu, go to Window > Cinematics > Movie Render Queue.
-
Add your sequence asset to the job list by clicking the + Render button and selecting your sequence.

-
Make sure that the correct Level is set in the Map property.

Output Settings
Once your sequence is added, you may want to adjust some of the output settings such as the destination folder, resolution, and file type.
In the Settings column, click Unsaved Config to open the Render Settings window for that job.

By default, Movie Render Queue will render out to a sequence of .jpg images. If you want to change this, you can delete the .jpg Sequence [8bit] entry and click the + Setting button to pick a different output format.
Select the .jpg Sequence [8bit] entry and press Delete, then click the + Setting button and select .png Sequence [8bit].

The Deferred Rendering entry will cause the output to render the exact image you see in your viewport. For basic renders like this, you can leave this setting as-is, but it must exist here in order for your image to render.

Clicking Output will reveal typical output-related settings such as file name, directory, and resolution.
If you want to change the Output Directory field, click the … button next to the entry, navigate to a new folder, and press Select Folder. Your image sequence will now output here.

Close the Render Settings window once you are done making changes.
Render
You can now render your sequence.
Click Render (Local) to start the render job for your sequence. A Render Preview window will appear showing your current render progress.

Once the render has completed, the preview window will close. You can now navigate to the output folder by clicking the linked output text for your job and view your output image sequence.
(convert:false)
Usage in Blueprints
You can use Movie Render Queue to render movies in runtime builds and output files to a user's computer using Blueprints. Visit the Movie Render Queue in Runtime Builds to learn more.