When creating your cinematic sequences, you may want to blend gameplay animation to or from animation inside your Level Sequence. Typically this is done to create seamless transitions into and out of a cinematic, which includes blending both the player animation and the player camera.
This document provides instructions on workflows and considerations you can use to blend player and camera animations between Sequencer and gameplay.
Prerequisites
- You have a controllable player character in your project. For this document, the Third Person Template is used as an example.
- You have created your cinematic sequence and you are ready to blend it to gameplay.
- You are familiar with how to reference the player in Sequencer.
Animation Blueprint Setup
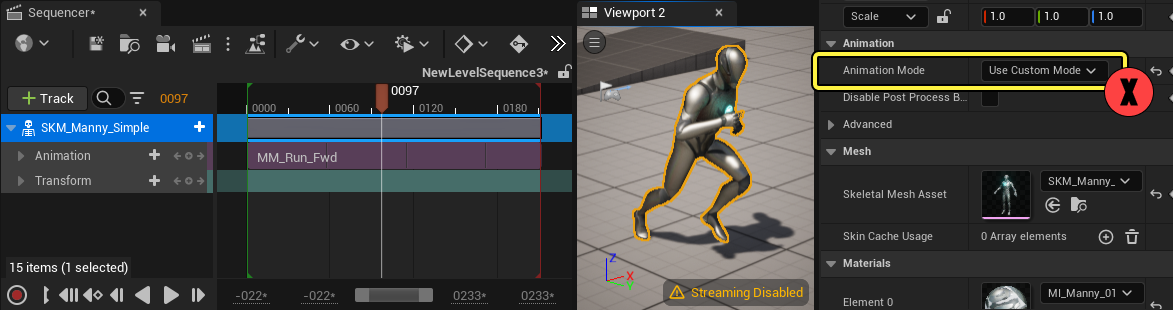
Normally when animating characters in Sequencer, the Animation Mode property automatically changes to Use Custom Mode. Custom Mode is a special Sequencer-specific Animation Blueprint, different from the one used to animate the player in gameplay. In order to blend characters between Sequencer to Gameplay, you cannot use Custom Mode, and must instead use the same Animation Blueprint the character uses in gameplay.
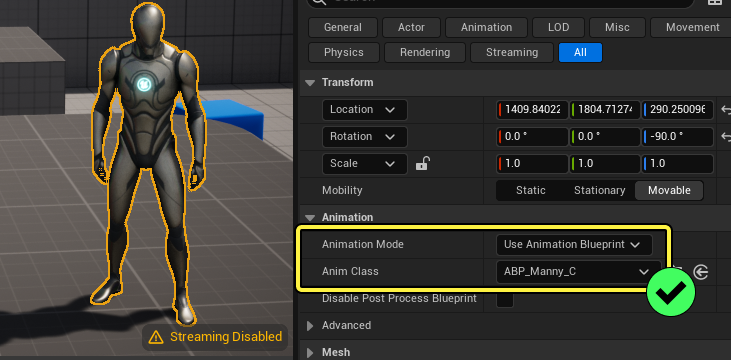
You can ensure this by referencing the player Character Blueprint in your Sequence, which should have Animation Mode set to the gameplay Animation Blueprint. If not, then you can manually set this property by selecting the character, navigating to the Details panel, and doing the following:
- Set Animation Mode to Use Animation Blueprint.
- Set Anim Class to the Animation Blueprint used in gameplay. In the case of the Third Person Template, it is ABP_Manny_C.
When an Animation Blueprint is explicitly set, Sequencer will not override this property to Use Custom Mode.
Slot Setup
When animating characters in Sequencer using their Animation Blueprint, you must ensure that Animation Blueprint contains Slots, which provide a way to inject animation into the Anim Graph. Although mainly used to play animations from Montages, you can also use Slots to play animation from Sequencer.
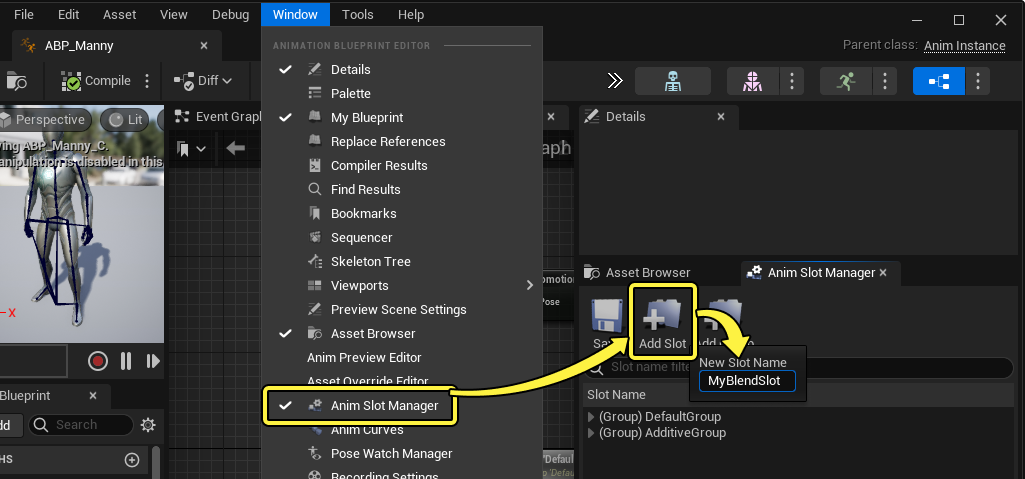
To create a new Slot, open the Animation Blueprint for the character you want to blend, and do the following:
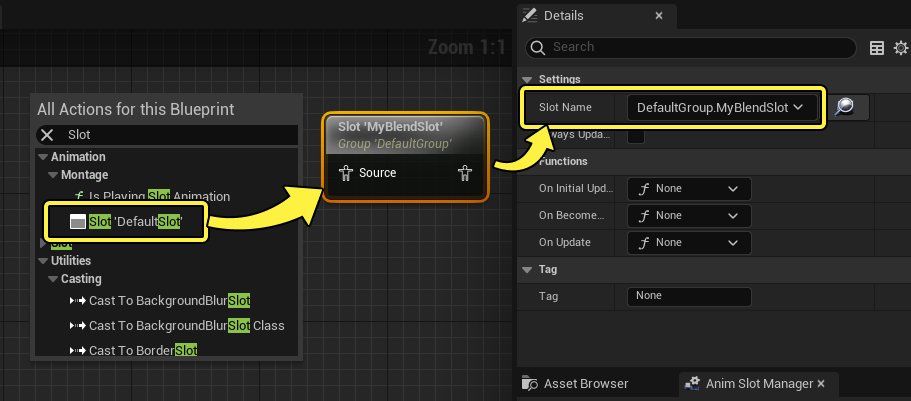
- Click Window and enable Anim Slot Manager, if it is not already enabled.
- In the Anim Slot Manager, click Add Slot.
- Type the name of your new Slot and press Enter.
Slots are stored on the Skeleton, therefore, when you are creating or changing Slots, you are also editing the Skeleton. Clicking Save in the Anim Slot Manager will save the Skeleton when you make any Slot changes.
Next, reference the Slot in your Anim Graph.
- Right-click in the graph and add a Slot 'DefaultSlot' node.
- Select the node and in the Details panel, set Slot Name to the name of the Slot you created earlier.
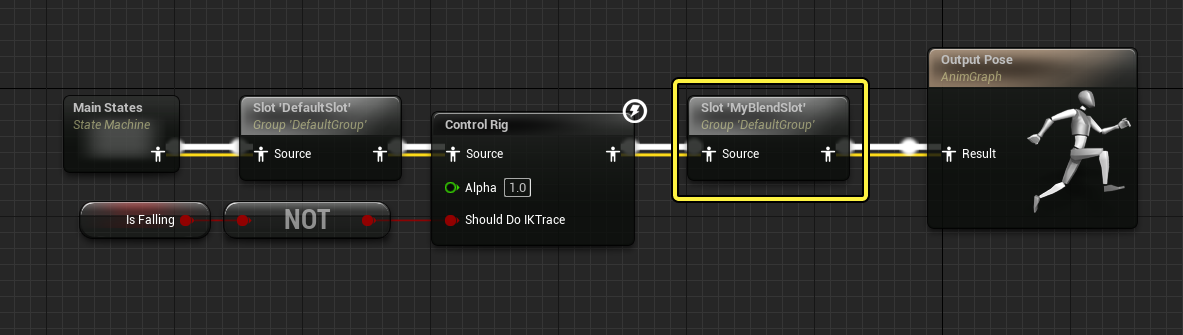
In addition to making the slot, also consider where in the Anim Graph it should be inserted. For most simple blends, it is best to place it as the final node before Output Pose, however there may be cases where it would be better to place it earlier in the Anim Graph logic chain to take advantage of procedural effects.
For this example, connect the Slot node between the Animation Blueprint logic and Output Pose.
Blending to Idle
One of the most common seamless blends to create is blending a cinematic to gameplay with the player character ending in their default idle locomotion pose. As stated in the prerequisites, this guide assumes your animation and Sequencer content already exists. This includes:
-
Character animation where the character ends at the component root coordinates and matches the gameplay idle pose.
-
Camera animation which ends in the approximate location of the gameplay camera.
Character Setup in Sequencer
To make the player character blend correctly, do the following operations in Sequencer:
-
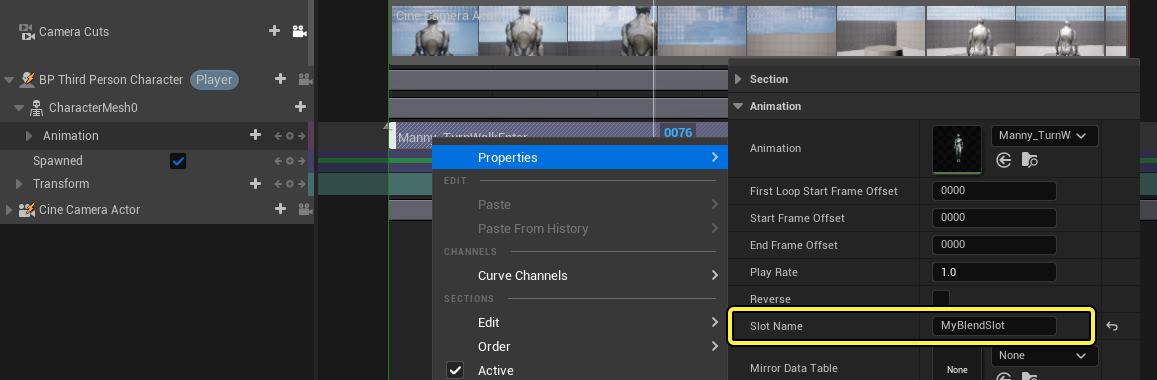
Right click the animation section, navigate to the Properties menu, and set Slot Name to the name of the Slot you created earlier.
-
Drag on the upper-right corner of the animation section to create a blend out region at the end of the animation. Although the ending pose of this animation might match the gameplay pose, this can still help to ensure the character does not "pop" when the Sequencer animation finishes.
-
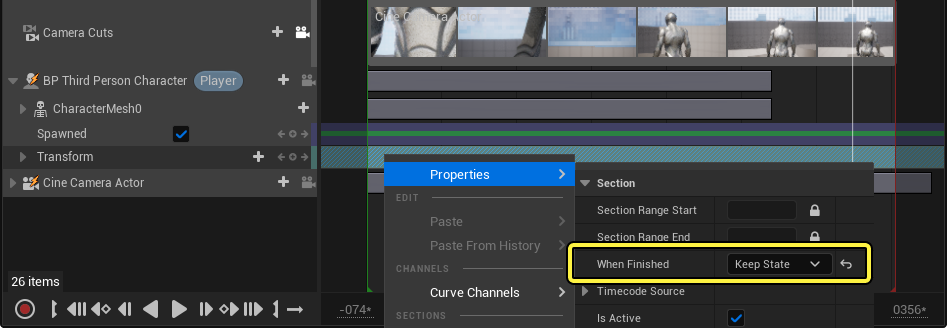
Right click on the character's transform section, navigate to the Properties menu, and set When Finished to Keep State. This is required to ensure the character remains at the same position when Sequencer finishes.
Camera Setup in Sequencer
To make the cinematic camera blend correctly to the gameplay camera, do the following operations in Sequencer:
-
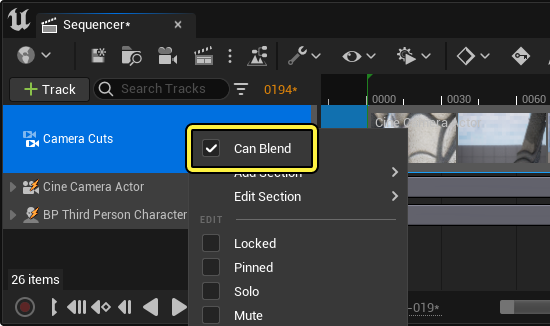
Right-click on the Camera Cut Track and enable Can Blend.
-
Similar to blending the animation section, drag on the upper-right corner of the camera cut section to create a blend out region at the end of the camera animation.
-
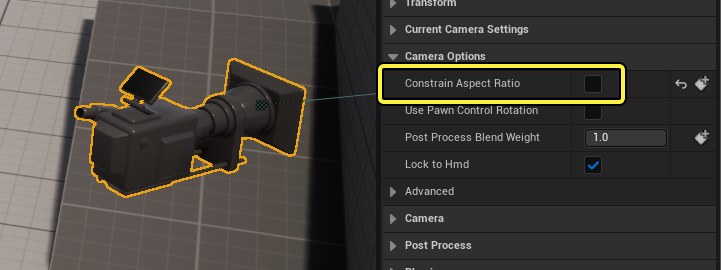
Select the Cine Camera Actor and disable Constrain Aspect Ratio in the Details panel.
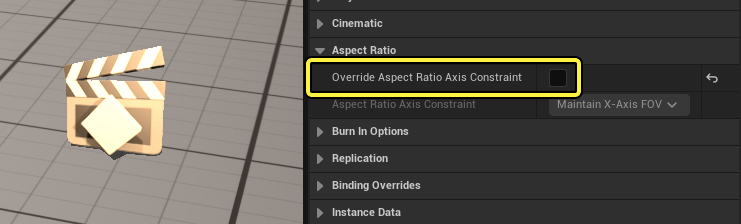
You may also need to select the Level Sequence Actor and disable Override Aspect Ratio Axis Constraint to prevent abrupt field of view changes, if your gameplay camera uses a different axis constraint.
Blending Idle Results
When playing this sequence at runtime, you should see your character blend from Sequencer to gameplay. Again, this guide assumes you are familiar with how to reference the player in Sequencer.
Additional Considerations
To improve the quality of your Sequencer blends, consider the following factors in your project:
Uneven Terrain
Blending character animation on flat surfaces typically requires simple blend logic and Slot placement in your Anim Graph. However, if your gameplay Animation Blueprint contains logic for IK feet placement on uneven surfaces, then you may need to reconsider where the blending Slot is placed in the Anim Graph. Otherwise, your character may exhibit a noticeable adjustment to this terrain as the cinematic animation blends out.
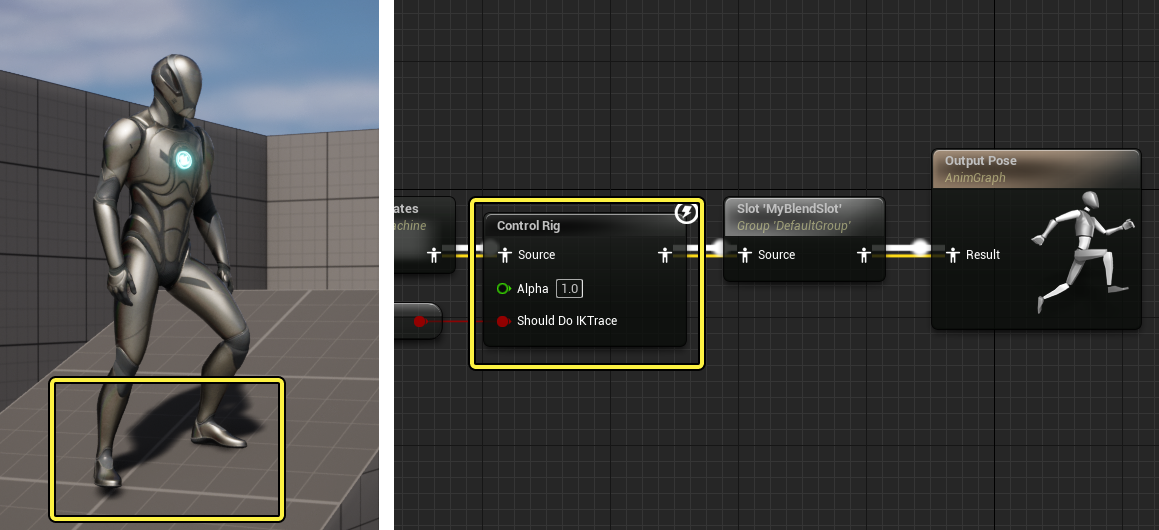
For example, in the Third Person Template, the Mannequin procedurally adjusts to uneven surfaces using IK logic in the Control Rig node.
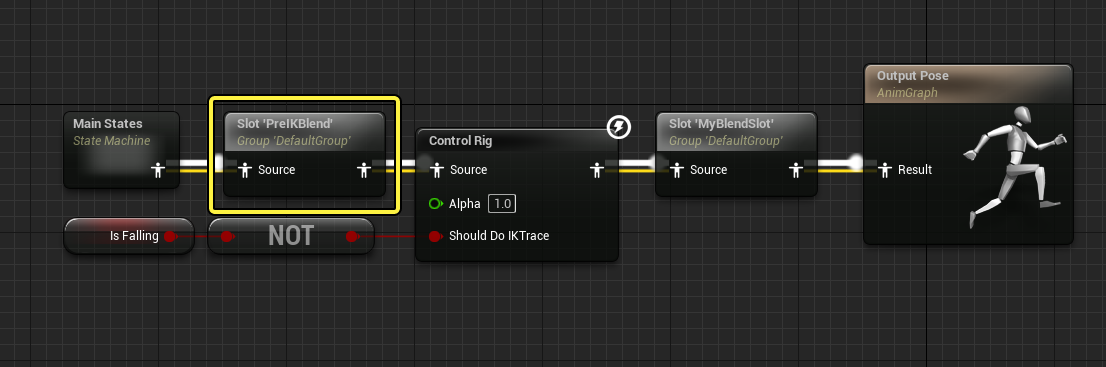
If your blend occurs on an uneven surface, then you may want to move or create a new Slot that executes before the IK adjustment node in the Anim Graph. When the IK adjustment occurs afterward, it will take into account the animation from that Slot.
When your animation in Sequencer uses that Slot, you should see appropriate procedural adjustments as the animation plays.
Suppressing and Restoring Input
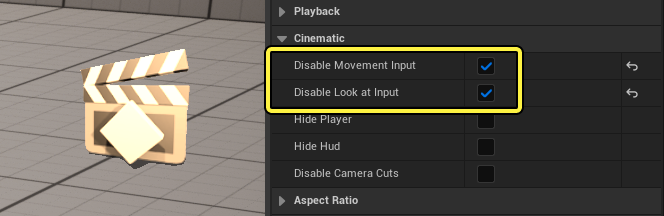
During most blends, you may want to suppress controller input to prevent conflicts between the controller and Sequencer as the blending sequence plays. The main way you can do this is to select the Level Sequence Actor, and in the Details panel enable the following:
- Disable Movement Input, which disables gameplay movement on the character.
- Disable Look at Input, which disables gameplay camera control on the character.
This suppresses all input for the duration of the sequence.
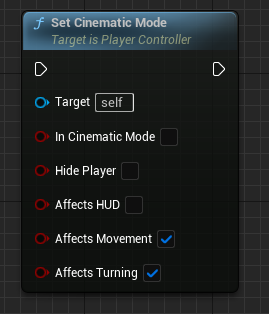
In cases where you want to have precise control over when player input can be restricted and released, you can also use the Set Cinematic Mode function to manually control input.
As an example of more nuanced input management, you may want to release control of the player before the blend sequence ends. You can do this by doing the following:
-
Right-click the character's transform section, navigate to the Properties menu, and unlock Section Range End. Then, drag the end time of the transform section to the point where you want control released. This is necessary because the transform section continuously evaluates as the sequence plays, holding the character in place. Ending it early makes it no longer evaluate.
-
Create an Event Track keyframe at the same time as the end of the transform section with the following logic:
- The event executes Set Cinematic Mode.
- Target is connected to Get Player Controller, which then connects to Get Player State.
- Disable In Cinematic Mode.
- Enable both Affects Movement and Affects Turning.
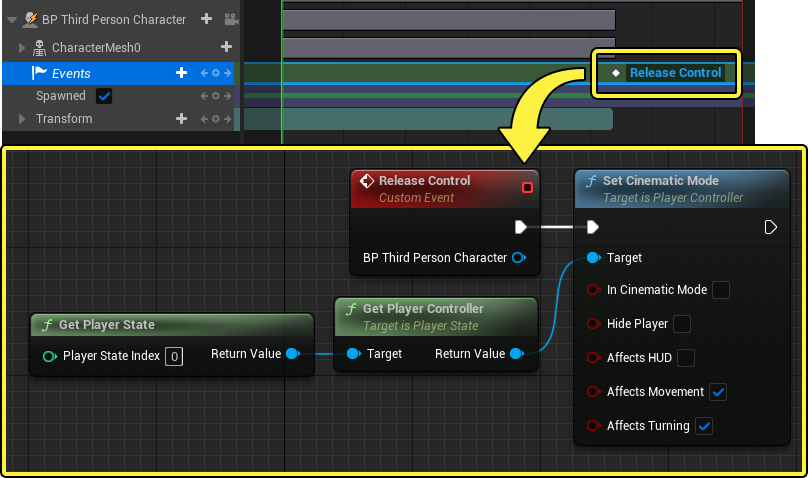
Now when you play your cinematic, player control should restore before the sequence ends. This can sometimes make for a smoother and more natural gameplay experience for the player.
Gameplay Camera Direction
For games with free-moving camera controls, such as the one used in the Third Person Template, the gameplay camera sometimes might not face in the direction you want when blending out.
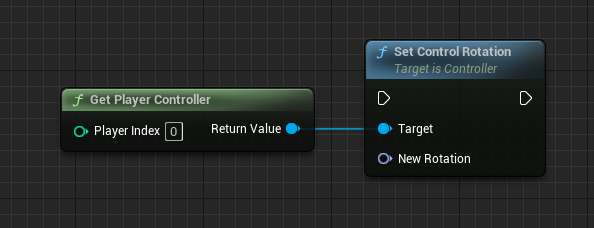
You can manually set the direction of the gameplay camera by using Get Player Controller and Set Control Rotation.
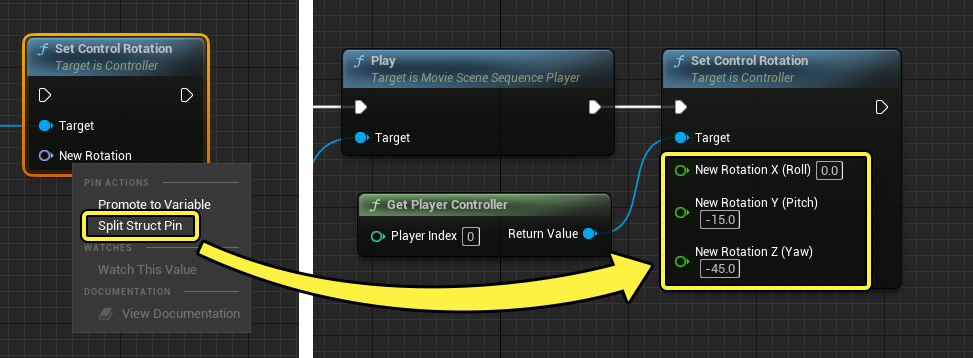
Right-click the New Rotation pin and select Split Struct Pin to view all rotation axes available and set the rotation values on the node. For this example, create the following logic:
- Execute Set Control Rotation after the sequence starts to play.
- Set New Rotation Y to -15, to pitch the camera slightly downward.
- Set New Rotation Z to -45, to laterally rotate the camera and face the intended direction.
Now when you play your cinematic, the camera blends out facing your intended direction.