
この操作チュートリアルでは Spring Arm コンポーネント を追加して、 Camera コンポーネント と親子関係を設定します。Spring Arm コンポーネントの機能を利用すると、ゲームプレイの状況に応じてカメラの距離を伸縮できます。通常、サードパーソンのパースペクティブを実現する場合は、キャラクターにカメラを追加します。その際に Spring Arm を含めることで、レベル ジオメトリやその他のオブジェクトがカメラを遮った状況で、どのようにカメラを処理するかを自動で制御できます。
この操作チュートリアルでは Spring Arm コンポーネント (USpringArmComponent) を追加して、 Camera コンポーネント と親子関係を設定します。Spring Arm コンポーネントの機能を利用すると、ゲームプレイの状況に応じてカメラの距離を伸縮できます。通常、サードパーソンのパースペクティブを実現する場合は、キャラクターにカメラを追加します。その際に Spring Arm を含めることで、レベル ジオメトリやその他のオブジェクトがカメラを遮った状況で、どのようにカメラを処理するかを自動で制御できます。
このチュートリアルでは Camera コンポーネントが割り当てられていることを前提に、独自のキャラクターを使用することができます。キャラクターがない場合、このガイドで使用する基本的なキャラクターを作成するために、まず カメラ コンポーネントを使用する チュートリアルを完了することをお勧めします。
Spring Arm の設定によっては、レベル内のオブジェクトを貫通するカメラのすべてのインスタンスが排除されるわけではありませんが、カメラが遮られたときにカメラの位置を自動的に移動し、カメラが遮蔽から解放されたときにデフォルトの位置に戻すことで、それらを減らすのに役立ちます。
Spring Arm コンポーネントを作成する
-
「カメラ コンポーネントを使用する」ガイド チュートリアル プロジェクトから引き続き、BP_CameraCharacter ブループリントを開きます。
-
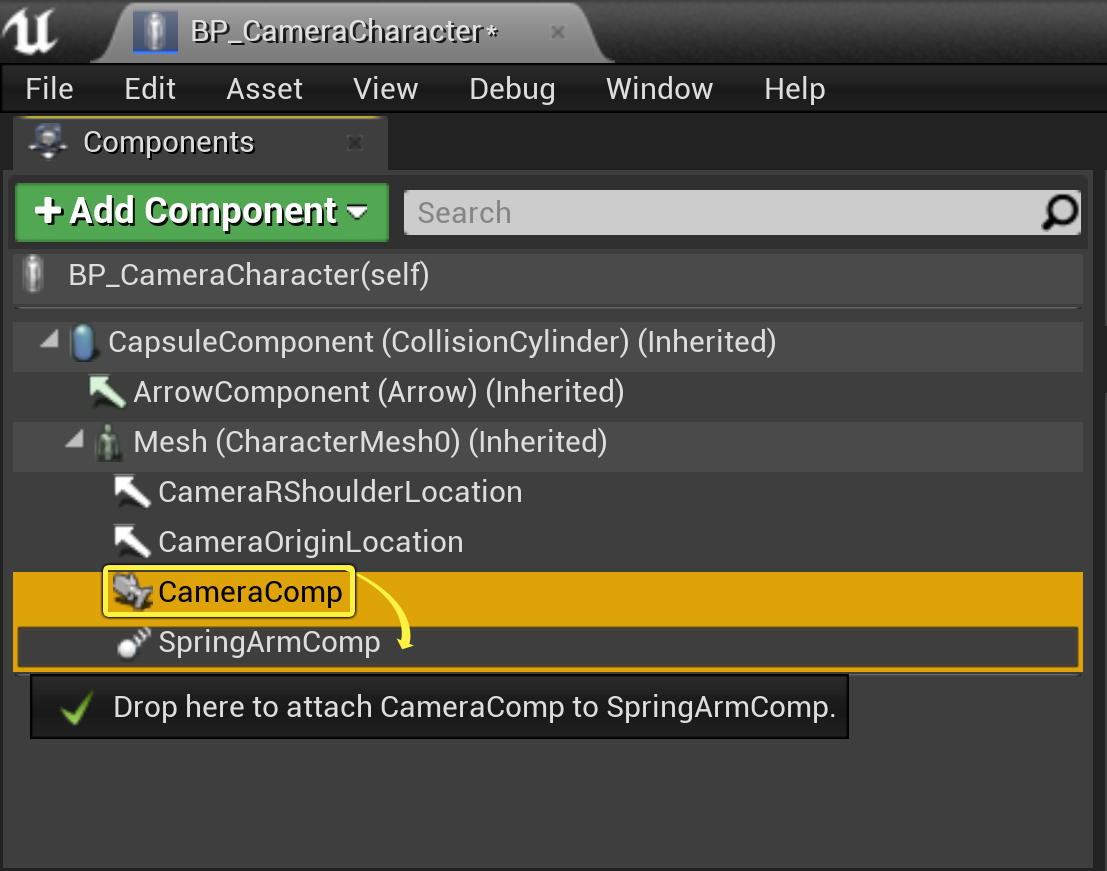
[Components (コンポーネント)] タブで [Add Component (コンポーネントを追加)] ボタンをクリックし、「Spring Arm Component」と検索してから選択します。このコンポーネントの名前を 「SpringArmComp」 に変更します。

-
[Components (コンポーネント)] タブで CameraComp コンポーネント を Spring Arm コンポーネント の上にドラッグし、アタッチします
-
[Components (コンポーネント)] タブで SpringArmComp を選択し、その状態で [Details (詳細)] パネルに移動します。こちらには Spring Arm コンポーネント に対して有効なさまざまな設定があります。それぞれの概要を以下に示します。
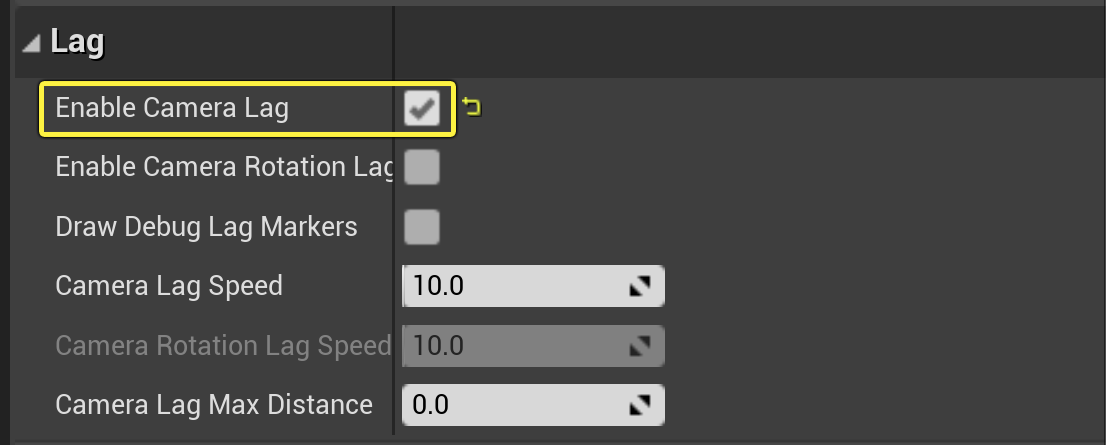
セクション 説明 Sockets スケルタル メッシュ の ボーン や ソケット と、Spring Arm の親子関係を設定する機能を提供します。 Camera コリジョンが発生しないときの Spring Arm の長さを設定し、 オフセット も設定します。 Camera Collision コリジョンを確認するかどうかを設定し、さらにコリジョンを確認するクエリ プローブの大きさを定義します。 Camera Settings 親や [Use Pawn Control Rotation] から Pitch (ピッチ)、 Yaw (ヨー) 、 Roll (ロール) を継承するかどうかを設定します。 Lag カメラをターゲット位置より遅延させるかどうかと、その他の遅延に関連する設定を行います。 -
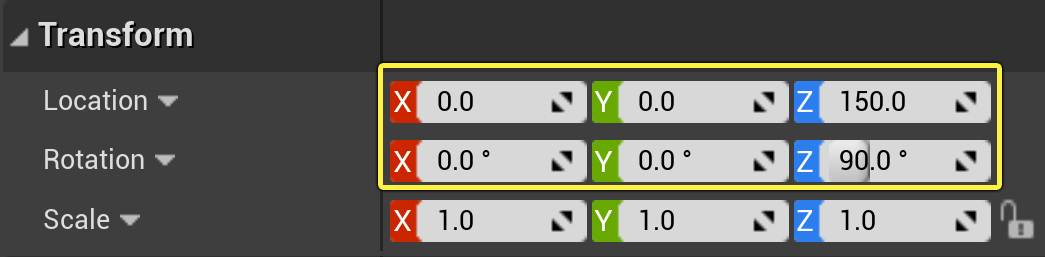
Transform カテゴリで、 Location 値を (0,0,150) に、 Rotation 値を (0,0,90) に変更します。
-
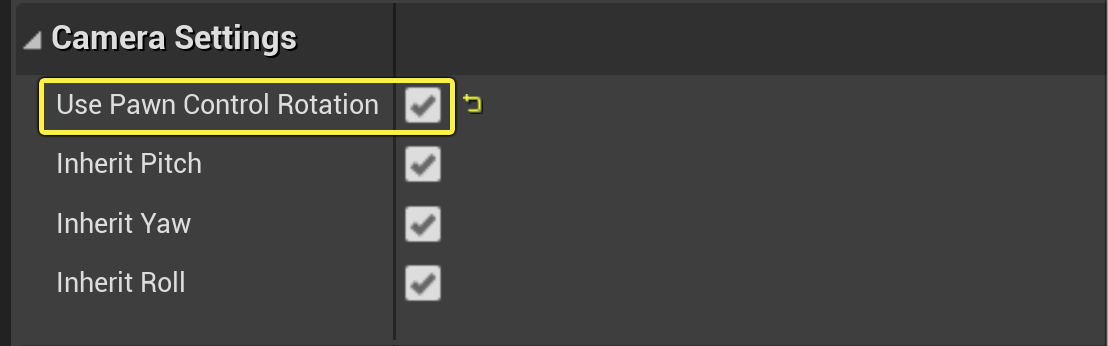
Camera Settings カテゴリで Use Pawn Control Rotation 変数の隣にあるチェックボックスをクリックします。これを有効化すると、 Spring Arm コンポーネント の親はポーン (使用している CameraCharacter ) のビュー/コントロール回転を使用します。
-
Lag カテゴリで Enable Camera Lag 変数の隣にあるチェックボックスをクリックします。これを有効化するとカメラをターゲット位置より遅延させて、動きを滑らかにします。
-
「カメラ コンポーネントを使用する」ガイド チュートリアル プロジェクトから引き続き、
CameraCharacter.hを開いてクラス定義で以下を宣言します。UPROPERTY(EditDefaultsOnly,BlueprintReadWrite) class USpringArmComponent* SpringArmComp; -
CameraCharacter.Cppに移動し、以下のクラス ライブラリをインクルードします。#include "GameFramework/SpringArmComponent.h" -
次に ACameraCharacter::ACameraCharacter コンストラクタで以下のコードを宣言します。
//Instantiating Class Components SpringArmComp = CreateDefaultSubobject<USpringArmComponent>(TEXT("SpringArmComp")); //Attach the Spring Arm to the Character's Skeletal Mesh Component SpringArmComp->SetupAttachment(GetMesh()); //Attach the Camera to the SpringArmComponent CameraComp->AttachToComponent(SpringArmComp, FAttachmentTransformRules::KeepRelativeTransform); //Setting default properties of the SpringArmComp SpringArmComp->bUsePawnControlRotation = true; SpringArmComp->bEnableCameraLag = true; SpringArmComp->TargetArmLength = 300.0f; -
コードを コンパイル します。
-
コンテンツ ブラウザ で BP_CameraCharacter をダブルクリックして Class Defaults を開きます。次に [Components (コンポーネント)] タブに移動して SpringArmComp を選択します。
こちらには Spring Arm コンポーネント に対して有効な、さまざまな設定があります。それぞれの概要を以下に示します。
/** The name of the socket at the end of the spring arm (looking back towards the spring arm origin) */
static const FName SocketName;
/** Natural length of the spring arm when there are no collisions */
UPROPERTY(EditAnywhere, BlueprintReadWrite, Category=Camera)
float TargetArmLength;
/** offset at end of spring arm; use this instead of the relative offset of the attached component to ensure the line trace works as desired */
UPROPERTY(EditAnywhere, BlueprintReadWrite, Category=Camera)
FVector SocketOffset;
/** Offset at the start of the spring, applied in world space.Use this if you want a world-space offset from the parent component instead of the usual relative-space offset. */
UPROPERTY(EditAnywhere, BlueprintReadWrite, Category=Camera)
FVector TargetOffset;
/** How big should the query probe sphere be (in unreal units) */
UPROPERTY(EditAnywhere, BlueprintReadWrite, Category=CameraCollision, meta=(editcondition="bDoCollisionTest"))
float ProbeSize;
/** Collision channel of the query probe (defaults to ECC_Camera) */
UPROPERTY(EditAnywhere, BlueprintReadWrite, Category=CameraCollision, meta=(editcondition="bDoCollisionTest"))
TEnumAsByte<ECollisionChannel> ProbeChannel;
/** If true, do a collision test using ProbeChannel and ProbeSize to prevent camera clipping into level. */
UPROPERTY(EditAnywhere, BlueprintReadWrite, Category=CameraCollision)
uint32 bDoCollisionTest:1;
/**If this component is placed on a pawn, should it use the view/control rotation of the pawn where possible?
* When disabled, the component will revert to using the stored RelativeRotation of the component.**/
UPROPERTY(EditAnywhere, BlueprintReadWrite, Category=CameraSettings)
uint32 bUsePawnControlRotation:1;
/** Should we inherit pitch from the parent component.Does nothing if using Absolute Rotation. */
UPROPERTY(EditAnywhere, BlueprintReadWrite, Category=CameraSettings)
uint32 bInheritPitch :1;
/** Should we inherit yaw from the parent component.Does nothing if using Absolute Rotation. */
UPROPERTY(EditAnywhere, BlueprintReadWrite, Category=CameraSettings)
uint32 bInheritYaw :1;
/** Should we inherit roll from the parent component.Does nothing if using Absolute Rotation. */
UPROPERTY(EditAnywhere, BlueprintReadWrite, Category=CameraSettings)
uint32 bInheritRoll :1;
/**
* If true, the camera lags behind the target position to smooth its movement.
* @see CameraLagSpeed
*/
UPROPERTY(EditAnywhere, BlueprintReadWrite, Category=Lag)
uint32 bEnableCameraLag :1;
/**
* If true, the camera lags behind target rotation to smooth its movement.
* @see CameraRotationLagSpeed
*/
UPROPERTY(EditAnywhere, BlueprintReadWrite, Category=Lag)
uint32 bEnableCameraRotationLag :1;
/**
* If bUseCameraLagSubstepping is true, sub-step camera damping so that it handles fluctuating frame rates well (though this comes at a cost).
* @see CameraLagMaxTimeStep
*/
UPROPERTY(EditAnywhere, BlueprintReadWrite, Category = Lag, AdvancedDisplay)
uint32 bUseCameraLagSubstepping :1;
/**
* If true and camera location lag is enabled, draws markers at the camera target (in green) and the lagged position (in yellow).
* A line is drawn between the two locations, in green normally but in red if the distance to the lag target has been clamped (by CameraLagMaxDistance).
*/
UPROPERTY(EditAnywhere, BlueprintReadWrite, Category=Lag)
uint32 bDrawDebugLagMarkers :1;
/** If bEnableCameraLag is true, controls how quickly the camera reaches the target position.Low values are slower (more lag), high values are faster (less lag), while zero is instant (no lag). */
UPROPERTY(EditAnywhere, BlueprintReadWrite, Category=Lag, meta=(editcondition="bEnableCameraLag", ClampMin="0.0", ClampMax="1000.0", UIMin = "0.0", UIMax = "1000.0"))
float CameraLagSpeed;
/** If bEnableCameraRotationLag is true, controls how quickly the camera reaches the target position.Low values are slower (more lag), high values are faster (less lag), while zero is instant (no lag). */
UPROPERTY(EditAnywhere, BlueprintReadWrite, Category=Lag, meta=(editcondition = "bEnableCameraRotationLag", ClampMin="0.0", ClampMax="1000.0", UIMin = "0.0", UIMax = "1000.0"))
float CameraRotationLagSpeed;
/** Max time step used when sub-stepping camera lag. */
UPROPERTY(EditAnywhere, BlueprintReadWrite, Category = Lag, AdvancedDisplay, meta=(editcondition = "bUseCameraLagSubstepping", ClampMin="0.005", ClampMax="0.5", UIMin = "0.005", UIMax = "0.5"))
float CameraLagMaxTimeStep;
/** Max distance the camera target may lag behind the current location.If set to zero, no max distance is enforced. */
UPROPERTY(EditAnywhere, BlueprintReadWrite, Category=Lag, meta=(editcondition="bEnableCameraLag", ClampMin="0.0", UIMin = "0.0"))
float CameraLagMaxDistance;
Character Input を設定する
新しく実装した Spring Arm コンポーネントの動作をテストする際は、Character クラスに Movement Input を追加する必要があります。
-
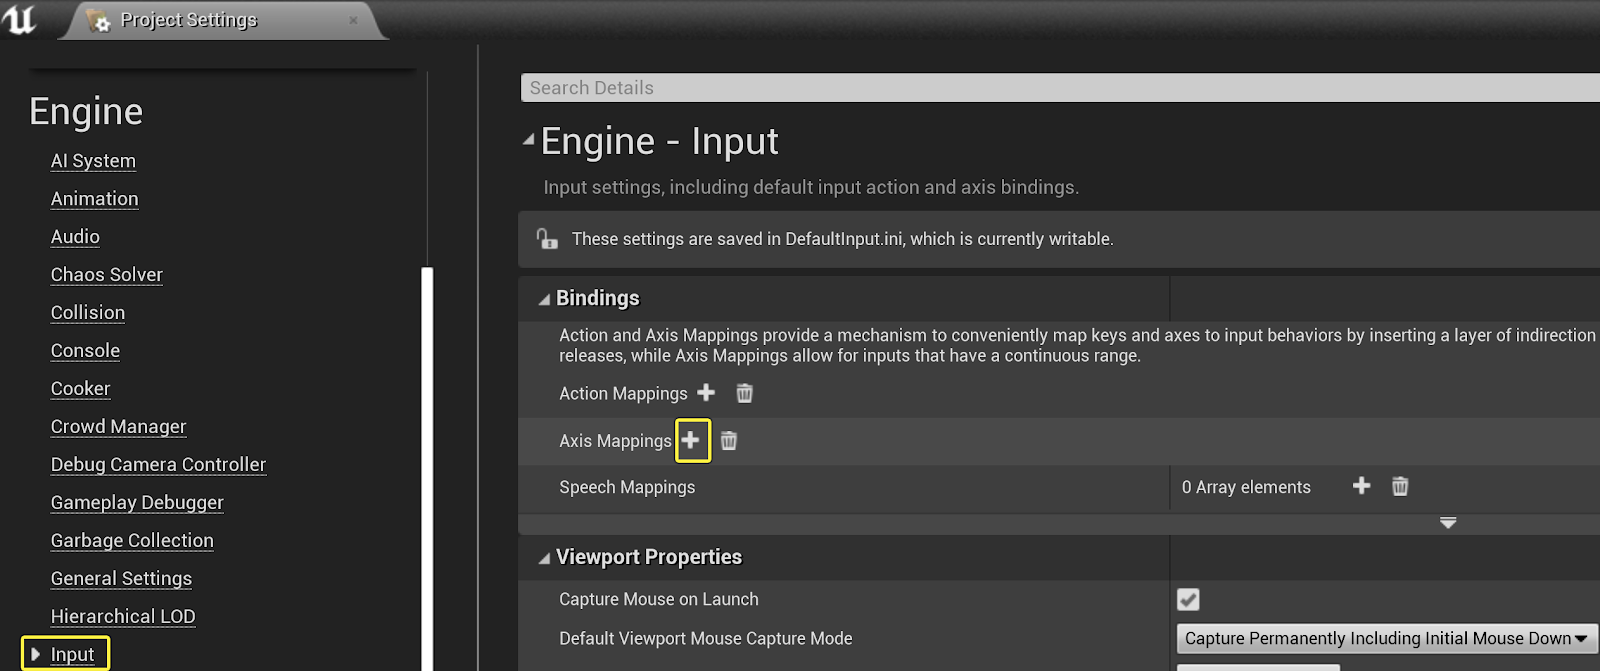
まず最初に [Edit (編集)] > [Project Settings (プロジェクト設定)] > [Engine (エンジン)] > [Input (インプット)] に移動してから、 [Bindings (バインディング)] カテゴリで [Axis Mappings (軸マッピング)] の隣にある [+] マークをクリックし、新しい Axis Input を作成します。

-
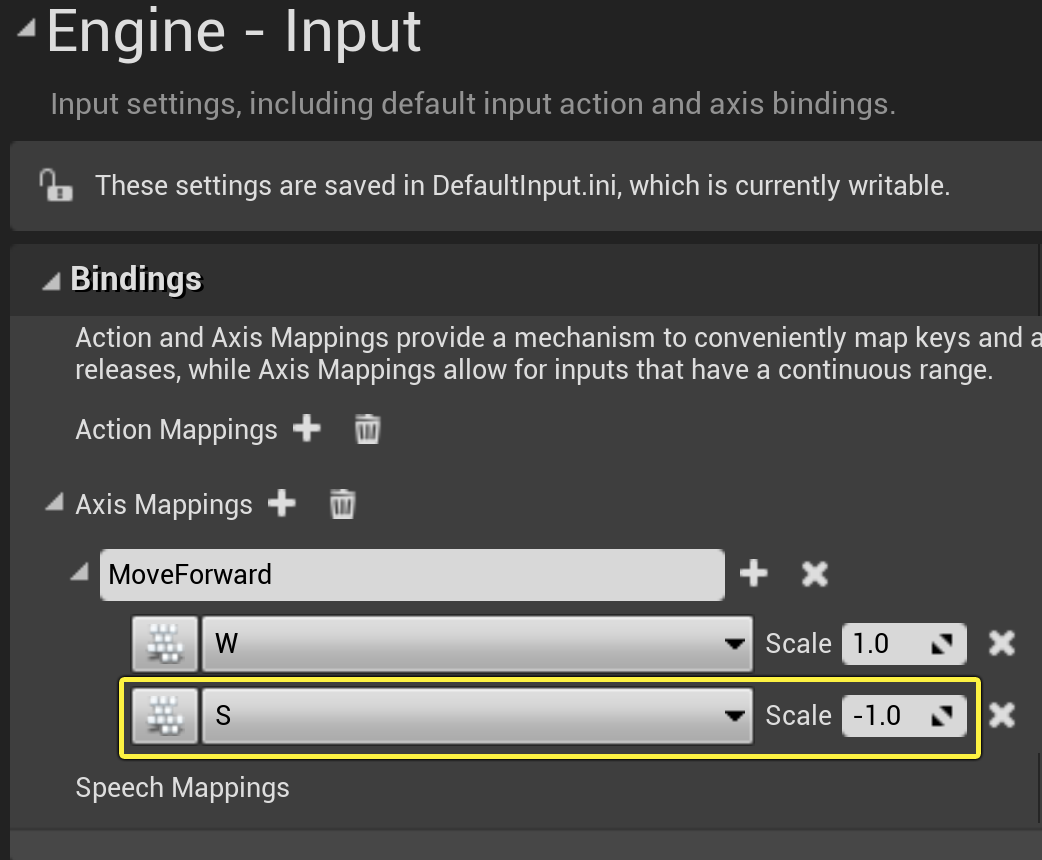
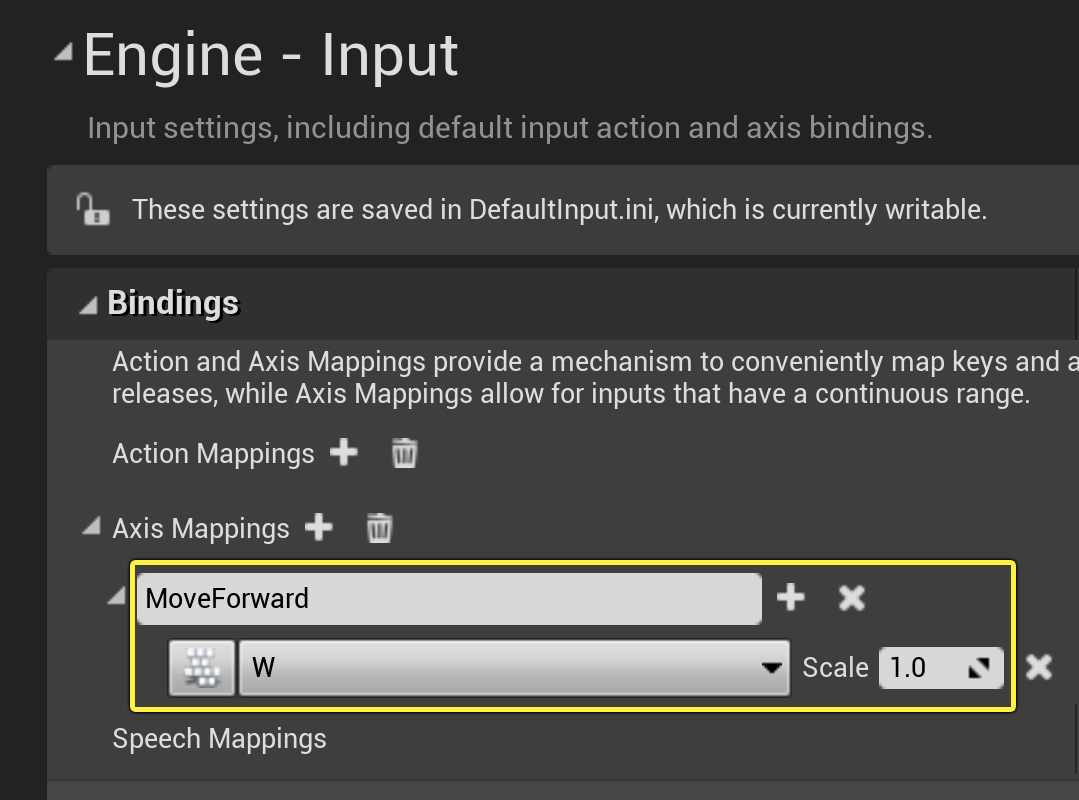
この Axis Mapping に「MoveForward」と名前をつけ、次にキー マッピングのドロップダウン メニューから W キーの値 を探して選択します。

-
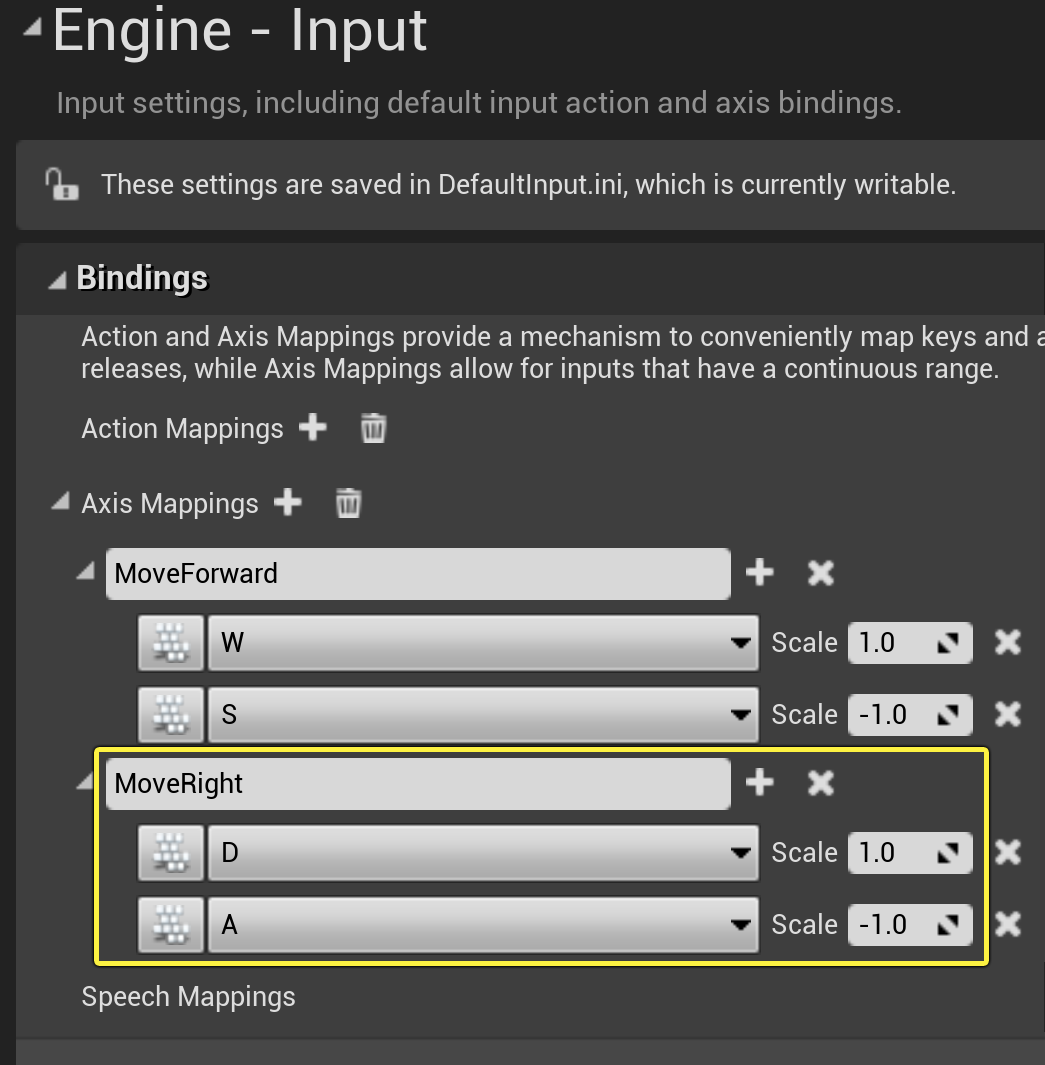
[MoveForward] Axis Mapping の隣にある [+] マークをクリックして、キーを追加します。ドロップダウン メニューから S キー を探して選択し、次に [Scale] 値に -1.0 を設定します。
-
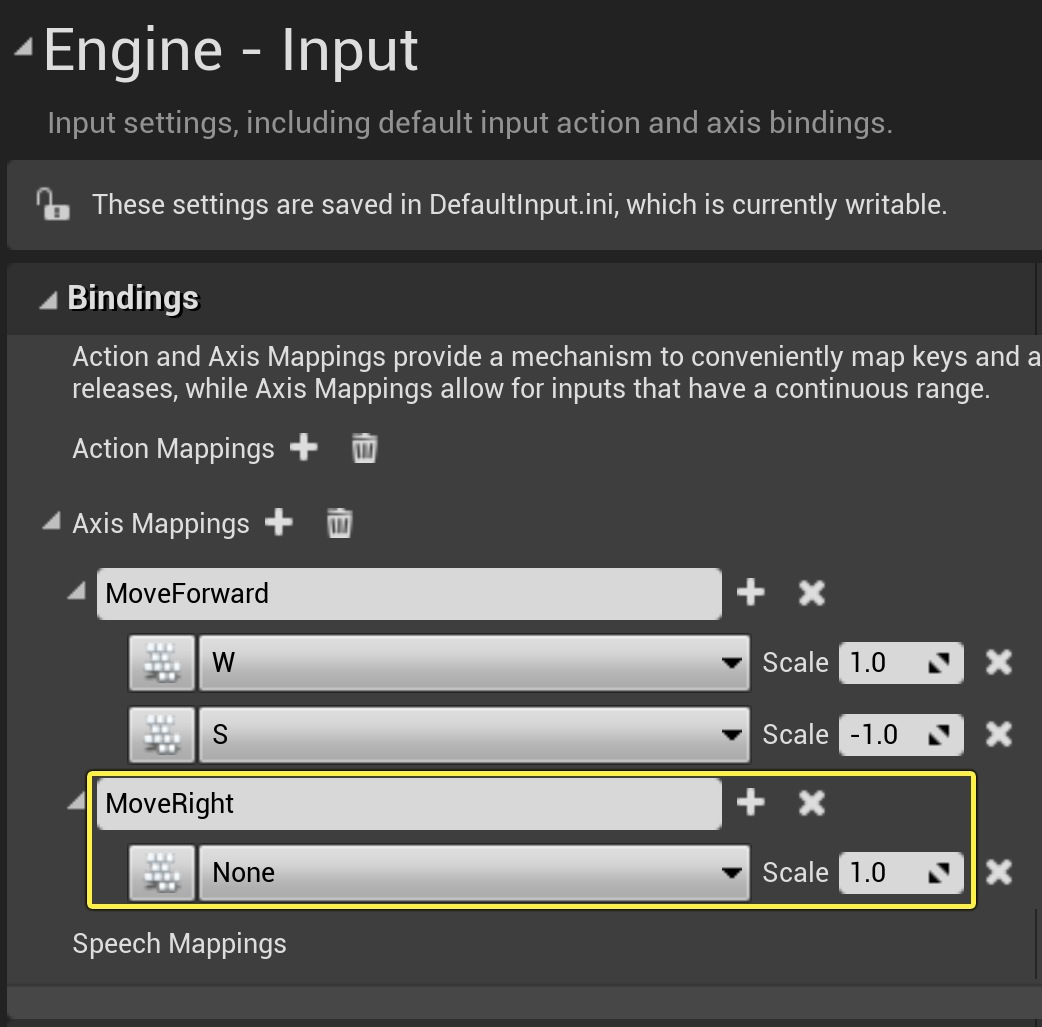
Axis Mappings の隣にある [+] マークをクリックして、新しい Axis Input を作成します。この Input に「MoveRight」と名前をつけます。
-
[MoveRight Axis Mapping] の隣にある [+] マークをクリックして、さらにキーを作成します。そして次の画像のように、 D と S のキーにそれぞれ 1.0 と -1.0 の値で Move Right キーのマッピングとスケールを設定します。

-
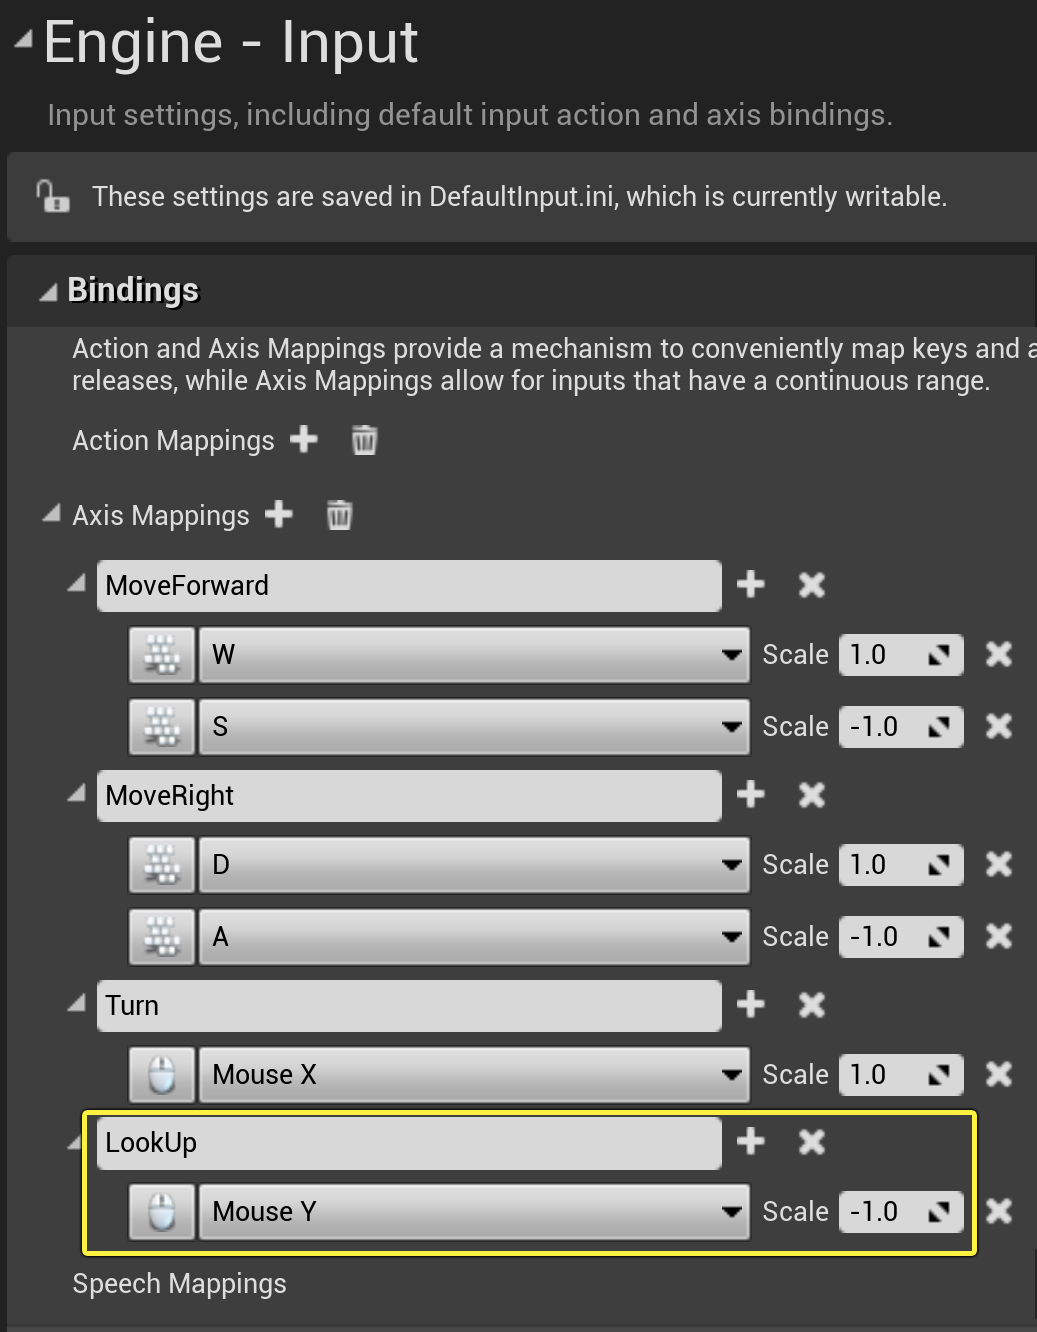
Bindings カテゴリで Axis Mappings の隣にある [+] マークをクリックして「Turn」という名前の新しい入力を作成します。次に Input Mapping Key として [Mouse X] を探し、選択します。

-
Bindings カテゴリで [Axis Mappings] の隣にある [+] マークをクリックして、「LookUp」という名前の新しい入力を作成します。次に Input Mapping Key として Mouse Y を探して選択し、その Scale 値を -1.0 に設定します。

-
そして BP_CameraCharacter をダブルクリックして イベント グラフ に移動し、グラフを右クリックして MoveForward と検索し、 Input Axis Event のカテゴリから選択します。
画像をクリックして拡大表示
-
InputAxis Move Forward ノードの 実行 ピンを引き出して、 ドロップダウン メニュー から Add Movement Input ノードを探して選択します。次に InputAxis Move Forward ノードの Axis Value ピンを引き出して、 Add Movement Input ノードの Scale Value ピンに接続します。
画像をクリックして拡大表示
-
イベント グラフ で右クリックして コンテキスト メニュー から Get Control Rotation を検索して選択します。次に Rotator Return Value ピンを引き出して ドロップダウン メニュー で Break Rotator を検索して選択します。
画像をクリックして拡大表示
-
Break Rotator ノードから Z (Yaw) ピンを引き出して、 ドロップダウン メニュー で Make Rotator ノードを検索し、選択します。次に Make Rotator ノードの Rotator Return Value ピンを引き出して、ドロップダウン メニューで Get Forward Vector を検索し、選択します。
画像をクリックして拡大表示
-
Get Forward Vector ノードの Vector Return Value ピンを引き出して、 Add Movement Input ノードの World Direction ピンに接続します。
画像をクリックして拡大表示
-
Get Forward Vector ノードの Vector Return Value ピンを引き出して、 Add Movement Input ノードの World Direction ピンに接続します。
画像をクリックして拡大表示
-
InputAxis MoveRight ノードの Execution ピンを引き出して、 ドロップダウン メニュー から Add Movement Input を検索し、選択します。次に InputAxis MoveRight ノードの Axis Value ピンを引き出して、 Add Movement Input ノードの Scale Value に接続します。
画像をクリックして拡大表示
-
Make Rotator ノードの Rotator Return Value ピンを引き出して ドロップダウン メニュー で Get Right Vector ノードを検索し、選択します。次に Vector Return Value ピンを引き出して Add Movement Input ノードの World Direction ピンに接続します。
画像をクリックして拡大表示
手順を完了すると Movement Input Events は以下の画像のようになります。
画像をクリックして拡大表示
-
イベント グラフ で右クリックして InputAxis LookUp イベント ノードを検索し、選択します。次に右クリックして Add Controller Pitch Input ノードを検索し、選択します。
-
InputAxis LookUp ノードから Axis Value ピンを引き出して、 Add Controller Pitch Input ノードの Val ピンに接続します。InputAxis LookUp ノードから Execution Output ピンを引き出して、 Add Controller Pitch Input ノードの Execution Input ピンに接続します。
画像をクリックして拡大表示
-
イベント グラフ で右クリックして Input Axis Turn イベント ノードを検索し、選択します。次に右クリックして Add Controller Yaw Input ノードを検索し、選択します。
-
Input Axis Turn ノードの Axis Value ピンを引き出して、 Add Controller Yaw Input ノードの Val ピンに接続します。Input Axis Turn ノードの execution output pピンを引き出して、 Add Controller Yaw Input ノードの execution input ピンに接続します
画像をクリックして拡大表示
-
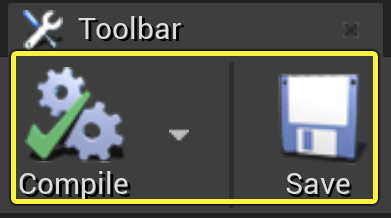
[Compile] と [Save] を順にクリックします。
新しく実装した Spring Arm コンポーネントの動作をテストする際は、Character クラスに Movement Input を追加する必要があります。
-
まず最初に [Edit (編集)] > [Project Settings (プロジェクト設定)] > [Engine (エンジン)] > [Input (インプット)] に移動してから、 [Bindings (バインディング)] カテゴリで [Axis Mappings (軸マッピング)] の隣にある [+] マークをクリックし、新しい Axis Input を作成します。
-
この Axis Mapping に「MoveForward」と名前をつけ、次にキー マッピングのドロップダウン メニューから W キーの値 を探して選択します。
-
[MoveForward] Axis Mapping の隣にある [+] マークをクリックして、キーを追加します。ドロップダウン メニューから S キー を探して選択し、次に [Scale] 値に -1.0 を設定します。

-
Axis Mappings の隣にある [+] マークをクリックして、新しい Axis Input を作成します。この Input に「MoveRight」と名前をつけます。

-
[MoveRight Axis Mapping] の隣にある [+] マークをクリックして、さらにキーを作成します。そして次の画像のように、 D と S のキーにそれぞれ 1.0 と -1.0 の値で Move Right キーのマッピングとスケールを設定します。
-
Bindings カテゴリで Axis Mappings の隣にある [+] マークをクリックして「Turn」という名前の新しい入力を作成します。次に Input Mapping Key として [Mouse X] を探し、選択します。

-
Bindings カテゴリで [Axis Mappings] の隣にある [+] マークをクリックして、「LookUp」という名前の新しい入力を作成します。次に Input Mapping Key として Mouse Y を探して選択し、その Scale 値を -1.0 に設定します。
-
そして
CameraCharacter.cppの ACameraCharacter::MoveFoward と ACameraCharacter::MoveRight クラス メソッドに、以下のロジックを実装します。void ACameraCharacter::MoveForward(float AxisValue) { if ((Controller != nullptr) && (AxisValue != 0.0f)) { // Find out which way is forward const FRotator Rotation = Controller->GetControlRotation(); const FRotator YawRotation(0, Rotation.Yaw, 0); // Get forward vector const FVector Direction = FRotationMatrix(YawRotation).GetUnitAxis(EAxis::X); AddMovementInput(Direction, AxisValue); } } void ACameraCharacter::MoveRight(float AxisValue) { if ((Controller != nullptr) && (AxisValue != 0.0f)) { // Find out which way is right const FRotator Rotation = Controller->GetControlRotation(); const FRotator YawRotation(0, Rotation.Yaw, 0); // Get right vector const FVector Direction = FRotationMatrix(YawRotation).GetUnitAxis(EAxis::Y); // Add movement in that direction AddMovementInput(Direction, AxisValue); } } -
次に ACameraCharacter::SetupPlayerInputComponent メソッドに移動して、以下のコードを実装します。
//Called to bind functionality to input void ACameraCharacter::SetupPlayerInputComponent(UInputComponent*) { Super::SetupPlayerInputComponent(PlayerInputComponent); PlayerInputComponent->BindAxis("MoveForward",this, &ACameraCharacter::MoveForward); PlayerInputComponent->BindAxis("MoveRight", this, &ACameraCharacter::MoveRight); PlayerInputComponent->BindAxis("Turn", this, &APawn::AddControllerYawInput); PlayerInputComponent->BindAxis("LookUp", this, &APawn::AddControllerPitchInput); }
この Character クラスは Pawn クラスを継承しています。たとえば回転とルックアップのロジックを処理する際は、Pawn の AddControllerPitchInput と AddControllerYawInput クラス メソッドを使用しています。
レベル設定
Spring Arm コンポーネントの機能を実証するには、いくつかの幾何学的な障害物をレベルに配置する必要があります。
-
エディタ で [Window] > [Place Actors] の順に選択して [Place Actors (アクタを配置)] パネルを開きます。
-
[Place Actors] パネルで [Geometry] を選択し Box Brush (ボックスブラシ) をレベルにドラッグします。
画像をクリックして拡大表示
-
[Details (詳細)] パネルの [Brush Settings (ブラシ設定)] カテゴリに移動し X、Y、Z の値を変更することで ボックスブラシ の境界を調節できます。
画像をクリックして拡大表示
-
次に、ツールバー の [PIE (Play In Editor)] を押します。

最終結果
WASD を使ってキャラクターを動かすと、カメラがキャラクターの動きから若干遅れるのがわかります。キャラクターを壁の近くに移動すると、カメラはそれ自体の位置を変えようとし、近くに移動します。キャラクターに対する障害物がない場合、Spring Arm はカメラをデフォルトのクラス プロパティで指定されたデフォルトの Target Arm Length に戻します。