
このチュートリアルでは、カメラのアクティベート方法、またあるカメラから別のカメラへアクティブなカメラを切り替える方法を紹介します。
1 - ワールドにカメラを配置する
Unreal Engine を初めて使用する場合は「プログラミング クイックスタート チュートリアル」から始めることをお勧めします。このドキュメントでは、Unreal Engine でのプロジェクトの作成、プロジェクトへの C++ コードの追加、コードのコンパイル、アクタ への コンポーネント の追加に慣れている方を対象として想定しています。
-
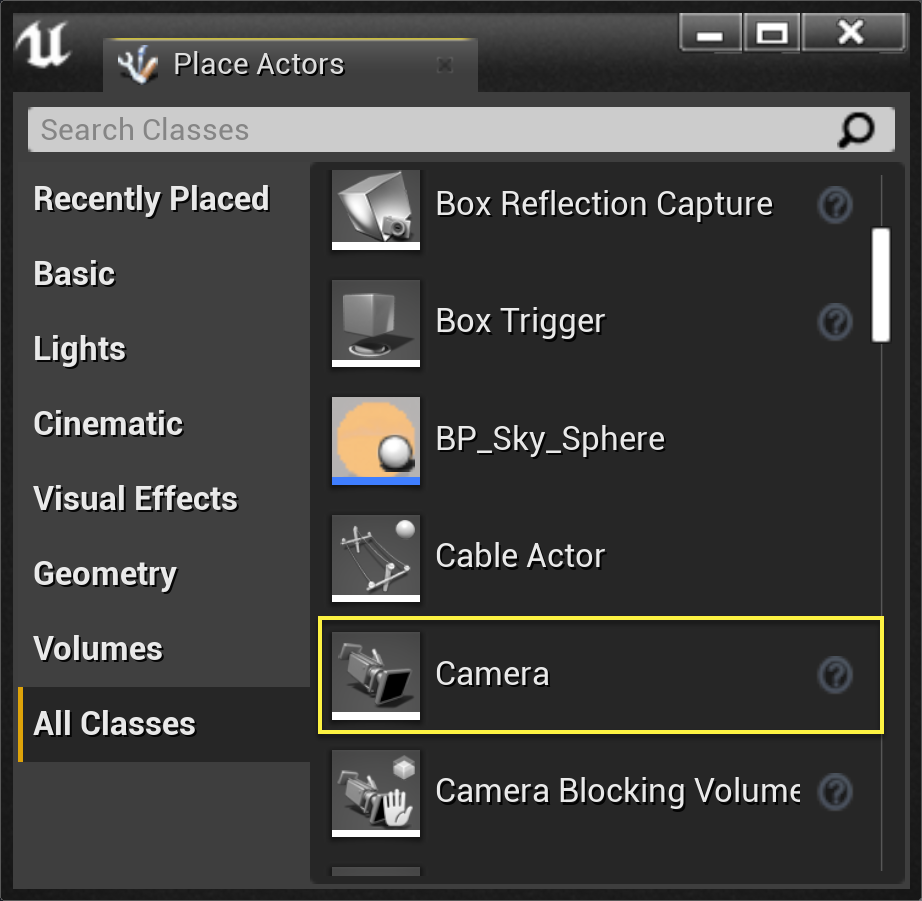
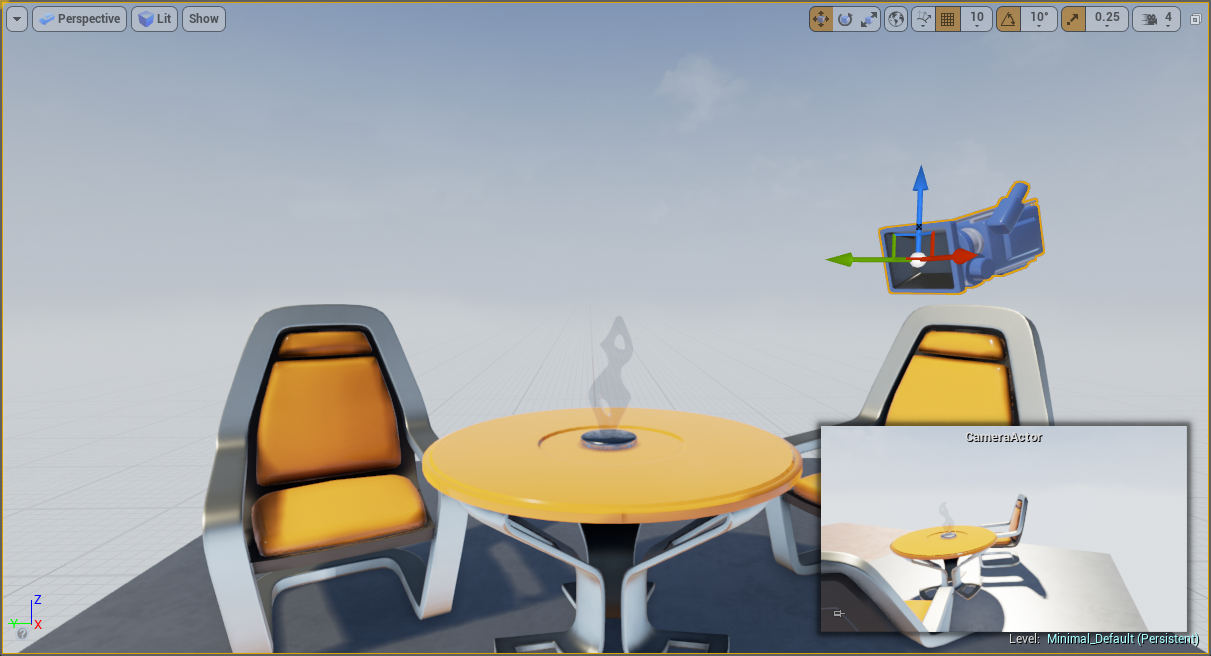
まず「HowTo_AutoCamera」という名前のスターター コンテンツを使用して、新規 Basic Code プロジェクトを作成します。最初にワールドにカメラを 2 つ作成します。さまざまなカメラの設定方法がありますが、ここでは最も一般的な 2 つの方法を紹介します。最初のカメラでは プレースメントブラウザ の [Place Actors] パネルへ移動して [All Classes] タブを選択するか Shift + 1 を押します。[All Classes (すべてのクラス)] セクションに Camera アクタが表示されます。このアクタを レベルエディタ へドラッグして、シーンを良く見渡すことができる位置に置きます。
この操作により、 Camera アクタ を選択している間は、新規作成した Camera アクタ から見えるピクチャイン ピクチャビューが レベルエディタ ウィンドウに表示されます。
-
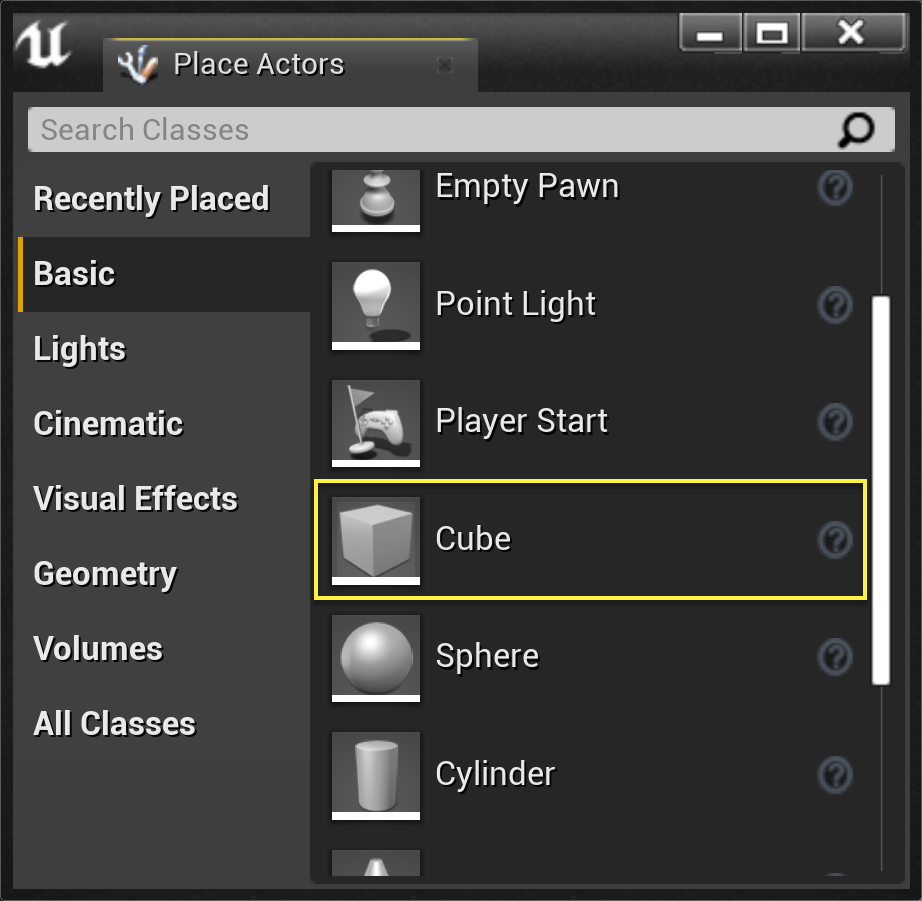
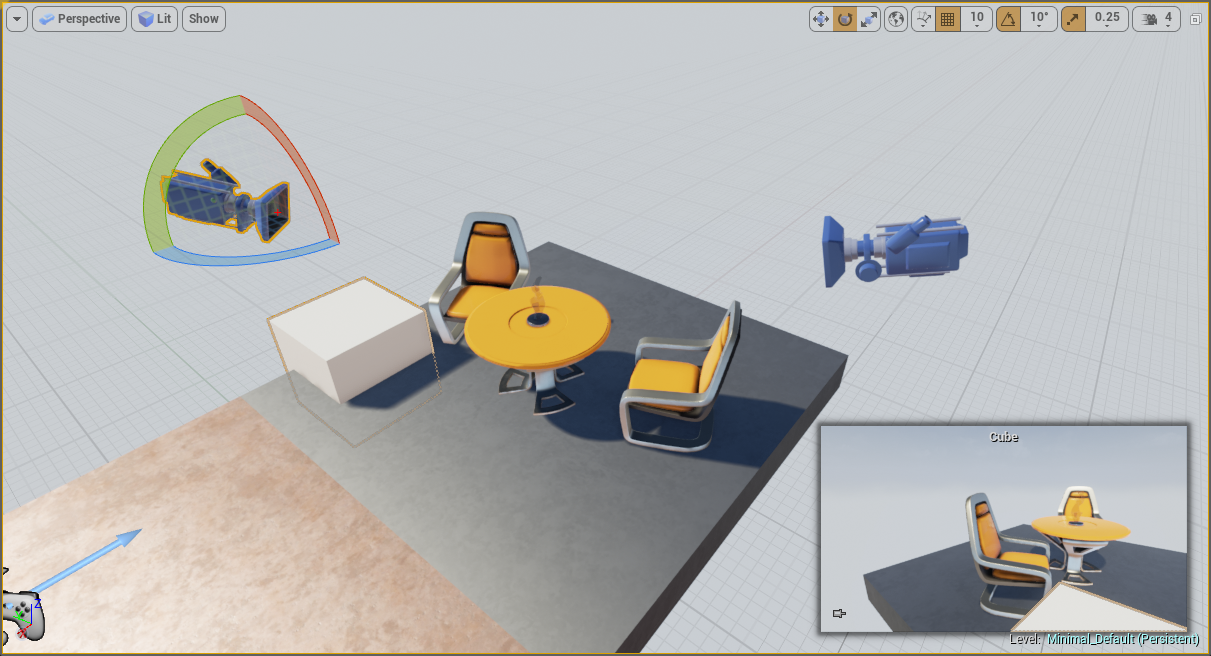
2 つ目のカメラは、さらに詳細で正確に制御する方法を使用します。プレースメントブラウザ の [Place Actors] パネルで [Basic (基本)] タブをクリックして キューブ を [レベルエディタ] ウィンドウへドラッグします。
このステップではほぼすべてのアクタ クラスを使用できます。QuickStart チュートリアルで作成した MyActor クラスを Cube の代わりに使用すると面白いかもしれません。
-
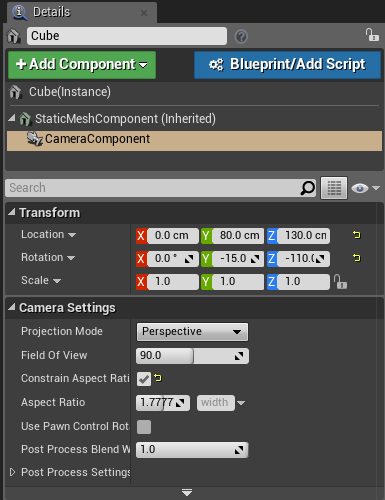
Cube アクタを配置する場合、Camera コンポーネント を追加します。これは、 Cube の [Details] パネルで + Add Component (コンポーネント追加) ボタンをクリックして行います。先に配置した Camera アクタ と異なるビューになるように、この Camera コンポーネント の位置と回転を設定します。
-
Constrain Aspect Ratio をオンにして Camera アクタ の設定と一致するように Camera コンポーネント をカスタマイズします。この設定によりカメラビュー間の遷移がスムーズになりますが、必須ではありません。

ワールドを設定したので、カメラビューを制御するクラスの作成準備が整いました。
2 - C++ コードでのカメラビューを制御する
-
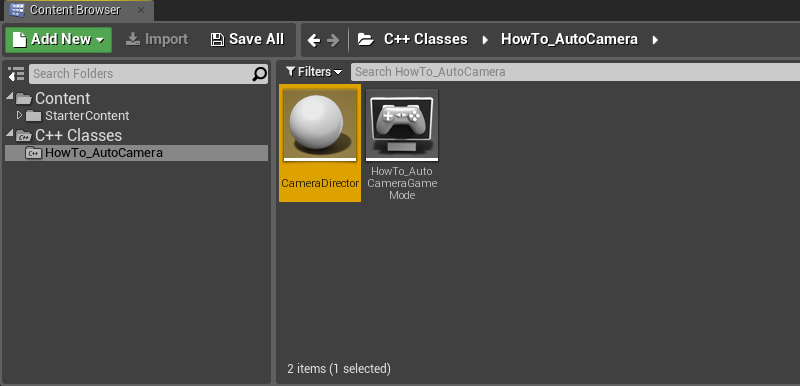
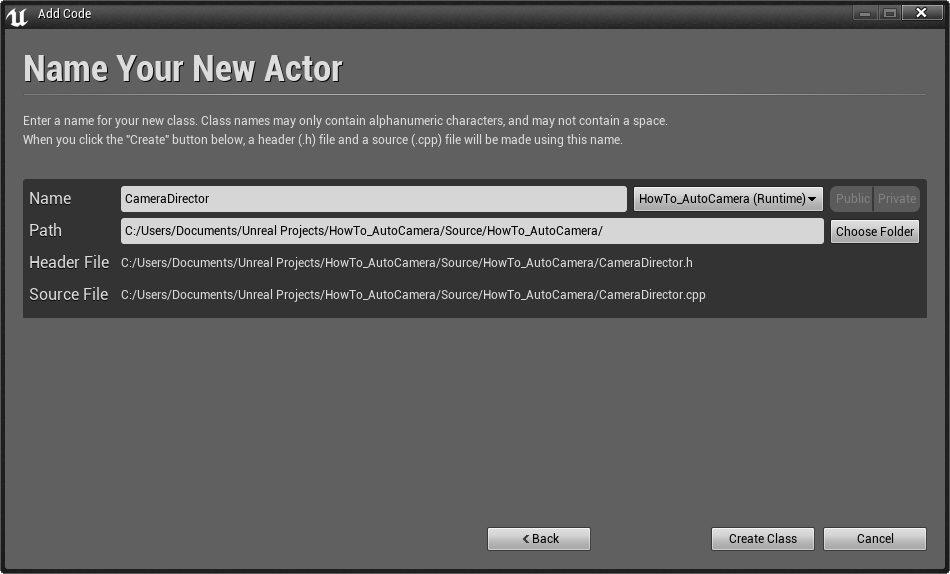
カメラビューを制御する C++ クラスの作成準備が整いました。このチュートリアルでは、アクタ を CameraDirector という新規クラスに拡張します。

-
「 CameraDirector.h 」ファイル内の ACameraDirector クラス定義の下部に次のコードを追加します。
UPROPERTY(EditAnywhere) AActor* CameraOne; UPROPERTY(EditAnywhere) AActor* CameraTwo; float TimeToNextCameraChange;UPROPERTY マクロは Unreal Engine に変数を公開します。これによりこれらの変数に設定された値は、今後のセッションでゲームを起動したり、レベルやプロジェクトをリロードした時にリセットされないようになります。Unreal Editor に CameraOne と CameraTwo の設定を有効にする EditAnywhere キーワードも追加されました。
-
"CameraDirector.cpp" ファイル上部の "#include" のすぐ下に以下のコード行を追加します。
#include "Kismet/GameplayStatics.h"「GameplayStatics」ヘッダファイルで、いくつかの汎用関数にアクセスすることができます。その中にこのチュートリアルに必要な関数があります。終了後、以下のコードを ACameraDirector::Tick の下部に追加します。
const float TimeBetweenCameraChanges = 2.0f; const float SmoothBlendTime = 0.75f; TimeToNextCameraChange -= DeltaTime; if (TimeToNextCameraChange <= 0.0f) { TimeToNextCameraChange += TimeBetweenCameraChanges; // ローカル プレイヤーの制御を扱うアクタを見つける。 APlayerController* OurPlayerController = UGameplayStatics::GetPlayerController(this, 0); if (OurPlayerController) { if ((OurPlayerController->GetViewTarget() != CameraOne) && (CameraOne != nullptr)) { // カメラ1に瞬時に切り替わる。 OurPlayerController->SetViewTarget(CameraOne); } else if ((OurPlayerController->GetViewTarget() != CameraTwo) && (CameraTwo != nullptr)) { // カメラ2へスムーズにブレンドする。 OurPlayerController->SetViewTargetWithBlend(CameraTwo, SmoothBlendTime); } } }このコードは 3 秒ごとに 2 つのカメラ間でデフォルト プレイヤーのビューを切り替えます。
-
コードのコンパイル準備ができたので、エディタ に戻って [Compile (コンパイル)] ボタンを押します。
追加のコードは不要です。これで CameraDirector をワールドに設定することができます。
完成コード
CameraDirector.h
// Copyright 1998-2017 Epic Games, Inc.All Rights Reserved.
#pragma once
#include "GameFramework/Actor.h"
#include "CameraDirector.generated.h"
UCLASS()
class HOWTO_AUTOCAMERA_API ACameraDirector : public AActor
{
GENERATED_BODY()
public:
// このアクターのプロパティのデフォルト値を設定します
ACameraDirector();
protected:
// ゲーム開始時またはスポーン時に呼び出されます
virtual void BeginPlay() override;
public:
// フレーム毎に呼び出される
virtual void Tick( float DeltaSeconds ) override;
UPROPERTY(EditAnywhere)
AActor* CameraOne;
UPROPERTY(EditAnywhere)
AActor* CameraTwo;
float TimeToNextCameraChange;
};
CameraDirector.cpp
// Copyright 1998-2017 Epic Games, Inc.All Rights Reserved.
#include "HowTo_AutoCamera.h"
#include "CameraDirector.h"
#include "Kismet/GameplayStatics.h"
// デフォルト値を設定する
ACameraDirector::ACameraDirector()
{
// フレームごとにTick()を呼び出すようにこのアクタを設定する。 必要ない場合は、これをオフにしてパフォーマンスを向上させることができる。
PrimaryActorTick.bCanEverTick = true;
}
// Called when the game starts or when spawned
void ACameraDirector::BeginPlay()
{
Super::BeginPlay();
}
// フレーム毎に呼び出される
void ACameraDirector::Tick( float DeltaTime )
{
Super::Tick( DeltaTime );
const float TimeBetweenCameraChanges = 2.0f;
const float SmoothBlendTime = 0.75f;
TimeToNextCameraChange -= DeltaTime;
if (TimeToNextCameraChange <= 0.0f)
{
TimeToNextCameraChange += TimeBetweenCameraChanges;
//ローカル プレイヤーの制御を扱うアクタを見つける。
APlayerController* OurPlayerController = UGameplayStatics::GetPlayerController(this, 0);
if (OurPlayerController)
{
if ((OurPlayerController->GetViewTarget() != CameraOne) && (CameraOne != nullptr))
{
//カメラ1に瞬時に切り替わる。
OurPlayerController->SetViewTarget(CameraOne);
}
else if ((OurPlayerController->GetViewTarget() != CameraTwo) && (CameraTwo != nullptr))
{
//カメラ2に滑らかにブレンドする。
OurPlayerController->SetViewTargetWithBlend(CameraTwo, SmoothBlendTime);
}
}
}
}
3 - ワールドに Camera Director を配置する
-
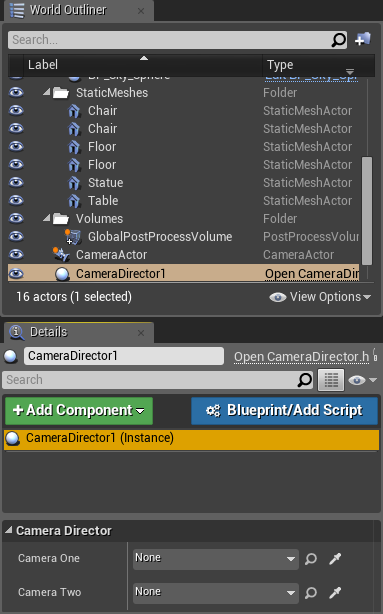
コードのコンパイルが終了すると、新規クラスのインスタンスを コンテンツ ブラウザ から レベル エディタ へドラッグできます。
-
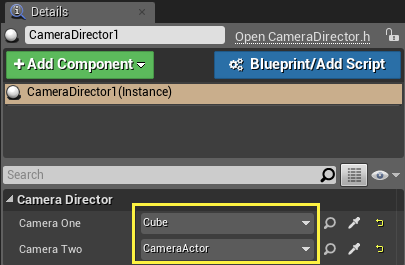
次に CameraOne 変数と CameraTwo 変数を設定する必要があります。ワールド アウトライナー で CameraDirector を検索して [Details (詳細)] パネルで編集します。
ドロップダウンから [None (なし)] をクリックして、これらの変数を既に作成した Cube と CameraActor に設定します。
-
[Play (プレイ)] を押すと、カメラがこのビューにスナップします。
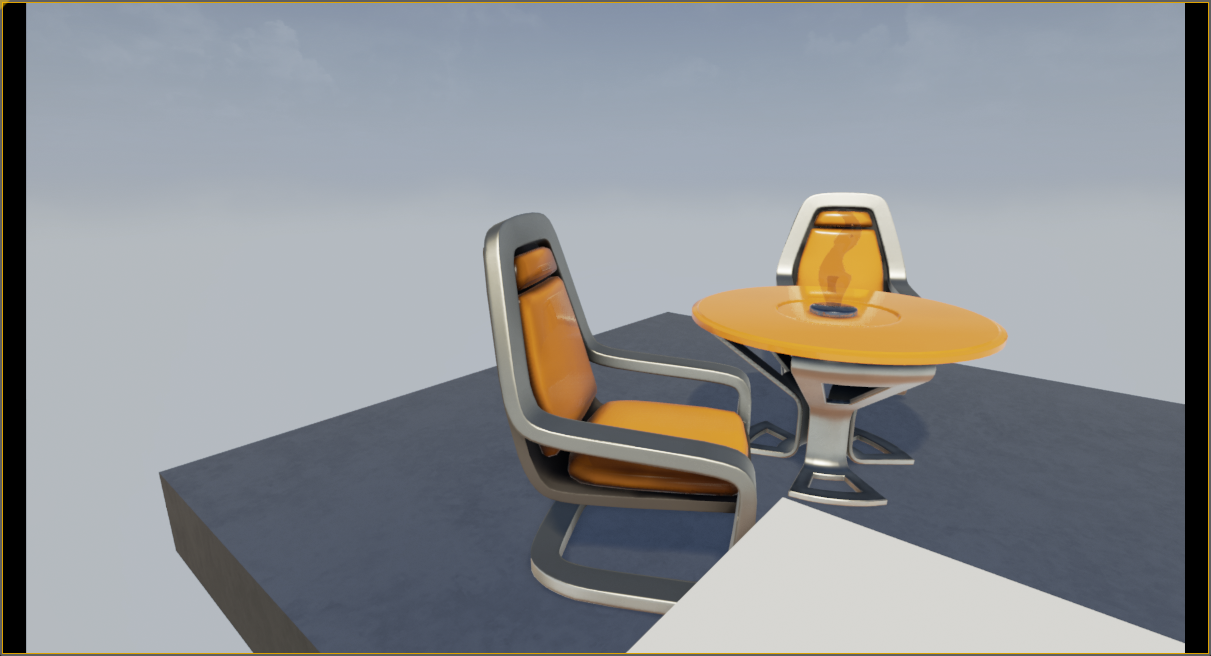
そしてビューへスムーズにブレンドします。
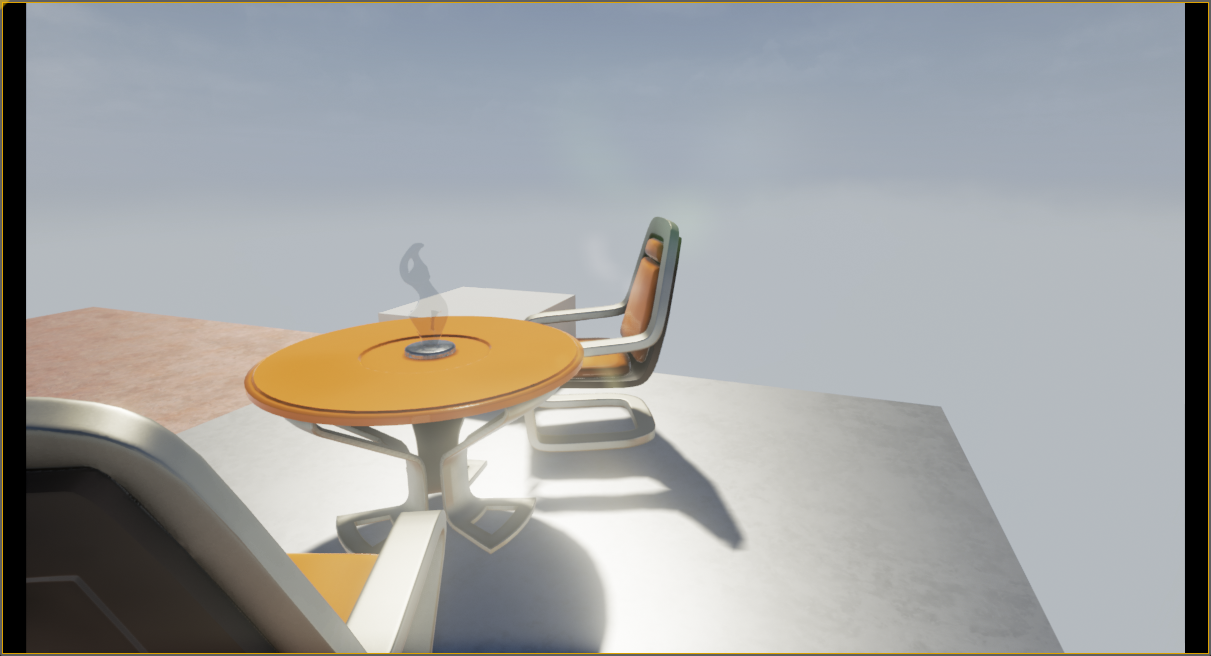
スナップバックする前に数秒間待機します。
これで、純粋にゲームロジックに基づいてプレーヤーのカメラを動かすシステムができました。このコードは、プレイヤーがカメラを直接操作しないゲームやカメラビュー間のブレンディングが役立つゲームなど、任意のゲームで使用できるように変更可能です。
完成コード
CameraDirector.h
// Copyright 1998-2017 Epic Games, Inc.All Rights Reserved.
#pragma once
#include "GameFramework/Actor.h"
#include "CameraDirector.generated.h"
UCLASS()
class HOWTO_AUTOCAMERA_API ACameraDirector : public AActor
{
GENERATED_BODY()
public:
// このアクタのプロパティのデフォルト値を設定する
ACameraDirector();
protected:
// ゲーム開始時またはスポーン時に呼び出される
virtual void BeginPlay() override;
public:
// フレーム毎に呼び出される
virtual void Tick( float DeltaSeconds ) override;
UPROPERTY(EditAnywhere)
AActor* CameraOne;
UPROPERTY(EditAnywhere)
AActor* CameraTwo;
float TimeToNextCameraChange;
};
CameraDirector.cpp
// Copyright 1998-2017 Epic Games, Inc. All Rights Reserved.
#include "HowTo_AutoCamera.h"
#include "CameraDirector.h"
#include "Kismet/GameplayStatics.h"
// デフォルト値を設定する
ACameraDirector::ACameraDirector()
{
// フレームごとにTick()を呼び出すようにこのアクタを設定する。 必要ない場合は、これをオフにしてパフォーマンスを向上させることができる。
PrimaryActorTick.bCanEverTick = true;
}
// ゲーム開始時やスポーン時に呼び出される
void ACameraDirector::BeginPlay()
{
Super::BeginPlay();
}
// フレーム毎に呼び出される
void ACameraDirector::Tick( float DeltaTime )
{
Super::Tick( DeltaTime );
const float TimeBetweenCameraChanges = 2.0f;
const float SmoothBlendTime = 0.75f;
TimeToNextCameraChange -= DeltaTime;
if (TimeToNextCameraChange <= 0.0f)
{
TimeToNextCameraChange += TimeBetweenCameraChanges;
//ローカルぷpレイヤーの制御を扱うアクタを見つける。
APlayerController* OurPlayerController = UGameplayStatics::GetPlayerController(this, 0);
if (OurPlayerController)
{
if (CameraTwo && (OurPlayerController->GetViewTarget() == CameraOne))
{
//カメラ2に滑らかにブレンドする。
OurPlayerController->SetViewTargetWithBlend(CameraTwo, SmoothBlendTime);
}
else if (CameraOne)
{
//カメラ1に瞬時に切り替わる。
OurPlayerController->SetViewTarget(CameraOne);
}
}
}
}
4 - 応用編
ここまでで学んだ知識を活かして、以下を行ってみましょう。
- クレーンまたはドリーのショットを作成するために動くアクタにカメラをアタッチします。
- CameraOne と CameraTwo ではなく 配列 変数を 1 つだけ使ってカメラを保存すれば、2 以外の数字をカメラの台数に使うことができます。
- カメラの保存には、アクタ ポインタを使わずに、ポインタとビューの変更前の時間を保持する [構造体](programming-and-scripting\programming-language-implementation## 1 - Place Cameras in the World
If you are new to Unreal Engine, you might want to read our Programming Quick Start first. For this tutorial, we will assume you are familiar with creating a project, adding C++ code to it, compiling your code, and adding Components to Actors in Unreal Engine.
-
We will begin by creating a new Basic Code project, with starter content, named "HowTo_AutoCamera". The first thing we'll need to do is create two cameras in our world. Since there are multiple ways to set up cameras, we'll go with the two most common ways here. For our first camera, go to the Place Actors panel and select the All Classes tab, you'll find a Camera actor. Drag this into the Level Editor and position it so that it has a good view of our scene.

When this is done, the Level Editor window will have a picture-in-picture view of what our new Camera Actor can see as long as we have the Camera Actor selected.

-
For our second camera, we'll use a method that goes a little more in-depth and gives us a little more control. Start by clicking the Basic tab in the Place Actors panel, then drag a Cube into the Level Editor window.

We can use almost any actor class for this step. The MyActor class we created in the Quick Start tutorial might be interesting to substitute for the Cube.
-
When our Cube actor is placed, add a CameraComponent by clicking the + Add Component button in the Details panel for the Cube. You can now set the position and rotation of that CameraComponent to give us a different view of the scene than the CameraActor we placed earlier.

-
We should customize our CameraComponent by turning on Constrain Aspect Ratio so that it matches the setting on our CameraActor. This will make transitions between camera views smoother, but it is not required.
With our world set up, we're now ready to create the class that will control our camera view.
2 - Control Camera View in C++
-
We're ready to create a C++ class to control our camera view. For this tutorial, we can extend Actor into a new class which we'll call CameraDirector.
-
In CameraDirector.h, add the following code to the bottom of the ACameraDirector class definition:
UPROPERTY(EditAnywhere) AActor* CameraOne; UPROPERTY(EditAnywhere) AActor* CameraTwo; float TimeToNextCameraChange;The UPROPERTY macro makes our variables visible to Unreal Engine. This way, values set in these variables will not be reset when we launch the game or reload our level or project in a future work session. We have also added the EditAnywhere keyword, which will allow us to set CameraOne and CameraTwo in the Unreal Editor.
-
In CameraDirector.cpp, add the following line of code to the top of the file, right underneath the other #include lines:
#include "Kismet/GameplayStatics.h"The GameplayStatics header file gives us access to some useful general-purpose functions, one of which we will need for this tutorial. When that is done, add the following code to the bottom of ACameraDirector::Tick:
const float TimeBetweenCameraChanges = 2.0f; const float SmoothBlendTime = 0.75f; TimeToNextCameraChange -= DeltaTime; if (TimeToNextCameraChange <= 0.0f) { TimeToNextCameraChange += TimeBetweenCameraChanges; // Find the actor that handles control for the local player. APlayerController* OurPlayerController = UGameplayStatics::GetPlayerController(this, 0); if (OurPlayerController) { if ((OurPlayerController->GetViewTarget() != CameraOne) && (CameraOne != nullptr)) { // Cut instantly to camera one. OurPlayerController->SetViewTarget(CameraOne); } else if ((OurPlayerController->GetViewTarget() != CameraTwo) && (CameraTwo != nullptr)) { // Blend smoothly to camera two. OurPlayerController->SetViewTargetWithBlend(CameraTwo, SmoothBlendTime); } } }This code will cause us to switch the default player's view between two different cameras every three seconds.
-
Our code is now ready to be compiled, so we can return to the Unreal Editor and press the Compile button.
No further code is needed. We can set up our CameraDirector in our world now.
Finished Code
CameraDirector.h
// Copyright 1998-2017 Epic Games, Inc. All Rights Reserved.
#pragma once
#include "GameFramework/Actor.h"
#include "CameraDirector.generated.h"
UCLASS()
class HOWTO_AUTOCAMERA_API ACameraDirector : public AActor
{
GENERATED_BODY()
public:
// Sets default values for this actor's properties
ACameraDirector();
protected:
// Called when the game starts or when spawned
virtual void BeginPlay() override;
public:
// Called every frame
virtual void Tick( float DeltaSeconds ) override;
UPROPERTY(EditAnywhere)
AActor* CameraOne;
UPROPERTY(EditAnywhere)
AActor* CameraTwo;
float TimeToNextCameraChange;
};
CameraDirector.cpp
// Copyright 1998-2017 Epic Games, Inc. All Rights Reserved.
#include "HowTo_AutoCamera.h"
#include "CameraDirector.h"
#include "Kismet/GameplayStatics.h"
// Sets default values
ACameraDirector::ACameraDirector()
{
// Set this actor to call Tick() every frame. You can turn this off to improve performance if you don't need it.
PrimaryActorTick.bCanEverTick = true;
}
// Called when the game starts or when spawned
void ACameraDirector::BeginPlay()
{
Super::BeginPlay();
}
// Called every frame
void ACameraDirector::Tick( float DeltaTime )
{
Super::Tick( DeltaTime );
const float TimeBetweenCameraChanges = 2.0f;
const float SmoothBlendTime = 0.75f;
TimeToNextCameraChange -= DeltaTime;
if (TimeToNextCameraChange <= 0.0f)
{
TimeToNextCameraChange += TimeBetweenCameraChanges;
//Find the actor that handles control for the local player.
APlayerController* OurPlayerController = UGameplayStatics::GetPlayerController(this, 0);
if (OurPlayerController)
{
if ((OurPlayerController->GetViewTarget() != CameraOne) && (CameraOne != nullptr))
{
//Cut instantly to camera one.
OurPlayerController->SetViewTarget(CameraOne);
}
else if ((OurPlayerController->GetViewTarget() != CameraTwo) && (CameraTwo != nullptr))
{
//Blend smoothly to camera two.
OurPlayerController->SetViewTargetWithBlend(CameraTwo, SmoothBlendTime);
}
}
}
}
3 - Place a Camera Director in the World
-
Once our code has compiled, we can drag an instance of our new class from the Content Browser into the Level Editor.

-
Next, we'll need to set the CameraOne and CameraTwo variables. Find our CameraDirector in the World Outliner and edit it in the Details Panel.

Click on the dropdown boxes labeled "None" and set our variables to the Cube and the CameraActor that we created earlier.

-
If we press Play, we will see the camera snap to this view:

And then blend smoothly to this view:

Where it will wait a few seconds before snapping back.
We now have a system that moves the player's camera based purely on game logic. This code can be modified for use in any game where the player does not have direct control over the camera, or where blending between camera views is useful.
Finished Code
CameraDirector.h
// Copyright 1998-2017 Epic Games, Inc. All Rights Reserved.
#pragma once
#include "GameFramework/Actor.h"
#include "CameraDirector.generated.h"
UCLASS()
class HOWTO_AUTOCAMERA_API ACameraDirector : public AActor
{
GENERATED_BODY()
public:
// Sets default values for this actor's properties
ACameraDirector();
protected:
// Called when the game starts or when spawned
virtual void BeginPlay() override;
public:
// Called every frame
virtual void Tick( float DeltaSeconds ) override;
UPROPERTY(EditAnywhere)
AActor* CameraOne;
UPROPERTY(EditAnywhere)
AActor* CameraTwo;
float TimeToNextCameraChange;
};
CameraDirector.cpp
// Copyright 1998-2017 Epic Games, Inc. All Rights Reserved.
#include "HowTo_AutoCamera.h"
#include "CameraDirector.h"
#include "Kismet/GameplayStatics.h"
// Sets default values
ACameraDirector::ACameraDirector()
{
// Set this actor to call Tick() every frame. You can turn this off to improve performance if you don't need it.
PrimaryActorTick.bCanEverTick = true;
}
// Called when the game starts or when spawned
void ACameraDirector::BeginPlay()
{
Super::BeginPlay();
}
// Called every frame
void ACameraDirector::Tick( float DeltaTime )
{
Super::Tick( DeltaTime );
const float TimeBetweenCameraChanges = 2.0f;
const float SmoothBlendTime = 0.75f;
TimeToNextCameraChange -= DeltaTime;
if (TimeToNextCameraChange <= 0.0f)
{
TimeToNextCameraChange += TimeBetweenCameraChanges;
//Find the actor that handles control for the local player.
APlayerController* OurPlayerController = UGameplayStatics::GetPlayerController(this, 0);
if (OurPlayerController)
{
if (CameraTwo && (OurPlayerController->GetViewTarget() == CameraOne))
{
//Blend smoothly to camera two.
OurPlayerController->SetViewTargetWithBlend(CameraTwo, SmoothBlendTime);
}
else if (CameraOne)
{
//Cut instantly to camera one.
OurPlayerController->SetViewTarget(CameraOne);
}
}
}
}
4 - On Your Own!
Using what you have learned, try to do the following:
- Attach a Camera to a moving Actor to create a crane or dolly shot.
- Use a single Array variable to store your cameras, instead of CameraOne and CameraTwo, so you can go through a sequence of any number of cameras, instead of just two.
- Instead of using Actor pointers to store your cameras, create a Structure that holds the pointer, as well as time before changing the view, and blend time to the new view.
As for the specifics covered in this tutorial:
- For more information on Cameras and ways to control them, see the Camera framework page, or try the Player-Controlled Cameras tutorial.
- For further tutorials, see the C++ Programming Tutorials page. \Structs) を作成し、新しいビューに対して時間をブレンドします。
以下はこのチュートリアルの内容の詳しい情報のリンク先です。
- カメラとその操作に関する詳細は「カメラ」フレームワークのページ、または「Player-Controlled Cameras」を参照してください。
- 詳しいチュートリアルは「C++ プログラミング チュートリアル」を参照してください。