
When creating cinematic content in Unreal Engine, you can craft more complex Sequences using multiple Sub-Sequences. By adding Sequences as Sub-Sequences to larger level Sequences you can organize larger cinematic content into more performant sections that team members can work on independently. Within a Sequence or Sub-Sequence you can create Shots, or individual camera cuts within your cinematic, similar to other non-linear editors.
Content and game objects can be added to shots, such as Cameras, Characters, and other Actors. They can be trimmed and moved anywhere within its Sequence, enabling a full non-linear editing experience. You can also differentiate shots from one another using the Take System, in order to experiment with different Shots and content without modifying the original shot.
You can use the following document to learn more about using Sequences, Shots, and Takes, to craft cinematic content in Unreal Engine.
Prerequisites
Level Sequences
A Level Sequence Actor is the foundational asset used to create cinematic content for games and traditional animation in Unreal Engine. Level Sequences can contain Cameras, Characters and other game objects that you can animate and will be played back during a game or rendered. You can add Sub-Sequences and Shots to a Level Sequence, for more dynamic and complex cinematics.
You can create a new Level Sequence by navigating in the Content Browser to (+) Add > Cinematics > Level Sequence.

You can also create a new Sequence asset pre-configured with shots, by navigating in the menu bar to the Cinematics button, and selecting Add Level Sequence with Shots.

In the new Level Sequence with Shots Settings window, you can set the assets Name, saving location, and the Number of Shots to be added.

Here you can reference a list of the Level Sequence with Shots Settings properties, and a description of their functionality
| Property | Description |
|---|---|
| Name | Assign a name to the Level Sequence asset you are creating and its containing folder. |
| Suffix | Set a suffix name to apply to the Level Sequence name to distinguish the main, or root sequence asset from the Sub-Sequence Shot assets. |
| Base Path | Set the base file directory in which to save the Level Sequence asset and its contained Shot assets. The Level Sequence will be stored in a folder relative to this. The Seqencce's Shots will then be stored in nested shot-named folders relative to the Level Sequence's folder. |
| Number of Shots | Set the number of Sub-Sequence assets to create, and add to the Level Sequence as Shots. Each Shot will be automatically added to the Level Sequence, named, lengthened, and incremented based on the Shots settings you have set. |
| Sequence to Duplicate | If you already have a Level Sequence with cinematic content, you wish to duplicate, you can assign it here using the asset drop-down menu. When assigning an existing Level Sequence its contents will be copied and duplicated over the number of shots you have specified. If no sequence is specified, then all shots will be created, and preconfigured with a Camera and a Camera Cut Track. This is useful if you want to automatically populate your Shots with Actors and Cameras. |
| Sub-Sequence Names | Here you can add and name Sub Sequences that will be created within each shot. To add a Sub Sequence to each of your Level Seqence's Shots, select (+) Add and set a Name using the array instance. |
| Instance Sub Sequences | When enabled, Sub Sequence assets will only be generated for the first Shot. Any other Shots will reference that Sub-Sequence, instead of creating a unique Sub Sequence per shot. |
| Default Start Time | Set the Default start time for the new Level Sequence, in seconds. |
| Default Duration | Set the default duration for the new Level Sequences, in seconds. |
| Shot Directory | Here you can set the folders name, that will contain your Level Sequene's Shot assets. This folder will be created within the Level Seqence's parent folder, adjacent to your Level Sequence asset. |
| Shot Prefix | Set a prefix name that will be applied to each of the generated Shot assets, to distinguish you Level Sequence's Shots from other Sequence assets. |
| First Shot Number | Set the value that is added to the end of the first generated Shot's name. This value will be added to the end of the Shot assest's name, for example {ShotName}{0000}. |
| Shot Increment | Set the value that will be used to increase the First Shot Number property's value for every generated asset. |
| Shot Num Digits | Set the total number of digits added to the end of the generated Shot assets' name. |
| First Take Number | Set the total number of digits added to the end of a new Take asset's name. |
| Take Separator | Set the character that will be used to separate a new Take asset's name and number. |
| Sub Sequence Separator | Set a character that will be used to separate a new Sub-Sequence asset's name and number. |
| FBX Settings | Here you can set FBX property readers used to map properties and their keyframes to relevant tracks when Importing FBXs in Sequencer. You can add a new FBX setting to your Level Sequence using (+) Add. By default this array includes property mappings for common FBX camera properties such as FieldOfView, FocalLength, and FocusDistance. After adding a new FBX Settings array, you can set the following properties within each array:
|
After setting the new Level Sequence with Shot's settings, the asset will be saved in the assigned location using a folder structure containing the Sub-Sequence Shot assets.

You can save alternate versions of Shots, called Takes, within these folders to organize your Sequence.
User Interface
When viewing a Level Sequence with Shots, there are two main areas for navigation and interaction.

Breadcrumbs
The breadcrumbs area of the toolbar expands when editing a Level Sequence with Shots, it can be used to navigate between your main Level Sequence and its Shots.
Clicking the folder dropdown will display a tree view list containing the Level Sequence and the Shots contained within. Selecting any of these items will open that sequence.

When viewing a Shot or Sub-Sequence, the Sequence's name area will also display the main Level Sequence it is a part of. You can navigate back to the main Level Sequence by selecting it. Within a Sub-Sequence or Shot you can also observe the Viewing Context, or the content from the main Level Sequence that is influencing the Sub-Sequence or Shot content you are viewing.

You can use the Forward and Backward to step through your sequence view history.

Shot Sections
Your Shots are displayed in Sequencer's timeline as Sections. Each Shot Section operates similar to most Sections, and can be moved, trimmed or edited. Double-clicking a shot will open it.
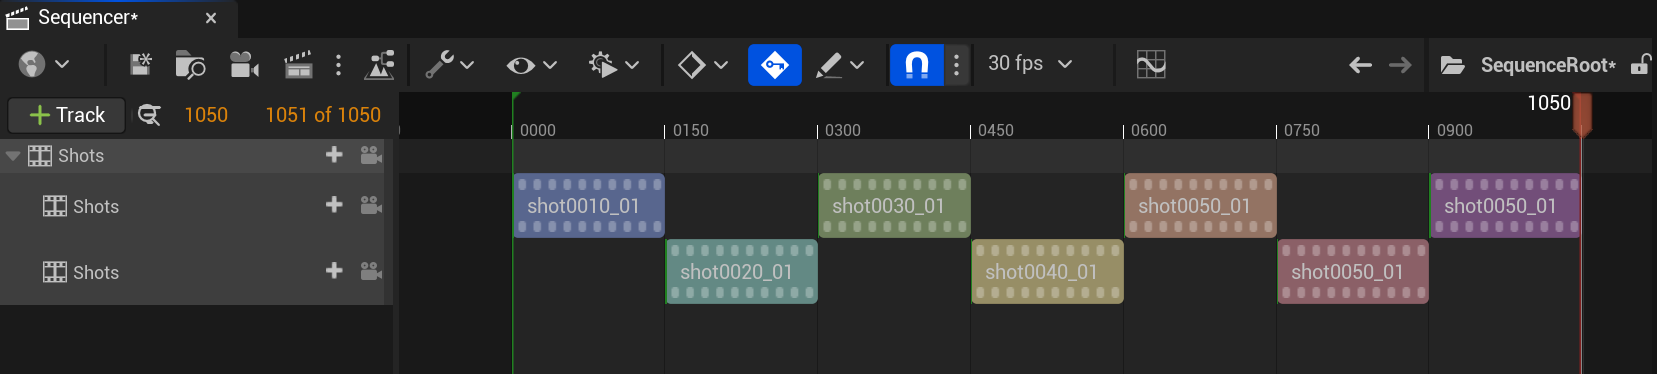
When multiple Shot tracks are being used, Shot Sections placed in the top tracks will be prioritized. This means that if their sections overlap with other sections below, the section range on the top-most tracks will evaluate instead of the bottom tracks.

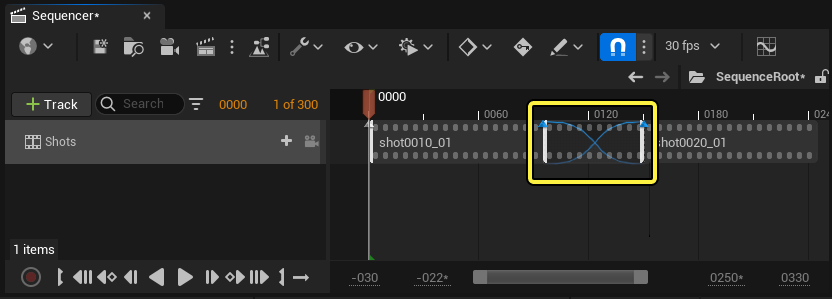
Shots can also be blended together by clicking and dragging the shots in the timeline to overlap with one another in the same track.

You can adjust the blending between shots by clicking and dragging the handles that are rendered over the shot's thumbnail.
Blending can also be controlled using the Set Wight node in the level seqenuce's blueprint.

Shots
Shots are individual sequences within a Level Sequence that you can use to create more complex cinematics in Unreal Engine. Each Shot corresponds to its own Sequence asset. It is recommended when setting up cinematic content to add Actors, cameras, and other cinematic components within Shots, that can then be edited as whole sequences in the main Level Sequence.

Creation
You can add Shots to an existing Level Sequence, by navigating in the Sequence Editor to the Tracks (+) button > Shots Track. Then within the Shots Track you can select (+) Shot > Insert Shot, to create a new Level Sequence asset that will be added to your main Level Sequence as a Sub-Sequence Shot.

When selecting Insert Shot, an asset creation dialog window will appear, asking you to save the shot sequence asset to a location in your project. By default, the directory will be relative to the main Level Sequence, and placed in a shot subdirectory if one is defined in your Editor Project Settings.

Alternatively you can add an existing Level Sequence asset as a Shot using (+) Shot, and selecting the Sequence asset you wish to add as a Sub-Sequence Shot.

Shots can also be added by dragging a Level Sequencer asset from the Content Browser to the Shots track in the main Level Seqence's timeline.

Filler Shots
When selecting Insert Filler, a shot section is created without binding to a sequence asset. A typical use case for filler is when creating a proxy shot or timing that will later have a sequence assigned to it.

You can assign a Sequence asset to an empty filler section, or re-assign a Sequence asset to a Shot, by right clicking the Section and navigating to Properties > Sub Seqence, and selecting the asset using the drop-down menu.

Details and Interaction
You can right-click a Shot in the timeline and navigate in the context menu to Properties to see its details.

Here you can reference a list of a Shot's Properties and a description of their functionality:
| Name | Description |
|---|---|
| Start Frame Offset | Set the number of frames to offset the start time of this Shot. This value provides a similar effect to Slip Editing, as it adjusts the playable region of a clip without affecting the duration. Alternatively, you can hold **Shift and drag along the clip in the Sequencer Timeline** to edit this property. |
| Can Loop | When enabled, the selected Shot will loop when extending its section length beyond its default playable region. |
| End Frame Offset | When the Can Loop property is enabled, this property can be used to offset the loop region end time. |
| First Loop Start Frame | When Can Loop is enabled, this property can be used to offset the first loops start time. |
| Time Scale | Controls the playback rate of the shot. A value of 1 is normal speed, larger numbers are faster, and smaller numbers are slower. |
| Hierarchical Bias | Controls the Hierarchical Bias of the shot. Larger numbers will cause this shot to take priority over other sources when referencing the same Actors. |
| Sub Sequence | The assigned Sequence asset the selected Shot is playing. |
Right-clicking a shot and navigating to the bottom of the context menu will reveal shot-specific actions.
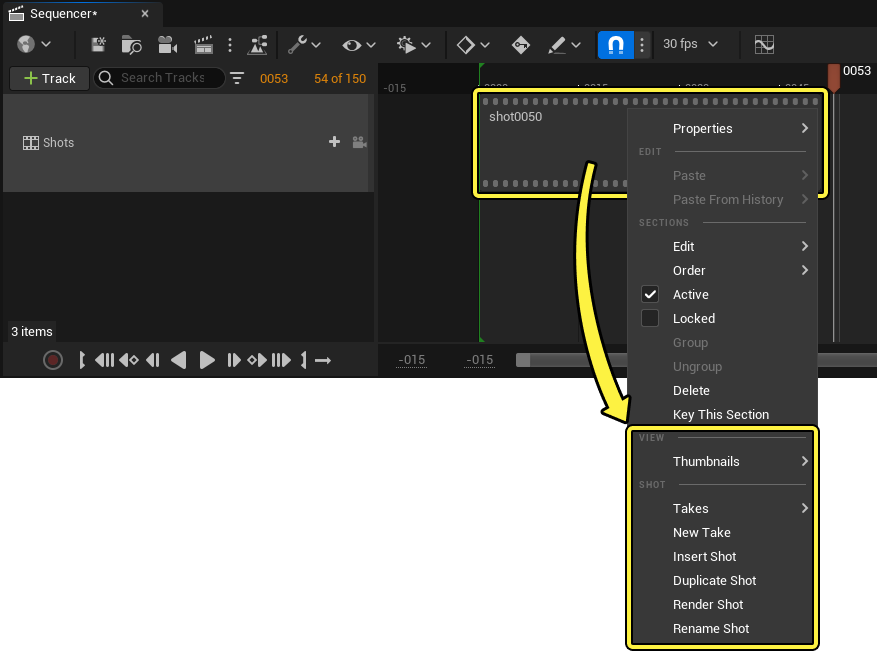
Here you can reference a list of Shot Actions and their functionality, that you can use when editing Shots in a Level Sequence:
| Name | Description |
|---|---|
| Thumbnails | Opens the Thumbnails menu for controlling the image preview on the shot section. |
| Takes | Opens the Takes list for switching your current take for the shot. |
| New Take | Creates a new Take based on this current shot. |
| Insert Shot | Creates a new Shot at the playhead's location. |
| Duplicate Shot | Creates a new Sequence asset by duplicating the currently selected Shot's data. |
| Render Shot | Opens the Render Movie dialog window. If Movie Render Queue is enabled, then a Movie Render Queue window will open instead and will assign the selected Shot as to be rendered. |
| Rename Shot | Renames the Shot. |
Shot Colors
You can color code shots within a root Level Sequence to organize complex cinematics.
To color code a shot, right click the shot and navigate in the context menu to Properties > Color Tint, and set your desired color using the color wheel, RGBA color values, or the eyedropper tool.

Thumbnails
Thumbnails are images that are displayed on the Shot Sections in the Sequencer Timeline to provide a preview image of the shot. Thumbnail images update when zooming in on the timeline in order to show an accurate preview of any specific area of a shot.
 (convert:false)
You can customize the thumbnail display of a Shot by right-clicking any Shot in the timeline and navigating to the Thumbnails menu.

Here you can reference a list of the Thumbnail properties and a description of their function:
| Name | Description |
|---|---|
| Refresh | Regenerates the thumbnails for this shot. This is useful if the thumbnail images are out of date or are displaying incorrectly. |
| Set Thumbnail Time to… | If the Draw Single Thumbnail property is enabled, you can set a time value to display a specific frame of the current shot to use as the single thumbnail image. |
| Refresh All | Regenerates the thumbnails for all shots. This is useful if the thumbnail images are out of date or are showing incorrectly. |
| Draw Thumbnails | Controls the display of thumbnails for all shots. If disabled, then no thumbnails will display, and the track size will reduce. |
| Draw Single Thumbnail | Enabling this will cause only a single thumbnail image to display, which is anchored to the start region of the shot. This mimics the thumbnail display found in other editors like Adobe Premiere. |
| Thumbnail Size | Controls the width and height of thumbnails. Adjusting the height of your thumbnail will increase or decrease the shot track size. |
| Quality | The quality used to render the thumbnail images. |
Sequence Context
When a shot is opened from within a Level Sequence, it will be displayed within the context of the Root Level Sequence. This will include elements from that sequence and other neighboring shots in order to provide the full scene context.
When viewing shots from the Level Sequence context, start and end times will be displayed for both the base shot sequence, and the actual trimmed shot. In this example, you can see a shot with both the Start and End times being trimmed in the Root Level Sequence, and how that information is displayed in the shot view.

-
The trimmed area. This is the region that will be played from the Root Level Sequence.
-
The full sequence playable area. This area is being edited out, and will not play.
Conversely, you can also trim the Start and End times within a shot and observe the trimmed region on your shot from the Root Level Sequence.

If Keep Cursor in Playback Range While Scrubbing is disabled from the Playback Menu, then you can further utilize the Root Level Sequence context by scrubbing outside of the bounds of the trimmed area and see the previous or next shots. This is useful when aligning your current shot with the edits of your adjacent shots.

You can disable this context view by enabling Evaluate Sub Sequences In Isolation from Sequencer's Playback Menu. This option is useful if you want to isolate a specific shot sequence from its Root Level Sequence, as any tracks not in this sequence will no longer evaluate alongside the sequence you are currently viewing.

Hierarchical Bias
Due to the nature of the Root Level Sequence, Shot, and Subsequence systems, there may be cases where the same Actor is being referenced by both the shot and the Root Level Seqeunce, which can cause conflicts. Hierarchical Bias can be used to arbitrate which reference of that Actor should be prioritized to evaluate over other sources. This property is found when right-clicking Shots or Sub Sequence, navigating to the Properties menu, and locating Hierarchical Bias.

Increasing the bias number on a source will cause that source to "win", decreasing the number will cause it to "lose", and having equal bias between sources will cause all sources to evaluate together and blend when possible.
The default value for Hierarchical Bias on the top-level (root) sequence is 0, while for subsequences it is 100. This causes shot sources to take precedence over Root Level Seqeunce sources. Bias also compounds for each subseqeunce layer added, so if a shot sequence contained a child Sub Sequence, then it would have a total bias of 200 (100 + 100), causing the deepest level of influence to "win'' by default.
This effect is demonstrated in the image below, where:
-
The root sequence, which has a default bias of 0, and cumulative bias of 0.
-
The first child sequence, which has a default bias of 100, and cumulative bias of 100.
-
The second child sequence, which has a default bias of 100, and cumulative bias of 200.
Bias Example
The following example demonstrates how to utilize Hierarchical Bias values in your sequences.
A Light Actor is placed in a Level, and is referenced by three different sequences:
- The Root Level Sequence references this light, and its color is keyframed to red.

- Within the Root Level Sequence is a Shot, and its color is keyframed to green.

- Within the Shot, is a Sub Sequence, and its color is keyframed to blue.

By default, the Sub Sequnce, and blue light take priority, because it has the largest cumulative bias. For reference, each sequence's bias value is listed below:
-
Root Level Sequence = 0
-
First child sequence = 100
-
Second child sequence = 200 (100 + 100)

If you right-click the Sub Sequence section and lower its hierarchical bias to -50, then that will cause the Shot, and green light to take priority. This is because the Sub Sequence's cumulative bias is now smaller than its parent, causing the green light to have the largest bias.
At this point, each sequence's bias value would be:
-
Root Sequence = 0
-
First child sequence = 100
-
Second child sequence = 50 (100 - 50)

Setting all the bias values to 0 will cause all sequences to evaluate together and the results will be blended. In this example, the red, green, and blue light color values are combined, becoming white.
At this point, each sequence's bias value would be:
-
Root Sequence = 0
-
First child sequence = 0
-
Second child sequence = 0 (0 + 0)

Takes
When creating cinematic content, there may be cases where you want to experiment with your shots without modifying the original shot. Takes can be used to create separate copies of shots, allowing you to edit those copies without disturbing the original.
To create a Take, right-click a shot and select New Take. A new asset window will appear, with the directory pointing to the same folder as the original shot. Click Save to save the new Take.

By default, new takes will be named after a shot, with a numerical postfix. You can customize this postfix in the Editor Project Settings Page.
When a new take is created, the shot will switch to using it instead of the original shot. You can change between the original (Take 1), and other Takes by right-clicking and navigating to the Takes menu. The active take is denoted by a star icon next to the entry.
