Getting Started
A Multi-Process nDisplay config, whether created from scratch or by converting an existing one, will have the following:
- Onscreen Nodes: Each regular “onscreen” nDisplay node has its GPU adapter set to the primary GPU
- Offscreen Nodes: Additional “offscreen” nDisplay nodes are added for each host, with the GPU adapter set to the secondary GPU
- ICVFX Cameras: The Shared Media Input and Output are set up for each ICVFX camera component to transfer the render from the offscreen node to the onscreen node. Due to the ICVFX camera rendering on the secondary GPU, a performance advantage is gained.
This guide will outline each of these setup aspects in more detail.
If you would like to learn about creating a new config from scratch, check out the In-Camera VFX Quick Start documentation linked below:
Setting up the Regular Onscreen nDisplay Node
The regular “onscreen” nDisplay node must be set to render on a different GPU than the offscreen node. Setting the regular nDisplay node’s Graphics Adapter to 0 will assign it to the computer’s primary GPU. Note: While this numbering is typical, some machines may require a different number. If you experience unexpected GPU utilization in Switchboard monitor, it may be advisable to change the GPU Index number.
Graphics Adapter settings are found in the Details panel of a node.

The regular nDisplay node can be found in the Cluster tab.

Graphics Adapter settings are found in the Details panel of a node.
Setting up the Offscreen nDisplay Node
An “offscreen” render node is added for each of the host machines:

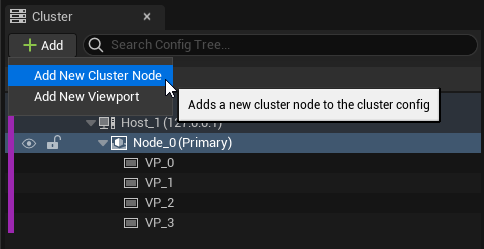
“Add New Cluster Node” can be found in the Cluster tab.
Note the following details in the Add New Cluster Node window:
- The Name requires a unique identifier. In the example below, “_OS” has been added to indicate that this is the offscreen node. Note that the rest of the name (“Node_0”) is kept consistent - this is important so that it is clear which nodes belong to each host machine in Switchboard.
- Add Viewport to New Cluster Node is unticked to prevent a viewport from being added. If this option were enabled, the viewport would need to be removed for Headless Rendering.
- Headless Rendering is enabled. This forces the render to render offscreen, therefore not negatively impacting desktop real estate or interfering with Nvidia Sync.
- Graphics Adapter is set to 1, indicating the secondary GPU. Note: While this numbering is typical, some machines may require a different number.

Image highlighting which sections of the Add New Cluster Node window must be updated.
ICVFX Camera Setup
Shared Media Input and Output
In the Details panel of the ICVFX component, there is a Media section. In this context, it’s helpful to think of “media” as the inner frustum render, which is transferred from the offscreen node to the regular node and then displayed over the outer frustum. The Media settings control how different types of media are sent and received by nDisplay viewports. Media must be “enabled” and two areas must be configured:
- Media Output Groups control where rendered media is sent from.
- Media Input Groups control where the rendered media is received.
Media Output Group
It is essential that all offscreen nodes are added under the Cluster Nodes Index. Additionally, a unique name (“CameraA”) has been assigned to the Media Output. Since this name is used to receive the texture on the input group, it is case-sensitive and must be unique for each ICVFX camera component.

Media Input Group
The Media Input Group has a similar setup:
- The regular node has been added to the Cluster Nodes Index. All regular nodes should be listed here.
- The unique name (“CameraA”) should be identical to the one set in the Media Output Section, per ICVFX Camera component.
- Mode is set to Framelocked. This ensures that the frames rendered on the offscreen node are correctly paired with the frame currently being rendered on the onscreen node. This is important because the offscreen node is running sync policy none, which is essentially freerunning. Without Framelocked enabled, it could be possible to present a frame that has been received ahead of when it's needed.
- Zero Latency is enabled. This removes any latency, which is typically used as a buffer to protect against FPS drops. That is redundant for ICVFX since target FPS must always be achieved.

Once these settings are updated, Compile.
Reference Project
A reference to a Multi-Process enabled nDisplay config is available in the InCamera VFX template project. This can be found via the new project window under Film/Video & Live Events > InCameraVFX.

This config can be found in the Content Browser under Content > InCamVFXBP > nDisplay_InCamVFX_MultiProcess_Config.
Running Multi-Process with Switchboard
Once the Multi-Process nDisplay config has been added, both the offscreen and onscreen nodes show as separate devices in Switchboard. Learn more about Switchboard in Unreal Engine here.
Connection is required for each node, but only a single instance of the switchboard listener is required per machine. Both onscreen and offscreen nodes should be launched and run simultaneously. This is best achieved via the Start All Connected nDisplay Devices button.

