
本教程将会向你展示如何激活摄像机以及如何切换你激活的摄像机。
1 - 在场景中放置摄像机
如果你是 虚幻引擎 (UE)的新手,你可需要先阅读我们的编程快速入门教程。对于本教程,我们假设你熟悉以下操作:创建项目,向项目添加C++代码,编译代码,以及在虚幻引擎中向 Actor 添加 组件
-
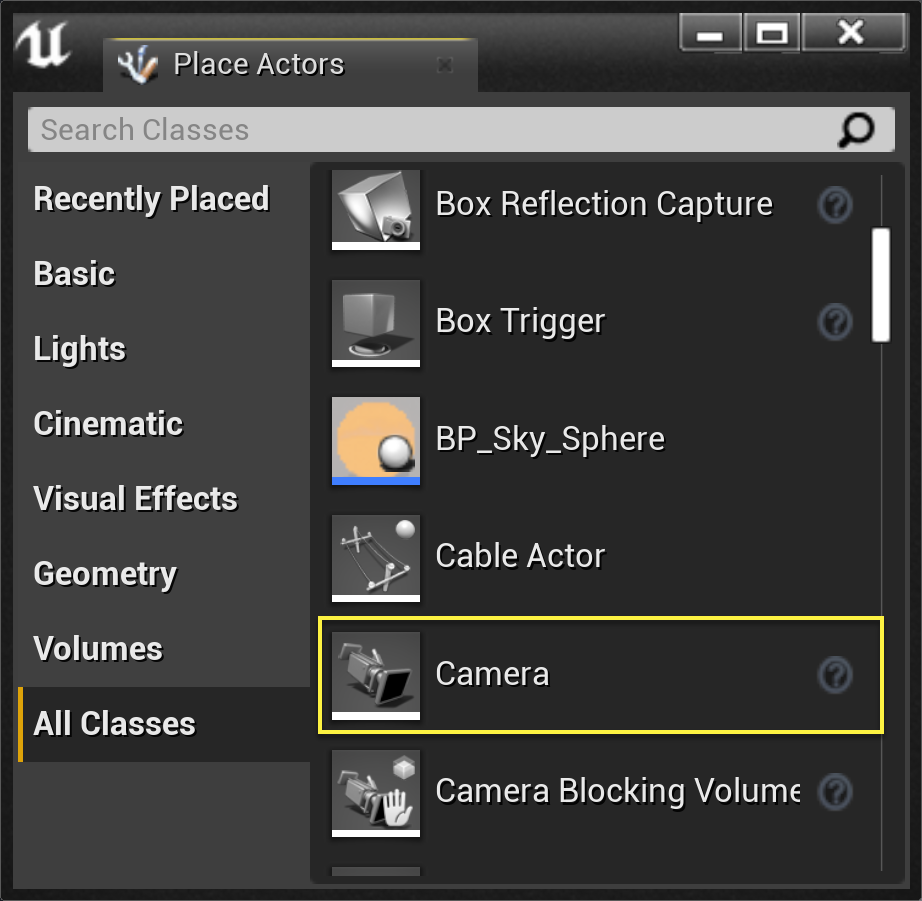
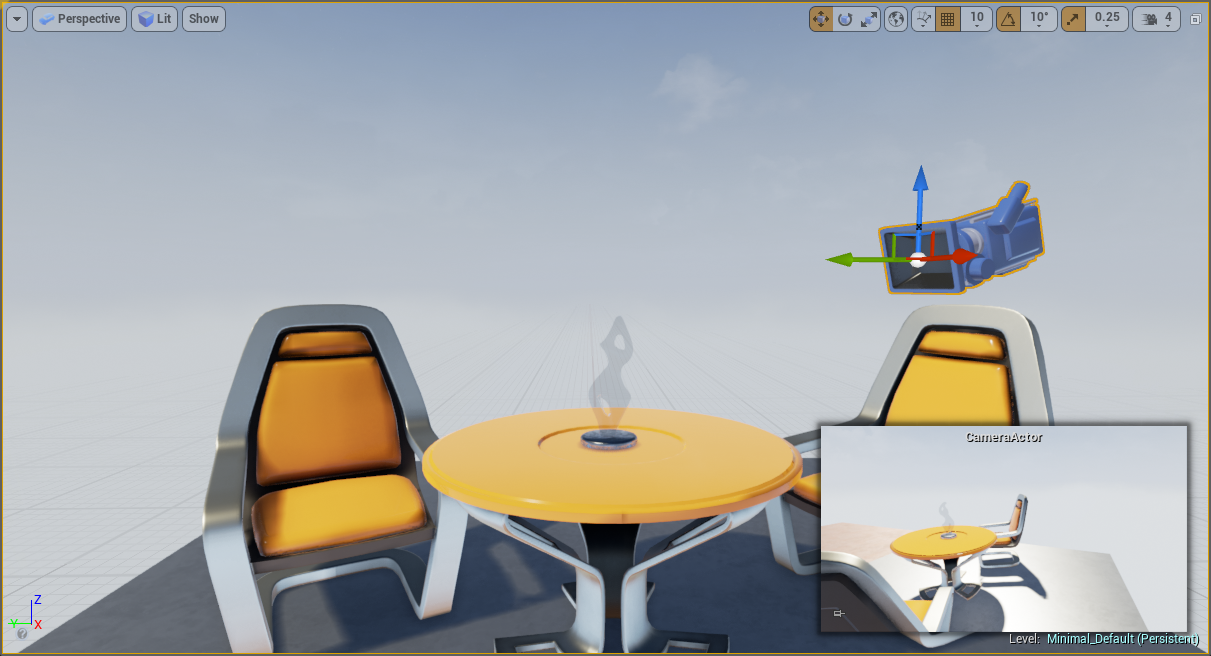
我们将从创建一个新的基本代码项目开始,名为"HowTo_AutoCamera",其中包含初学者内容。我们需要做的第一件事是在我们的场景中创建两个摄像机。由于设置摄像机有多种方法,在这里我们将使用最常见的两种方法。对于我们的第一个摄像机,找到 放置Actor(Place Actors) 面板并选中 所有类(All Classes) 选项卡,你将找到一个 摄像机(Camera) Actor。将其拖拽到 关卡编辑器(Level Editor) 中,并将其放置在合适的位置,以便它能清楚地看到我们的场景。

完成此操作后,只要我们选择了新的 摄像机Actor(Camera Actor),关卡编辑器(Level Editor) 窗口就会有一个画中画视图,显示该 摄像机Actor(Camera Actor) 可以看到的内容。

-
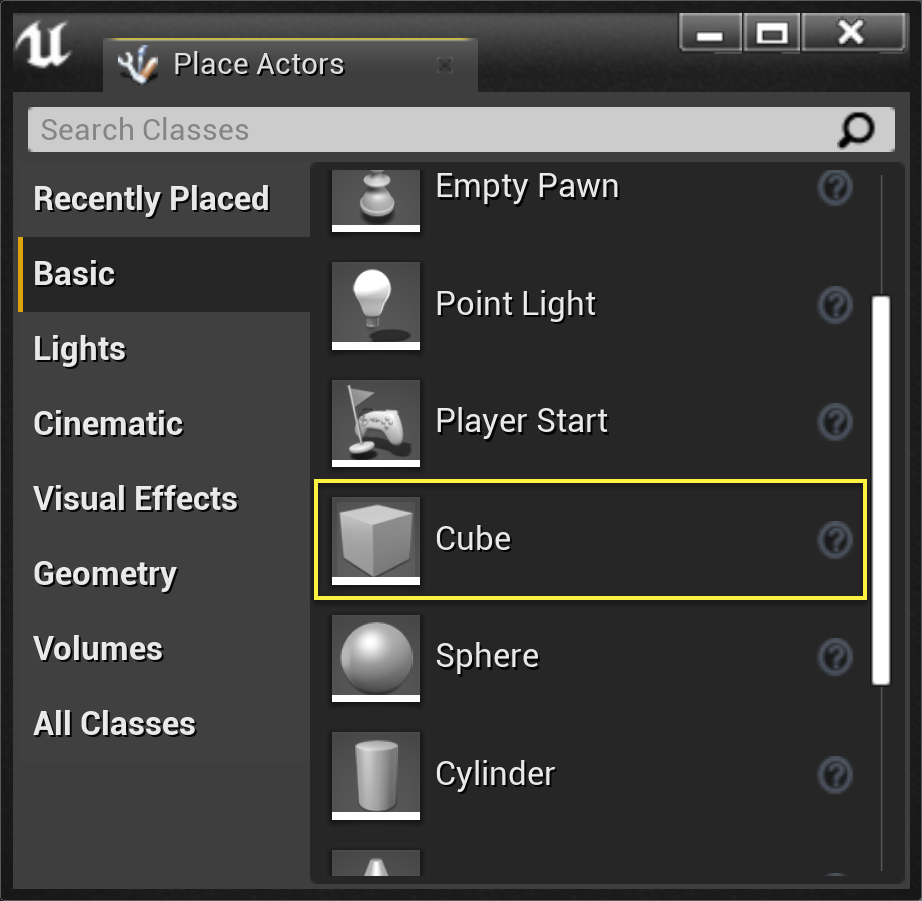
对于我们的第二个摄像机,我们将使用一种更深入的方法,让我们可以进行更多的控制。首先,单击 放置Actor(Place Actor) 面板的 基本(Basic) 选项卡,将一个 立方体(Cube) 拖放到 关卡编辑器(Level Editor) 窗口中。

在这一步骤中,我们几乎可以使用任何Actor类。用我们在快速入门教程中创建的MyActor类来替代立方体(Cube)可能会很有趣。
-
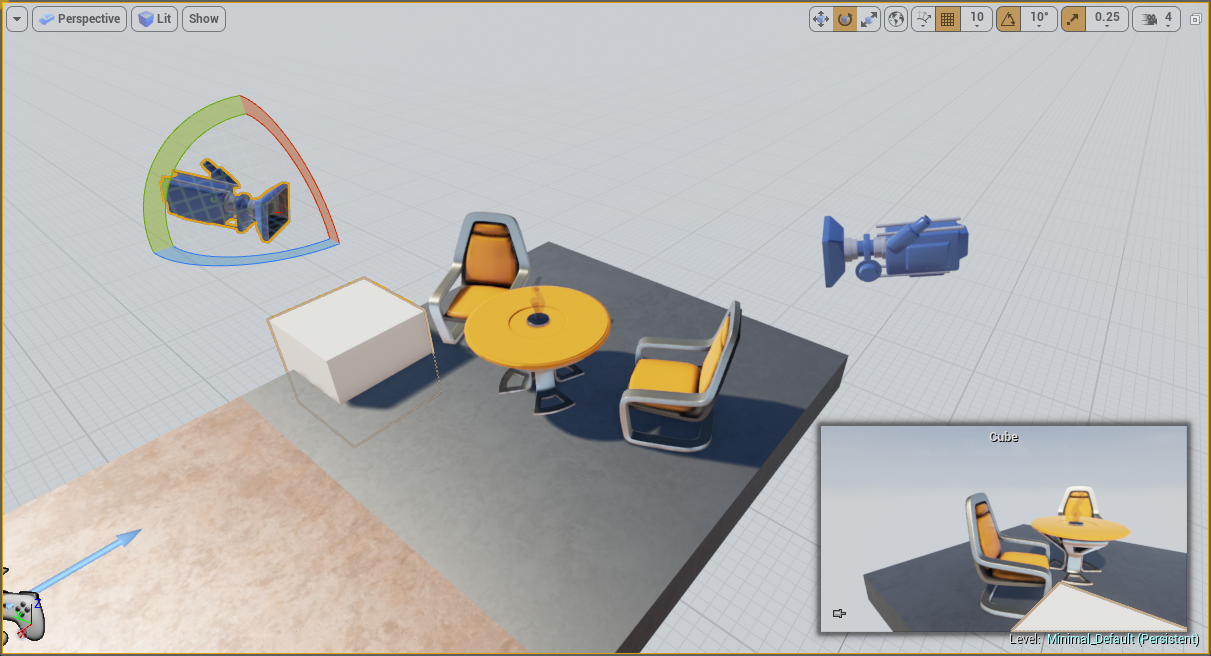
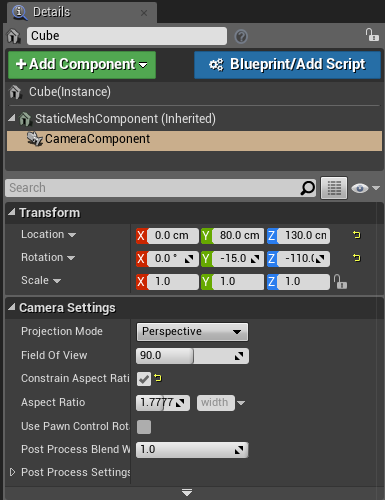
放置我们的 立方体(Cube) Actor后,单击 详细信息(Details) 面板中的 +添加组件(+ Add Component) 按钮,来为 立方体(Cube) 添加 摄像机组件(CameraComponent)。你现在可以设置该 摄像机组件(CameraComponent) 的位置和旋转,让我们看到一个不同于我们之前放置的 摄像机Actor(CameraActor) 的场景视图。

-
我们应该打开 约束高宽比(Constrain Aspect Ratio) 来自定义我们的 摄像机组件(CameraComponent),以便它与我们的 摄像机Actor(CameraActor) 上的设置匹配。这会使摄像机视图之间的转换更流畅,但这不是必需的。

设置好我们的场景后,我们现在可以开始创建控制摄像机视图的类。
2 - 在C++中控制摄像机视图
-
我们现在可以创建一个C++类来控制摄像机视图了。在本教程中,我们可以扩展 Actor 为新类,我们将其称之为CameraDirector。
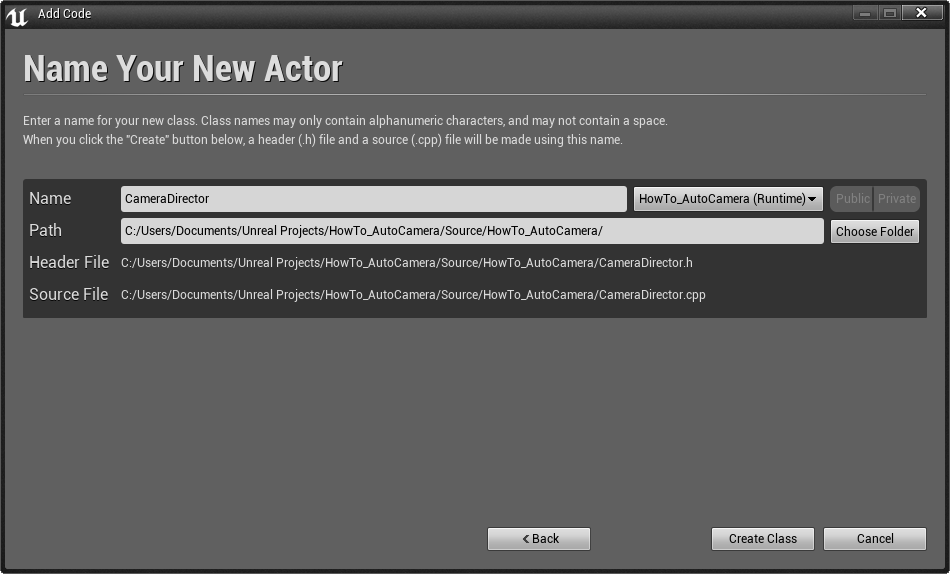
-
在CameraDirector.h中,我们将以下代码添加到ACameraDirector类定义的底部位置:
UPROPERTY(EditAnywhere) AActor* CameraOne; UPROPERTY(EditAnywhere) AActor* CameraTwo; float TimeToNextCameraChange;UPROPERTY 宏使得变量对 虚幻引擎 可见。这样,当我们启动游戏或在将来的工作会话中重新载入关卡或项目时,这些变量中设置的值将不会被重置。我们还添加了 EditAnywhere 关键字,这允许我们在 虚幻编辑器 中设置摄像机1(CameraOne)和摄像机2(CameraTwo)。
-
在CameraDirector.cpp中,将以下代码行添加到文件的顶部位置,位于其它#include行的正下方:
#include "Kismet/GameplayStatics.h"GameplayStatics头文件允许我们访问一些有用的通用函数,在本教程中我们需要使用其中一个函数。完成后,将以下代码添加到 ACameraDirector::Tick 的底部位置:
const float TimeBetweenCameraChanges = 2.0f; const float SmoothBlendTime = 0.75f; TimeToNextCameraChange -= DeltaTime; if (TimeToNextCameraChange <= 0.0f) { TimeToNextCameraChange += TimeBetweenCameraChanges; // 查找处理本地玩家控制的actor。 APlayerController* OurPlayerController = UGameplayStatics::GetPlayerController(this, 0); if (OurPlayerController) { if ((OurPlayerController->GetViewTarget() != CameraOne) && (CameraOne != nullptr)) { // 立即切换到摄像机1。 OurPlayerController->SetViewTarget(CameraOne); } else if ((OurPlayerController->GetViewTarget() != CameraTwo) && (CameraTwo != nullptr)) { // 平滑地混合到摄像机2。 OurPlayerController->SetViewTargetWithBlend(CameraTwo, SmoothBlendTime); } } }此代码将可以让我们每隔3秒在两个不同的摄像机间切换默认玩家的视图。
-
现在我们的代码可进行编译,我们可以返回到 虚幻编辑器(Unreal Editor) 并按下 编译(Compile) 按钮。
无需其它代码。我们现在可以在场景中设置CameraDirector了。
完成的代码
CameraDirector.h
// 版权所有 1998-2017 Epic Games, Inc。保留所有权利。
#pragma once
#include "GameFramework/Actor.h"
#include "CameraDirector.generated.h"
UCLASS()
class HOWTO_AUTOCAMERA_API ACameraDirector : public AActor
{
GENERATED_BODY()
public:
// 为此Actor的属性设置默认值
ACameraDirector();
protected:
// 当游戏开始或生成时调用
virtual void BeginPlay() override;
public:
// 每一帧调用
virtual void Tick( float DeltaSeconds ) override;
UPROPERTY(EditAnywhere)
AActor* CameraOne;
UPROPERTY(EditAnywhere)
AActor* CameraTwo;
float TimeToNextCameraChange;
};
CameraDirector.cpp
// 版权所有 1998-2017 Epic Games, Inc。保留所有权利。
#include "HowTo_AutoCamera.h"
#include "CameraDirector.h"
#include "Kismet/GameplayStatics.h"
// 设置默认值
ACameraDirector::ACameraDirector()
{
// 将此Actor设置为每一帧调用Tick()。如果不需要,可以关闭此选项来提高性能。
PrimaryActorTick.bCanEverTick = true;
}
// 当游戏开始或生成时调用
void ACameraDirector::BeginPlay()
{
Super::BeginPlay();
}
// 每一帧调用
void ACameraDirector::Tick( float DeltaTime )
{
Super::Tick( DeltaTime );
const float TimeBetweenCameraChanges = 2.0f;
const float SmoothBlendTime = 0.75f;
TimeToNextCameraChange -= DeltaTime;
if (TimeToNextCameraChange <= 0.0f)
{
TimeToNextCameraChange += TimeBetweenCameraChanges;
//查找处理本地玩家控制的Actor。
APlayerController* OurPlayerController = UGameplayStatics::GetPlayerController(this, 0);
if (OurPlayerController)
{
if ((OurPlayerController->GetViewTarget() != CameraOne) && (CameraOne != nullptr))
{
//立即切换到摄像机1。
OurPlayerController->SetViewTarget(CameraOne);
}
else if ((OurPlayerController->GetViewTarget() != CameraTwo) && (CameraTwo != nullptr))
{
//平滑地混合到摄像机2。
OurPlayerController->SetViewTargetWithBlend(CameraTwo, SmoothBlendTime);
}
}
}
}
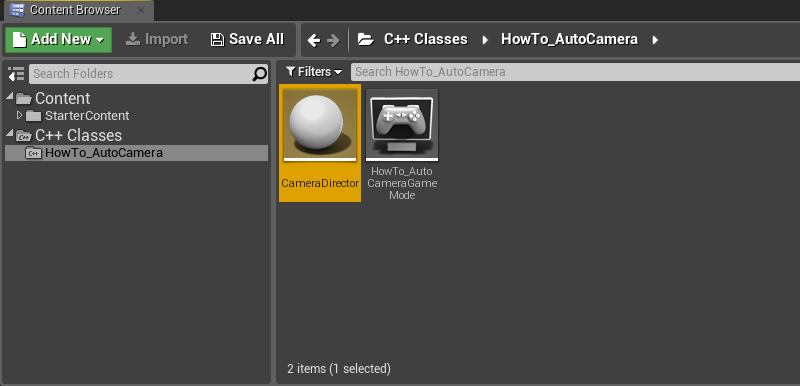
3 - 在场景中放置Camera Director
-
在代码编译完成后,我们可以将 内容浏览器(Content Browser) 中的新类的实例拖曳到 关卡编辑器(Level Editor) 中。

-
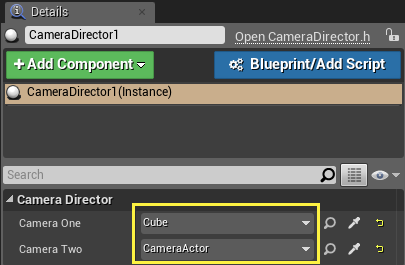
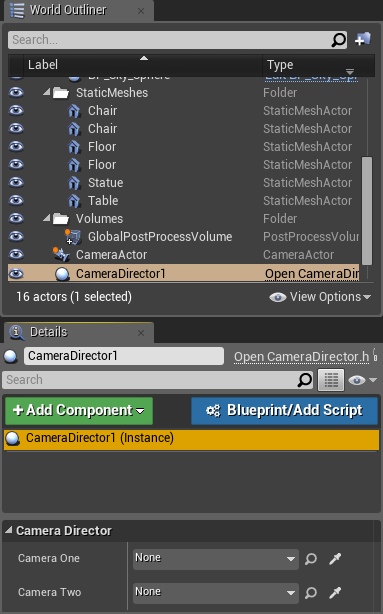
接下来,我们需要设置摄像机1(CameraOne)和摄像机2(CameraTwo)变量。在 World Outliner (世界大纲视图) 中找到CameraDirector,并在 详细信息面板(Details Panel) 中进行编辑。

单击标记为"无(None)"的下拉框,然后将变量设置为 Cube(立方体) 和我们之前创建的 摄像机Actor (CameraActor)。
-
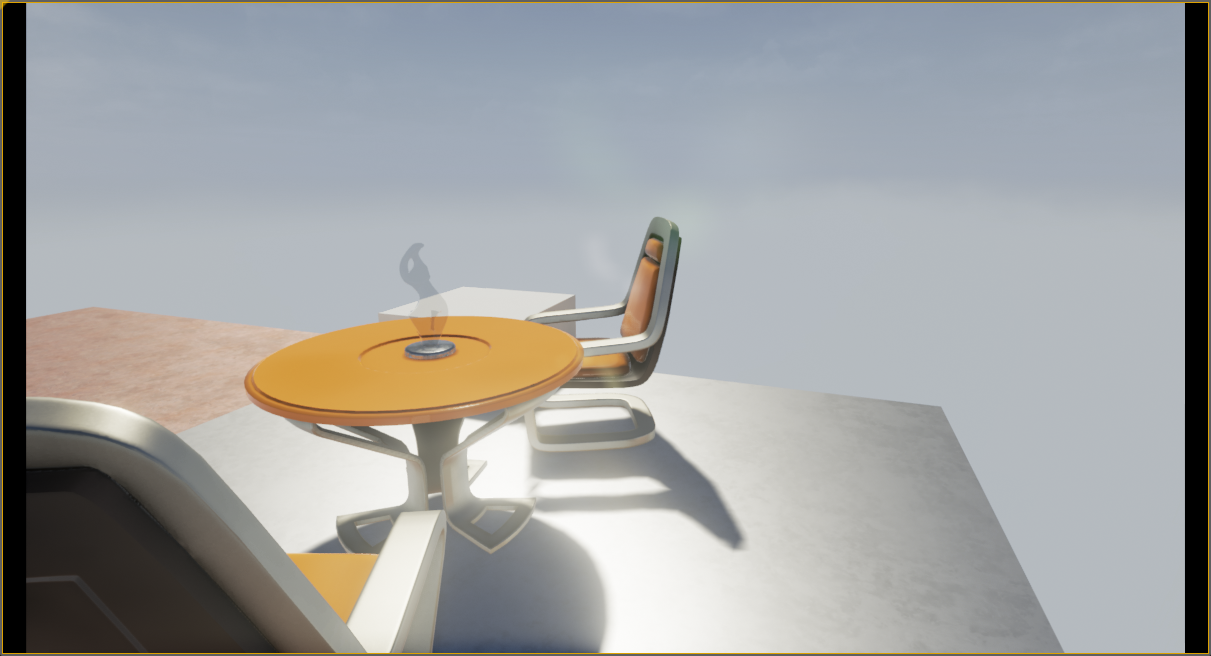
如果我们按下播放(Play),我们将会看到与此视图对齐的摄像机:
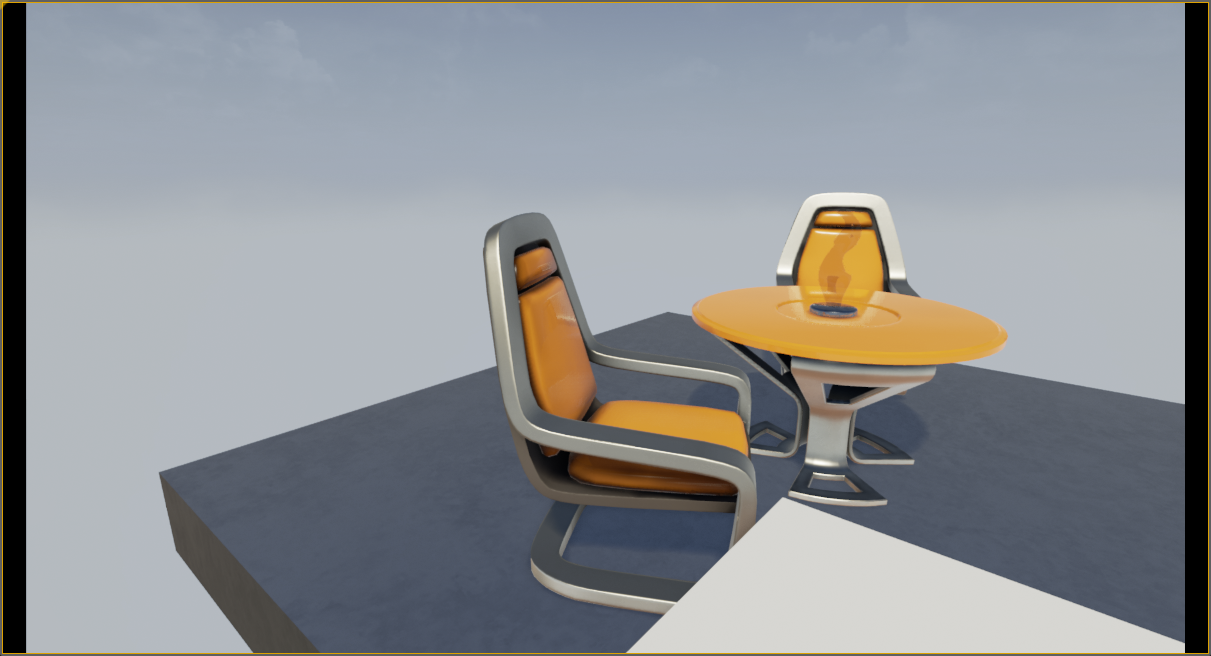
然后平滑混合到此视图:

需要等待几秒才会对齐。
我们现在的这个系统会完全基于游戏逻辑来移动玩家的摄像机。如果玩家在游戏中无法直接控制摄像机,或者混合摄像机视图十分有用时,我们可以修改代码以在这些游戏中使用。
完成的代码
CameraDirector.h
// 版权所有 1998-2017 Epic Games, Inc。保留所有权利。
#pragma once
#include "GameFramework/Actor.h"
#include "CameraDirector.generated.h"
UCLASS()
class HOWTO_AUTOCAMERA_API ACameraDirector : public AActor
{
GENERATED_BODY()
public:
// 为此Actor的属性设置默认值
ACameraDirector();
protected:
// 当游戏开始或生成时调用
virtual void BeginPlay() override;
public:
// 每一帧调用
virtual void Tick( float DeltaSeconds ) override;
UPROPERTY(EditAnywhere)
AActor* CameraOne;
UPROPERTY(EditAnywhere)
AActor* CameraTwo;
float TimeToNextCameraChange;
};
CameraDirector.cpp
// 版权所有 1998-2017 Epic Games, Inc。保留所有权利。
#include "HowTo_AutoCamera.h"
#include "CameraDirector.h"
#include "Kismet/GameplayStatics.h"
// 设置默认值
ACameraDirector::ACameraDirector()
{
// 将此Actor设置为每一帧调用Tick()。如果不需要,可以关闭此选项来提高性能。
PrimaryActorTick.bCanEverTick = true;
}
// 当游戏开始或生成时调用
void ACameraDirector::BeginPlay()
{
Super::BeginPlay();
}
// 每一帧调用
void ACameraDirector::Tick( float DeltaTime )
{
Super::Tick( DeltaTime );
const float TimeBetweenCameraChanges = 2.0f;
const float SmoothBlendTime = 0.75f;
TimeToNextCameraChange -= DeltaTime;
if (TimeToNextCameraChange <= 0.0f)
{
TimeToNextCameraChange += TimeBetweenCameraChanges;
//查找处理本地玩家控制的Actor。
APlayerController* OurPlayerController = UGameplayStatics::GetPlayerController(this, 0);
if (OurPlayerController)
{
if (CameraTwo && (OurPlayerController->GetViewTarget() == CameraOne))
{
//平滑地混合到摄像机2。
OurPlayerController->SetViewTargetWithBlend(CameraTwo, SmoothBlendTime);
}
else if (CameraOne)
{
//立即切换到摄像机1。
OurPlayerController->SetViewTarget(CameraOne);
}
}
}
}
4 - 自主操作!
利用你所学到知识,尝试执行以下操作:
- 将摄像机附加到移动Actor上来创建摇臂或移动车镜头。
- 使用一个数组变量来存储摄像机,而不是摄像机1(CameraOne)和摄像机2(CameraTwo),这样你就可以遍历任意数量摄像机的序列,而不是仅仅两个。
- 不要使用Actor指针来存储摄像机,而是创建一个[结构](programming-and-scripting\programming-language-implementation## 1 - Place Cameras in the World
If you are new to Unreal Engine, you might want to read our Programming Quick Start first. For this tutorial, we will assume you are familiar with creating a project, adding C++ code to it, compiling your code, and adding Components to Actors in Unreal Engine.
-
We will begin by creating a new Basic Code project, with starter content, named "HowTo_AutoCamera". The first thing we'll need to do is create two cameras in our world. Since there are multiple ways to set up cameras, we'll go with the two most common ways here. For our first camera, go to the Place Actors panel and select the All Classes tab, you'll find a Camera actor. Drag this into the Level Editor and position it so that it has a good view of our scene.
When this is done, the Level Editor window will have a picture-in-picture view of what our new Camera Actor can see as long as we have the Camera Actor selected.
-
For our second camera, we'll use a method that goes a little more in-depth and gives us a little more control. Start by clicking the Basic tab in the Place Actors panel, then drag a Cube into the Level Editor window.
We can use almost any actor class for this step. The MyActor class we created in the Quick Start tutorial might be interesting to substitute for the Cube.
-
When our Cube actor is placed, add a CameraComponent by clicking the + Add Component button in the Details panel for the Cube. You can now set the position and rotation of that CameraComponent to give us a different view of the scene than the CameraActor we placed earlier.
-
We should customize our CameraComponent by turning on Constrain Aspect Ratio so that it matches the setting on our CameraActor. This will make transitions between camera views smoother, but it is not required.
With our world set up, we're now ready to create the class that will control our camera view.
2 - Control Camera View in C++
-
We're ready to create a C++ class to control our camera view. For this tutorial, we can extend Actor into a new class which we'll call CameraDirector.

-
In CameraDirector.h, add the following code to the bottom of the ACameraDirector class definition:
UPROPERTY(EditAnywhere) AActor* CameraOne; UPROPERTY(EditAnywhere) AActor* CameraTwo; float TimeToNextCameraChange;The UPROPERTY macro makes our variables visible to Unreal Engine. This way, values set in these variables will not be reset when we launch the game or reload our level or project in a future work session. We have also added the EditAnywhere keyword, which will allow us to set CameraOne and CameraTwo in the Unreal Editor.
-
In CameraDirector.cpp, add the following line of code to the top of the file, right underneath the other #include lines:
#include "Kismet/GameplayStatics.h"The GameplayStatics header file gives us access to some useful general-purpose functions, one of which we will need for this tutorial. When that is done, add the following code to the bottom of ACameraDirector::Tick:
const float TimeBetweenCameraChanges = 2.0f; const float SmoothBlendTime = 0.75f; TimeToNextCameraChange -= DeltaTime; if (TimeToNextCameraChange <= 0.0f) { TimeToNextCameraChange += TimeBetweenCameraChanges; // Find the actor that handles control for the local player. APlayerController* OurPlayerController = UGameplayStatics::GetPlayerController(this, 0); if (OurPlayerController) { if ((OurPlayerController->GetViewTarget() != CameraOne) && (CameraOne != nullptr)) { // Cut instantly to camera one. OurPlayerController->SetViewTarget(CameraOne); } else if ((OurPlayerController->GetViewTarget() != CameraTwo) && (CameraTwo != nullptr)) { // Blend smoothly to camera two. OurPlayerController->SetViewTargetWithBlend(CameraTwo, SmoothBlendTime); } } }This code will cause us to switch the default player's view between two different cameras every three seconds.
-
Our code is now ready to be compiled, so we can return to the Unreal Editor and press the Compile button.
No further code is needed. We can set up our CameraDirector in our world now.
Finished Code
CameraDirector.h
// Copyright 1998-2017 Epic Games, Inc. All Rights Reserved.
#pragma once
#include "GameFramework/Actor.h"
#include "CameraDirector.generated.h"
UCLASS()
class HOWTO_AUTOCAMERA_API ACameraDirector : public AActor
{
GENERATED_BODY()
public:
// Sets default values for this actor's properties
ACameraDirector();
protected:
// Called when the game starts or when spawned
virtual void BeginPlay() override;
public:
// Called every frame
virtual void Tick( float DeltaSeconds ) override;
UPROPERTY(EditAnywhere)
AActor* CameraOne;
UPROPERTY(EditAnywhere)
AActor* CameraTwo;
float TimeToNextCameraChange;
};
CameraDirector.cpp
// Copyright 1998-2017 Epic Games, Inc. All Rights Reserved.
#include "HowTo_AutoCamera.h"
#include "CameraDirector.h"
#include "Kismet/GameplayStatics.h"
// Sets default values
ACameraDirector::ACameraDirector()
{
// Set this actor to call Tick() every frame. You can turn this off to improve performance if you don't need it.
PrimaryActorTick.bCanEverTick = true;
}
// Called when the game starts or when spawned
void ACameraDirector::BeginPlay()
{
Super::BeginPlay();
}
// Called every frame
void ACameraDirector::Tick( float DeltaTime )
{
Super::Tick( DeltaTime );
const float TimeBetweenCameraChanges = 2.0f;
const float SmoothBlendTime = 0.75f;
TimeToNextCameraChange -= DeltaTime;
if (TimeToNextCameraChange <= 0.0f)
{
TimeToNextCameraChange += TimeBetweenCameraChanges;
//Find the actor that handles control for the local player.
APlayerController* OurPlayerController = UGameplayStatics::GetPlayerController(this, 0);
if (OurPlayerController)
{
if ((OurPlayerController->GetViewTarget() != CameraOne) && (CameraOne != nullptr))
{
//Cut instantly to camera one.
OurPlayerController->SetViewTarget(CameraOne);
}
else if ((OurPlayerController->GetViewTarget() != CameraTwo) && (CameraTwo != nullptr))
{
//Blend smoothly to camera two.
OurPlayerController->SetViewTargetWithBlend(CameraTwo, SmoothBlendTime);
}
}
}
}
3 - Place a Camera Director in the World
-
Once our code has compiled, we can drag an instance of our new class from the Content Browser into the Level Editor.
-
Next, we'll need to set the CameraOne and CameraTwo variables. Find our CameraDirector in the World Outliner and edit it in the Details Panel.
Click on the dropdown boxes labeled "None" and set our variables to the Cube and the CameraActor that we created earlier.

-
If we press Play, we will see the camera snap to this view:

And then blend smoothly to this view:
Where it will wait a few seconds before snapping back.
We now have a system that moves the player's camera based purely on game logic. This code can be modified for use in any game where the player does not have direct control over the camera, or where blending between camera views is useful.
Finished Code
CameraDirector.h
// Copyright 1998-2017 Epic Games, Inc. All Rights Reserved.
#pragma once
#include "GameFramework/Actor.h"
#include "CameraDirector.generated.h"
UCLASS()
class HOWTO_AUTOCAMERA_API ACameraDirector : public AActor
{
GENERATED_BODY()
public:
// Sets default values for this actor's properties
ACameraDirector();
protected:
// Called when the game starts or when spawned
virtual void BeginPlay() override;
public:
// Called every frame
virtual void Tick( float DeltaSeconds ) override;
UPROPERTY(EditAnywhere)
AActor* CameraOne;
UPROPERTY(EditAnywhere)
AActor* CameraTwo;
float TimeToNextCameraChange;
};
CameraDirector.cpp
// Copyright 1998-2017 Epic Games, Inc. All Rights Reserved.
#include "HowTo_AutoCamera.h"
#include "CameraDirector.h"
#include "Kismet/GameplayStatics.h"
// Sets default values
ACameraDirector::ACameraDirector()
{
// Set this actor to call Tick() every frame. You can turn this off to improve performance if you don't need it.
PrimaryActorTick.bCanEverTick = true;
}
// Called when the game starts or when spawned
void ACameraDirector::BeginPlay()
{
Super::BeginPlay();
}
// Called every frame
void ACameraDirector::Tick( float DeltaTime )
{
Super::Tick( DeltaTime );
const float TimeBetweenCameraChanges = 2.0f;
const float SmoothBlendTime = 0.75f;
TimeToNextCameraChange -= DeltaTime;
if (TimeToNextCameraChange <= 0.0f)
{
TimeToNextCameraChange += TimeBetweenCameraChanges;
//Find the actor that handles control for the local player.
APlayerController* OurPlayerController = UGameplayStatics::GetPlayerController(this, 0);
if (OurPlayerController)
{
if (CameraTwo && (OurPlayerController->GetViewTarget() == CameraOne))
{
//Blend smoothly to camera two.
OurPlayerController->SetViewTargetWithBlend(CameraTwo, SmoothBlendTime);
}
else if (CameraOne)
{
//Cut instantly to camera one.
OurPlayerController->SetViewTarget(CameraOne);
}
}
}
}
4 - On Your Own!
Using what you have learned, try to do the following:
- Attach a Camera to a moving Actor to create a crane or dolly shot.
- Use a single Array variable to store your cameras, instead of CameraOne and CameraTwo, so you can go through a sequence of any number of cameras, instead of just two.
- Instead of using Actor pointers to store your cameras, create a Structure that holds the pointer, as well as time before changing the view, and blend time to the new view.
As for the specifics covered in this tutorial:
- For more information on Cameras and ways to control them, see the Camera framework page, or try the Player-Controlled Cameras tutorial.
- For further tutorials, see the C++ Programming Tutorials page. \Structs)来保持指针以及在更改视图之前的时间,并将时间混合到新视图中。
有关本教程介绍的细节: