
概述
接口负责定义一系列共有的行为或功能,这些行为或功能在不同Actor中可以有不同的实现方法。当你为不同Actor实现了相同类型的功能时,适合使用此通信方法。 接口通信的一个常见应用场景是,为项目中的多个Actor实现某种通用行为。这些Actor类可以是门、窗、汽车等。每个Actor类都不同,并且在调用"打开接口(Open Interface)"函数时会执行不同的行为。
在此示例中,建议你使用接口通信而非类型转换,因为你可以对所有Actor执行相同的函数调用,而不必单独去转换每个类。此外,与类型转换相比,接口还具备性能优势,因为加载一个需要转换成其他类型的Actor,如果不谨慎处理,可能会造成链式加载,即加载单个Actor导致更多Actor加载到内存中。 此方法要求每个Actor都实现接口,以便访问其共有功能。此外,你还需要引用Actor,以便通过引用来调用接口函数。采用这种通信方法时,当前Actor和目标Actor之间是一对一关系。
在此快速指南中,你将学习如何创建一个简单的交互系统,通过在两个不同Actor间通信,学习接口的用法。
必需设置
-
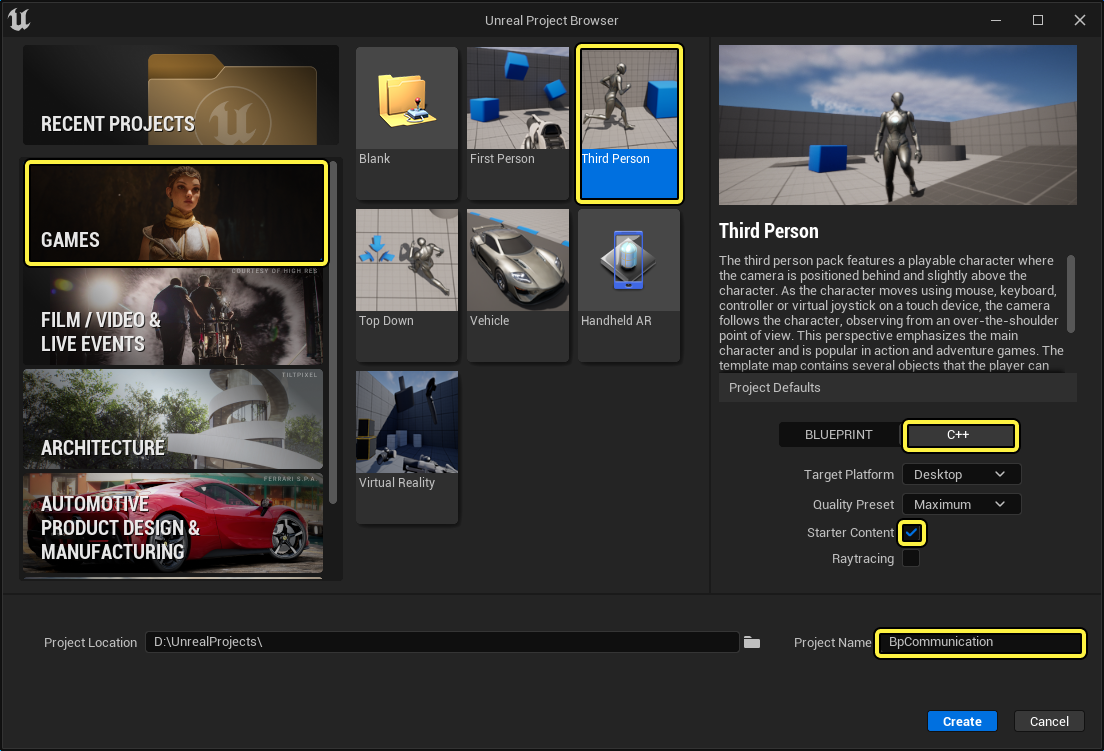
首先点击 游戏(Games) > 第三人称(Third Person) > 蓝图(Blueprint) ,创新名为 BPCommunication 的新项目,并启用初学者内容包。
 (w:600)
创建接口
-
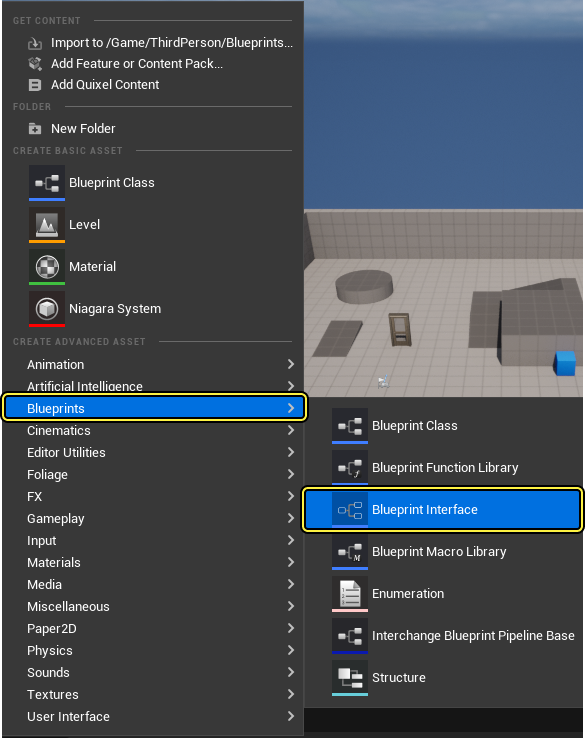
在 内容浏览器(Content Browser) 中右键点击,然后选择 蓝图(Blueprints) > 蓝图接口(Blueprint Interface) 。将接口命名为 BPI_Interact 。
命名蓝图接口时, BPI_ 是常见的名称前缀。
-
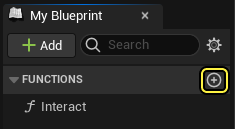
在 内容浏览器(Content Browser) 中双击 BPI_Interact 将其打开。 在 函数(Functions) 列表下,将第一个函数命名为 Interact 。
-
编译(Compile) 并 保存(Save) 接口。
创建交互式电灯
-
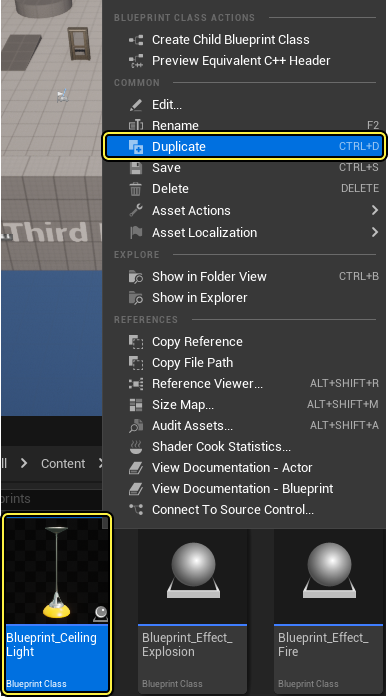
在 内容浏览器(Content Browser) 中转到 初学者内容包(Starter Content) > 蓝图(Blueprints) 。右键点击 Blueprint_CeilingLight ,然后选择 复制(Duplicate) 。将此蓝图命名为 BP_Lamp ,将其移动到游戏文件夹。
-
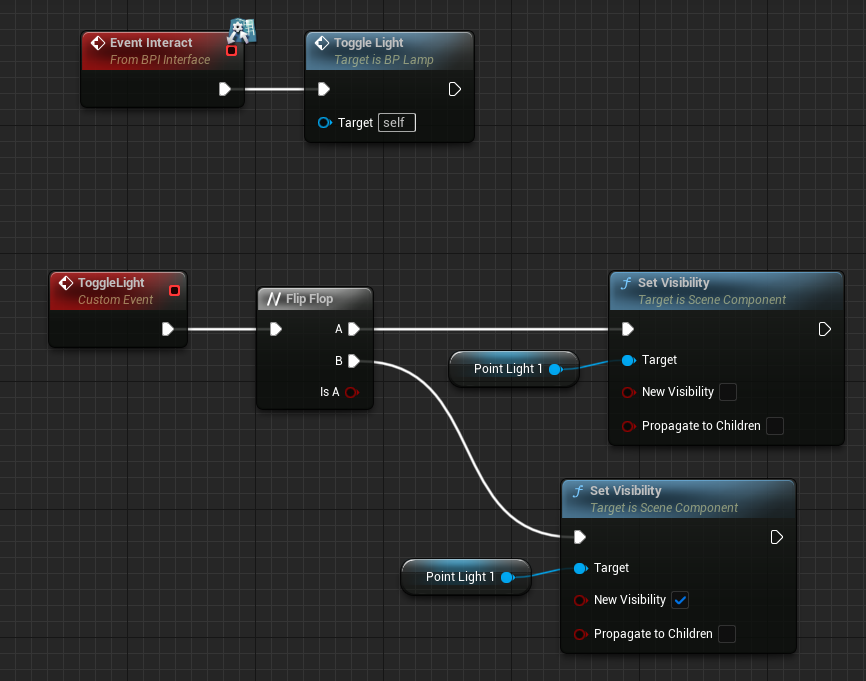
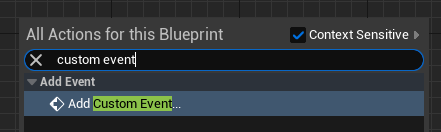
在 内容浏览器(Content Browser) 中双击 BPI_Lamp 将其打开。右键点击 事件图表(Event Graph) ,然后搜索并选择 添加自定义事件(Add Custom Event) 。将事件命名为 ToggleLight 。

-
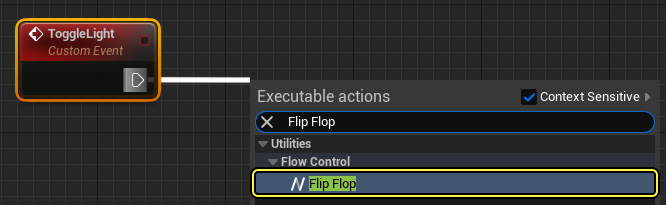
从 ToggleLight 节点拖出一根引线,然后搜索并选择 Flip Flop 。
-
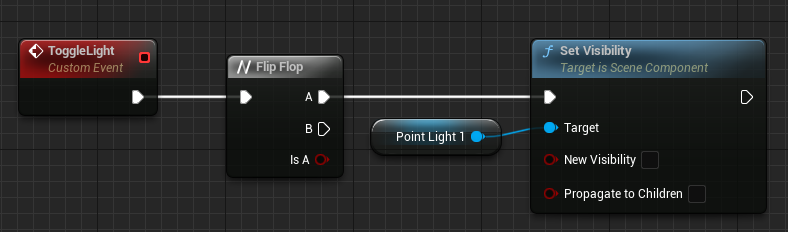
将 Point Light 1 组件拖动到 事件图表(Event Graph) 以创建参考节点。从 Point Light 1 节点拖出一根引线,然后搜索并选择 Set Visibility 。将 Flip Flop 节点的 A引脚(A pin) 连接到 Set Visibility 节点,如下所示。
-
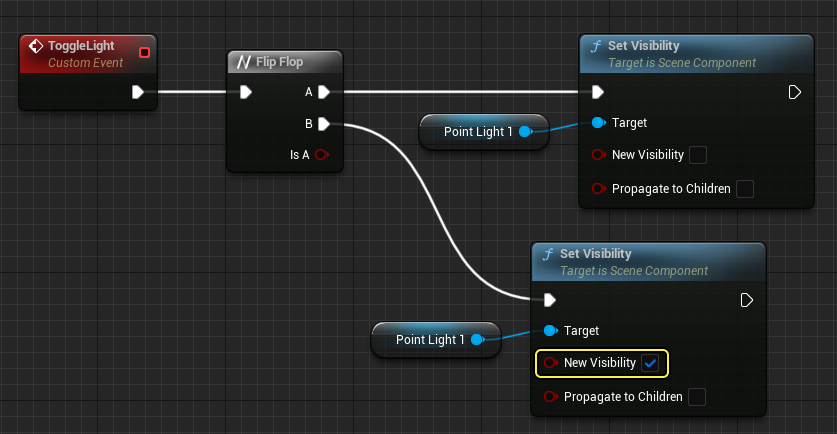
复制 Point Light 1 和 Set Visibility 节点,将它们连接到 Flip Flop 节点的 B引脚(B pin) 。将 New Visibility(新可视性) 设置为True。
-
点击菜单栏中的 类设置(Class Settings) ,然后找到 细节(Details) 面板。

-
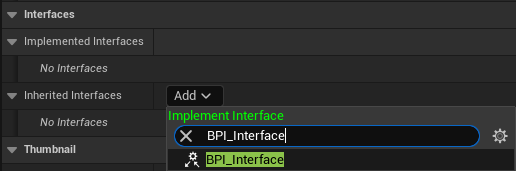
向下滚动到 接口(Interfaces) 部分,点击 添加(Add) 下拉菜单,然后搜索并选择 BPI_Interact 。 编译(Compile) 并 保存(Save) 蓝图。
-
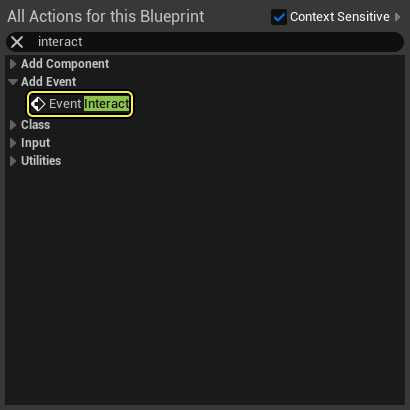
转到 我的蓝图(My Blueprint) 选项卡下的 接口(Interf aces) 部分。右键点击 Interact 接口函数,然后选择 实现(Implement) 事件(event) 。你将会看到 Event Interact 节点显示在 事件图表(Event Graph) 中。
-
从 Event Interact 节点拖出一根引线,然后搜索并选择 ToggleLight 。
-
编译(Compile) 并 保存(Save) 蓝图。
创建可交互的门
-
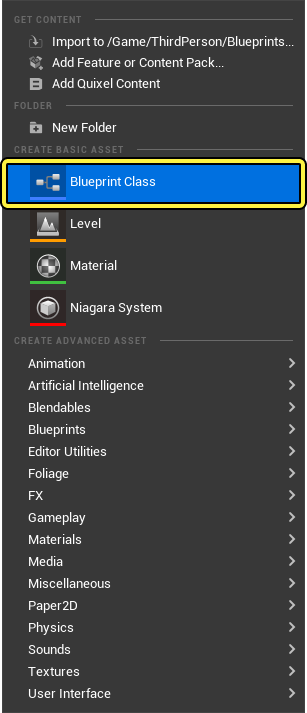
在 内容浏览器(Content Browser) 中点击右键,在 创建基本资产(Create Basic Asset) 分段下点击 蓝图类(Blueprint Class) 。
-
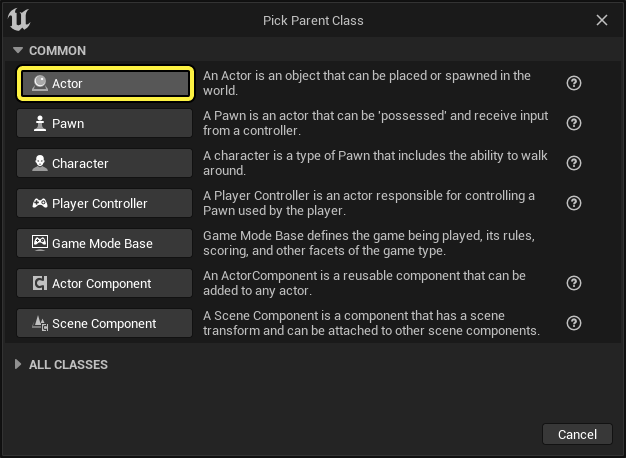
选择 Actor 类作为父类,并将蓝图命名为 BP_Door 。
-
在 内容浏览器(Content Browser) 中双击 BPI_Door 将其打开。然后在蓝图编辑器中,转到 组件(Components) 面板,点击 添加组件(Add Component) 下拉菜单。搜索并选择 静态网格体(Static Mesh) ,将组件命名为 Frame 。这会将静态网格体组件添加到蓝图。
-
添加另一个 静态网格体(Static Mesh) 组件,将其命名为 Door 。
-
选择 Frame 组件,在 细节(Details) 面板中,点击 静态网格体(Static Mesh) 下拉菜单,然后搜索并选择 SM_DoorFrame 。

-
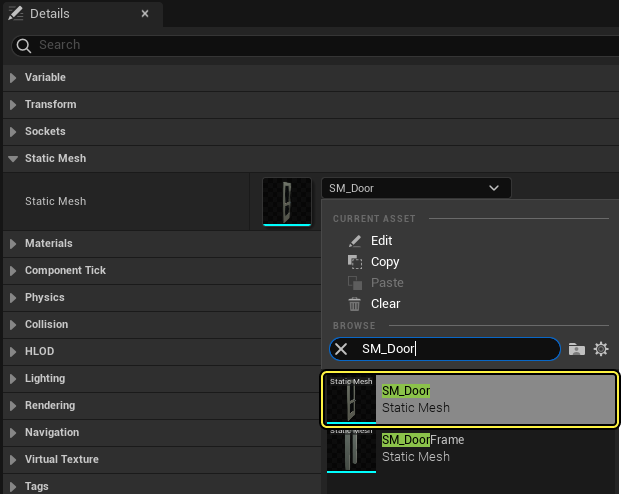
针对 Door 组件重复执行以上步骤,并添加 SM_Door 静态网格体。

-
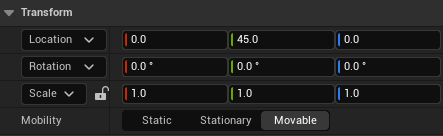
在选中 Door 组件时,将 Y 位置设置为 45.0 ,如下所示。你将会看到与框架对齐的门。
-
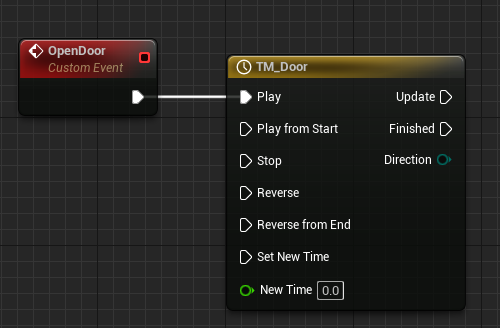
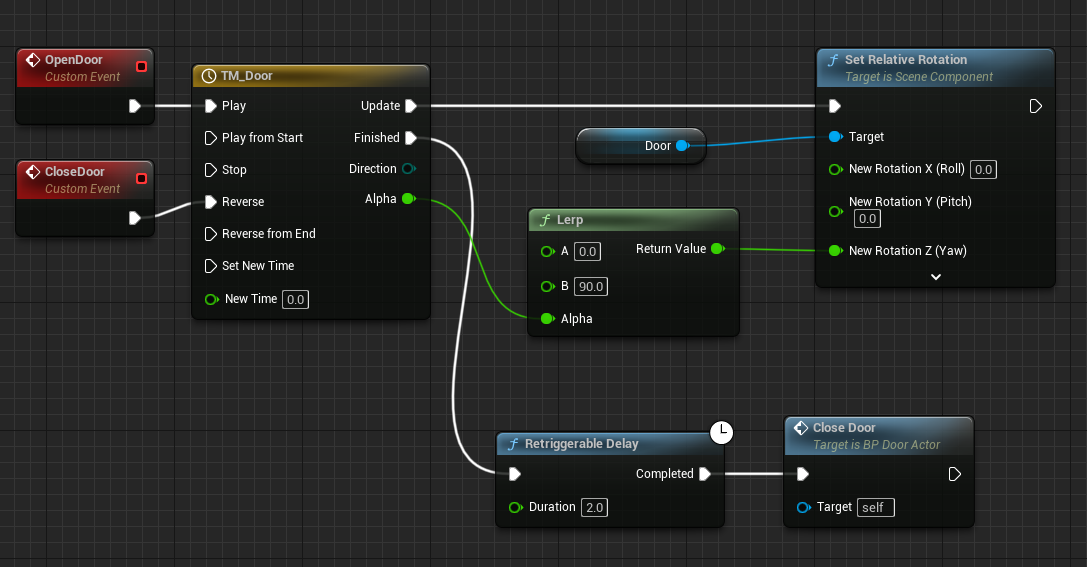
右键点击 事件图表(Event Graph) ,然后搜索并选择 添加自定义事件(Add Custom Event) 。将事件命名为 OpenDoor 。重复执行该过程,创建另一个名为 CloseDoor 的事件。
-
从 OpenDoor 事件拖出一根引线,然后搜索并选择 添加时间轴(Add Timeline) 。将时间轴命名为 TM_Door 。
-
将 CloseDoor 事件连接到 TM_Door 上的 恢复(Reverse) 执行引脚。
-
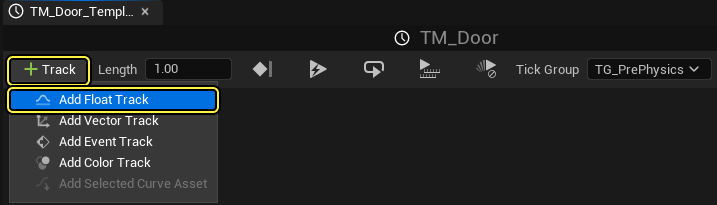
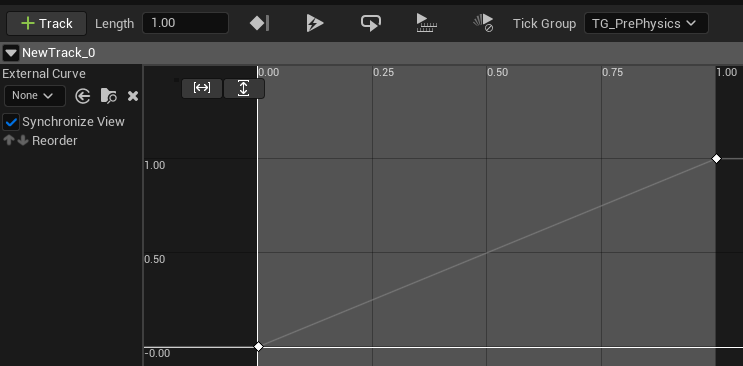
双击 TM_Door 将其打开。点击 添加浮点曲线(Add Float Curve) 按钮,添加浮点轨道并将其命名为 Alpha 。将长度设置为 1.00 。
-
右键点击图表,然后选择 将键添加到CurveFloat_1(Add key to CurveFloat_1) 以添加新点。将 时间(Time) 和 值(Value) 设置为 0.0 。
-
将 时间(Time) 和 值(Value) 设置为 1.0 ,重复执行以上步骤以添加另一个点。
-
返回到 事件图表(Event Graph) ,将 Door 静态网格体组件拖动到 事件图表(Event Graph) 中以创建节点。从 Door 节点拖出一根引线,然后搜索并选择 SetRelativeRotation 。
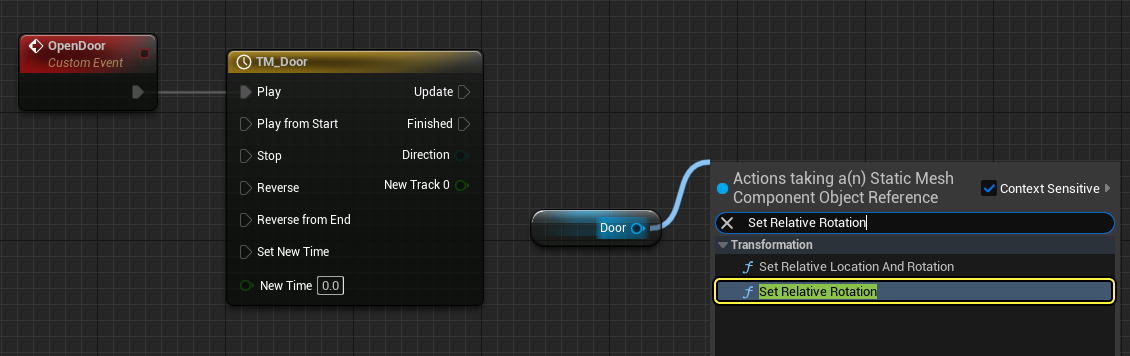
-
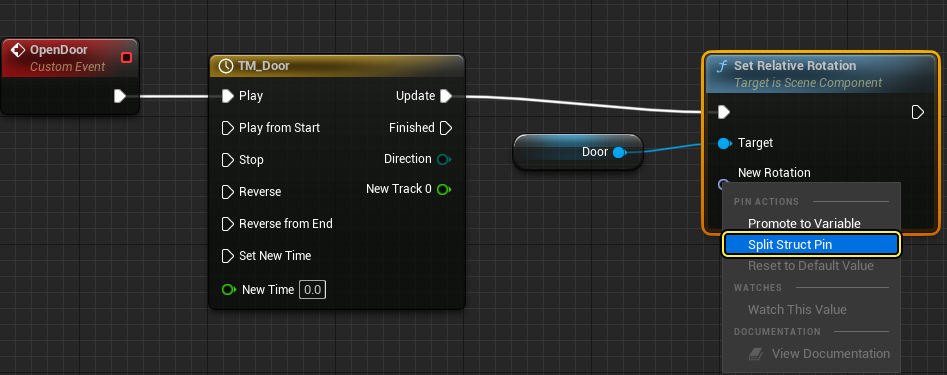
将 更新(Update) 引脚从 TM_Door 连接到 SetRelativeRotation 节点。右键点击 SetRelativeRotation 节点的 新旋转(New Rotation) 引脚,然后选择 分割结构体引脚(Split Struct Pin) 。
-
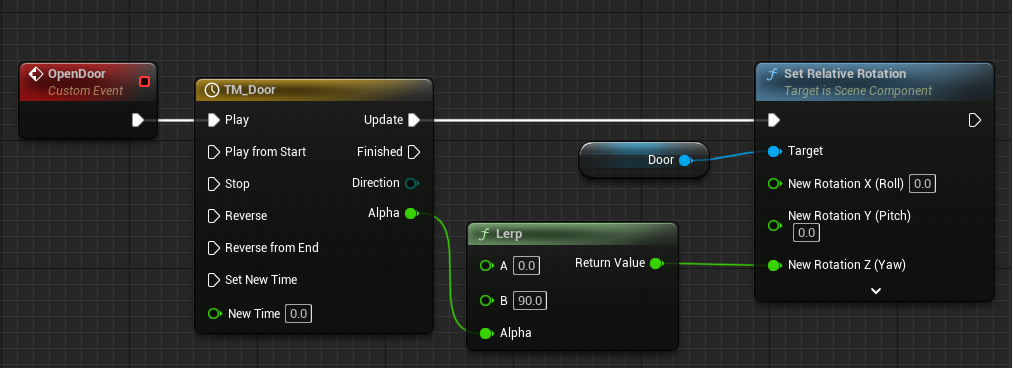
右键点击 事件图表(Event Graph) ,然后搜索并选择 Lerp浮点(Lerp Float) 。将 Lerp 节点的 返回值(Return Value) 连接到 SetRelativeRotation 节点的 偏转(Yaw) 引脚。将 TM_Door 的 Alpha 引脚连接到 Lerp 节点的 Alpha 引脚。最后,将 B 的值设置为 90.0 ,如下所示。
-
从 TM_Door 的 已完成(Finished) 引脚拖出一根引线,然后搜索并选择 Retriggerable Delay 。将节点的值设置为 2.0 。
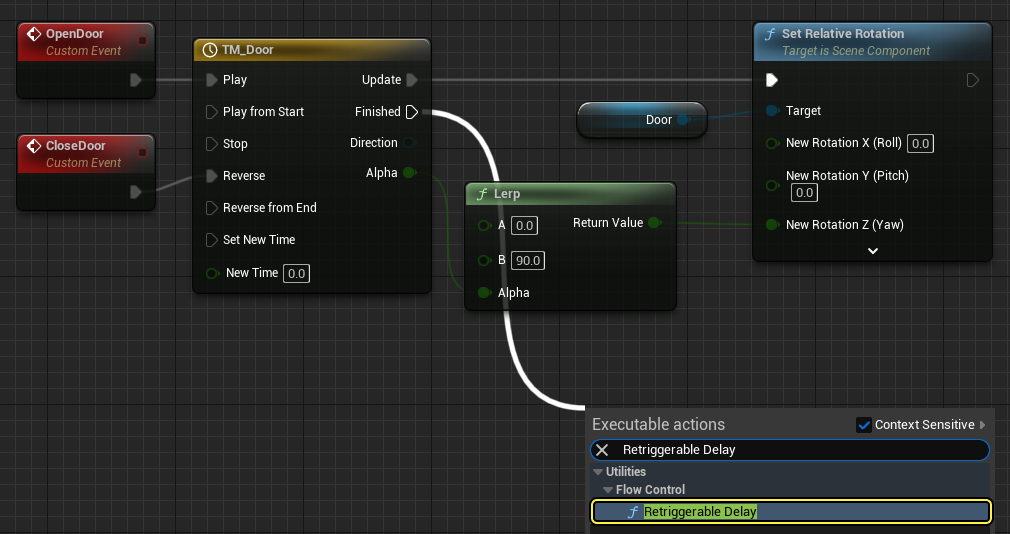
-
从 Retriggerable Delay 节点拖出一根引线,然后搜索并选择 CloseDoor 。
-
点击菜单栏上的 类设置(Class Settings) 。

-
在 接口(Interfaces) 部分中点击 添加(Add) 下拉菜单,然后搜索并选择 BPI_Interact 。

-
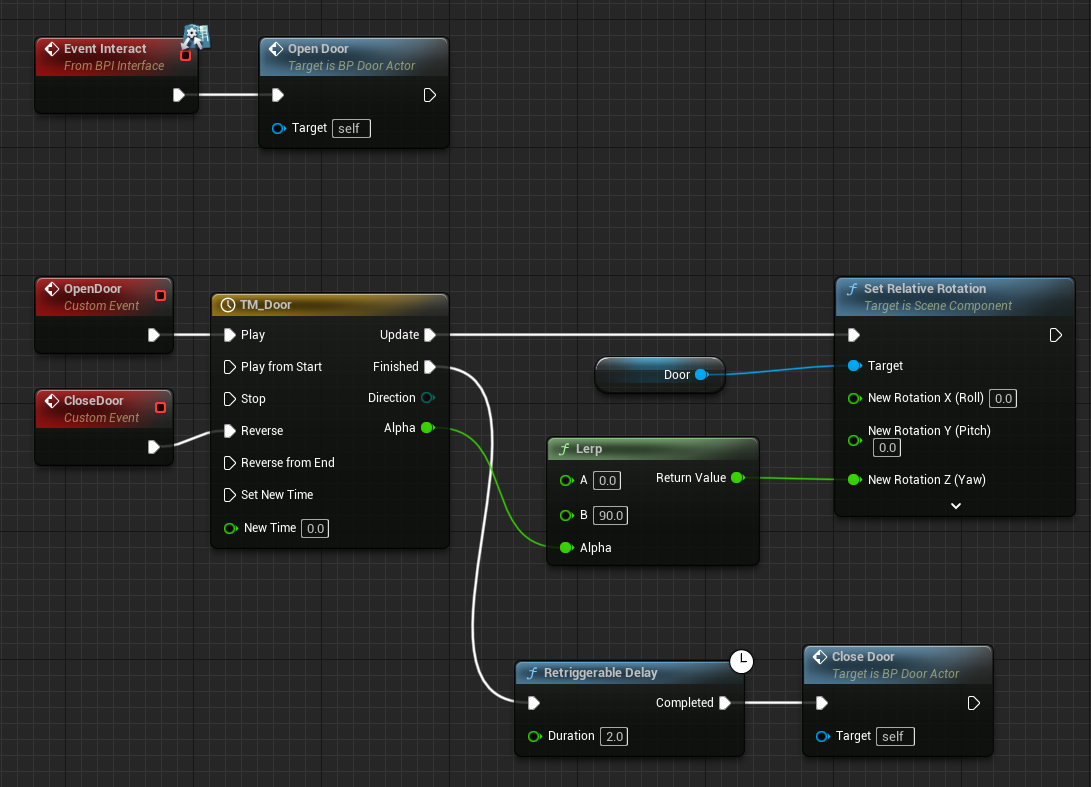
从 Event Interact 节点拖出一根引线,然后搜索并选择 OpenDoor 。
-
编译(Compile) 并 保存(Save) 蓝图。
修改玩家蓝图
-
在蓝图编辑器中打开 ThirdPersonCharacter 蓝图。
-
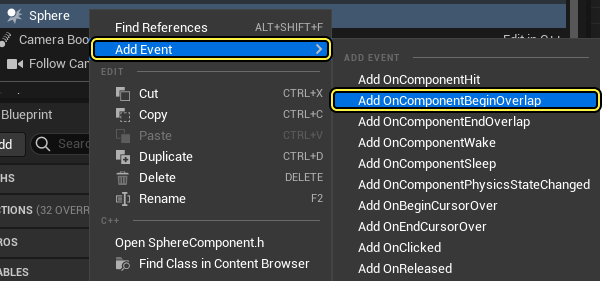
在蓝图编辑器中,转到 组件(Components) 面板,点击 添加组件(Add Component) 按钮。搜索并选择 球体碰撞(Sphere Collision) 。这会将球体碰撞组件添加到蓝图。

-
选择 球体碰撞(Sphere Collision) 组件之后,转到 细节(Details) 面板,将 半径(Radius) 设置为200。

-
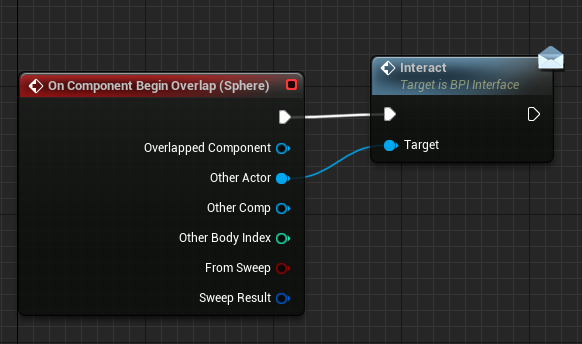
右键点击 球体碰撞(Sphere Collision) 组件,然后选择事件 OnComponentBeginOverlap ,将其添加到 事件图表(Event Graph) 。
-
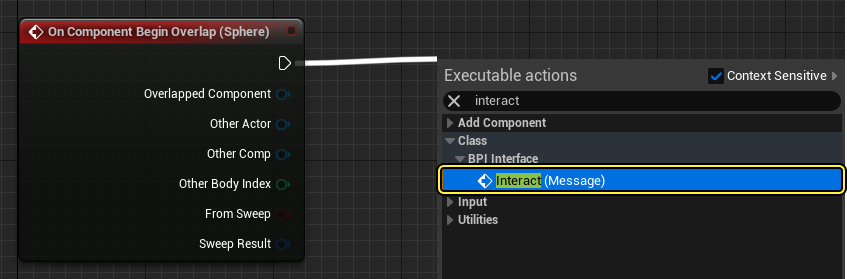
从 On Component Begin Overlap 节点拖出一根引线,然后搜索并选择 Interact (Message) 。确保选择位于 BPI交互(BPI Interact) 类别下的函数。
-
将 Other Actor 节点从 On Component Begin Overlap 事件连接到 交互(Interact) 函数上的 目标(Target) 引脚。
-
编译(Compile) 并 保存(Save) 蓝图。
6 - 测试交互系统
-
将 BP_Door 和 BP_Lamp Actor拖动到关卡。

-
点击 运行(Play) ,然后接近每个Actor以查看它们与玩家的交互。
 (w:600)(convert:false)
后续步骤
现在你已了解如何使用接口,接下来可以查看 Actor通信 文档中的其他通信类型。
概述
接口负责定义一系列共有的行为或功能,这些行为或功能在不同Actor中可以有不同的实现方法。当你为不同Actor实现了相同类型的功能时,适合使用此通信方法。 例如,当你需要为多个蓝图(例如门、窗、汽车等)实现一个共有的打开(Open)行为,你可以选择接口。在此示例中,每个Actor都是不同的类,并且在调用"打开"时会做出不同响应。
此外,与类型转换相比,接口还具备性能优势,因为加载一个需要转换成其他类型的 Actor,如果不谨慎处理,可能会造成链式加载,即加载单个Actor导致更多Actor加载到内存中。此方法要求每个Actor都实现接口,以便访问其共有功能(即该接口)。 在此快速指南中,你将学习如何创建一个简单的交互系统,通过在两个不同Actor间通信,学习接口的用法。
必需设置
首先点击 游戏(Games) > 第三人称(Third Person) > C++ 创建新项目,并启用初学者内容包。
2 - 创建接口
-
从 C++类向导 中新建名为 InteractInterface 的新虚幻接口类。
 (w:600)
 -
在IInteractInterface.h的类默认值中,声明以下方法。
public: UFUNCTION() virtual void OnInteract() = 0; -
编译你的代码。
已完成代码
InteractionInterface.h
#pragma once
#include "CoreMinimal.h"
#include "UObject/Interface.h"
#include "InteractInterface.generated.h"
// 此类不需要修改。
UINTERFACE(MinimalAPI)
class UInteractInterface : public UInterface
{
GENERATED_BODY()
};
/**
*
*/
class BPCOMMUNICATION_API IInteractInterface
{
GENERATED_BODY()
// 将接口函数添加到此类。这是将会被继承以实现此接口的类。
public:
UFUNCTION()
virtual void OnInteract() = 0;
};
创建可交互的天花板光源Actor
- 从 C++类向导 中新建名为 CeilingLight 的新Actor类。
在 CeilingLight.h 的类默认值中,声明以下类库。
#include "InteractInterface.h"
然后,实现以下代码。
UCLASS()
class BPCOMMUNICATION_API ACeilingLight : public AActor, public IInteractInterface
{
GENERATED_BODY()
public:
virtual void OnInteract();
protected:
UPROPERTY(EditAnywhere, BlueprintReadWrite)
class UPointLightComponent* PointLightComp;
UPROPERTY(EditAnywhere, BlueprintReadWrite)
UStaticMeshComponent* StaticMeshComp;
UPROPERTY(EditAnywhere, BlueprintReadWrite)
float Brightness;
UPROPERTY(EditAnywhere, BlueprintReadWrite)
float SourceRadius;
UPROPERTY(EditAnywhere, BlueprintReadWrite)
FLinearColor Color;
UPROPERTY(EditAnywhere, BlueprintReadWrite)
bool bIsLightOn;
UFUNCTION()
void ToggleLight();
}
-
然后找到 CeilingLight.cpp 并添加以下头文件。
#include "Components/PointLightComponent.h"
然后实现以下代码。
ACeilingLight::ACeilingLight()
{
// 将此Actor设置为每帧调用Tick()。如果你不需要此特性,你可以关闭它以提升性能。
PrimaryActorTick.bCanEverTick = true;
RootComponent = CreateDefaultSubobject<URootComponent>(TEXT("RootComponent"));
PointLightComp = CreateDefaultSubobject<UPointLightComponent>(TEXT("PointLightComp"));
StaticMeshComp = CreateDefaultSubobject<UStaticMeshComponent>(TEXT("StaticMeshComp"));
PointLightComp->AttachToComponent(RootComponent,FAttachmentTransformRules::KeepRelativeTransform);
StaticMeshComp->AttachToComponent(RootComponent, FAttachmentTransformRules::KeepRelativeTransform);
PointLightComp->SetWorldLocation(FVector(0, 0, -130));
Brightness = 1700.f;
Color = FLinearColor(1.f, 0.77f, 0.46f);
SourceRadius = 3.5f;
PointLightComp->SetIntensity(Brightness);
PointLightComp->SetLightColor(Color);
PointLightComp->SetSourceRadius(SourceRadius);
}
void ACeilingLight::OnInteract()
{
ToggleLight();
}
void ACeilingLight::ToggleLight()
{
if (bbIsLightOn)
{
PointLightComp->SetVisibility(false);
bbIsLightOn = false;
}
else
{
PointLightComp->SetVisibility(true);
bbIsLightOn = true;
}
}
-
编译你的代码。
-
在 C++类文件夹(C++ Classes folder) 中,右键点击 CeilingLight Actor,然后在 C++类操作(C++ Class Actions) 下拉菜单中,选择 基于CeilingLight创建蓝图类(Create Blueprint class based on CeilingLight) 。将蓝图命名为 Bp_CeilingLight 。
-
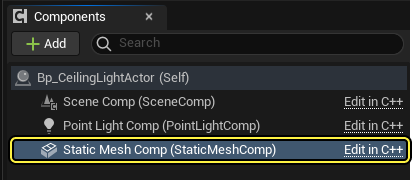
在 BP_CeilingLight 类默认值中,找到 组件(Components) 面板,然后选择 StaticMeshComp 。
-
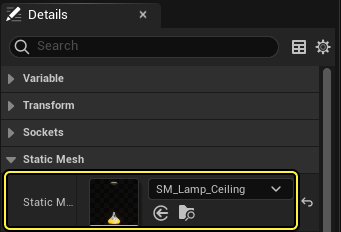
在 细节(Details) 面板中,找到 静态网格体(Static Mesh) 类别,选择 静态网格体(Static Mesh) 变量旁边的下拉箭头,然后搜索并选择 SM_Lamp_Ceiling 。
已完成代码
CeilingLight.h
//在项目设置(Project Settings)的描述(Description)页面中填写版权声明。
#pragma once
#include "CoreMinimal.h"
#include "GameFramework/Actor.h"
#include "InteractInterface.h"
#include "CeilingLight.generated.h"
UCLASS()
class BPCOMMUNICATION_API ACeilingLight : public AActor, public IInteractInterface
{
GENERATED_BODY()
public:
// 为此Actor的属性设置默认值
ACeilingLight();
virtual void OnInteract();
protected:
// 当游戏开始或重生(Spawn)时被调用
virtual void BeginPlay() override;
UPROPERTY(EditAnywhere, BlueprintReadWrite)
class UPointLightComponent* PointLightComp;
UPROPERTY(EditAnywhere, BlueprintReadWrite)
UStaticMeshComponent* StaticMeshComp;
UPROPERTY(EditAnywhere, BlueprintReadWrite)
float Brightness;
UPROPERTY(EditAnywhere, BlueprintReadWrite)
float SourceRadius;
UPROPERTY(EditAnywhere, BlueprintReadWrite)
FLinearColor Color;
UPROPERTY(EditAnywhere, BlueprintReadWrite)
bool bbIsLightOn;
public:
// 每一帧都调用
virtual void Tick(float DeltaTime) override;
UFUNCTION()
void ToggleLight();
};
CeilingLight.cpp
//版权所有Epic Games, Inc。保留所有权利。
#include "CeilingLight.h"
#include "Components/PointLightComponent.h"
// 设置默认值
ACeilingLight::ACeilingLight()
{
// 将此Actor设置为每帧调用更新函数()。如果你不需要此特性,你可以关闭它以提升性能。
PrimaryActorTick.bCanEverTick = true;
RootComponent = CreateDefaultSubobject<URootComponent>(TEXT("RootComponent"));
PointLightComp = CreateDefaultSubobject<UPointLightComponent>(TEXT("PointLightComp"));
StaticMeshComp = CreateDefaultSubobject<UStaticMeshComponent>(TEXT("StaticMeshComp"));
PointLightComp->AttachToComponent(RootComponent,FAttachmentTransformRules::KeepRelativeTransform);
StaticMeshComp->AttachToComponent(RootComponent, FAttachmentTransformRules::KeepRelativeTransform);
PointLightComp->SetWorldLocation(FVector(0, 0, -130));
Brightness = 1700.f;
Color = FLinearColor(1.f, 0.77f, 0.46f);
SourceRadius = 3.5f;
PointLightComp->SetIntensity(Brightness);
PointLightComp->SetLightColor(Color);
PointLightComp->SetSourceRadius(SourceRadius);
}
void ACeilingLight::OnInteract()
{
ToggleLight();
}
// 当游戏开始或重生(Spawn)时被调用
void ACeilingLight::BeginPlay()
{
Super::BeginPlay();
}
void ACeilingLight::ToggleLight()
{
if (bIsLightOn)
{
PointLightComp->SetVisibility(false);
bIsLightOn = false;
}
else
{
PointLightComp->SetVisibility(true);
bIsLightOn = true;
}
}
// 每一帧都调用
void ACeilingLight::Tick(float DeltaTime)
{
Super::Tick(DeltaTime);
}
创建可交互的门
-
在 C++类向导(C++ Class Wizard) 中新建名为 DoorActor 的 Actor 类。
-
找到DoorActor.h文件,并声明以下include:
#include "Components/TimelineComponent.h" #include "InteractInterface.h" -
在DoorActor类命名空间中,你需要从交互接口继承。
UCLASS() class BPCOMMUNICATION_API ADoorActor : public AActor, public IInteractInterface -
然后声明以下类定义。
// 用于保留曲线资产的变量 UPROPERTY(EditAnywhere) UCurveFloat* DoorTimelineFloatCurve; UFUNCTION() virtual void OnInteract(); protected: // 当游戏开始或重生(Spawn)时被调用 virtual void BeginPlay() override; //用于表示门资产的网格体组件 UPROPERTY(VisibleAnywhere, BlueprintReadWrite) UStaticMeshComponent* DoorFrame; UPROPERTY(VisibleAnywhere, BlueprintReadWrite) UStaticMeshComponent* Door; //用于对门网格体进行动画处理的时间轴组件 UPROPERTY(VisibleAnywhere, BlueprintReadWrite) UTimelineComponent* DoorTimelineComp; //用于处理我们的更新轨道事件的浮点轨道签名 FOnTimelineFloat UpdateFunctionFloat; //用于使用时间轴图表更新门相对位置的函数 UFUNCTION() void UpdateTimelineComp(float Output); -
在 DoorActor.cpp 中,实现以下类定义
ADoorActor::ADoorActor() { //创建我们的默认组件 DoorFrame = CreateDefaultSubobject<UStaticMeshComponent>(TEXT("DoorFrameMesh")); Door = CreateDefaultSubobject<UStaticMeshComponent>(TEXT("DoorMesh")); DoorTimelineComp = CreateDefaultSubobject<UTimelineComponent>(TEXT("DoorTimelineComp")); //设置我们的附件 DoorFrame->SetupAttachment(RootComponent); Door->AttachToComponent(DoorFrame, FAttachmentTransformRules::KeepRelativeTransform); Door->SetRelativeLocation(FVector(0, 35, 0)); } void ADoorActor::OnInteract() { DoorTimelineComp->Play(); } // 当游戏开始或重生(Spawn)时被调用 void ADoorActor::BeginPlay() { Super::BeginPlay(); //将浮点轨道绑定到UpdateTimelineComp函数的输出 UpdateFunctionFloat.BindDynamic(this, &ADoorActor::UpdateTimelineComp); //如果有浮点曲线,将其图表绑定到我们的更新函数 if (DoorTimelineFloatCurve) { DoorTimelineComp->AddInterpFloat(DoorTimelineFloatCurve, UpdateFunctionFloat); } } void ADoorActor::UpdateTimelineComp(float Output) { // 基于时间轴曲线的输出创建并设置门的新相对位置 FRotator DoorNewRotation = FRotator(0.0f, Output, 0.f); Door->SetRelativeRotation(DoorNewRotation); } -
编译你的代码。
-
从 内容浏览器 中选择 添加/导入(Add/Import) > 杂项(Miscellaneous) > 曲线(Curve) 。
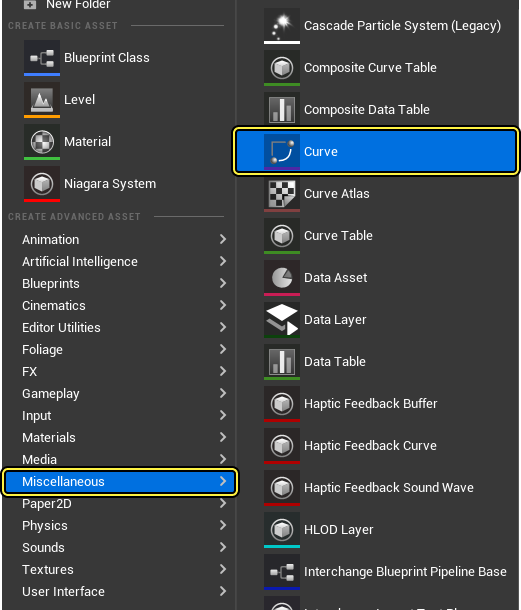
-
选择 CurveFloat 并将CurveFloat资产命名为 DoorCurveFloat
-
双击DoorCurveFloat资产。向你的浮点曲线添加两个键,为一个键赋予时间值(0,0),另一个键赋予时间值(4,90)。
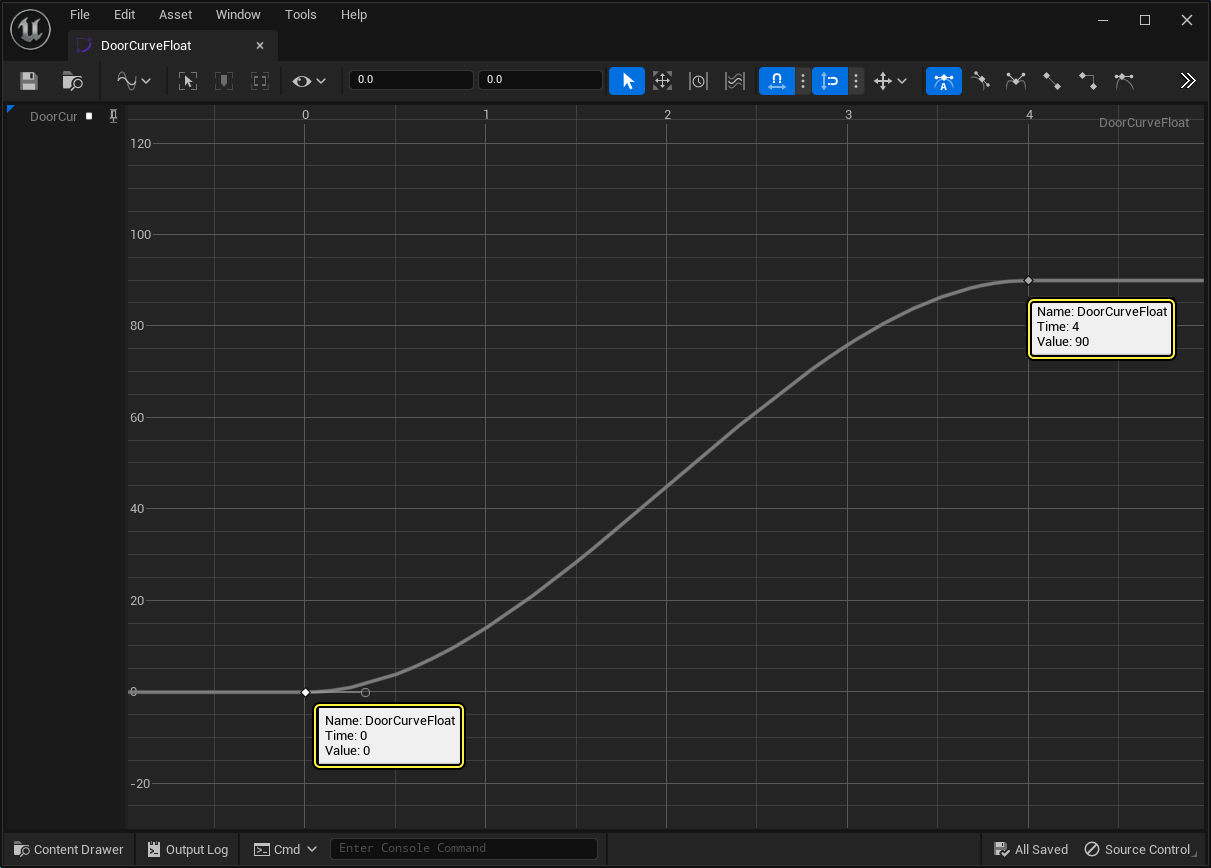
-
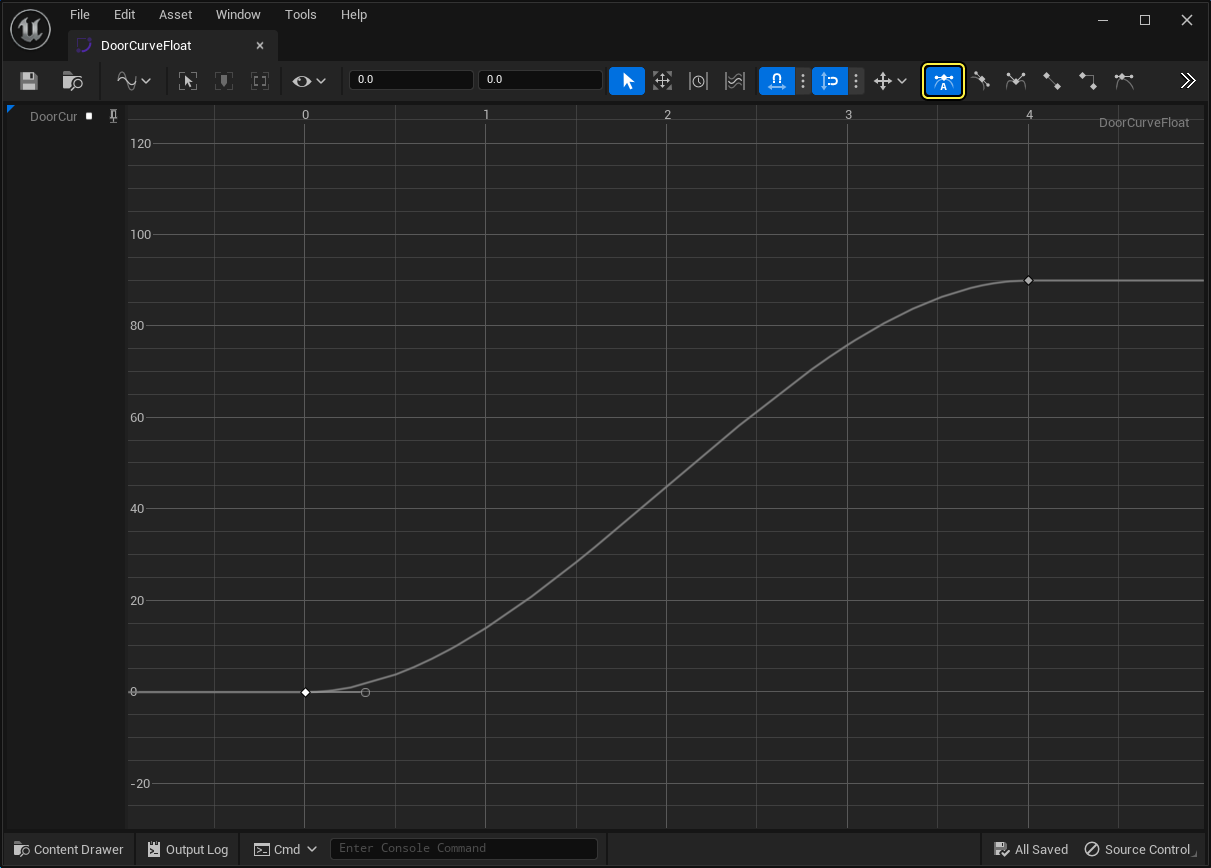
按住Shift键并选中这两个键,将它们设置为自动立方体插值,然后保存曲线。
-
保存你的DoorCurveFloat。
-
在内容浏览器中,找到 C++类文件夹(C++ Classes folder) ,右键点击DoorActor类。选择 基于门Actor创建蓝图类(Create Blueprint Class based on Door Actor) ,并将你的蓝图Actor命名为 Bp_DoorActor 。
-
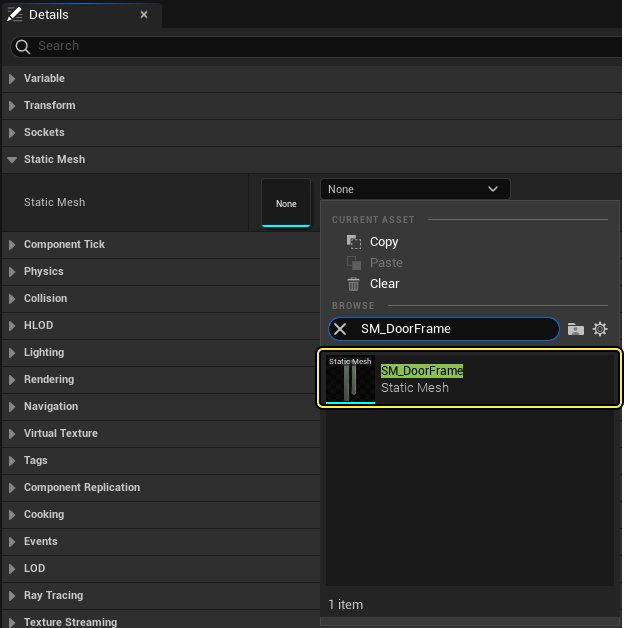
在 BP_DoorActor 的 类默认值(class defaults) 中,找到 组件(Components) 选项卡然后选择 DoorFrame 静态网格体(Static Mesh) 组件,找到 细节(Details) 面板,将静态网格体更改为 SM_DoorFrame 。
-
接下来,在组件(Components)选项卡中选择DoorMesh组件。找到细节面板,将静态网格体更改为 SM_Door 。
-
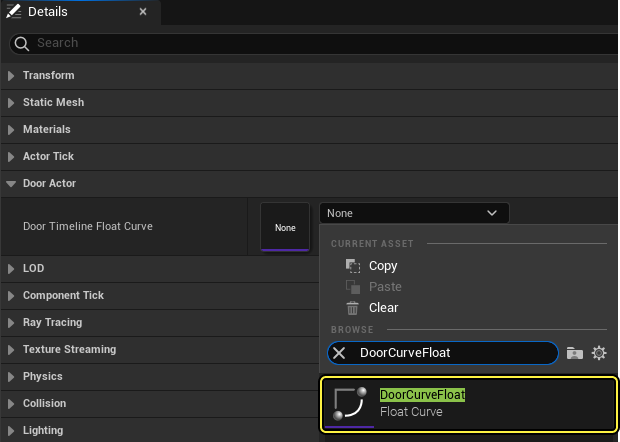
在细节面板中,从门时间轴浮点曲线(Door Timeline Float Curve)下拉菜单中选择DoorCurveFloat。
-
编译并保存蓝图。
已完成代码
DoorActor.h
#pragma once
#include "CoreMinimal.h"
#include "GameFramework/Actor.h"
#include "Components/TimelineComponent.h"
#include "InteractInterface.h"
#include "DoorActor.generated.h"
UCLASS()
class BPCOMMUNICATION_API ADoorActor : public AActor, public IInteractInterface
{
GENERATED_BODY()
public:
// 为此Actor的属性设置默认值
ADoorActor();
// 用于保留曲线资产的变量
UPROPERTY(EditAnywhere)
UCurveFloat* DoorTimelineFloatCurve;
UFUNCTION()
virtual void OnInteract();
protected:
// 当游戏开始或重生(Spawn)时被调用
virtual void BeginPlay() override;
//用于表示门资产的网格体组件
UPROPERTY(VisibleAnywhere, BlueprintReadWrite)
UStaticMeshComponent* DoorFrame;
UPROPERTY(VisibleAnywhere, BlueprintReadWrite)
UStaticMeshComponent* Door;
//用于对门网格体进行动画处理的时间轴组件
UPROPERTY(VisibleAnywhere, BlueprintReadWrite)
UTimelineComponent* DoorTimelineComp;
//用于处理我们的更新轨道事件的浮点轨道签名
FOnTimelineFloat UpdateFunctionFloat;
//用于使用时间轴图表更新门相对位置的函数
UFUNCTION()
void UpdateTimelineComp(float Output);
public:
// 每一帧都调用
virtual void Tick(float DeltaTime) override;
};
DoorActor.cpp
#include "DoorActor.h"
// 设置默认值
ADoorActor::ADoorActor()
{
// 将此Actor设置为每帧调用更新函数()。如果你不需要此特性,你可以关闭它以提升性能。
PrimaryActorTick.bCanEverTick = true;
//创建我们的默认组件
DoorFrame = CreateDefaultSubobject<UStaticMeshComponent>(TEXT("DoorFrameMesh"));
Door = CreateDefaultSubobject<UStaticMeshComponent>(TEXT("DoorMesh"));
DoorTimelineComp = CreateDefaultSubobject<UTimelineComponent>(TEXT("DoorTimelineComp"));
//设置绑定
DoorFrame->SetupAttachment(RootComponent);
Door->AttachToComponent(DoorFrame, FAttachmentTransformRules::KeepRelativeTransform);
Door->SetRelativeLocation(FVector(0, 35, 0));
}
void ADoorActor::OnInteract()
{
DoorTimelineComp->Play();
}
// 在游戏开始或重生(Spawn)时被调用
void ADoorActor::BeginPlay()
{
Super::BeginPlay();
//将浮点轨道绑定到UpdateTimelineComp函数的输出
UpdateFunctionFloat.BindDynamic(this, &ADoorActor::UpdateTimelineComp);
//如果有浮点曲线,将其图表绑定到我们的更新函数
if (DoorTimelineFloatCurve)
{
DoorTimelineComp->AddInterpFloat(DoorTimelineFloatCurve, UpdateFunctionFloat);
}
}
void ADoorActor::UpdateTimelineComp(float Output)
{
// 基于时间轴曲线的输出创建并设置门的新相对位置
FRotator DoorNewRotation = FRotator(0.0f, Output, 0.f);
Door->SetRelativeRotation(DoorNewRotation);
}
// 每一帧都调用
void ADoorActor::Tick(float DeltaTime)
{
Super::Tick(DeltaTime);
}
修改BPCommunicationCharacter类
-
打开BpCommunicationCharacter.h文件,然后在其类定义中声明以下内容。
protected: virtual void NotifyActorBeginOverlap(AActor* OtherActor); class USphereComponent* SphereComp; -
找到 BpCommunicationCharacter .cpp文件并声明以下类库。
#include "Components/SphereComponent.h" #include "InteractInterface.h" 然后实现以下类方法。 ABPCommunicationCharacter::ABPCommunicationCharacter() { SphereComp = CreateDefaultSubobject<USphereComponent>(TEXT("SphereComp")); SphereComp->AttachToComponent(GetMesh(), FAttachmentTransformRules::KeepRelativeTransform); SphereComp->SetSphereRadius(200); } void ABPCommunicationCharacter::NotifyActorBeginOverlap(AActor* OtherActor) { if (IInteractInterface* ActorCheck = Cast<IInteractInterface>(OtherActor)) { ActorCheck->OnInteract(); } } -
编译你的代码。
已完成代码
BpCommunicationCharacter.h
//版权所有Epic Games, Inc。保留所有权利。
#pragma once
#include "CoreMinimal.h"
#include "GameFramework/Character.h"
#include "BPCommunicationCharacter.generated.h"
UCLASS(config=Game)
class ABPCommunicationCharacter : public ACharacter
{
GENERATED_BODY()
/ ** 用于将摄像机放置在角色后面的摄像机升降臂 * /
UPROPERTY(VisibleAnywhere, BlueprintReadOnly, Category = Camera, meta = (AllowPrivateAccess = "true"))
class USpringArmComponent* CameraBoom;
/ ** 跟随摄像机 * /
UPROPERTY(VisibleAnywhere, BlueprintReadOnly, Category = Camera, meta = (AllowPrivateAccess = "true"))
class UCameraComponent* FollowCamera;
public:
ABPCommunicationCharacter();
/ ** 基本旋转速度,以"度/秒"为单位。其他计量方式可能会影响最终旋转速度。* /
UPROPERTY(VisibleAnywhere, BlueprintReadOnly, Category=Camera)
float BaseTurnRate;
/ ** 基本仰视/俯视速度,以"度/秒"为单位。其他计量方式可能会影响最终速度。* /
UPROPERTY(VisibleAnywhere, BlueprintReadOnly, Category=Camera)
float BaseLookUpRate;
protected:
virtual void NotifyActorBeginOverlap(AActor* OtherActor);
class USphereComponent* SphereComp;
/ ** 重置VR中的HMD方向。* /
void OnResetVR();
/ ** 出现向前/向后输入时调用 * /
void MoveForward(float Value);
/ ** 出现侧边到侧边输入时调用 * /
void MoveRight(float Value);
/**
* 通过输入进行调用,以给定的速度旋转。
* @param速度 这是标准化速度,即1.0表示100%的所需旋转速度
*/
void TurnAtRate(float Rate);
/**
* 通过输入进行调用,以给定的速度仰视/俯视旋转。
* @param速度 这是标准化速度,即1.0表示100%的所需旋转速度
*/
void LookUpAtRate(float Rate);
/ ** 当触摸输入开始时的处理程序。* /
void TouchStarted(ETouchIndex::Type FingerIndex, FVector Location);
/ ** 当触摸输入停止时的处理程序。* /
void TouchStopped(ETouchIndex::Type FingerIndex, FVector Location);
protected:
// APawn接口
virtual void SetupPlayerInputComponent(class UInputComponent* PlayerInputComponent) override;
// APawn接口结束
public:
/ ** 返回CameraBoom子对象 ** /
FORCEINLINE class USpringArmComponent* GetCameraBoom() const { return CameraBoom; }
/ ** 返回FollowCamera子object ** /
FORCEINLINE class UCameraComponent* GetFollowCamera() const { return FollowCamera; }
};
BpCommunicationCharacter.cpp
//版权所有Epic Games, Inc。保留所有权利。
#include "BPCommunicationCharacter.h"
#include "HeadMountedDisplayFunctionLibrary.h"
#include "Camera/CameraComponent.h"
#include "Components/CapsuleComponent.h"
#include "Components/InputComponent.h"
#include "Components/SphereComponent.h"
#include "GameFramework/CharacterMovementComponent.h"
#include "GameFramework/Controller.h"
#include "InteractInterface.h"
#include "GameFramework/SpringArmComponent.h"
//////////////////////////////////////////////////////////////////////////
// ABPCommunicationCharacter
ABPCommunicationCharacter::ABPCommunicationCharacter()
{
// 设置碰撞胶囊体的大小
GetCapsuleComponent()->InitCapsuleSize(42.f, 96.0f);
// 设置我们的输入旋转速度
BaseTurnRate = 45.f;
BaseLookUpRate = 45.f;
// 不在控制器旋转时旋转。使其仅影响摄像机。
bUseControllerRotationPitch = false;
bUseControllerRotationYaw = false;
bUseControllerRotationRoll = false;
// 配置角色移动
GetCharacterMovement()->bOrientRotationToMovement = true; // 角色沿输入方向移动...
GetCharacterMovement()->RotationRate = FRotator(0.0f, 540.0f, 0.0f); // ...以此旋转速度
GetCharacterMovement()->JumpZVelocity = 600.f;
GetCharacterMovement()->AirControl = 0.2f;
// 创建摄像机升降臂(如果发生碰撞,朝着玩家推进)
CameraBoom = CreateDefaultSubobject<USpringArmComponent>(TEXT("CameraBoom"));
CameraBoom->SetupAttachment(RootComponent);
CameraBoom->TargetArmLength = 300.0f; // 摄像机在角色后面的这个距离上跟随
CameraBoom->bUsePawnControlRotation = true; // 基于控制器旋转升降臂
// 创建跟随摄像机
FollowCamera = CreateDefaultSubobject<UCameraComponent>(TEXT("FollowCamera"));
FollowCamera->SetupAttachment(CameraBoom, USpringArmComponent::SocketName); // 将摄像机附于升降臂末端,调整升降臂,使其与控制器方向一致
FollowCamera->bUsePawnControlRotation = false; // 摄像机不相对于升降臂旋转
SphereComp = CreateDefaultSubobject<USphereComponent>(TEXT("SphereComp"));
SphereComp->AttachToComponent(GetMesh(), FAttachmentTransformRules::KeepRelativeTransform);
SphereComp->SetSphereRadius(200);
// 注意:网格体组件上的骨骼网格体和动画蓝图引用(从角色继承)
// 是在名为MyCharacter的派生蓝图资产中设置的(以避免C++中的直接内容引用)
}
//////////////////////////////////////////////////////////////////////////
// 输入
void ABPCommunicationCharacter::SetupPlayerInputComponent(class UInputComponent* PlayerInputComponent)
{
// 设置游戏的按键绑定
check(PlayerInputComponent);
PlayerInputComponent->BindAction("Jump", IE_Pressed, this, &ACharacter::Jump);
PlayerInputComponent->BindAction("Jump", IE_Released, this, &ACharacter::StopJumping);
PlayerInputComponent->BindAxis("MoveForward", this, &ABPCommunicationCharacter::MoveForward);
PlayerInputComponent->BindAxis("MoveRight", this, &ABPCommunicationCharacter::MoveRight);
// 我们提供了两个版本的旋转绑定来分别处理不同类型的设备
// "turn"处理提供绝对增量的设备,例如鼠标。
// "turnrate"适用于我们选择以变化速度方式进行处理的设备,例如模拟摇杆
PlayerInputComponent->BindAxis("Turn", this, &APawn::AddControllerYawInput);
PlayerInputComponent->BindAxis("TurnRate", this, &ABPCommunicationCharacter::TurnAtRate);
PlayerInputComponent->BindAxis("LookUp", this, &APawn::AddControllerPitchInput);
PlayerInputComponent->BindAxis("LookUpRate", this, &ABPCommunicationCharacter::LookUpAtRate);
// 处理触摸设备
PlayerInputComponent->BindTouch(IE_Pressed, this, &ABPCommunicationCharacter::TouchStarted);
PlayerInputComponent->BindTouch(IE_Released, this, &ABPCommunicationCharacter::TouchStopped);
// VR头戴设备功能
PlayerInputComponent->BindAction("ResetVR", IE_Pressed, this, &ABPCommunicationCharacter::OnResetVR);
}
void ABPCommunicationCharacter::NotifyActorBeginOverlap(AActor* OtherActor)
{
if (IInteractInterface* ActorCheck = Cast<IInteractInterface>(OtherActor))
{
ActorCheck->OnInteract();
}
}
void ABPCommunicationCharacter::OnResetVR()
{
// 如果在虚幻编辑器中通过"添加功能(Add Feature)"将BPCommunication添加到项目,则BPCommunication.Build.cs中HeadMountedDisplay上的依赖关系不会自动传播,
// 并将产生连接器错误。
// 你需要:
// 将"HeadMountedDisplay"添加到[YourProject].Build.cs PublicDependencyModuleNames,以便成功构建(如果支持VR则适用)。
// 或者:
// 注释掉或删除下面对ResetOrientationAndPosition的调用(如果不支持VR则适用)
UHeadMountedDisplayFunctionLibrary::ResetOrientationAndPosition();
}
void ABPCommunicationCharacter::TouchStarted(ETouchIndex::Type FingerIndex, FVector Location)
{
Jump();
}
void ABPCommunicationCharacter::TouchStopped(ETouchIndex::Type FingerIndex, FVector Location)
{
StopJumping();
}
void ABPCommunicationCharacter::TurnAtRate(float Rate)
{
// 根据速度信息计算此帧的增量
AddControllerYawInput(Rate * BaseTurnRate * GetWorld()->GetDeltaSeconds());
}
void ABPCommunicationCharacter::LookUpAtRate(float Rate)
{
// 根据速度信息计算此帧的增量
AddControllerPitchInput(Rate * BaseLookUpRate * GetWorld()->GetDeltaSeconds());
}
void ABPCommunicationCharacter::MoveForward(float Value)
{
if ((Controller != nullptr) && (Value != 0.0f))
{
// 找出向前方向
const FRotator Rotation = Controller->GetControlRotation();
const FRotator YawRotation(0, Rotation.Yaw, 0);
// 获取向前向量
const FVector Direction = FRotationMatrix(YawRotation).GetUnitAxis(EAxis::X);
AddMovementInput(Direction, Value);
}
}
void ABPCommunicationCharacter::MoveRight(float Value)
{
if ( (Controller != nullptr) && (Value != 0.0f) )
{
// 找出向右方向
const FRotator Rotation = Controller->GetControlRotation();
const FRotator YawRotation(0, Rotation.Yaw, 0);
// 获取向右向量
const FVector Direction = FRotationMatrix(YawRotation).GetUnitAxis(EAxis::Y);
// 添加该方向上的动作
AddMovementInput(Direction, Value);
}
}
测试交互系统
-
将 BP_DoorActor 和 BP_CeilingLamp 蓝图的实例拖动到关卡视口中。

-
点击运行(Play),然后接近每个蓝图以查看它们与玩家的交互。
(w:600)
后续步骤
现在你已了解如何使用接口,接下来可以查看 Actor通信 文档中的其他通信类型。