
Globals
Most nodes can be applied to the Globals chain, but some nodes can only be connected to the Globals chain. These settings can only be set once per render job and not per layer.
Most of these are present in the Movie Render Queue Preset in previous versions of Unreal Engine. For more information, see the Cinematic Rendering Image Quality Settings in Unreal Engine documentation.
Here you can reference a list of some of the Global Nodes you can use in the Movie Render Graph, and a description of the functionality:
| Node | Description |
|---|---|
| Warm Up Settings | The warm-up settings have been improved and streamlined by now only having to set one number and whether or not you would like to emulate motion blur. |
| Global Game Overrides | This matches the Game Overrides section in the Legacy MRQ UI. This node can be used to increase the rendering quality in various ways at render time in an effort to keep the editor fast to work in. If you are noticing differences between the editor viewport and MRQ renders consider disconnecting/disabling this node to troubleshoot. |
| Global Output Settings | The Output setting controls your output file's directory, frame rate, and output resolution. File name control is under the File Type node in Movie Render Graph. |
| Sampling Method | Set your Temporal Sample count here. Temporal Samples can only be applied per render job. Spatial Samples can be applied per layer and are located in the Render Type node. |
| Camera Settings | The Camera setting contains settings for the shutter timing and you can specify an overscan percentage to render extra pixels around the edges of your images. |
| Debug Settings | This node will allow you to capture Unreal Insights Traces right from Movie Render Queue as well as send the frames to Render Doc. |
| Apply CVar Preset | This node will allow you to apply a CVar Preset at render time. |
| Set CVar Value | This node will allow you to set a console variable at render time. |
| Command Line Encoder | The Command Line Encoder can be used to create your own output format from third-party software, such as FFmpeg. This setting requires an encoder executable and settings to be enabled in your Project Settings. |
| Execute Script | The Execute Script is a node that allows you to select a predefined Python UClass that can override pre/post shot and job callbacks. This setting requires creating a specialized class derived from MovieGraphScriptBase. |
Render Layer Nodes
The existence of the Render Layer node in your chain will signal for the Movie Render Graph to render this chain. Otherwise, logic will just be executed. The Render Layer Node is useful in Subgraphs or pipeline tools to better control the outcome of your render.
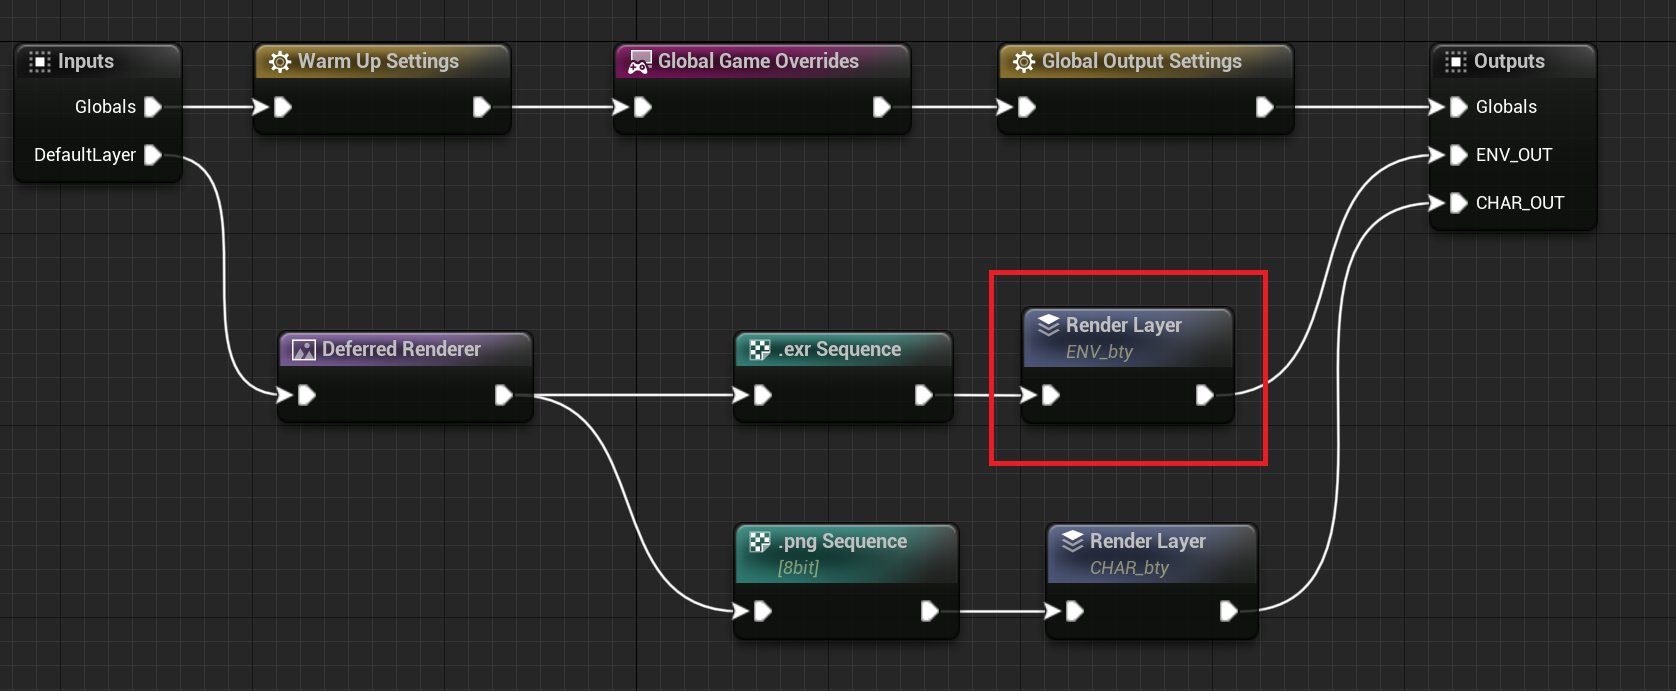
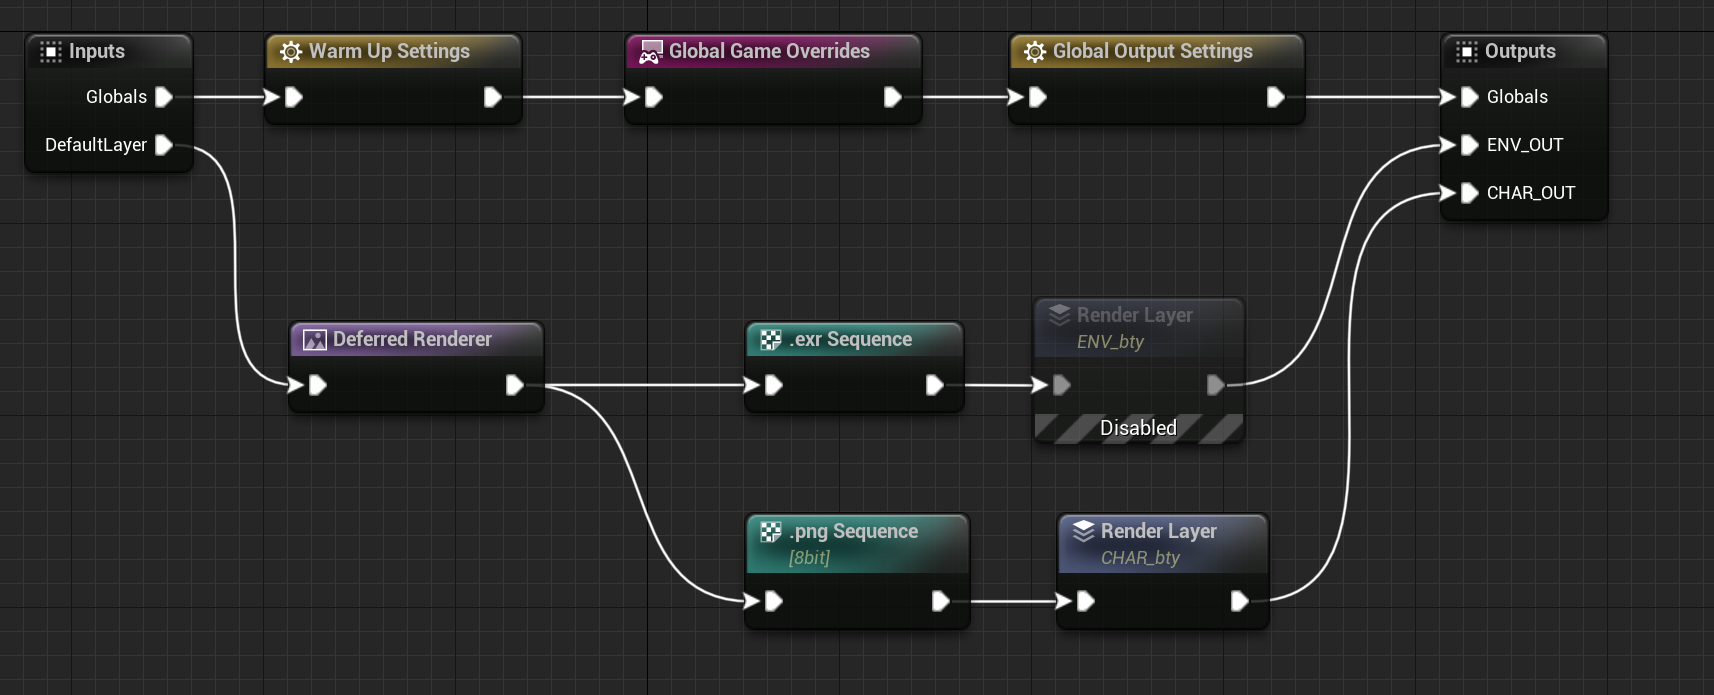
Along with disconnecting the chain from the Outputs tab, you can disable a render in the chain by right-mouse-clicking over the node and selecting the Disable property from the context menu.
Per-Render Layer Modifications
The following nodes are usable per-layer when using the Movie Render Graph.
Render Type Nodes
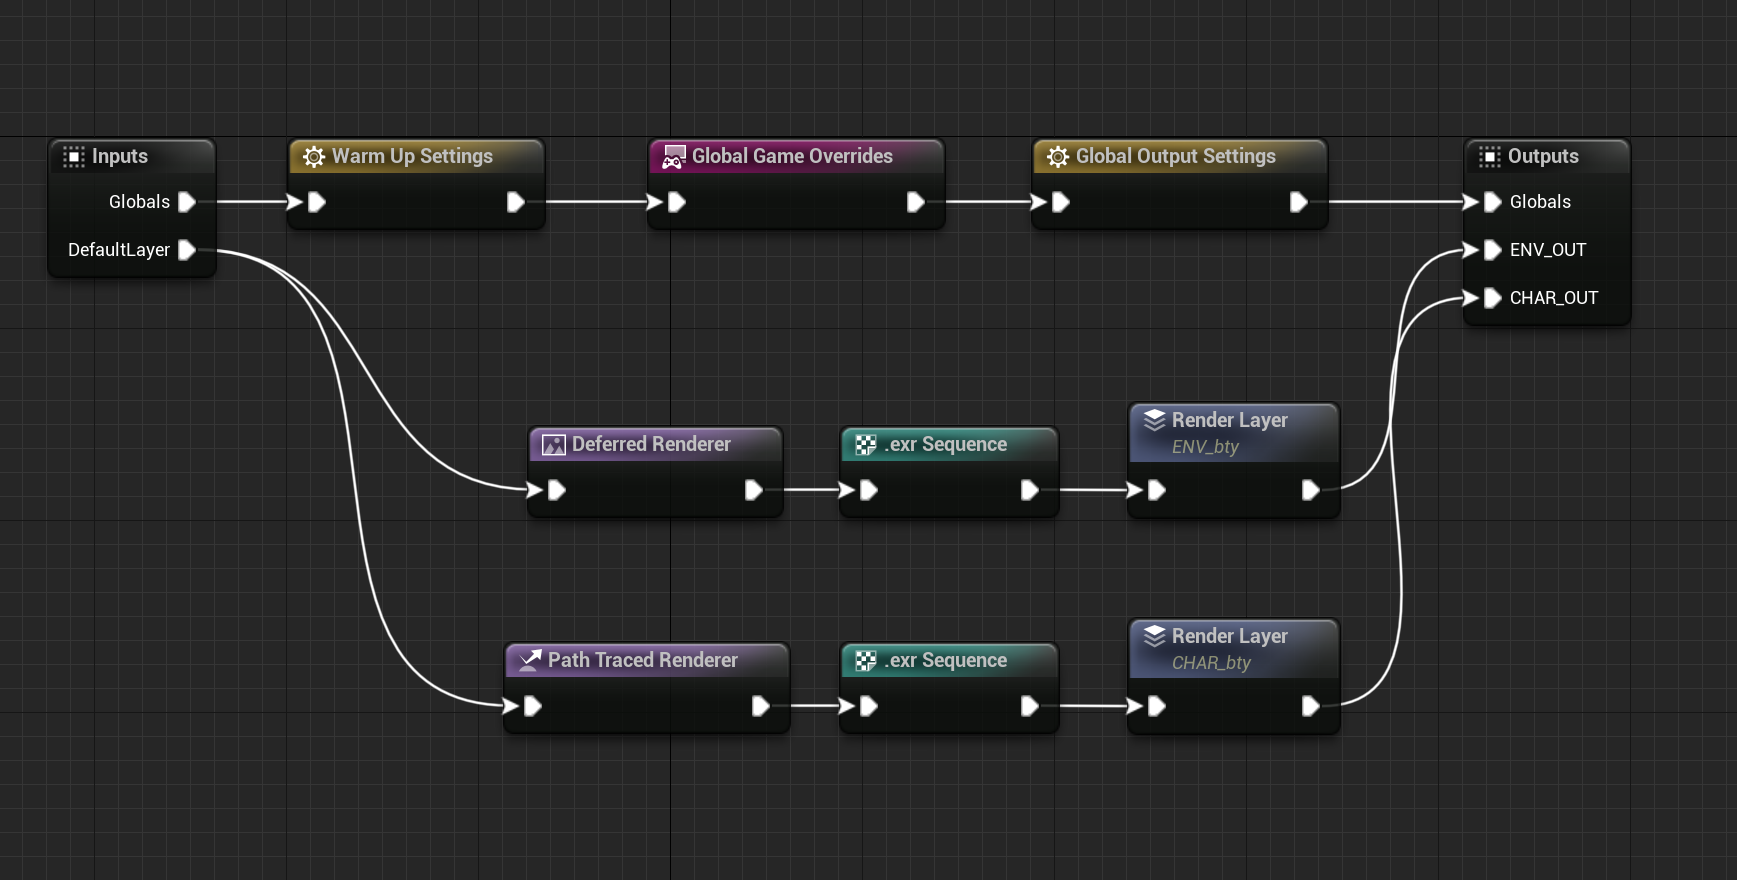
You have access to both the Pathtracer and Deferred renderers in the Movie Render Graph. You can define which render path you choose by connecting the correlating node in your chain. This can be chosen per render layer. This means you can have one layer take the Deferred render path and one take the Pathtracer in the same Render Graph.
Deferred Renderer
In the Deferred Renderer node you will find many parameters that can override Editor settings at render time, as well as set properties that must apply to all Render Layers. Here you can reference a list of the properties you can use with the Deferred Renderer node:
| Property |
|---|
| Spatial Sample Count |
| AntiAliasing Method |
| Disable Tone Curve |
| Allow OCIO |
| View Index Mode |
| Additional Post Process Materials |
| Render Show Flags |
Path Traced Renderer
In the Path Traced Renderer node you will find many parameters that can override Editor settings at render time. Here you can reference a list of the available properties that you can use with the Path Traced Renderer node:
| Property |
|---|
| Spatial Sample Count |
| Denoiser |
| Disable Tone Curve |
| Allow OCIO |
| Additional Post Process Materials |
| Render Show Flags |
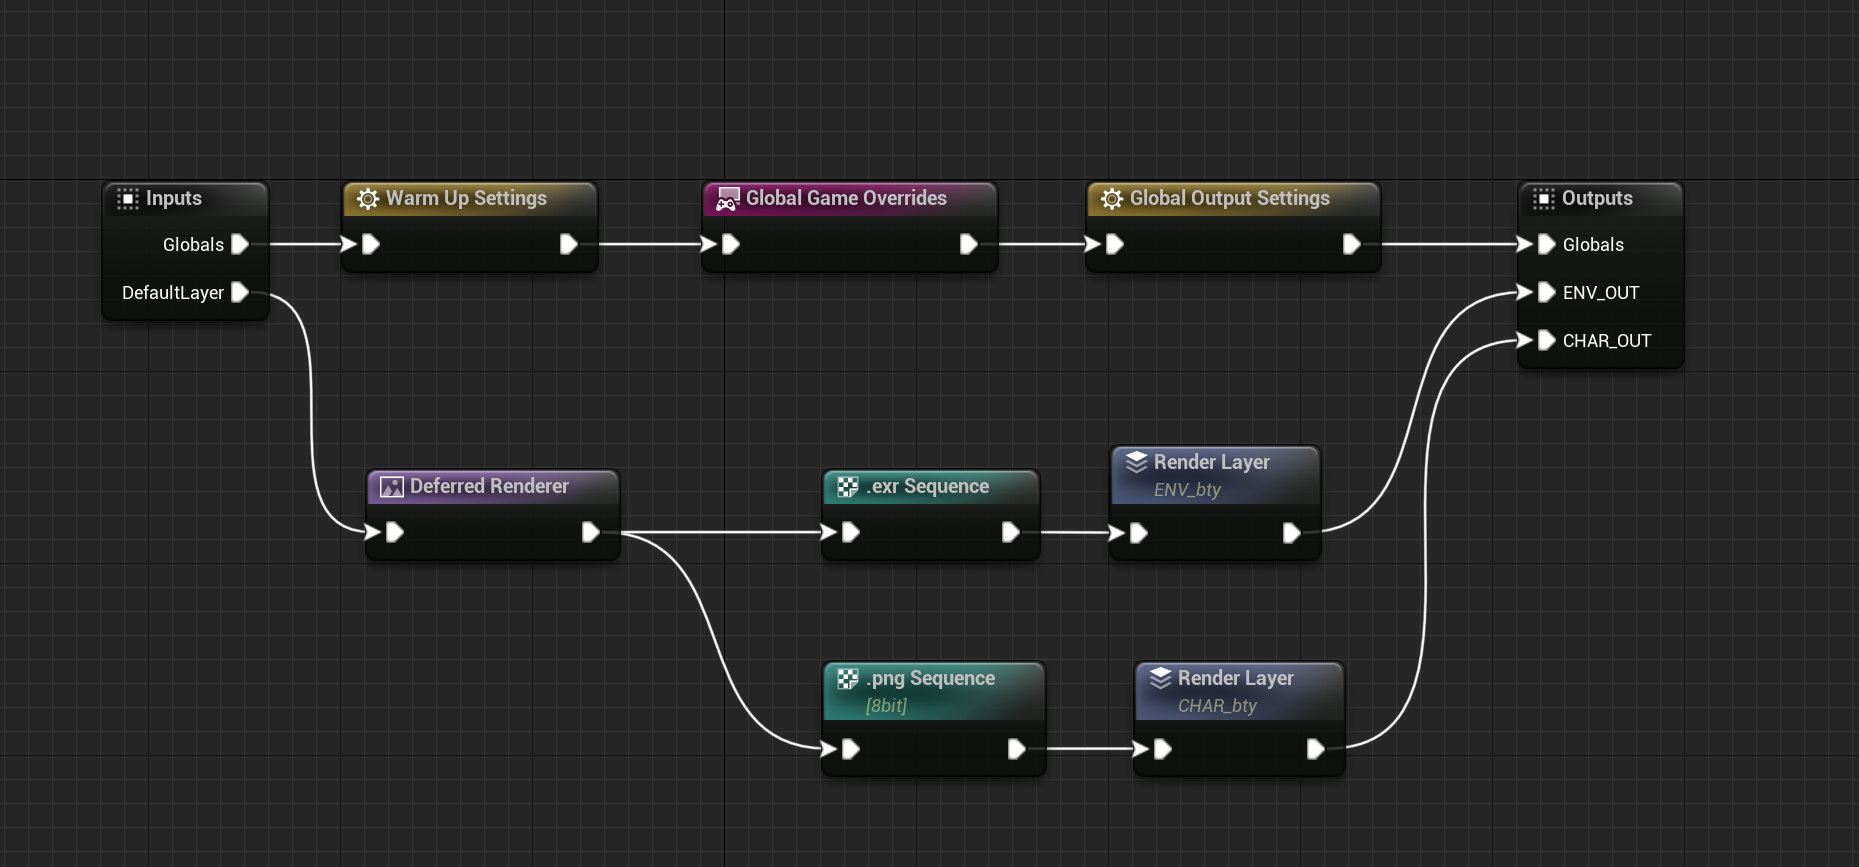
Output File Type Nodes
In the Movie Render Graph, you have the option of outputting many file types. You can pick the file output type per render chain.
The Movie Render Graph can output the following file types using the Output File Type node:
-
WAV
- This can only be applied Globally.
-
PNG
-
JPG
-
BMP
-
EXR
-
EXR Multilayer*
-
This can only be applied Globally
-
The first output will be in the RGBA. Any additional outputs will be listed in their own named layer.
-
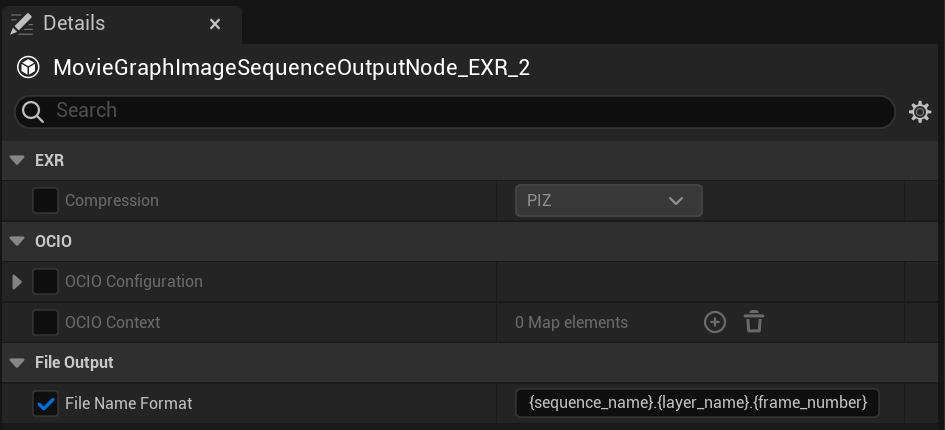
You can define OpenColorIO (OCIO) configurations and compression type where applicable as well as file naming in the Output File Type Details panel.
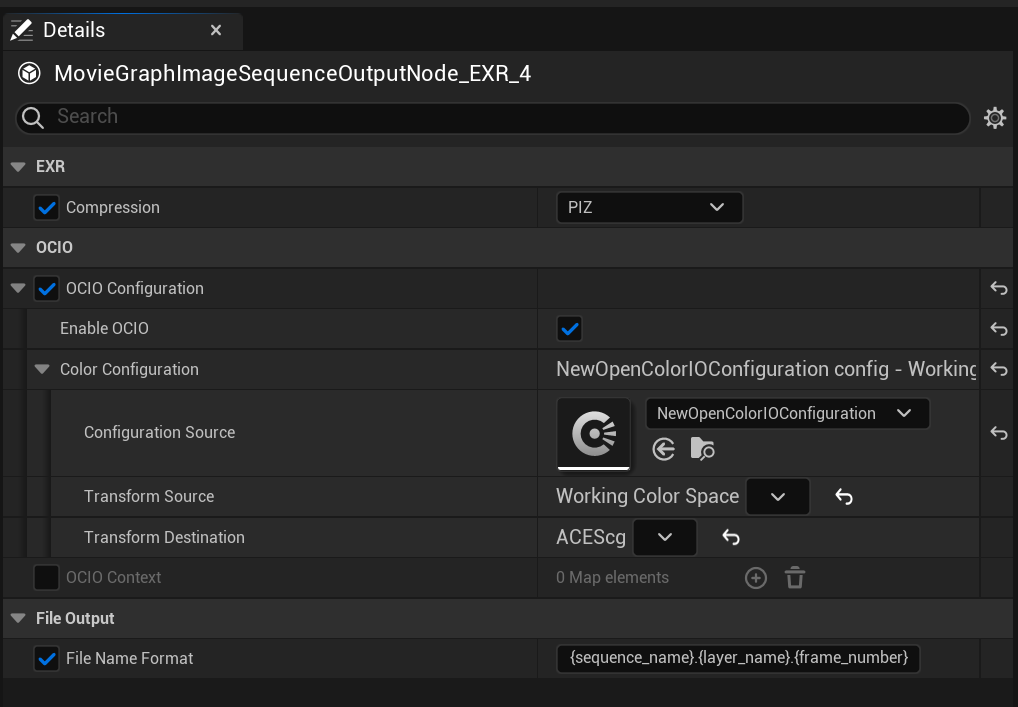
You can also state the File Name here. The Movie Render Graph defaults to using the {sequence_name}.{layer_name}.{frame_number} tokens, Tokens can be used to dictate frame name as well as folder name in the Global Output Settings node.
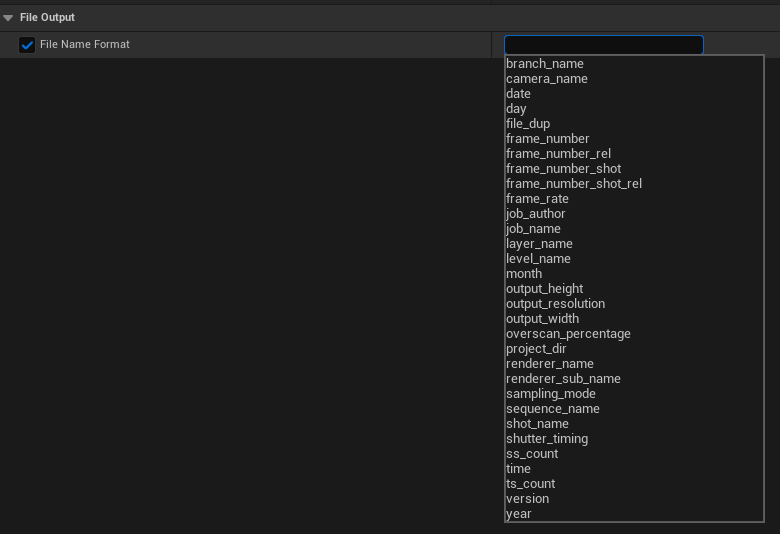
If you clear the File Name Format property you can then select a different File Name Format from the drop-down menu.
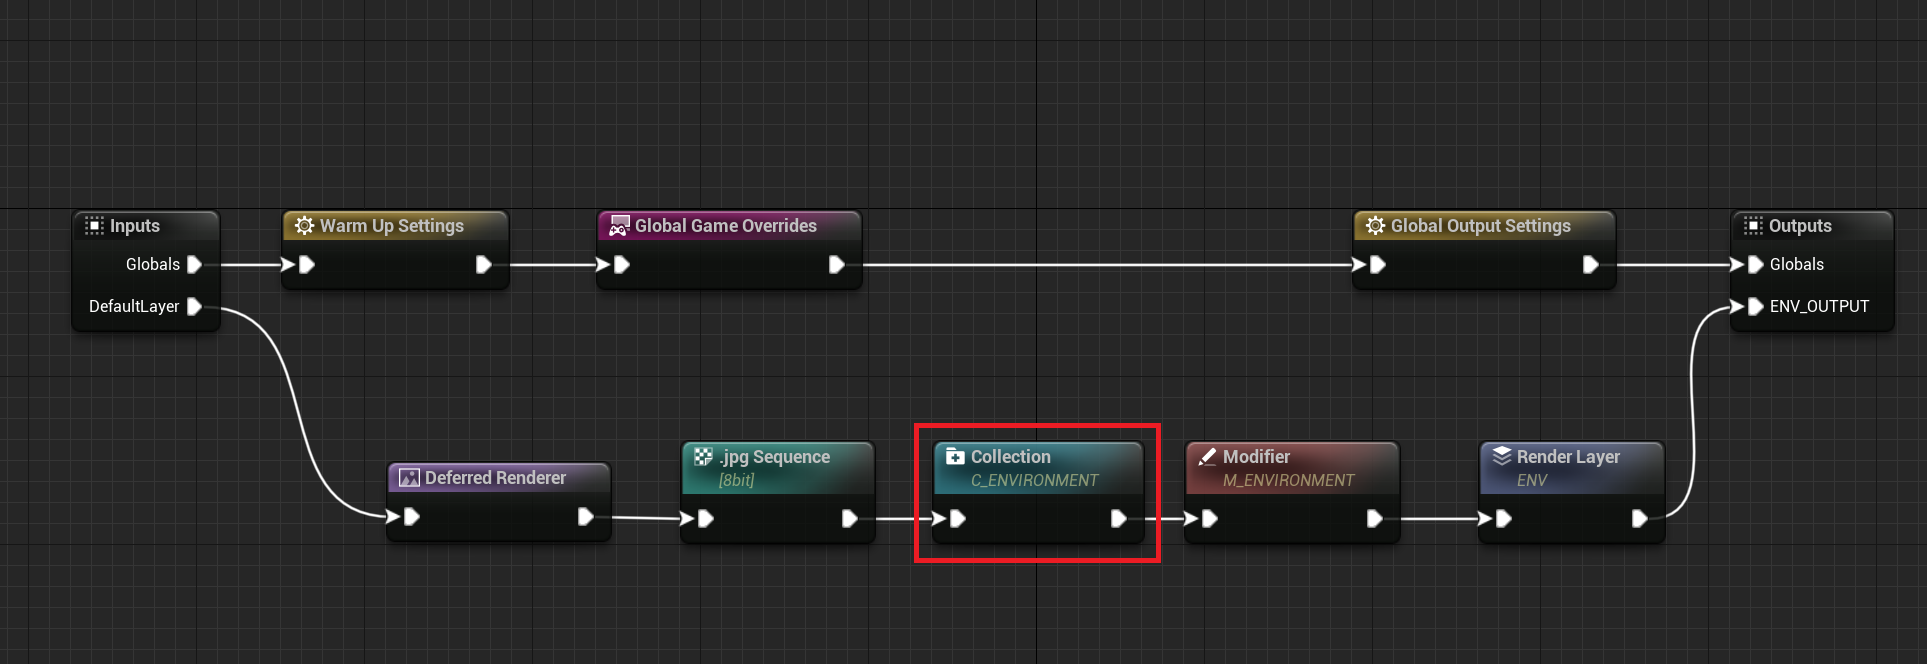
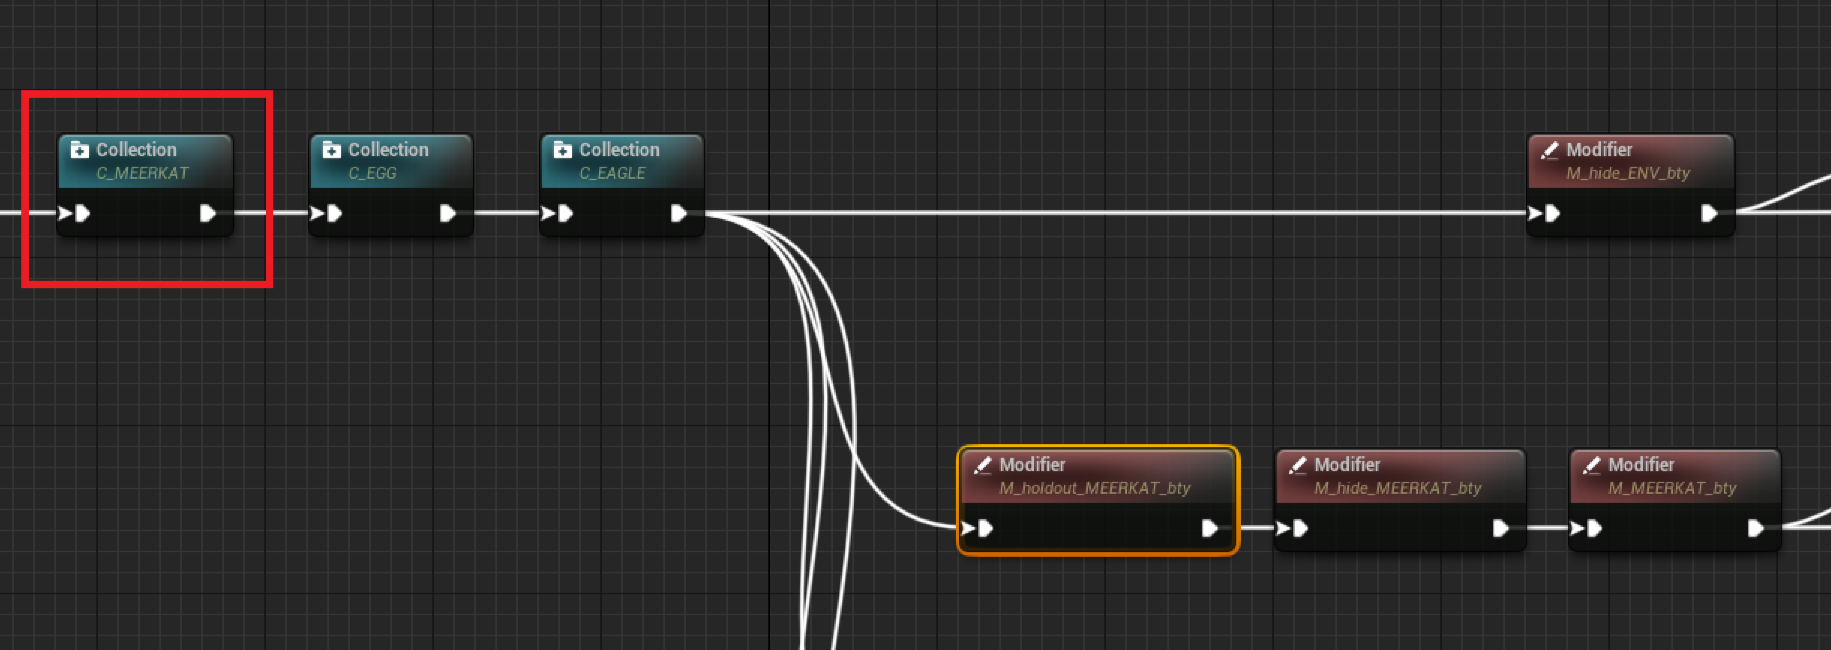
Collection Node
The collections node allows you to gather and group different actors based on visibility attributes you would like to override in your level. Examples of this would be Background, Characters, Lights, Foliage, etc.
You will need to give each Collection node its own unique name otherwise Collections of the same name later in the graph will override the original.
Condition Groups
Collections have a notion of Condition Groups. These are groups where you define the conditions that populate the collection. There are several conditions to choose from to enable you to traverse the level to get the desired actors.
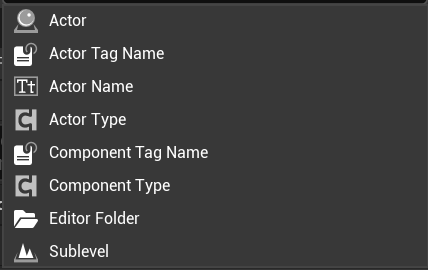
The following are some wildcard examples for the String data type inputs, such as Actor Name, Actor Tag Name, and Component Tag Name.
-
Foo*would matchFoo,FooBar, andFooBaz, but notBarFoo. -
*Foo*would match the above in addition toBarFoo. -
Foo?Barwould matchFoo.BarandFoo_Bar, but notFooBar. -
Foo?would matchFood, but notFooBarorBarFoo. -
Foo???would matchFooBarandFooBaz, but notFooorFood. -
?oo?would matchFood, but notFoo. -
?Foo*would matchAFooBar, but notFooBar.
Condition Group Leveraging
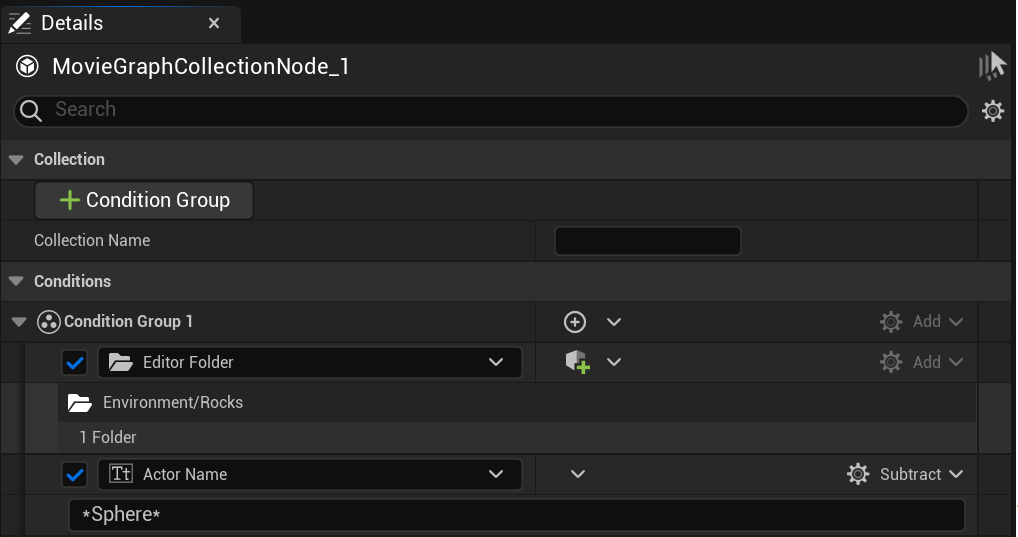
You can add multiple conditions per group to create the membership. You can also leverage the conditions with and/or against each other. You can use Add, Subtract, and And.
| Condition | |
|---|---|
| ADD | The Add condition will plus the results of the conditions together. |
For example:
actor name matches CHAR_*
Add
actor is in sublevel FG_SUBLEVEL
This would include actors in any sublevel that matched CHAR_* and also any actor in the sublevel FG_SUBLEVEL regardless of its name. |
| SUBTRACT | The Subtract condition will minus the condition groups from one another. |
For example:
actor name matches CHAR_*
Subtract
actor is in sublevel FG_SUBLEVEL
This would include actors in any sublevel that matched CHAR_* but remove any actor in the sublevel FG_SUBLEVEL. |
| AND | The And Condition will check that both condition groups are met. |
For example:
actor name matches CHAR_*
And
actor is in sublevel FG_SUBLEVEL
If you had actors matching CHAR_* in other sublevels like OTHER_SUBLEVEL then they would not be included, and if other actors in FG_SUBLEVEL don't match CHAR_* then they too would not be included. So the results would be only where the conditions intersect. |
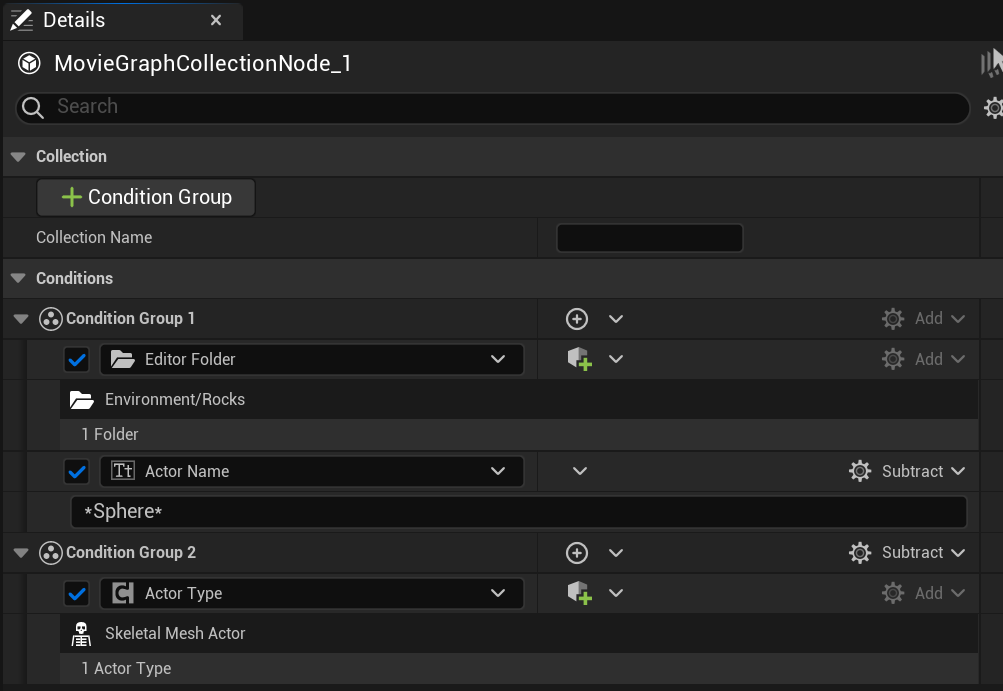
You can even leverage multiple condition groups.
Additionally, you can have multiple complicated Condition Groups and leverage the Groups with, or against each other.
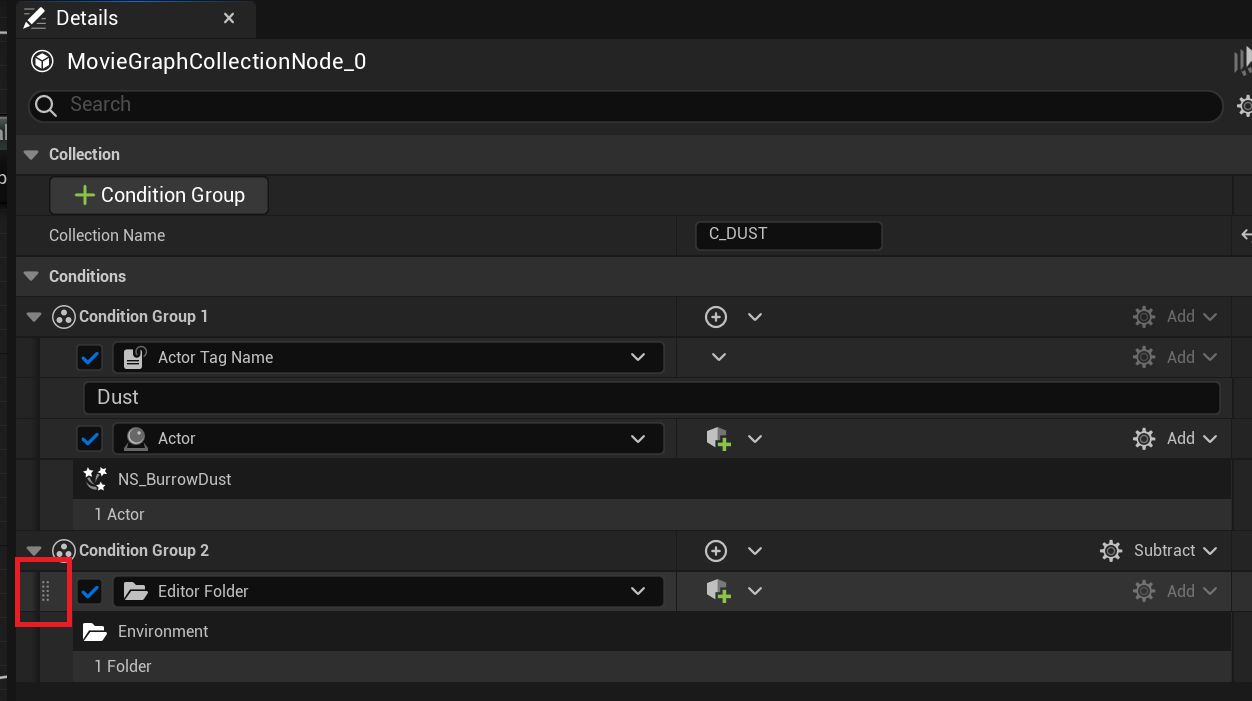
Condition Group Re-Ordering
If you hover over the left-hand side of a Condition Group or Condition Group Layer you will see ten dots show up in the UI and the mouse cursor icon will turn into a hand. You can then drag and drop to re-order the Conditions.
In-Editor Collection Membership Display
The arrow icon at the top of the details panel will resolve the node and select the actor members in the Engine.

A single actor can be a member of multiple Condition Groups and Collections. The Graph does not limit any membership under the hood and needs to be managed manually.
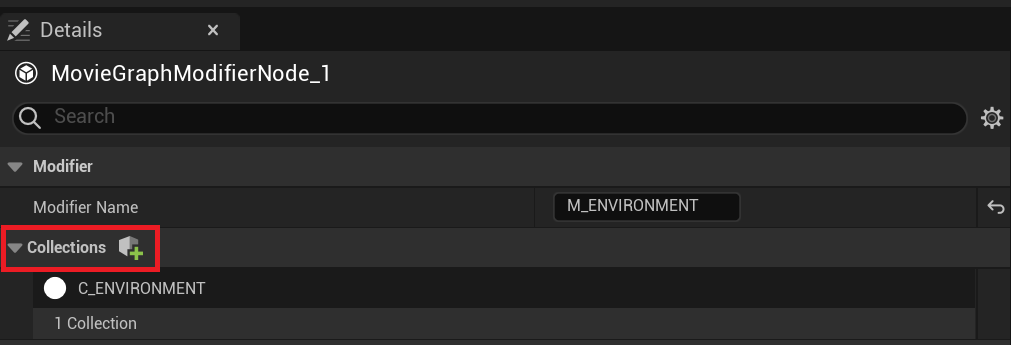
Collection Availability
Collections must be defined in the same chain as the Modifier you want to use them in. Though they are selectable, if they are outside the chain, you will get an error if you try to select an unconnected Collection. Collections in Subgraphs are available in Parent Graphs as well.
Spawnables
Due to the transient nature of Spawnables in the Engine, they have somewhat limited support in Movie Render Graph that will likely be improved in the future. In the collection node, you will need to get the spawnable actors by an applied Actor Tag.
There is a current limitation on tagged components. Those will not be retained in the level when the actor re-spawns due to Blueprint reconstruction. To tag components you will need to apply these render tags to the asset rather than the asset.
Modifier Node
Modifier nodes are used to control the visibility conditions of Collections. As with Collections, it is highly recommended to give each Modifier a unique name.
You set which Collection(s) the Modifier can control under the Collections section.
Under the Visibility section, there are five attributes and a Material slot that you can control on the actors in the Collection.
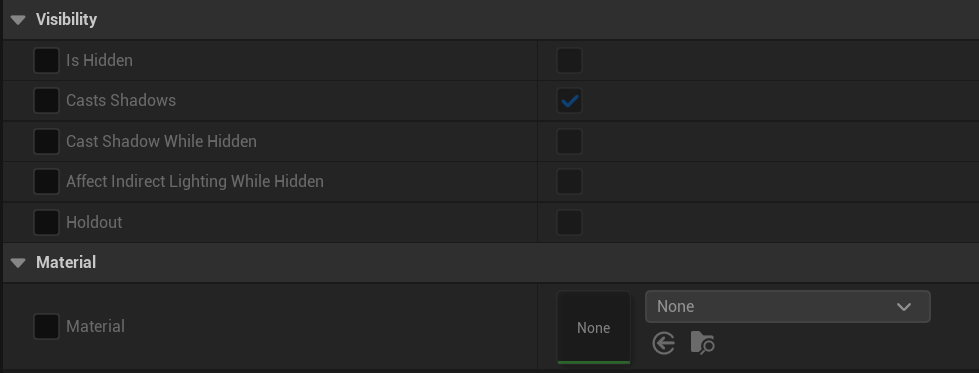
These parameters coincide with the same parameters on the Actor. The SkyAtmosphere and HeightFog Render in Main parameters are equivalent to Affect Indirect Lighting While Hidden. The Movie Render Graph makes this connection for you under the hood. Here you can reference a list of these properties and a description of their functionality:
If you do not see these attributes on a given actor type that means those types are not supported yet.
| Property | Description |
|---|---|
| Is Hidden (Visible to Camera) | Controls Collection actor membership visibility. |
| Cast Shadows | Controls whether the Collection actor membership will cast a shadow in the level. |
| Cast Shadows While Hidden (Visible to Shadows) | Controls the Collection actor membership’s ability to still cast a shadow while not being visible to primary pixels. |
| Affect Indirect Lighting While Hidden (Visible to Indirect) | Controls whether the Collection actor membership is visible to the Lumen scene, both GI and Reflections, while not visible to primary pixels. |
| Holdout | Control whether the Collection actor membership will poke a black hole in the renders layer’s RGBA. |
SkyAtmosphere and HeightFog actors have an attribute called Render In Main. This will essentially give you the same result as Affect Indirect Lighting While Hidden. There is one very big difference here though. For Render in Main to work the SkyAtmos and HeightFog actors need to be Visible. So these actor types will perhaps need to be treated separately in the Movie Render Graph, depending on your setup. The Holdout attribute works the same.
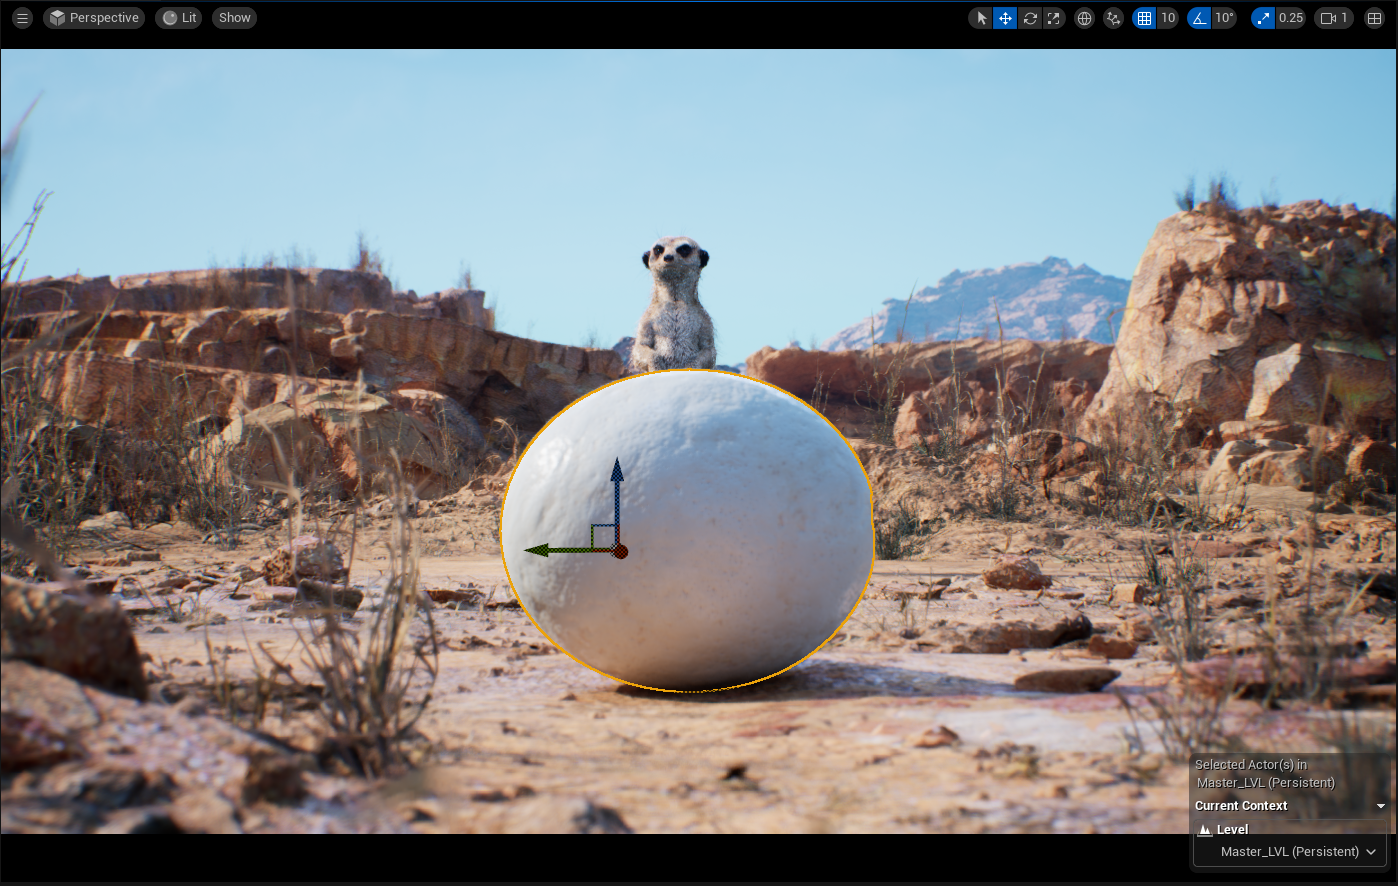
Using a Modifier Node
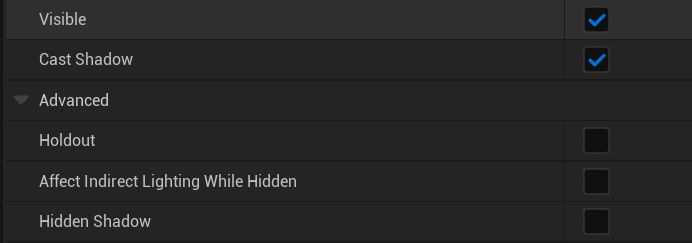
Let's take a look at a visual example here in the Meerkat sample project. In the first shot, we have the BG, an egg, and the meerkat.
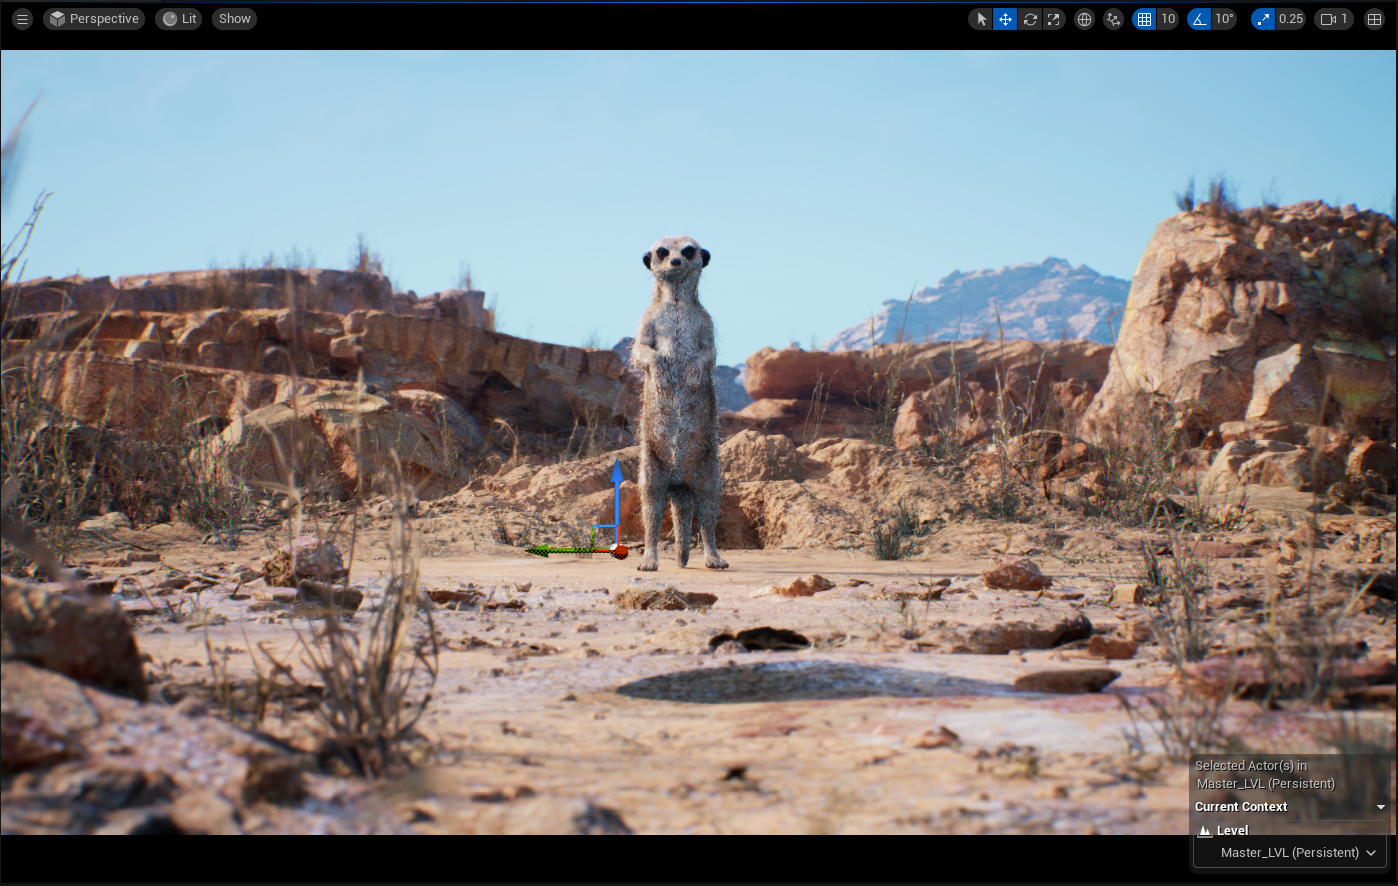
If we toggle the Visible flag on the egg we see it disappear along with the shadow and reflections, as well as any sort of GI contribution to the scene.

If we enable Hidden Shadow on the egg we see the shadow come back.
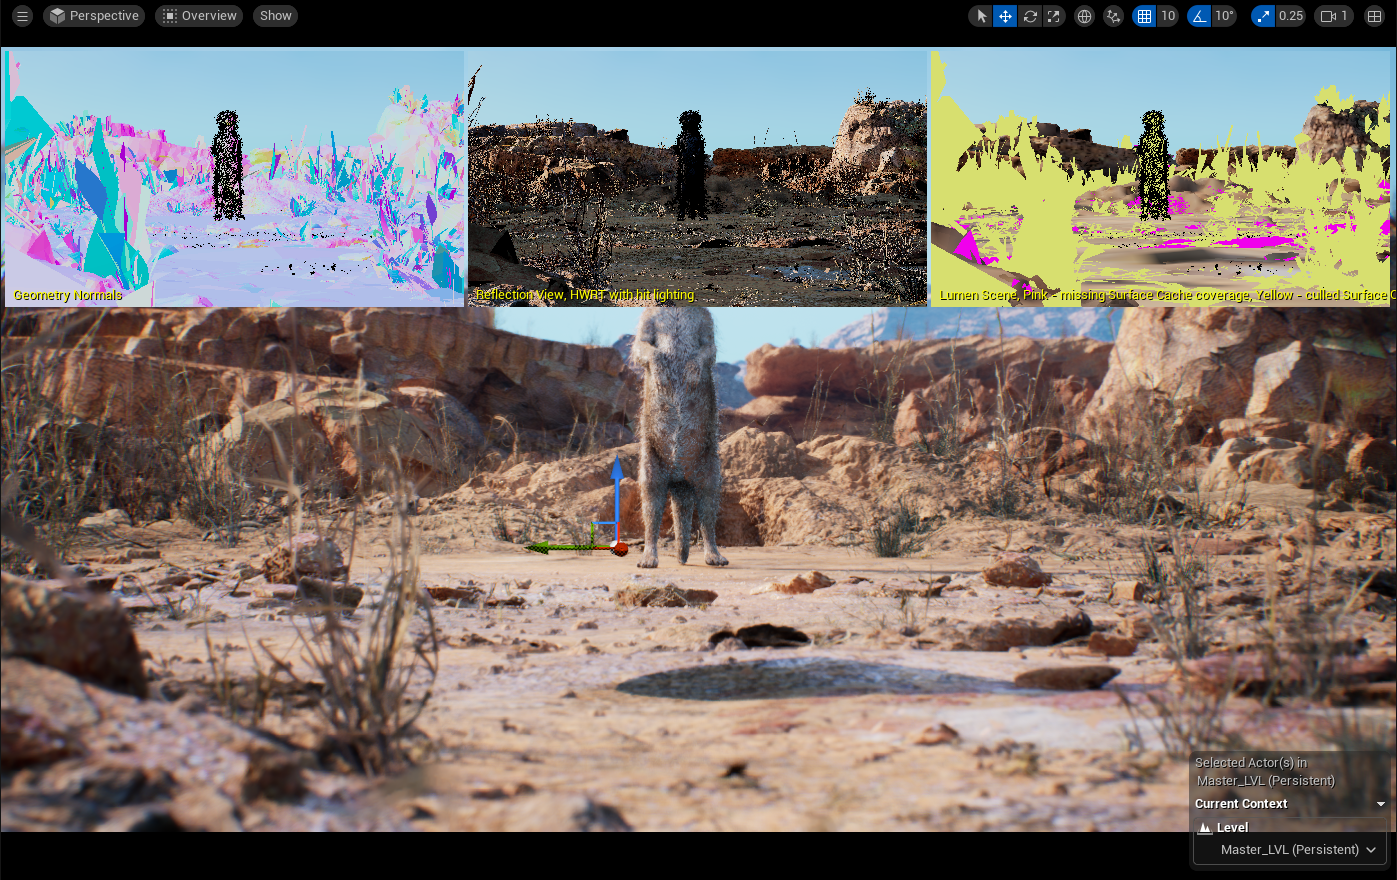
Now if we enable the Lumen Overview we see that the egg is no longer in the Lumen scene, so it will not cast any reflections or GI.
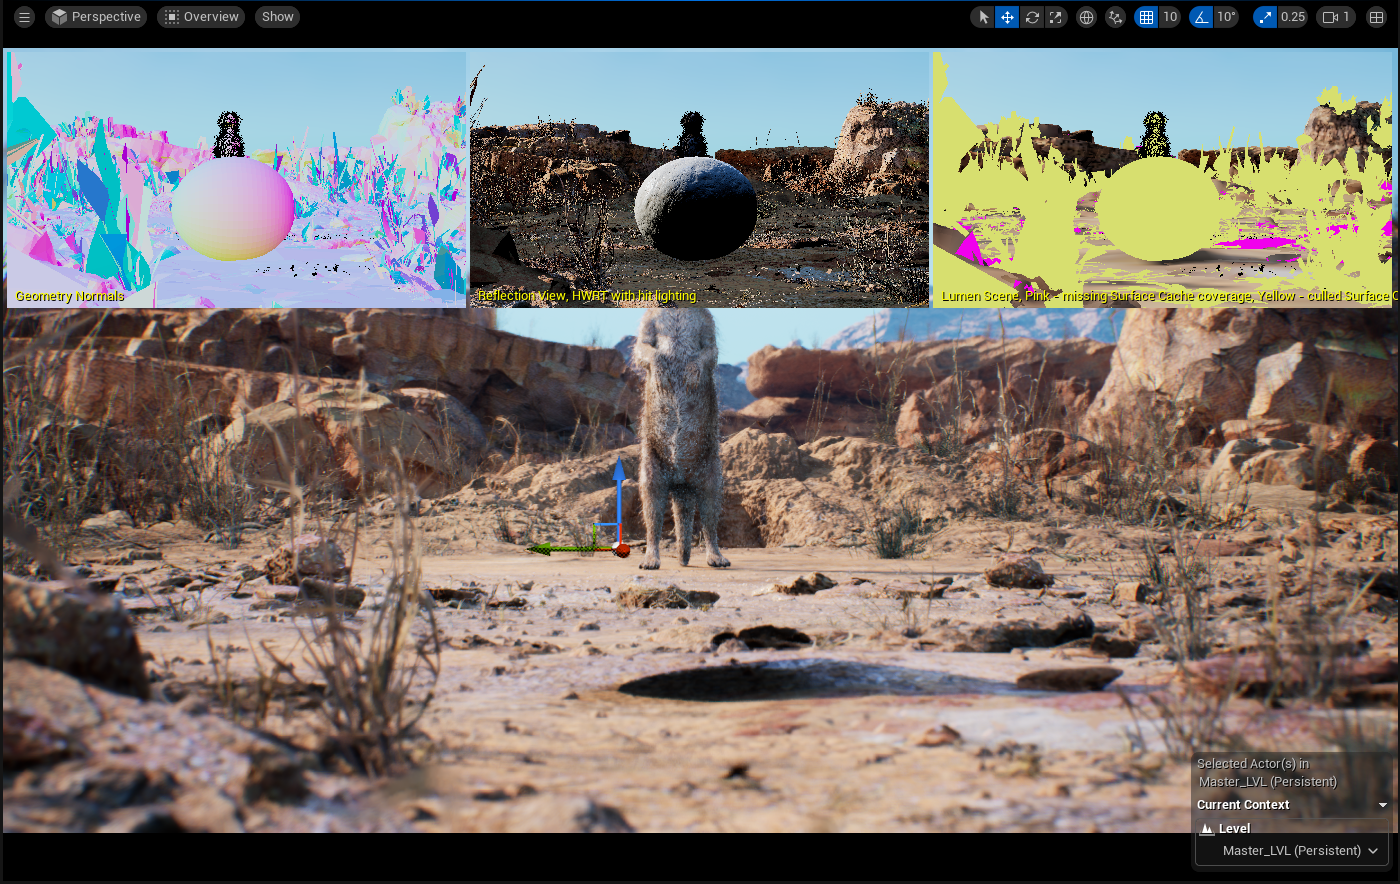
If we enable Affect Indirect Lighting While Hidden and disable Screen Traces, we see the egg reappear in the Lumen Scene, along with GI occlusion and reflections in the viewport.
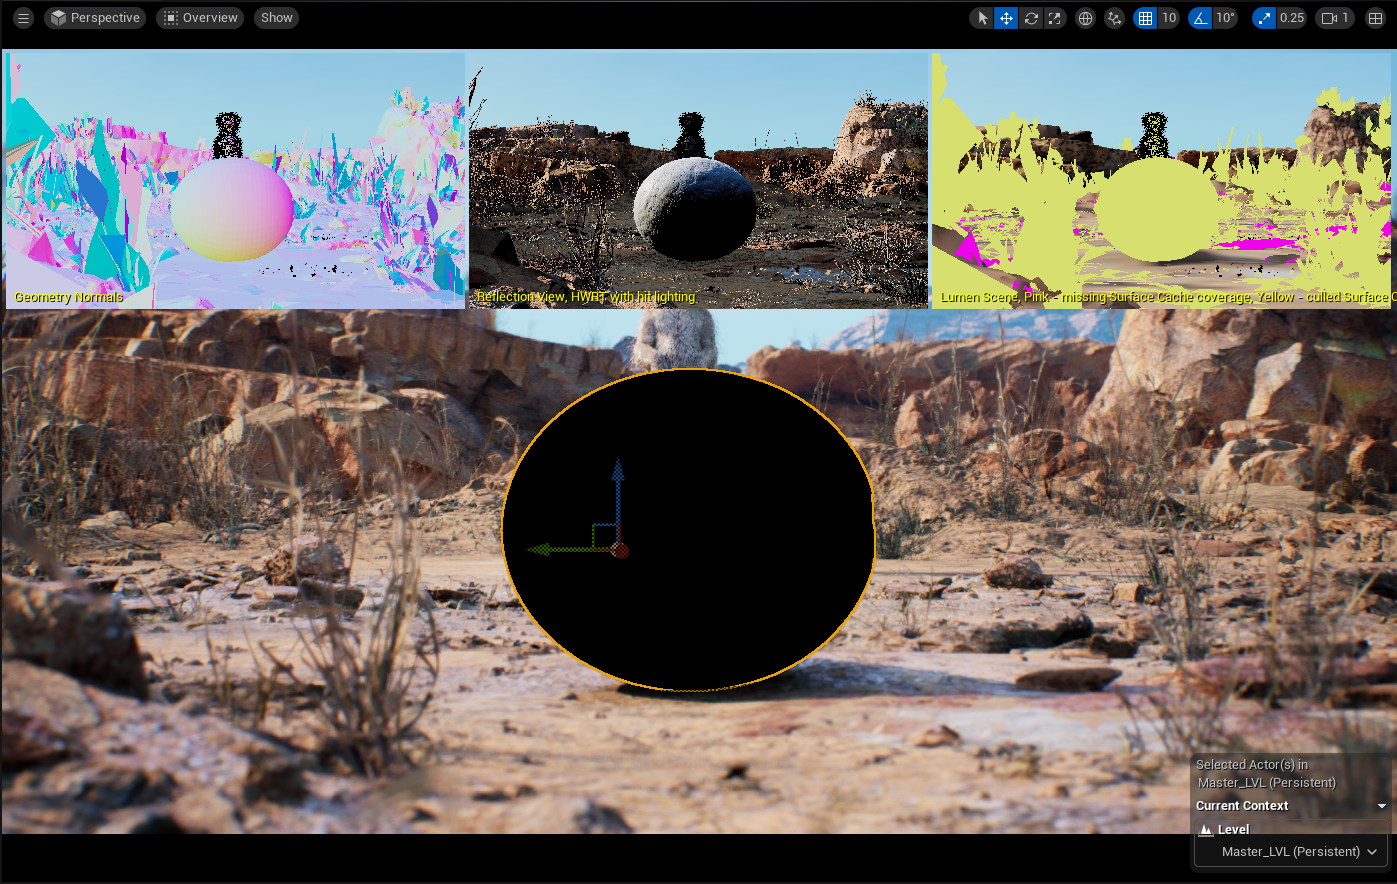
Now if we turn the Visibility back on, disable Affect Indirect Lighting While Hidden and Hidden Shadow, and enable the Holdout parameter you will see the egg has completely blacked out and is not poking a hole in the render. The alpha of this will render black as well.
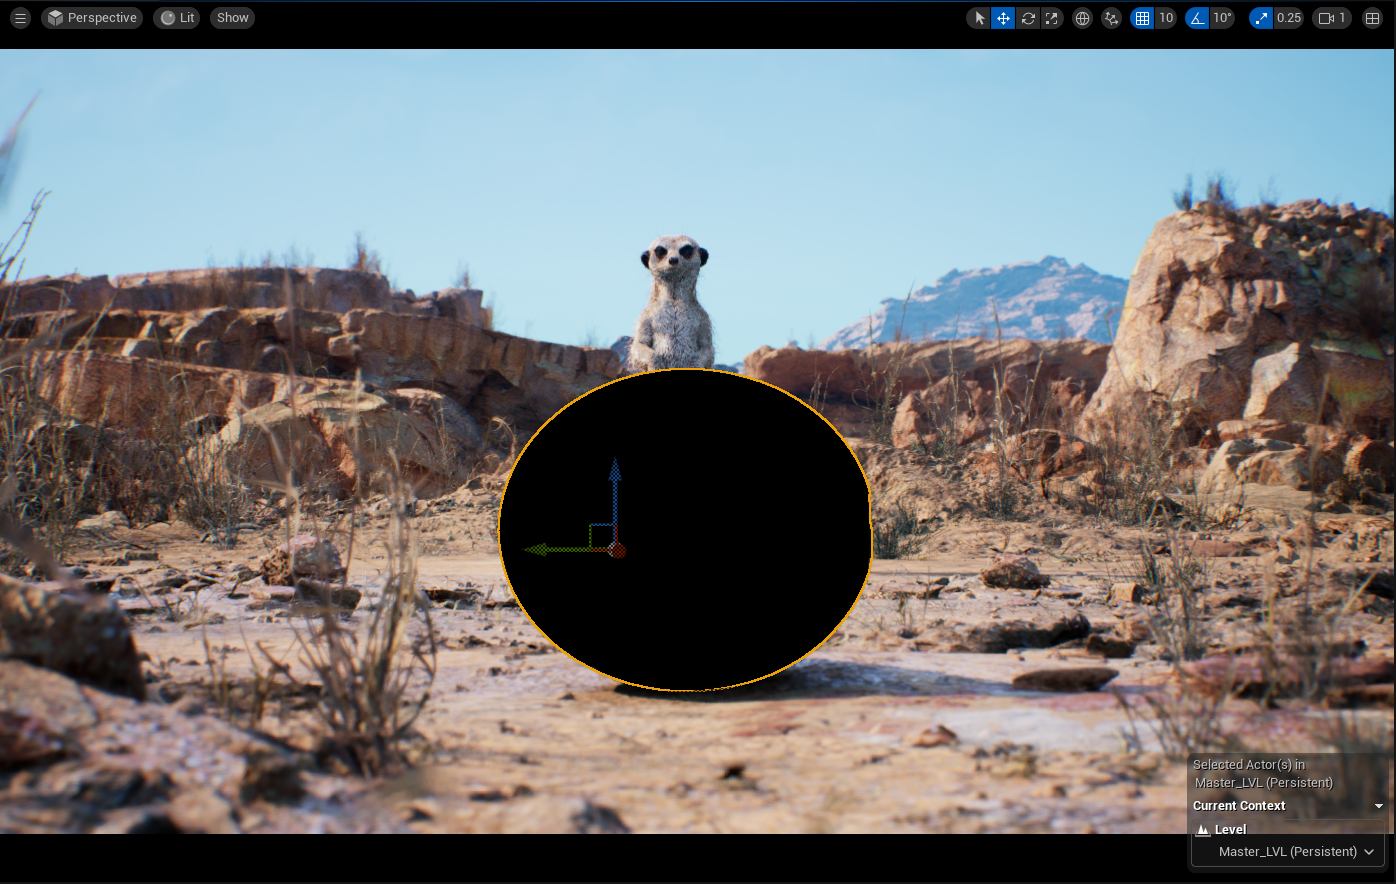
It will still cast a shadow, and looking at the Lumen Scene, we see that the egg is still in there and will cast proper GI and reflections.
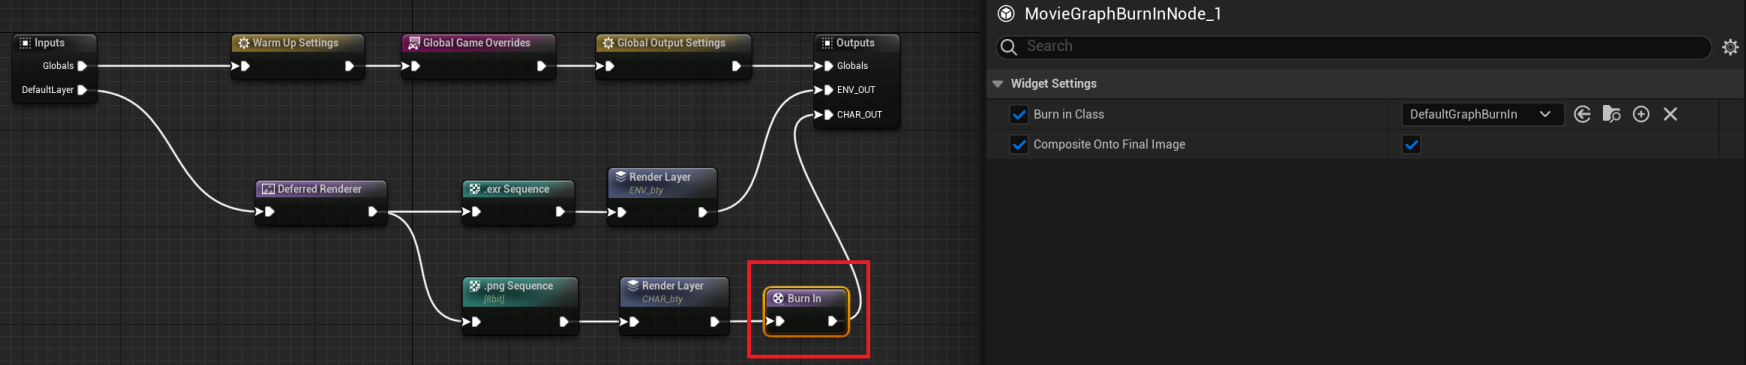
Burn-In and UI Renderer Nodes
The Burn-In node allows for adding custom watermarks to your render, which would typically be timecode-related. You can choose whether the burn-in is applied to the final image, or rendered to a separate layer. A default BurnIn class is provided that covers the basics of JobName, Date, Level Name, Author, Changelist, and camera information.
The UI Renderer node includes UMG widgets within the scene in the rendered output and provides flexibility by allowing the UMG-based elements to be in a separate Render Layer or composited into the final image.
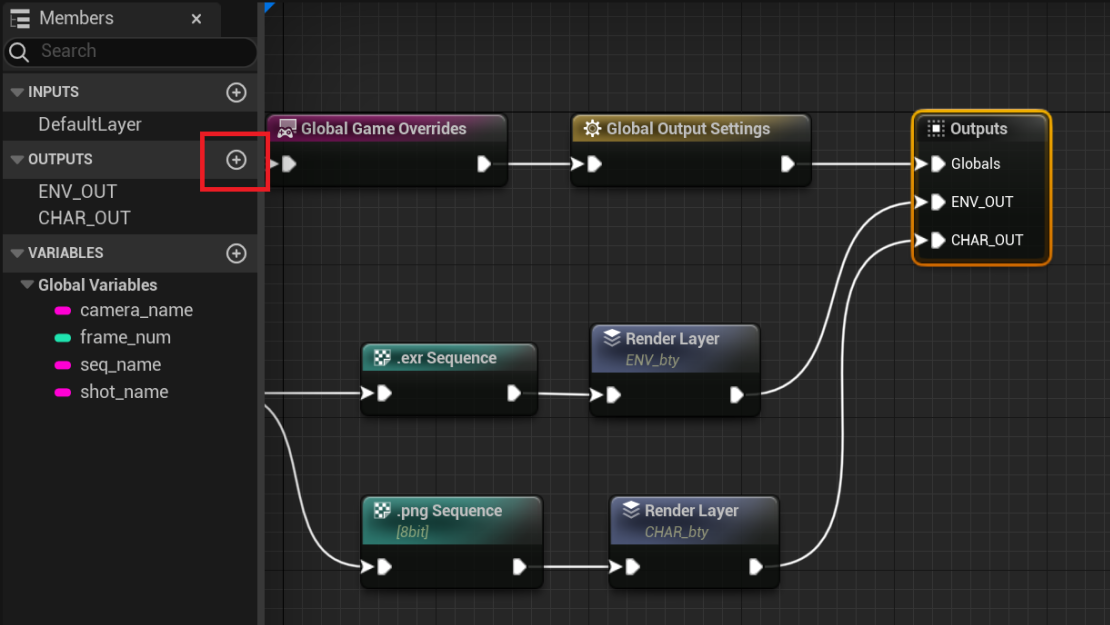
Output
The output node is what sends the logic to the renderer. To create outputs you need to click on the plus icon in the Members tab under the OUTPUTS section.
If there is a Render Layer node in the chain plugged into an Output then that chain’s logic will be sent to the renderer. If there is no Render Layer node then the logic will be passed out of the Movie Render Graph, which is useful for pipeline tools and for use with Subgraphs. Outputs without a connection will do nothing.
Conditional Nodes
There are some logic nodes that can apply to the Movie Render Graph to control the computing of branches.
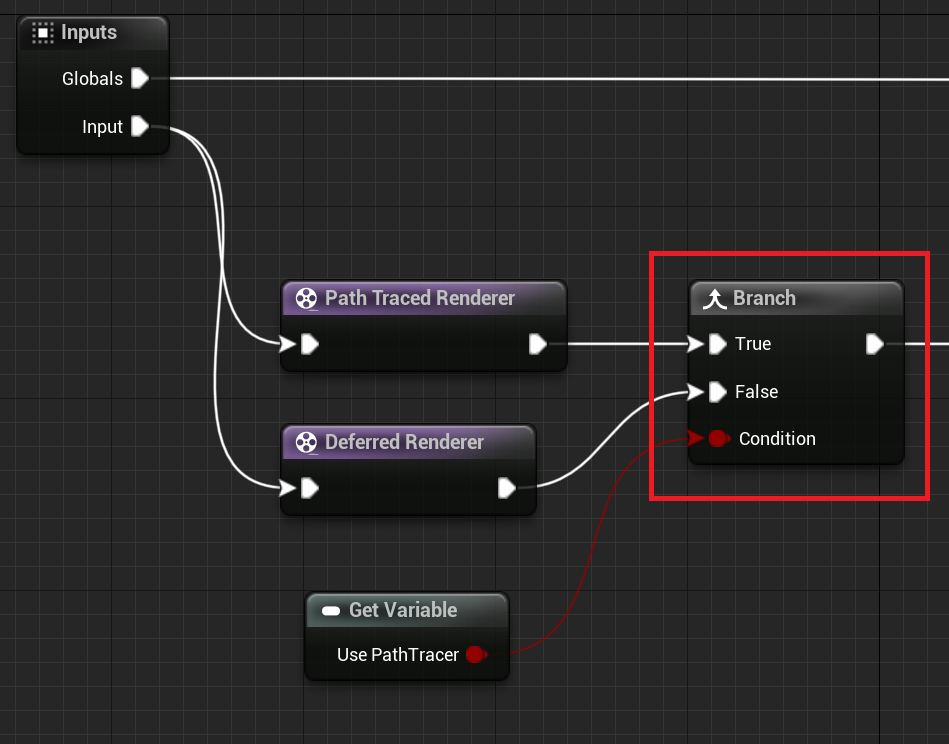
Branch Node
This node takes a True/False boolean as an input to let the Movie Render Graph which branch to compute.
For example, if you want to set up a single render layer but want to be able to choose whether it is rendered with the Pathtracer or the Deferred Path.
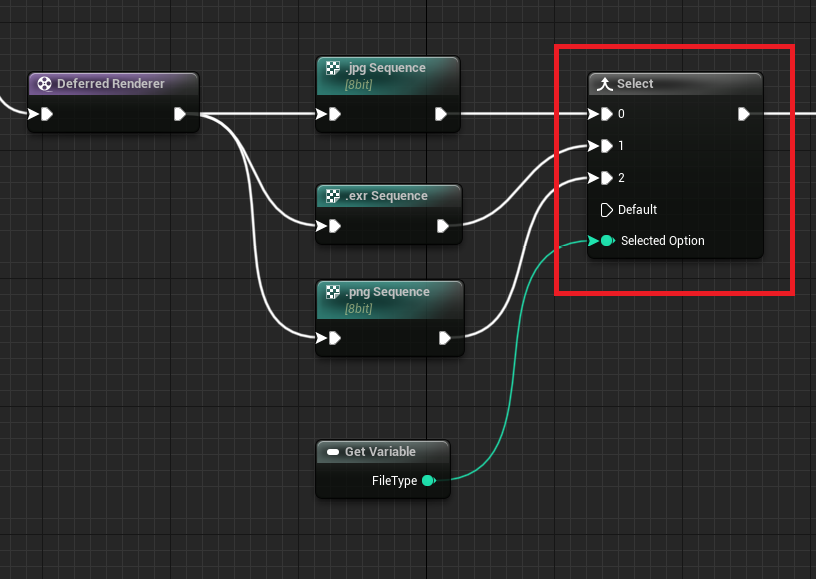
Select Node
This node takes an input to let Movie Render Graph know which branch to compute. You can select the desired data type for the input in the Details Panel of the Select node. If no option is stated the data will flow through the Default path.
For example, if you want to change which file type the renderer will write to:
Variables and Exposed Properties
Most nodes in the Movie Render Graph provide the ability to expose some of the properties as pins. This will allow you to promote these properties up to be set at the base Movie Render Queue UI rather than being hardcoded inside the Movie Render Graph. If you are familiar with Blueprints, this works similarly.
This is incredibly powerful when working in a source-controlled environment. Rather than having to have a graph per shot, you can expose desired parameters to be set at the job level rather than hard coded into the graph.
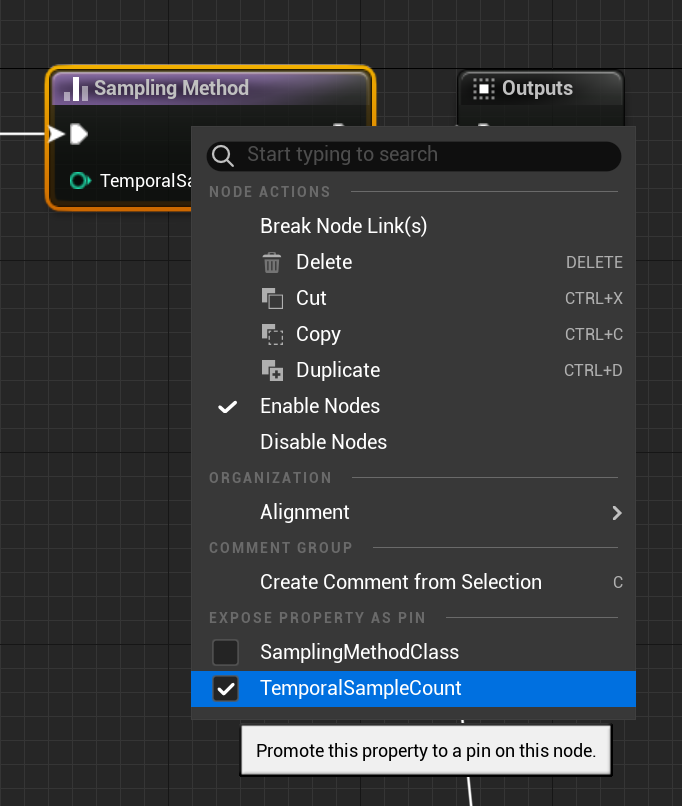
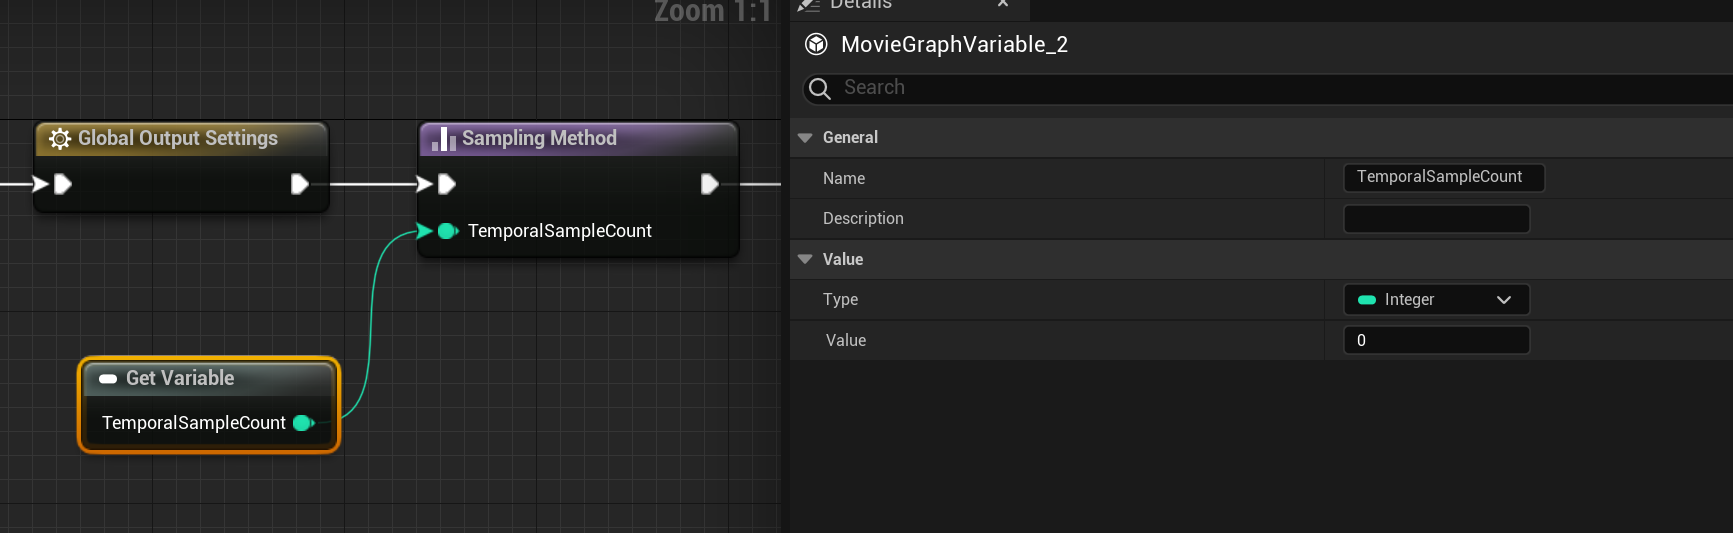
For example, if you want to be able to set Temporal Sampling differently for each shot in a sequence without having to make a Movie Render Graph per show, you can right-click on the Sampling Method node and expose the TemporalSampleCount parameter to a pin on the node.
Then you can right-click on the new exposed pin and select Promote to Variable.
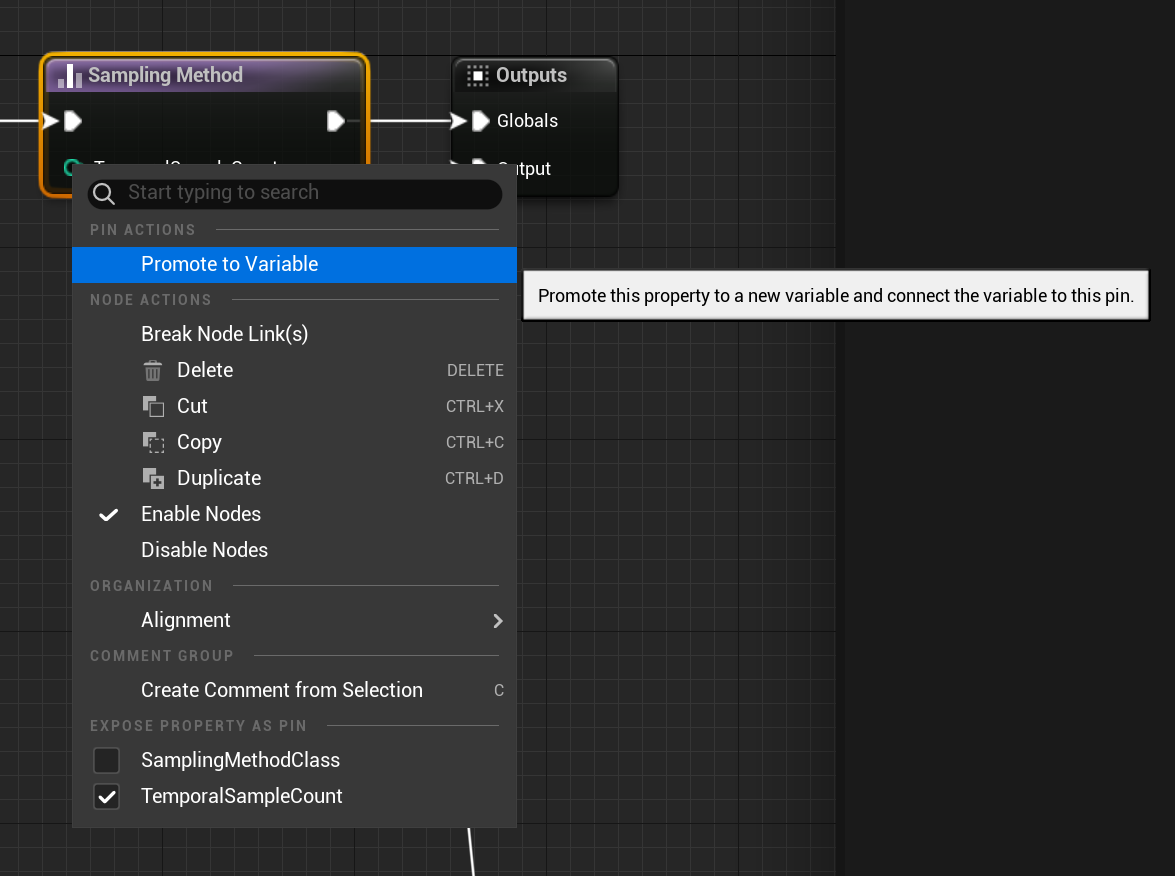
This will automatically create a variable of the correct data type– in this case, an Integer:
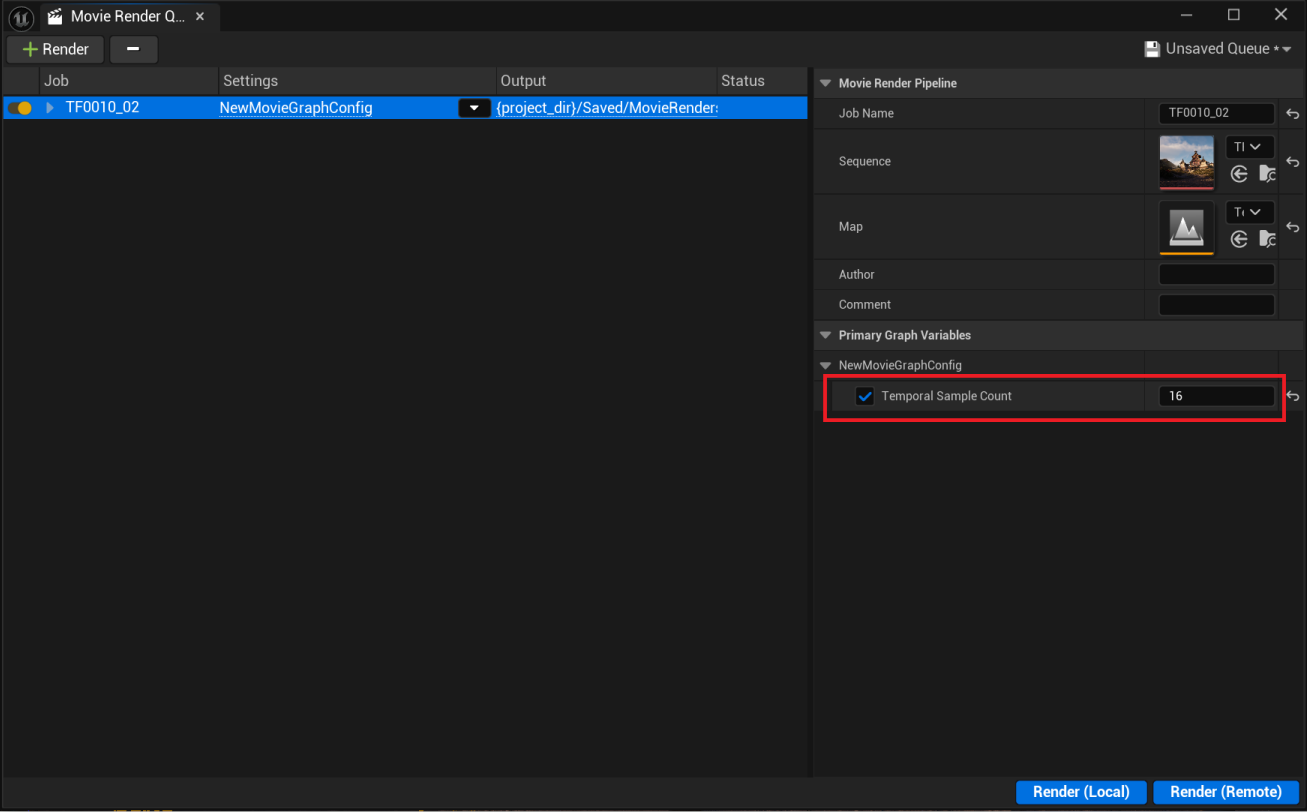
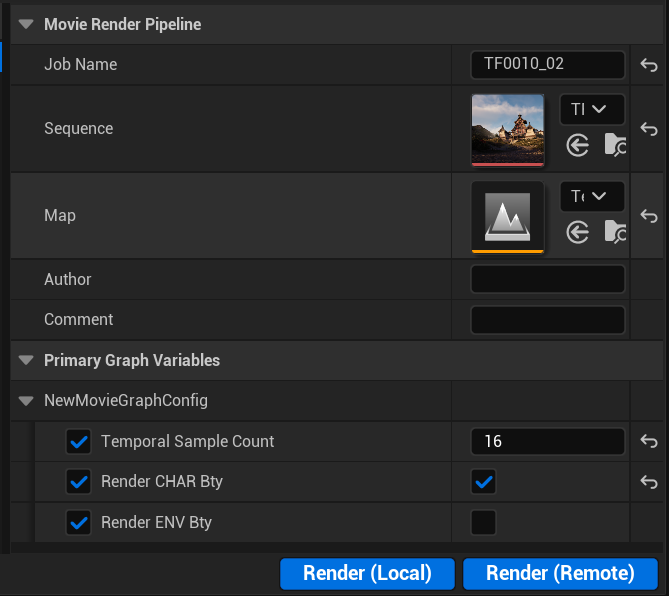
This will now be available to be set on the job in your Queue.
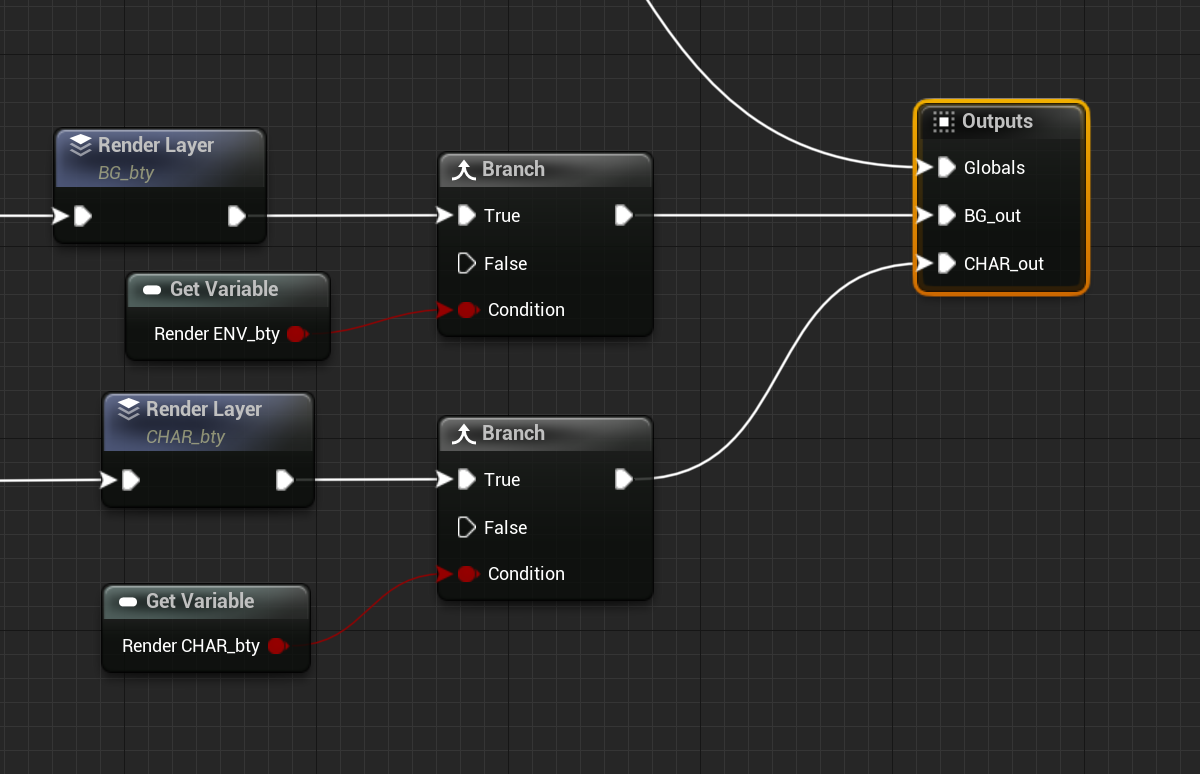
Or you can use the Branch conditional to pick which Render Layers you want to render without having to dive into the graph asset.
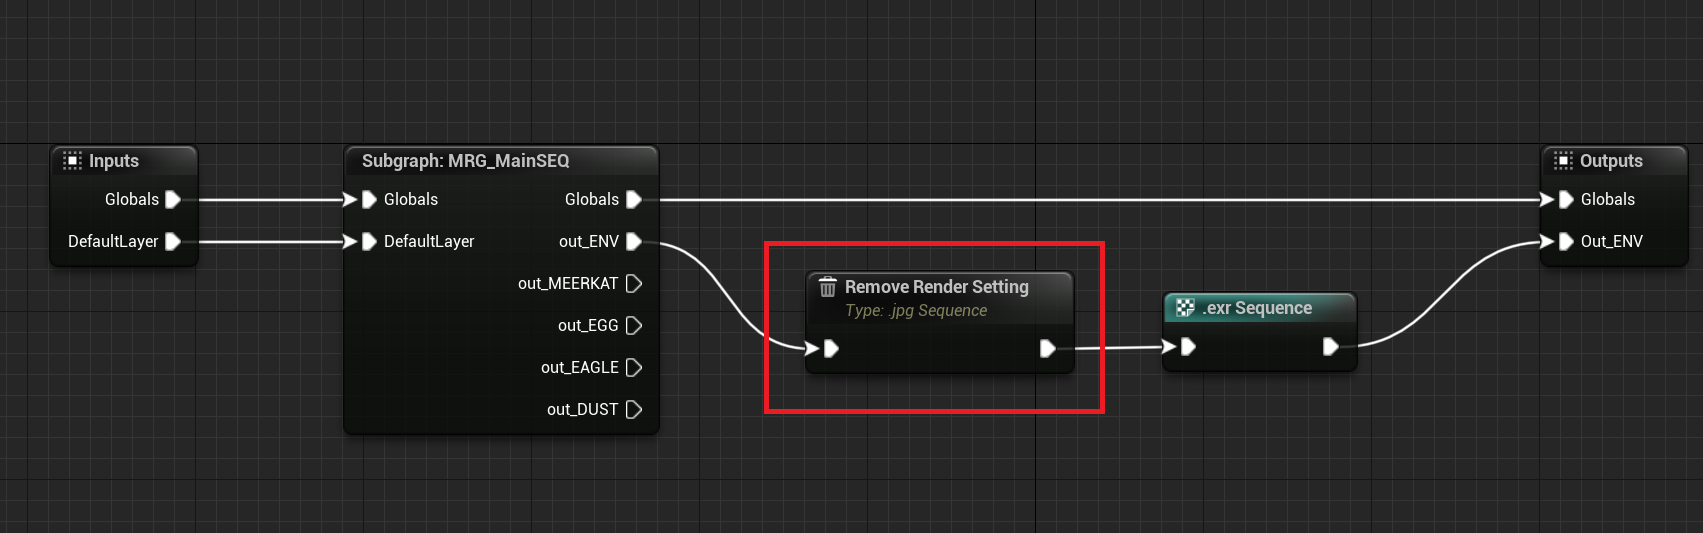
Remove Render Setting
This node can be connected in a parent graph to remove any node of type in the subgraph.
A use case is if a subgraph has a JPG node that you don't want in your parent graph. You can connect the Remove Render Setting node in the parent graph to get rid of the JPG node.
Subgraphs
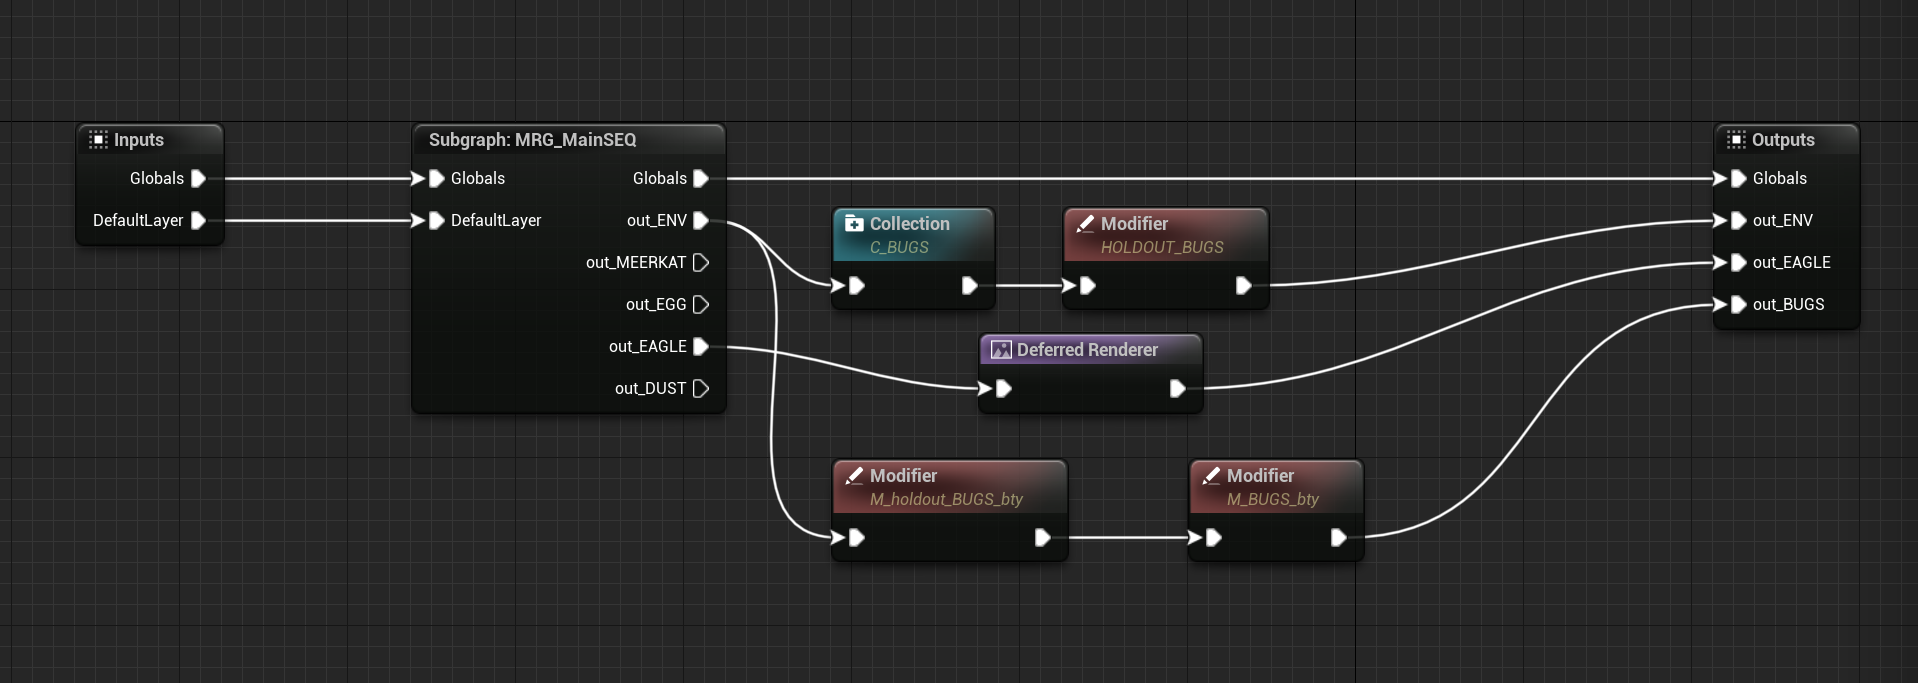
Subgraphs were created to give greater flexibility to base graphs in a source-controlled environment. Subgraphs are independently source-controlled Movie Render Graph assets that can be loaded into other Parent Graphs and still apply the logic. Parameters and/or logic can then be added, appended, or overridden.
In this screenshot, we are taking the output of the out_ENV render layer chain and creating a new Collection. Then splitting the Bugs out to their own render layer. This is an example of how an artist can make shot-level changes without having to check out and edit, or duplicate and edit, a sequence-level Movie Render Graph.
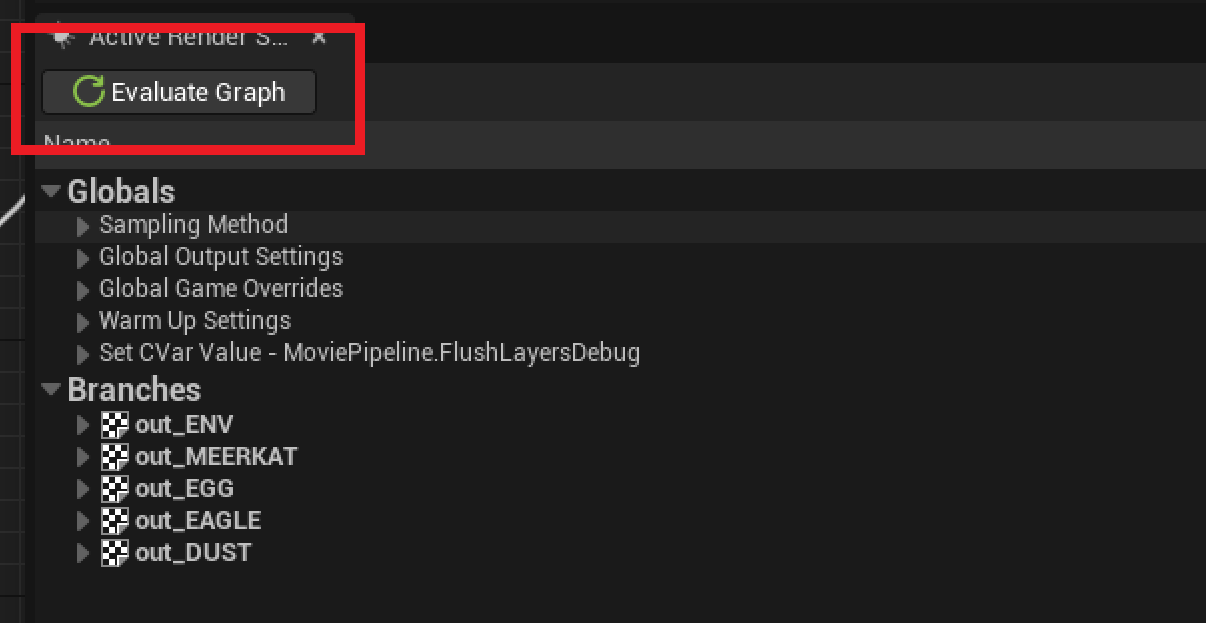
Graph Evaluation
You can see the results of the graph evaluation by pressing the Evaluate Graph button under the Active Render Settings tab.
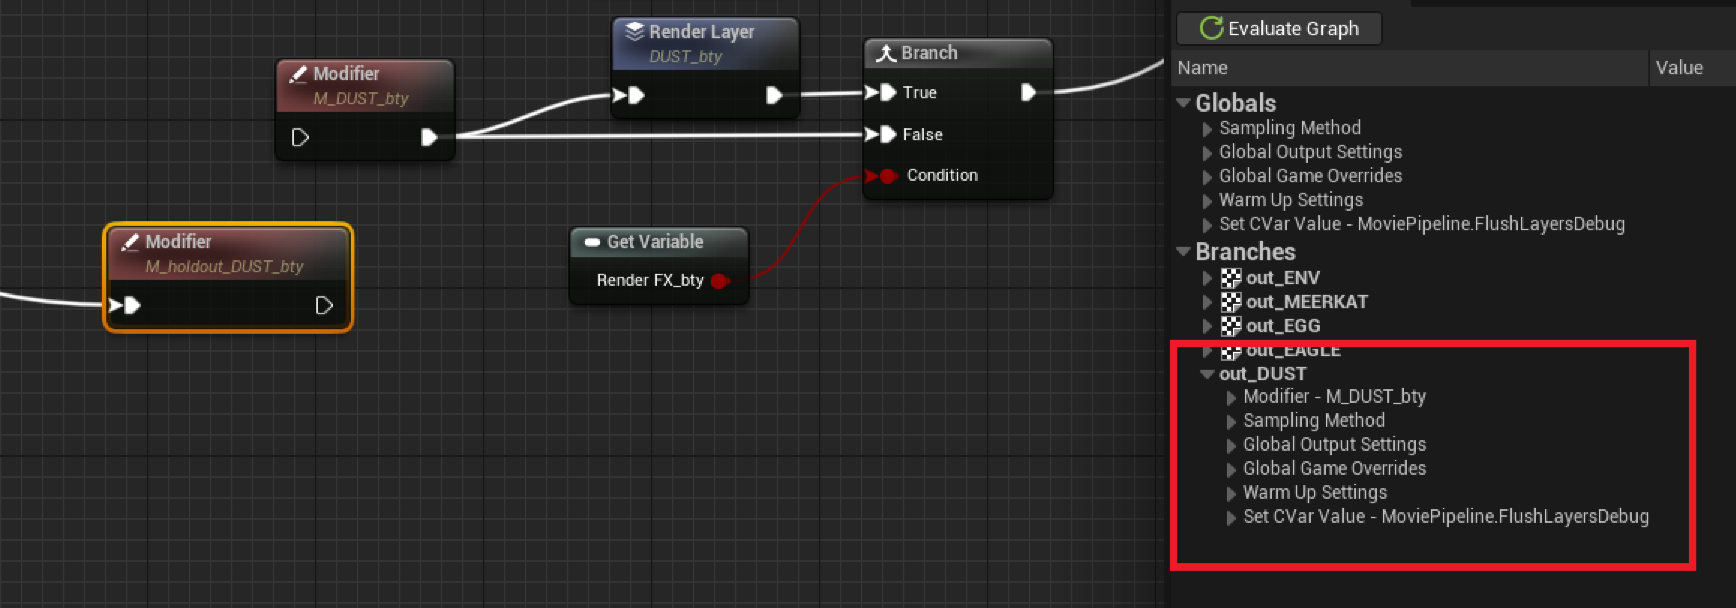
The Movie Render Graph is evaluated from the Output backward, or from right to left. The graph composes left-to-right, where nodes closest to the Output node 'win' or have the highest precedence
You can see this in action here by breaking a chain and re-evaluating, or by setting the default condition status one way or another on a Branch node:

Limited or Non-supported Actor Types
There are still some actor types that have limited support in Render Layers. Generally, the lack of support will be for Holdout and Affect Indirect While Hidden will be the issue. Here you can reference the Actor types that have no, or limited support when using the Movie Render Graph:
| Actor Type | Support Level |
|---|---|
| Landscapes | Not currently supported. |
| Child Actors | Not currently supported. |
| Heterogenous Volumes | Not currently supported. |
| Niagara, Fluid, and other Translucent FX | Not currently supported. |
| Translucent Actors | Limited support. |
| Spawnable Actors | Limited support, requires actor tags. |
| SkyAtmosphere without a Skydome | Limited support, proper holdout alpha requires a SkySphere. |