
Overview
Event Dispatchers are an Actor communication method where one Actor dispatches an event and other Actors that are listening to that event are notified.
Using this method, the notifying Actor creates an Event Dispatcher to which the listening Actors subscribe. This communication method uses a one to many relationship, where the working Actor triggers the Event Dispatcher and many listening Actors are notified. In this Quick Start guide, you will learn how to use Event Dispatchers to create an OnBossDied event that will trigger on two Actors in your Level.
Setup
-
Begin by creating a new Games > Third Person > Blueprint Project with Starter Content enabled.
 (w:600)
Creating the OnBossDied Event
-
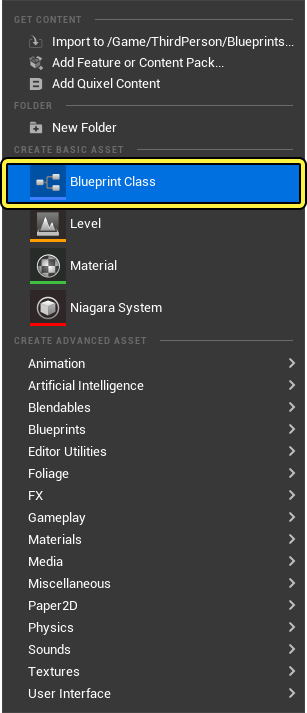
Right-click the Content Browser and click Blueprint Class under the Create Basic Asset section.

-
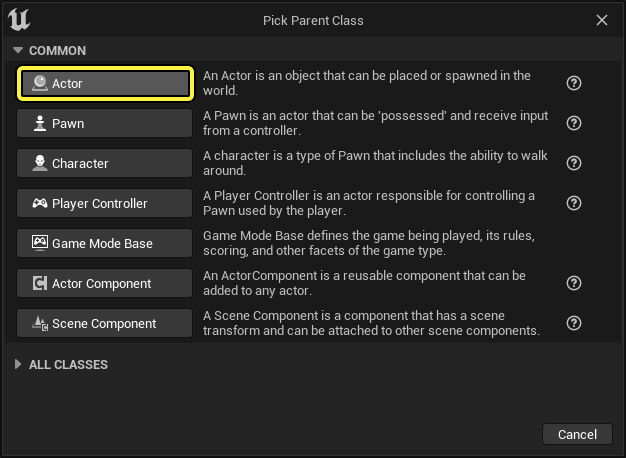
Select Actor class as your Parent Class and name the Blueprint BP_BossDied.

-
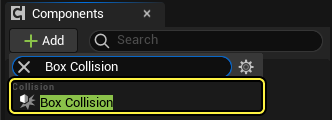
Open BP_BossDied in the Blueprint editor and from the Viewport, click the Add Component button then search for and select Box Collision.
-
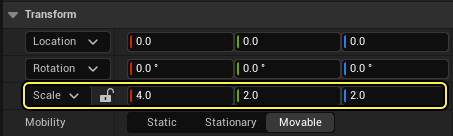
With the Box collision selected, change the scale to X = 4, Y = 4, and Z = 2.
-
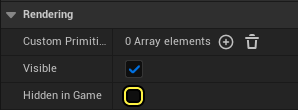
With the Box collision selected, go to the Rendering section of the Details panel and deselect the Hidden in Game checkbox. This will display the collision box during gameplay.
-
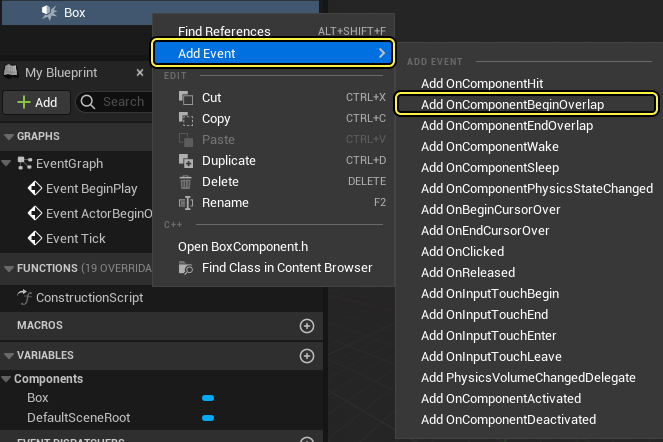
Right-click the Box collision and select Add OnComponentBeginOverlap. You will see the node added to the Event Graph.
-
From the My Blueprint panel on the left, navigate to the Event Dispatchers section and click + Add New to add a new event. Name this event OnBossDied.

-
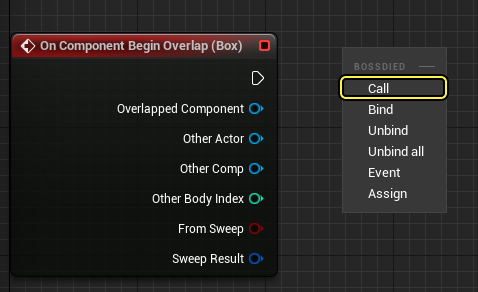
Drag OnBossDied to the Event Graph and select Call to add the node.
-
Connect the On Component Begin Overlap node to the Call OnBossDied node. Compile and Save the Blueprint.
-
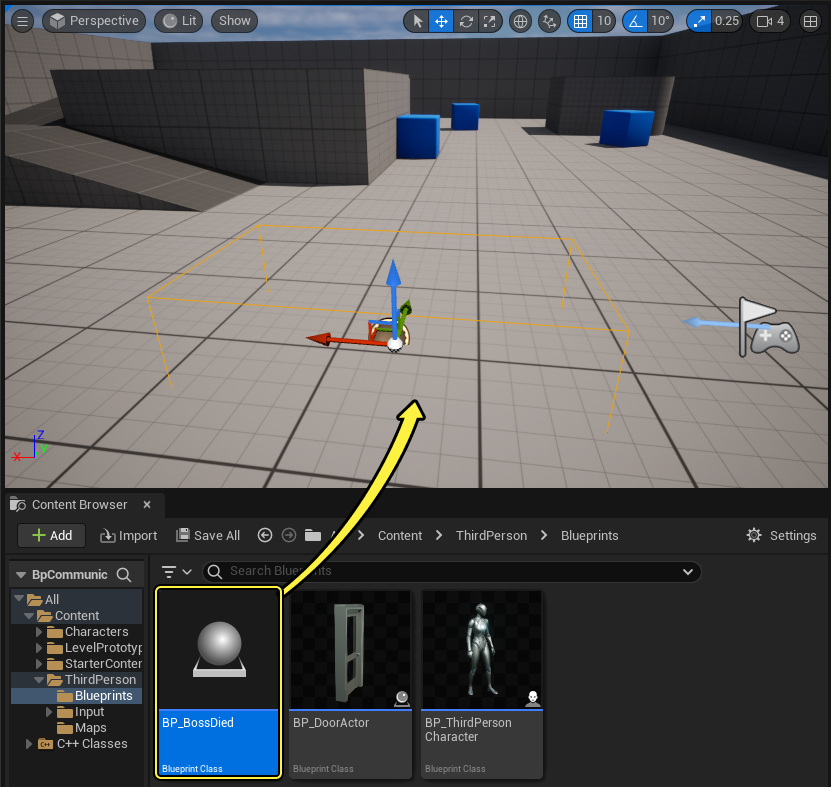
Drag the BP_BossDied Blueprint into the Level.
Creating an Interactive Door
-
Right-click the Content Browser and click Blueprint Class under the Create Basic Asset section.
-
Select the Actor class as your Parent Class and name the Blueprint BP_BossDoor.
-
Open BP_BossDoor and from the Viewport click the Add Component dropdown then search for and select Static Mesh. Name the component Frame.
-
Add another Static Mesh component and name it Door.
-
Select the Frame component and from the Details panel click the Static Mesh dropdown then search for and select SM_DoorFrame.
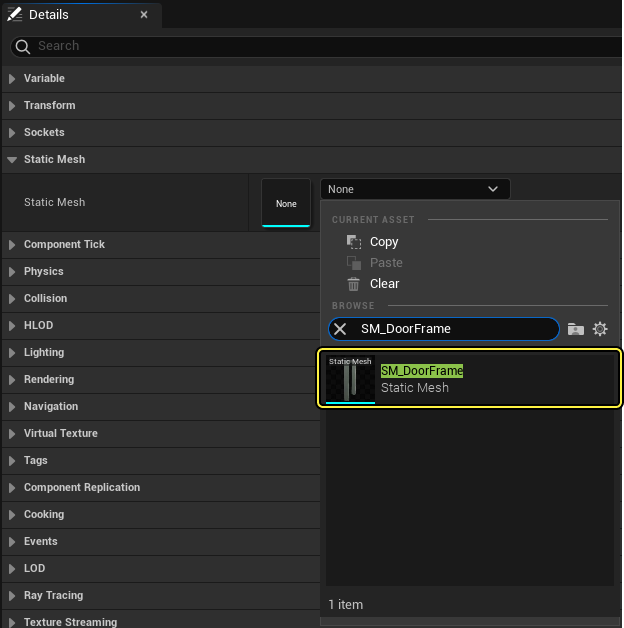
-
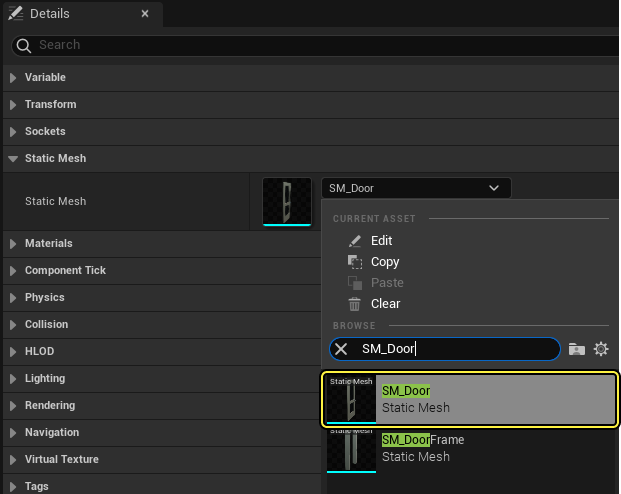
Repeat the step above for the Door component and add the SM_Door static mesh.
-
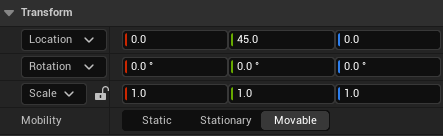
With the Door component still selected, set the Y location to 45 as seen below. You should see the door aligned with the frame.
-
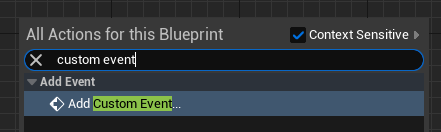
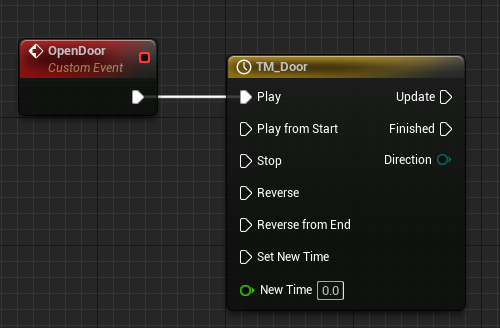
Right-click the Event Graph then search for and select Add Custom Event. Name the event OpenDoor.
-
Drag from the OpenDoor event then search for and select Add Timeline. Name the Timeline TM_Door.
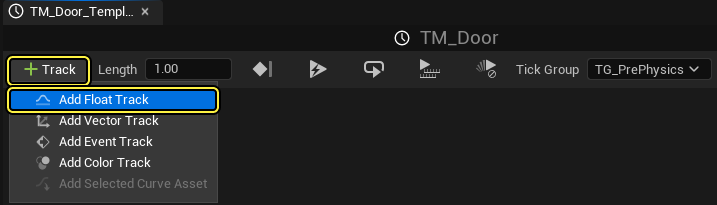
-
Double-click TM_Door to open it. Click on the Add Float Curve button to add a Float Track and name it Alpha. Set the length to 1.0.
-
Right-click the graph and select Add key to CurveFloat_1 to add a new point. Set the Time and Value to 0.0.
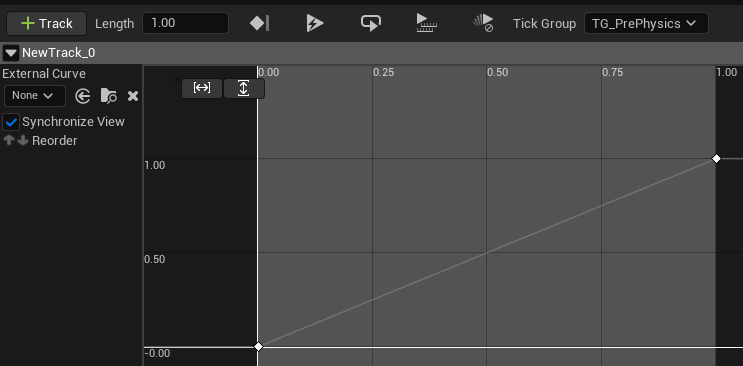
-
Repeat the steps above to add another point with Time and Value set to 1.0.
-
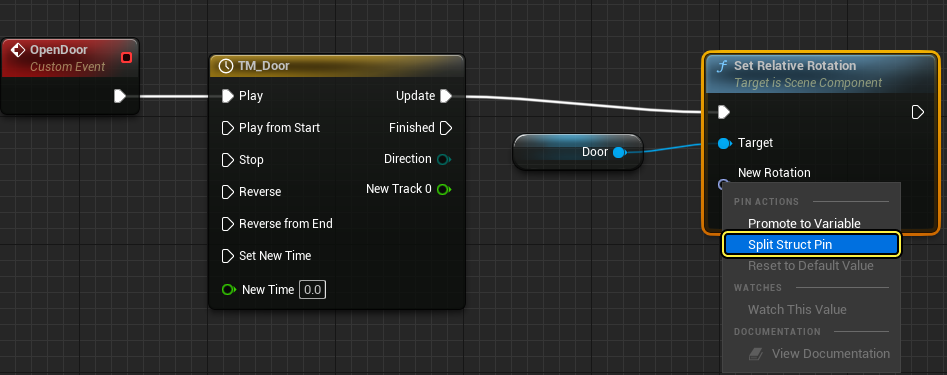
Go back to the Event Graph and drag the Door Static Mesh component into the Event Graph to create a node. Drag from the Door node then search for and select SetRelativeRotation.
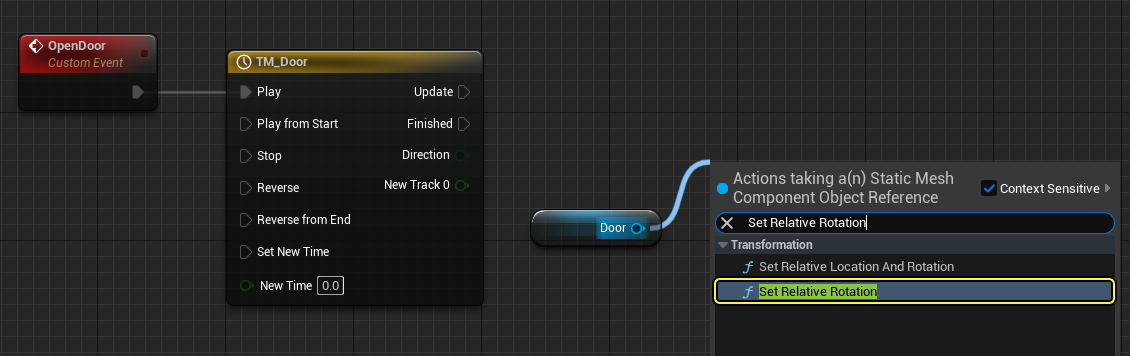
-
Connect the Update pin from TM_Door to the SetRelativeRotation node. Right-click the New Rotation pin and select Split Struct Pin.
-
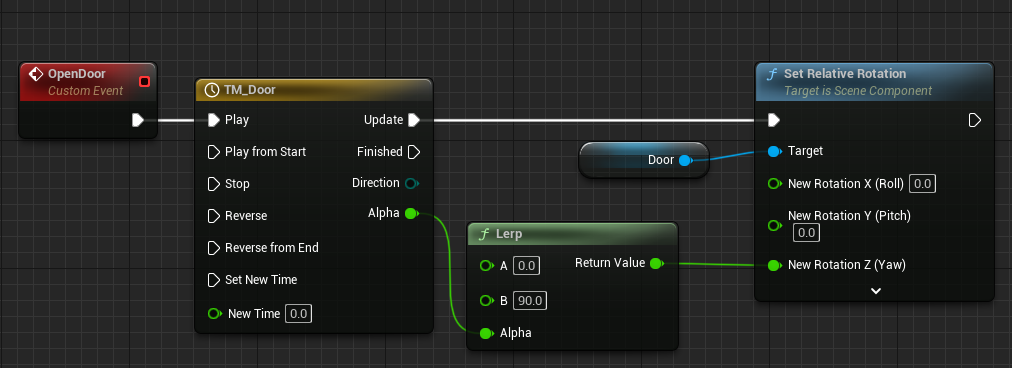
Right-click the Event Graph then search for and select Lerp Float. Connect the Return Value to the Yaw pin on the SetRelativeRotation node. Connect the Alpha pin from TM_Door to the Alpha pin on the Lerp node. Lastly, set the value of B to 90.0 as shown below.
-
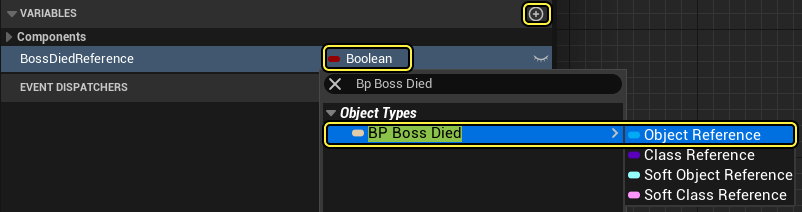
Add a new variable by clicking the + button next to the Variable section. Name the variable BossDiedReference.
-
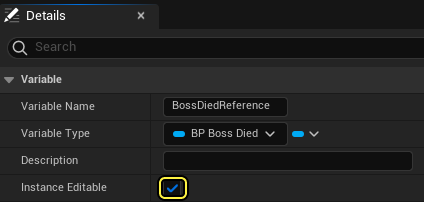
On the Details panel click the Variable Type dropdown then search for and select the Object Reference of BP_BossDied. Check the Instance Editable checkbox.
-
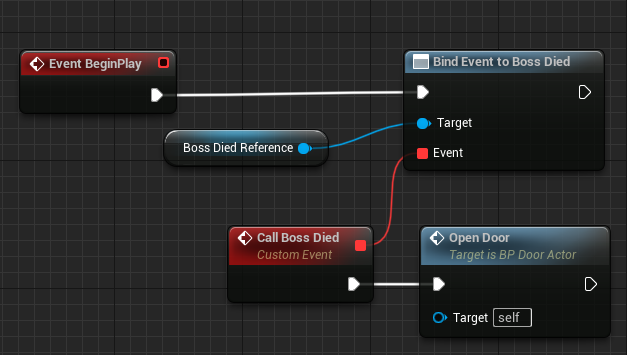
Drag BossDiedReference to the Event Graph and select Get BossDiedRerence. From the node, drag then search for and select Bind Event to On Boss Died.

-
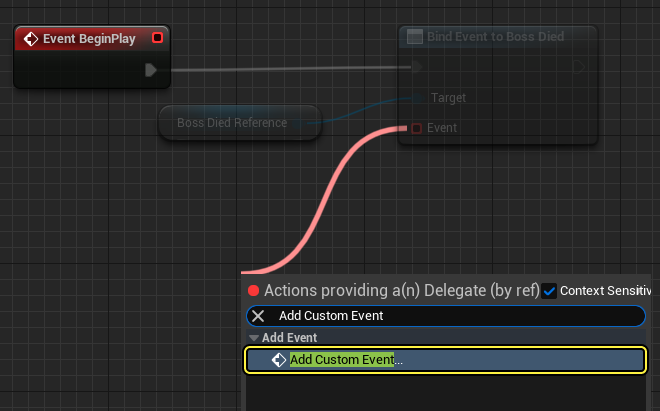
From the red Event pin of Bind Event to On Boss Died, drag then search for and select Add Custom Event. Name the event BossDied.
-
From the BossDied event node, drag then search for and select Open Door. Connect Event Begin Play to the Bind Event to On Boss Died node as seen below.
-
Compile and Save the Blueprint.
Testing the Event Dispatcher
-
Drag the BP_BossDoor Actor into your Level. Go to the Details panel and click the Boss Reference Died dropdown then search for and select BP_BossDied.

-
Press Play and walk over the BP_BossDied trigger to simulate your boss dying in the game.
 (convert:false)
Next Steps
Now that you know how to use Event Dispatchers, take a look at the other types of communication referenced in the Actor Communication documentation page.
Overview
Delegates can call methods in Actor class Blueprints in a type-safe way. A delegate can be bound dynamically to form a communication where one Actor triggers an event on another Actor that is listening to be notified for that event. In this Quick Start guide, you will learn how to use Delegates to create an OnBossDied event that will trigger two Actor class Blueprints in your Level.
See Delegates for additional documentation.
Required Setup
-
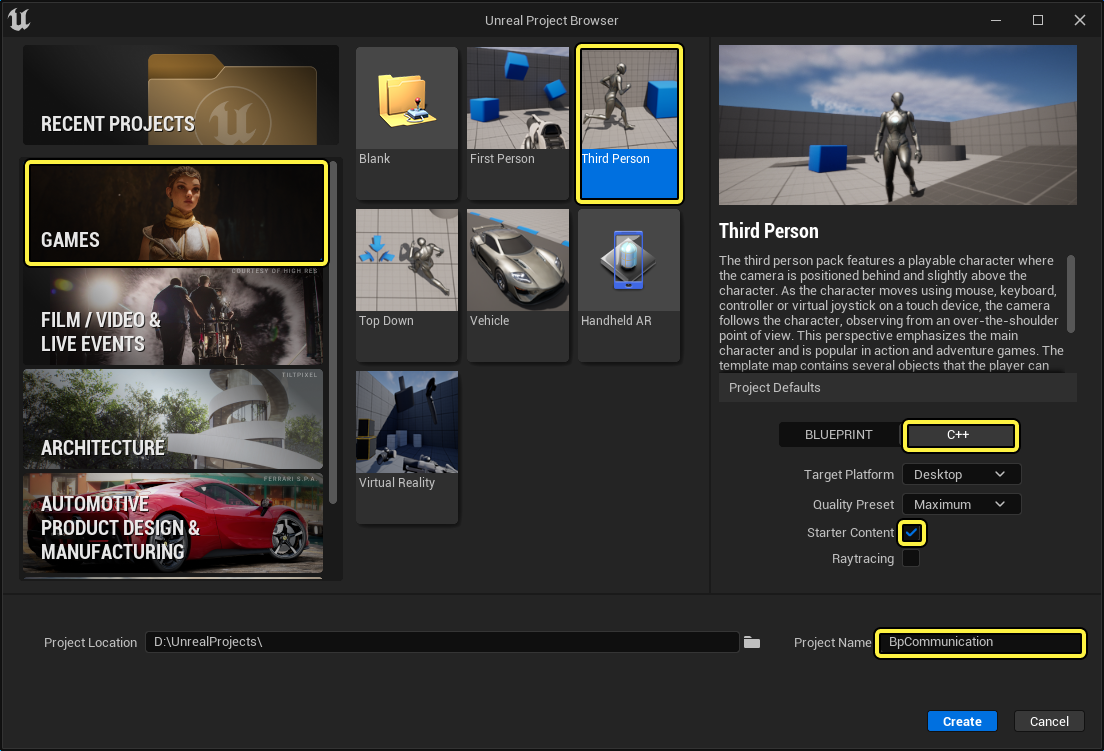
Begin by creating a new Games > Third Person > C++ Project with Starter Content enabled.
Creating the Boss Actor and OnBossDied Delegate
-
From the C++ Class Wizard, create a new Actor class named BossActor.
 (w:600)
 -
Navigate to your BossActor.h. Underneath your library includes, declare the following Delegate.
DECLARE_DELEGATE(FOnBossDiedDelegate); -
In your class defaults, declare the following
protected: UFUNCTION() void HandleBossDiedEvent(); UPROPERTY(EditInstanceOnly, BlueprintReadWrite) class UBoxComponent* BoxComp; virtual void NotifyActorBeginOverlap(AActor* OtherActor); public: FOnBossDiedDelegate OnBossDied; -
Navigate to your BossActor.cpp and add the following class library.
#include "Components/BoxComponent.h" -
Implement the following class definitions.
ABossActor::ABossActor() { BoxComp = CreateDefaultSubobject<UBoxComponent>(TEXT("BoxComp")); BoxComp->SetBoxExtent(FVector(128, 128, 64)); BoxComp->SetVisibility(true); } void ABossActor::HandleBossDiedEvent() { OnBossDied.ExecuteIfBound(); } void ABossActor::NotifyActorBeginOverlap(AActor* OtherActor) { HandleBossDiedEvent(); } -
Compile your code.
-
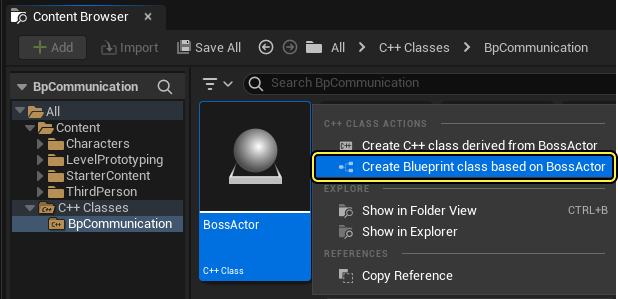
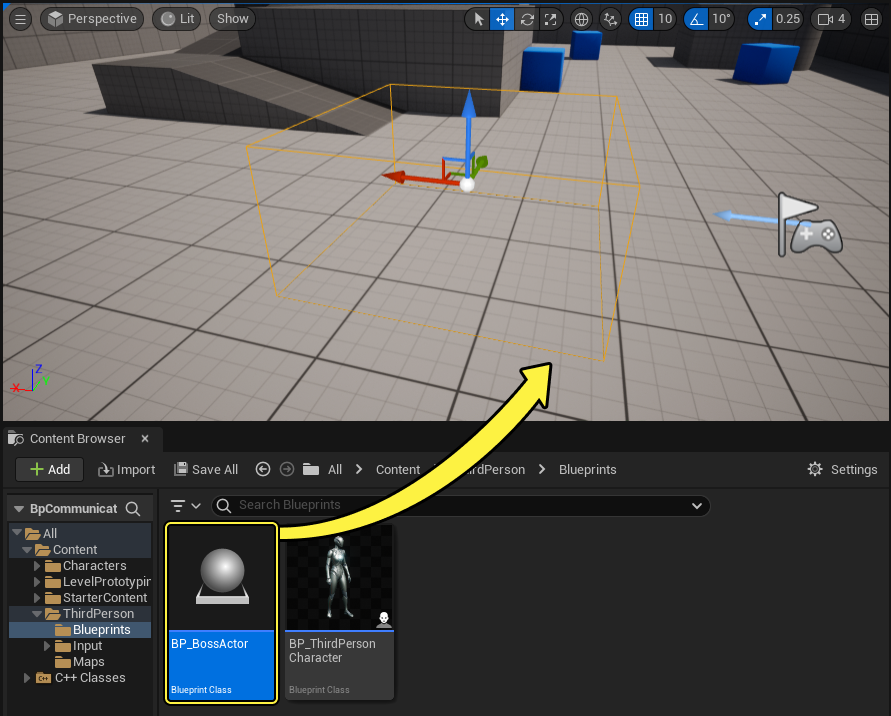
From the C++ Classes folder, right-click your BossActor, then from the C++ Class Actions dropdown menu, select Create Blueprint class based on BossActor. Name your Blueprint class BP_BossActor.
-
Drag an instance of your BossActor into the Level.
Finished Code
BossActor.h
#pragma once
#include "CoreMinimal.h"
#include "GameFramework/Actor.h"
#include "BossActor.generated.h"
DECLARE_DELEGATE(FOnBossDiedDelegate);
UCLASS()
class BPCOMMUNICATION_API ABossActor : public AActor
{
GENERATED_BODY()
public:
// Sets default values for this actor's properties
ABossActor();
protected:
// Called when the game starts or when spawned
virtual void BeginPlay() override;
UFUNCTION()
void HandleBossDiedEvent();
UPROPERTY(EditInstanceOnly, BlueprintReadWrite)
class UBoxComponent* BoxComp;
virtual void NotifyActorBeginOverlap(AActor* OtherActor);
public:
// Called every frame
virtual void Tick(float DeltaTime) override;
FOnBossDiedDelegate OnBossDied;
};
BossActor.cpp
#include "BossActor.h"
#include "Components/BoxComponent.h"
#include "BPCommunicationGameMode.h"
// Sets default values
ABossActor::ABossActor()
{
// Set this actor to call Tick() every frame. You can turn this off to improve performance if you don't need it.
PrimaryActorTick.bCanEverTick = true;
BoxComp = CreateDefaultSubobject<UBoxComponent>(TEXT("BoxComp"));
BoxComp->SetBoxExtent(FVector(128, 128, 64));
BoxComp->SetVisibility(true);
}
// Called when the game starts or when spawned
void ABossActor::BeginPlay()
{
Super::BeginPlay();
}
void ABossActor::HandleBossDiedEvent()
{
OnBossDied.ExecuteIfBound();
}
void ABossActor::NotifyActorBeginOverlap(AActor* OtherActor)
{
HandleBossDiedEvent();
}
// Called every frame
void ABossActor::Tick(float DeltaTime)
{
Super::Tick(DeltaTime);
}
Creating an Interactive Door
-
From the C++ Class Wizard, create a new Actor class named DoorActor.
-
Navigate to your DoorActor.h file and declare the following include:
#include "Components/TimelineComponent.h" -
Then declare the following class definitions.
// Variable to hold the Curve asset UPROPERTY(EditInstanceOnly) UCurveFloat* DoorTimelineFloatCurve; protected: void BossDiedEventFunction(); UPROPERTY(EditInstanceOnly,BlueprintReadWrite) class ABossActor* BossActorReference; //MeshComponents to represent Door assets UPROPERTY(VisibleAnywhere, BlueprintReadWrite) UStaticMeshComponent* DoorFrame; UPROPERTY(VisibleAnywhere, BlueprintReadWrite) UStaticMeshComponent* Door; //TimelineComponent to animate Door meshes UPROPERTY(VisibleAnywhere, BlueprintReadWrite) UTimelineComponent* DoorTimelineComp; //Float Track Signature to handle our update track event FOnTimelineFloat UpdateFunctionFloat; //Function which updates our Door's relative location with the timeline graph UFUNCTION() void UpdateTimelineComp(float Output); -
Inside of DoorActor.cpp declare the following class library.
#include "BossActor.h" -
Implement the following class definitions.
ADoorActor::ADoorActor() { //Create our Default Components DoorFrame = CreateDefaultSubobject<UStaticMeshComponent>(TEXT("DoorFrameMesh")); Door = CreateDefaultSubobject<UStaticMeshComponent>(TEXT("DoorMesh")); DoorTimelineComp = CreateDefaultSubobject<UTimelineComponent>(TEXT("DoorTimelineComp")); //Setup our Attachments DoorFrame->SetupAttachment(RootComponent); Door->AttachToComponent(DoorFrame, FAttachmentTransformRules::KeepRelativeTransform); Door->SetRelativeLocation(FVector(0, 35, 0)); } // Called when the game starts or when spawned void ADoorActor::BeginPlay() { Super::BeginPlay(); //Binding our float track to our UpdateTimelineComp Function's output UpdateFunctionFloat.BindDynamic(this, &ADoorActor::UpdateTimelineComp); //If we have a float curve, bind it's graph to our update function if (DoorTimelineFloatCurve) { DoorTimelineComp->AddInterpFloat(DoorTimelineFloatCurve, UpdateFunctionFloat); } if (BossActorReference) { BossActorReference->OnBossDied.BindUObject(this, &ADoorActor::BossDiedEventFunction); } } void ADoorActor::BossDiedEventFunction() { DoorTimelineComp->Play(); } void ADoorActor::UpdateTimelineComp(float Output) { // Create and set our Door's new relative location based on the output from our Timeline Curve FRotator DoorNewRotation = FRotator(0.0f, Output, 0.f); Door->SetRelativeRotation(DoorNewRotation); } -
Compile your code.
-
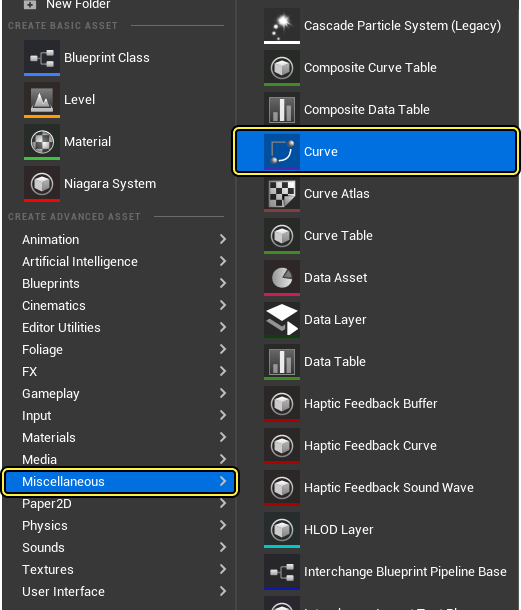
From the Content Browser, select Add/Import > Miscellaneous > Curve.
-
Select CurveFloat and name your CurveFloat asset DoorCurveFloat, then double-click your DoorCurveFloat asset. Add two keys to your Float Curve and give one key the time-value (0,0), and the other key the time-value of (4,90).

-
Shift-click to select both your keys, and set them to Auto Cubic interpolation, then save your Curve.

-
Save your DoorCurveFloat.
-
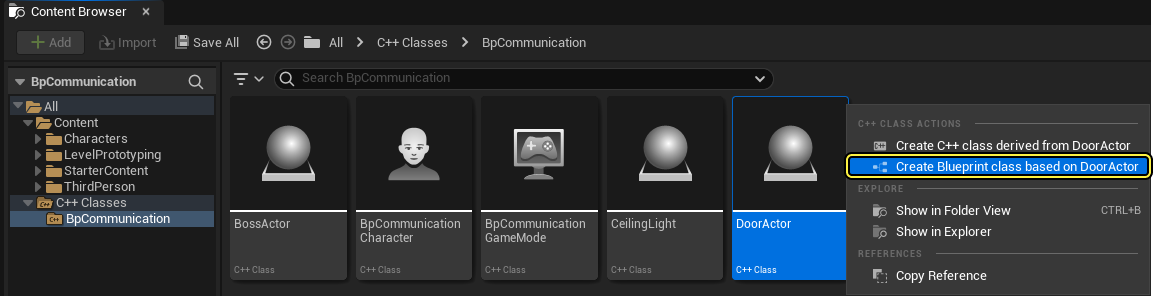
From the Content Browser, navigate to your C++ Classes folder, right-click your DoorActor class, then select Create Blueprint Class based on Door Actor. Name your Blueprint Actor Bp_DoorActor.
-
Inside BP_DoorActor's class defaults, find the Components tab, and select the DoorFrame Static Mesh component, navigate to the Details panel and change the Static Mesh to SM_DoorFrame.

-
Next, from the Components tab, select the DoorMesh component. Navigate to the Details panel and change the static mesh to SM_Door.

-
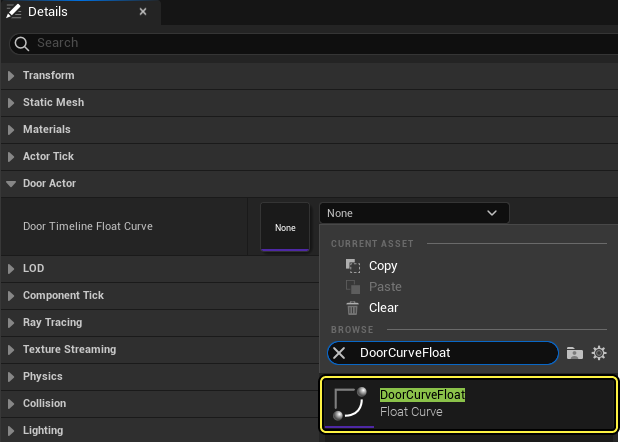
From the Details panel, select DoorCurveFloat from the Door Timeline Float Curve dropdown menu.
-
Compile and save your Blueprint.
Finished Code
DoorActor.h
#include "CoreMinimal.h"
#include "GameFramework/Actor.h"
#include "Components/TimelineComponent.h"
#include "DoorActor.generated.h"
UCLASS()
class BPCOMMUNICATION_API ADoorActor : public AActor
{
GENERATED_BODY()
public:
// Sets default values for this actor's properties
ADoorActor();
// Variable to hold the Curve asset
UPROPERTY(EditInstanceOnly)
UCurveFloat* DoorTimelineFloatCurve;
protected:
// Called when the game starts or when spawned
virtual void BeginPlay() override;
void BossDiedEventFunction();
UPROPERTY(EditInstanceOnly,BlueprintReadWrite)
class ABossActor* BossActorReference;
//MeshComponents to represent Door assets
UPROPERTY(VisibleAnywhere, BlueprintReadWrite)
UStaticMeshComponent* DoorFrame;
UPROPERTY(VisibleAnywhere, BlueprintReadWrite)
UStaticMeshComponent* Door;
//TimelineComponent to animate Door meshes
UPROPERTY(VisibleAnywhere, BlueprintReadWrite)
UTimelineComponent* DoorTimelineComp;
//Float Track Signature to handle our update track event
FOnTimelineFloat UpdateFunctionFloat;
//Function which updates our Door's relative location with the timeline graph
UFUNCTION()
void UpdateTimelineComp(float Output);
public:
// Called every frame
virtual void Tick(float DeltaTime) override;
};
DoorActor.cpp
#include "DoorActor.h"
#include "BossActor.h"
// Sets default values
ADoorActor::ADoorActor()
{
// Set this actor to call Tick() every frame. You can turn this off to improve performance if you don't need it.
PrimaryActorTick.bCanEverTick = true;
//Create our Default Components
DoorFrame = CreateDefaultSubobject<UStaticMeshComponent>(TEXT("DoorFrameMesh"));
Door = CreateDefaultSubobject<UStaticMeshComponent>(TEXT("DoorMesh"));
DoorTimelineComp = CreateDefaultSubobject<UTimelineComponent>(TEXT("DoorTimelineComp"));
//Setup our Attachments
DoorFrame->SetupAttachment(RootComponent);
Door->AttachToComponent(DoorFrame, FAttachmentTransformRules::KeepRelativeTransform);
Door->SetRelativeLocation(FVector(0, 35, 0));
}
// Called when the game starts or when spawned
void ADoorActor::BeginPlay()
{
Super::BeginPlay();
//Binding our float track to our UpdateTimelineComp Function's output
UpdateFunctionFloat.BindDynamic(this, &ADoorActor::UpdateTimelineComp);
//If we have a float curve, bind its graph to our update function
if (DoorTimelineFloatCurve)
{
DoorTimelineComp->AddInterpFloat(DoorTimelineFloatCurve, UpdateFunctionFloat);
}
if (DoorTimelineFloatCurve)
{
BossActorReference->OnBossDied.BindUObject(this, &ADoorActor::BossDiedEventFunction);
}
}
void ADoorActor::BossDiedEventFunction()
{
DoorTimelineComp->Play();
}
void ADoorActor::UpdateTimelineComp(float Output)
{
// Create and set our Door's new relative location based on the output from our Timeline Curve
FRotator DoorNewRotation = FRotator(0.0f, Output, 0.f);
Door->SetRelativeRotation(DoorNewRotation);
}
// Called every frame
void ADoorActor::Tick(float DeltaTime)
{
Super::Tick(DeltaTime);
}
5 - Testing the Event Dispatcher
-
Drag the BP_Door Blueprint into your Level. Go to the Details panel and click the Boss Reference Died dropdown and search for and select BP_BossDied.

-
With your Bp_DoorActor selected, navigate to the Details panel, click the Boss Actor Reference dropdown arrow, then search for and select BP_BossActpr.
-
Press Play and walk over the BP_BossActor trigger to simulate your boss dying in the game.
Next Steps
Now that you know how to use Delegates, take a look at the other communication types referenced in the Actor Communication documentation page.