With Blueprints, you can customize the Virtual Scouting tools by extending the classes and actors defined by the XR Creative Framework.
The XR Creative Framework is designed to share design patterns with the Unreal Gameplay framework. For more information, see Gameplay Framework.
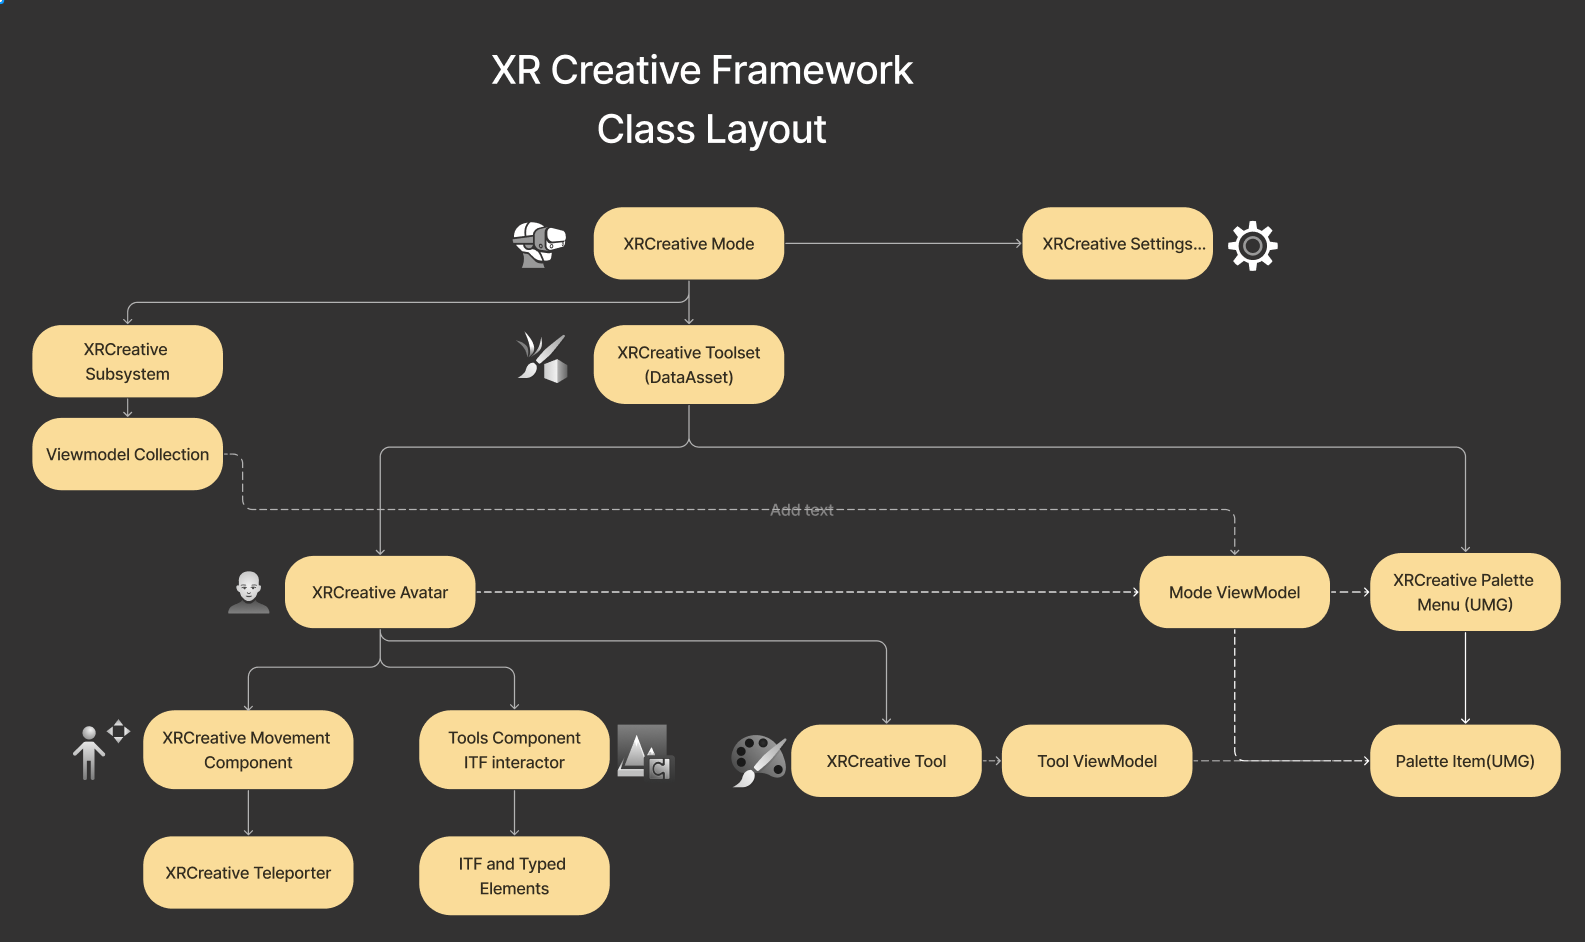
XR Creative Framework class diagram
Create a New XR Creative Mode and Toolset
Create a New XR Creative Mode
The core classes of an XR Creative experience are the XRCreativeMode and the XRCreativeToolset. XRCreativeMode contains a toolset and override events. You can create a custom toolset to add, remove, or reorganize existing tools, and to add new custom tools.
To create a new mode, follow these steps:
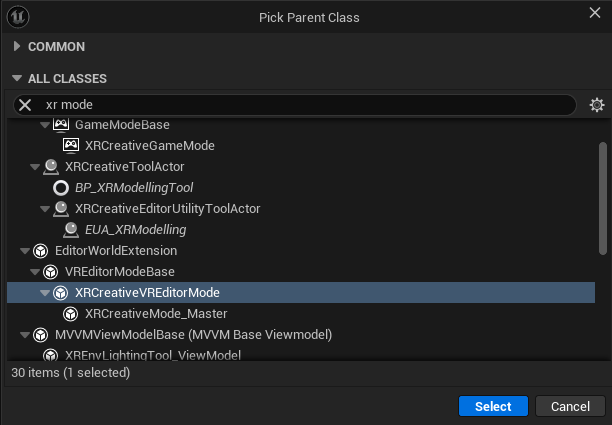
- In the Content Browser, click Add + > New Blueprint.
- Search "XR mode" and click XRCreativeVREditorMode.
The XR Creative Mode contains the following overridable events:
EventOnEnterEventOnExitEventTick
Create a New XR Creative Toolset
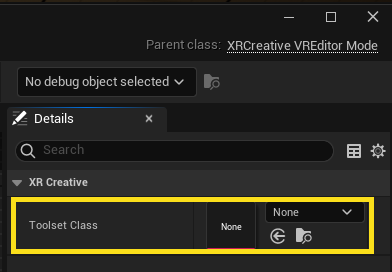
The XR Creative Mode contains the Toolset Class. This variable expects a Data Asset of the class XRCreative Toolset.
To create a new toolset, follow these steps:
- In the Content Browser, click Add + > Miscellaneous > Data Asset.
- Search "XR toolset" and click XR Creative Toolset.
The toolset Data Asset contains pointers to the following classes that you have access to in VREditor mode and in your XRCreativeGameMode:
- Avatar: A pawn of the Class
XRCreativeAvatar. The Avatar is spawned into the level when VREditor mode is started. It is spawned transiently, so it cannot be saved into a level and is also not visible to other users in the same multi-user session. - Right Handed Input Mapping Context: A Data Asset of input actions for the avatar.
- Left Handed Input Mapping Context: A Data Asset of input actions for the avatar when handedness is set to Left.
- An array of
XRBlueprintableToolActoractors - Palette: An Unreal Motion Graphics UI Designer (UMG) widget of the class
XRCreativePalette. It contains all of the menu and in-world UI for Virtual Scouting.
Virtual Scouting contains two default toolsets: Scouting_Default and Scouting_Basic. Both include the Main Menu and the Avatar, but Scouting_Basic contains fewer tools.
Create a New Tool
Tool object
The tool object is a container for all the other classes that you need to create a tool. It contains fields for the following required properties:
- Display Name
- Tool Actor
- Tool Viewmodel
- Palette (the UMG widget for this tool's settings)
Create a Tool Actor
Tool actors are spawned into the world, provide a set of functionality by operating on other actors in the world, and are then destroyed when you swap to another tool.
To begin making a new tool, follow these steps:
- In the Content Browser, click Add + > New Blueprint.
- Search "tool actor" and click XRCreativeToolActor.
Using XRCreativeToolActor provides a tool that works only at runtime. To make a tool that works only in the editor, choose the XRCreativeEditorUtilityToolActor.
Creating Tools For Both Editor and Runtime
Unreal Engine provides two asset factories for Blueprint actors: regular actors, and Editor Utility actors. Editor Utility actors have access to the Editor subsystems that provide editor scripting. Regular actors do not. Editor Utility actors cannot be packaged into a game because they reference editor-only modules that are not available to a packaged game. To learn more, see Scripting the Unreal Editor using Blueprints.
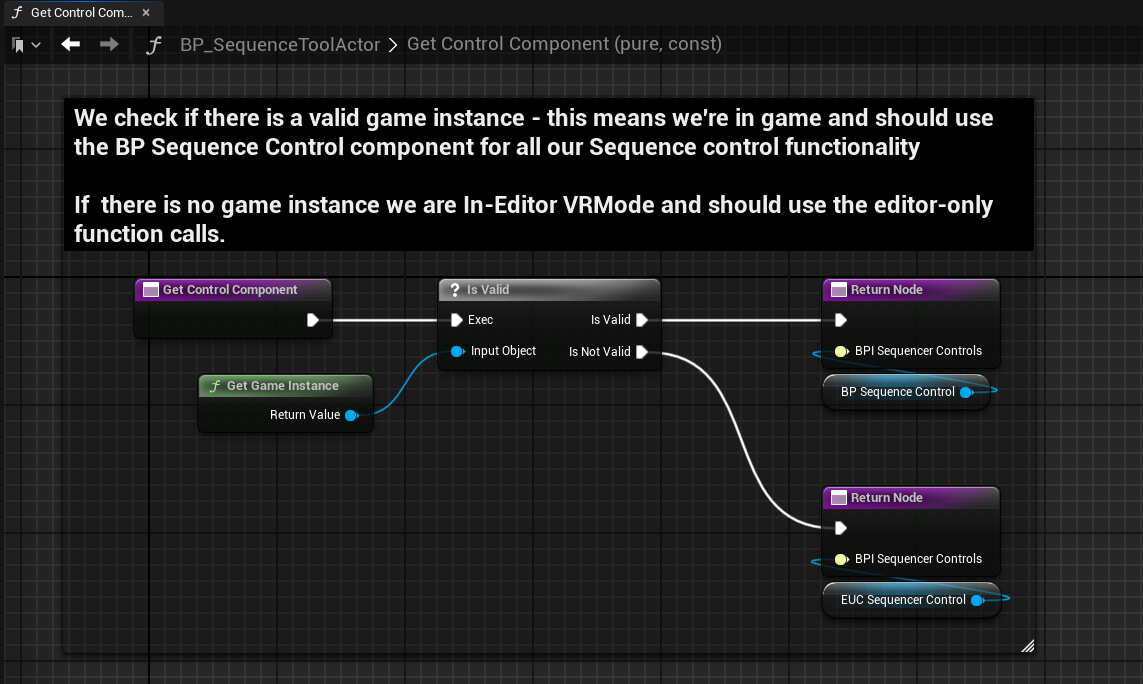
It is possible to create tools for both runtime packaging and in-editor workflows. An example of how to approach this is in the Virtual Scouting Sequencer tool. It includes the following components in the tool actor:
- BP_SequenceControl - a regular Blueprint Actor Component
- EUC_SequenceControl - an Editor Utility Actor Component

These two components both implement a common interface, BPI_SequencerControls.
The tool uses the GetControlComponent function to select the component it must use depending on the context the function is called from. If the function detects a valid GameInstance, then the regular Blueprint actor is used. If there is no valid GameInstance, then the Editor Utility actor is used. A valid GameInstance will only be available in PIE, -Game, and packaged games.
Input Actions and Input Mapping Contexts
You can make new input actions and add them to Input Mapping Contexts with the input bindings you want. You can add and use Input_Actions to your Tool Actors and to your XRCreativeAvatar. Both of these classes are pre-registered for input on creation.
For more information, see Enhanced Input.
Create a Tool Viewmodel
XR Creative uses UMG Viewmodels as a means to pass data between in-world objects like tool actors and the UMG palette menu. Viewmodels have the following features:
- A common class for all the variables which define the current state of your tool.
- The field notification system. UMG MVVM has a feature where you can bind (subscribe) to an event that fires each time a variable is updated. This allows you to make variable updates event-based, bindable delegates and avoid casting or interfaces to communicate and share data between the classes that make up your tool.
You can access a collection of viewmodels from XRCreativeSubsystem. In Virtual Scouting, each tool's viewmodel is named after the tool.
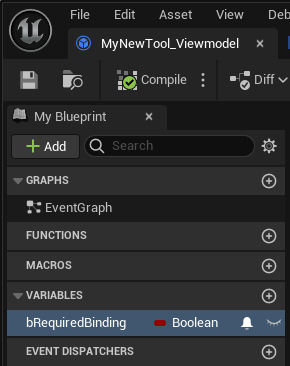
If you're creating a tool just for editor use, add a single boolean to the viewmodel called "bRequiredBinding" and set it to field notify. This will be used to ensure that your widgets are bound to the Viewmodel when in VREditor mode. This is not required if you're creating a new tool just for runtime use.
Create a Viewmodel Resolver
To use a viewmodel with a palette UMG widget in the Editor, you must create a resolver class.
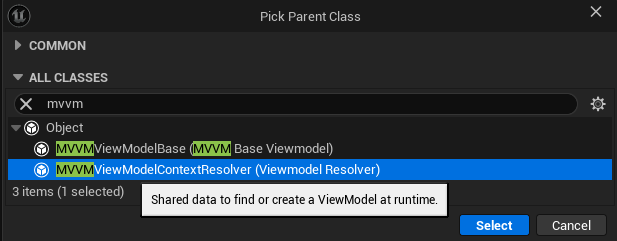
To create a resolver, follow these steps:
- In the Content Browser, click Add + > New Blueprint.
-
Search "MVVM" and click MVVMViewmodelResolver_Base.
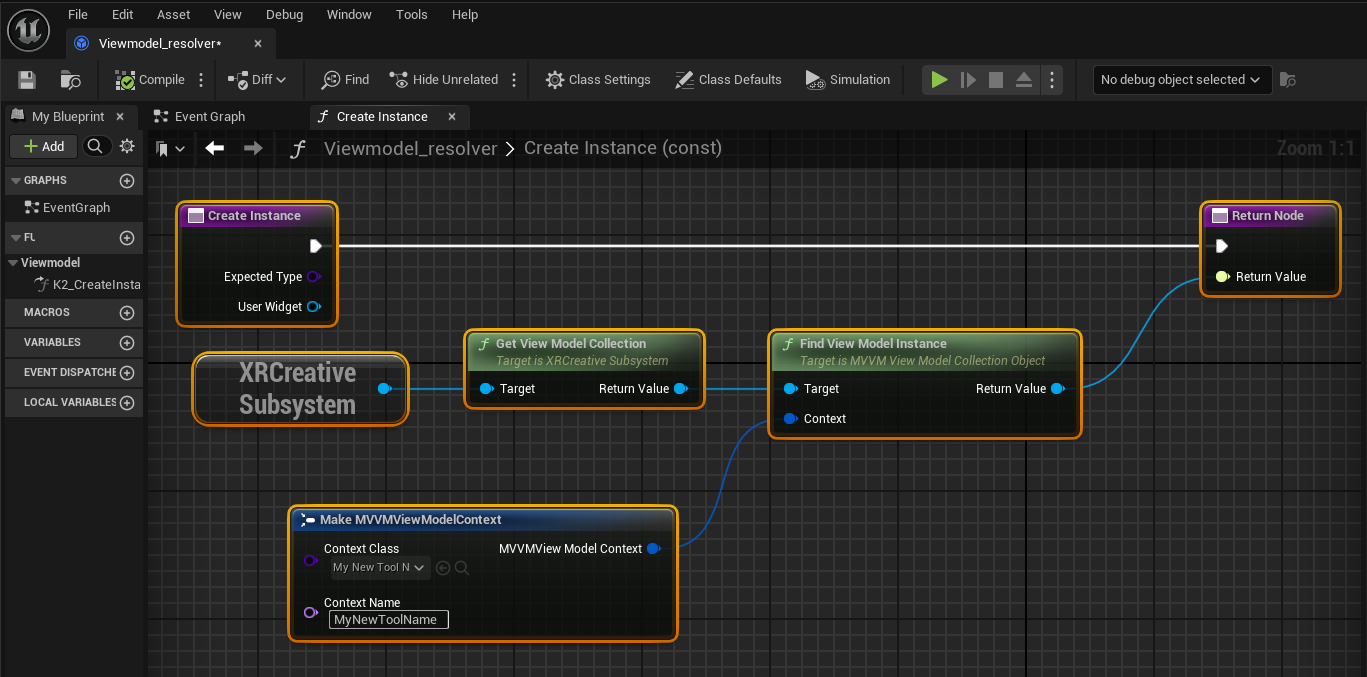
-
In the viewmodel Blueprint, set up the overridable event Create Instance as shown in the following screenshot. This code retrieves the viewmodel from the XR Creative Viewmodel Collection.
Create a Palette
Each tool needs a Palette, which is a UMG Widget that defines the tool's UI in the Main Menu. The viewmodel resolver lets the Palette communicate with the viewmodel and the tool actor.
To create a Palette Widget and bind it to a viewmodel, follow these steps:
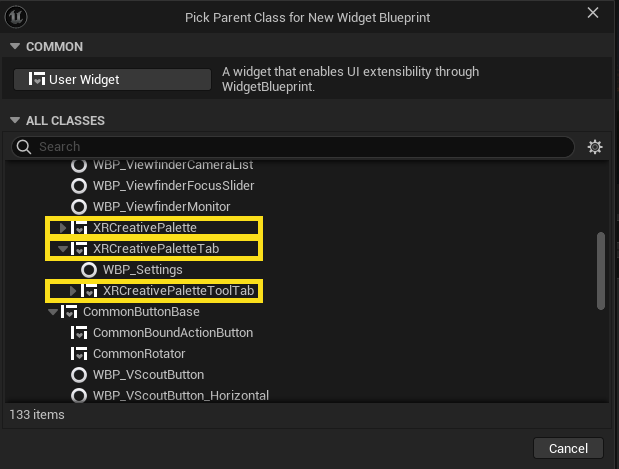
- In the Content Browser, click Add + > User interface > Widget Blueprint.
- Search for "XR tab" and click XRCreativePaletteToolTab.
-
In the class settings, set
bCanCallInitializedWithoutPlayerContexttotrue.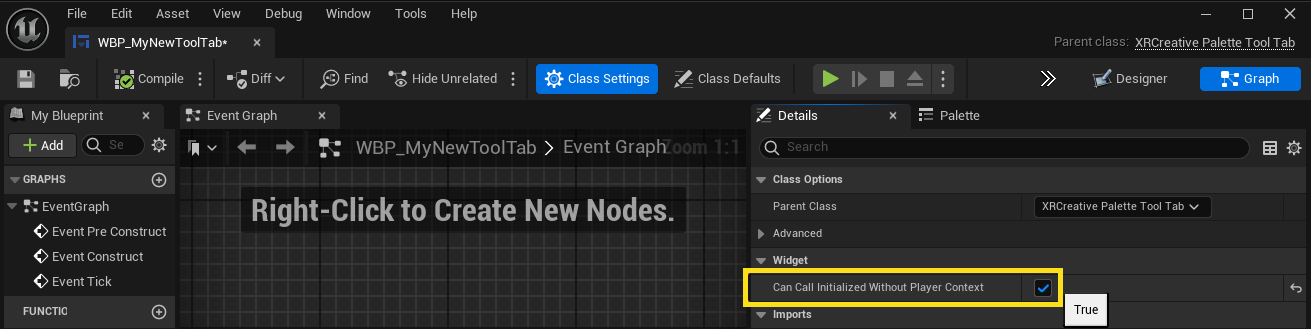
-
Create a single bool variable called
bRequiredVMBinding.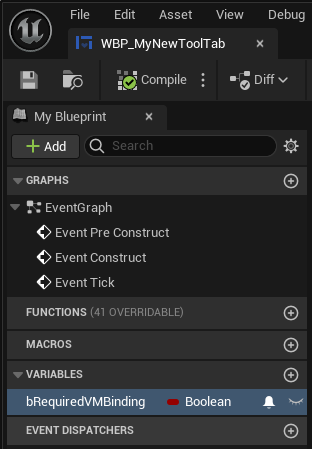
- Open the View Bindings tab and click the Add (+) button next to the widget.
- Set the new binding between the variable
bRequiredVMBindingin the widget and the variablebRequiredVMBindingin your viewmodel class. -
Set the binding to be One Way to Widget.

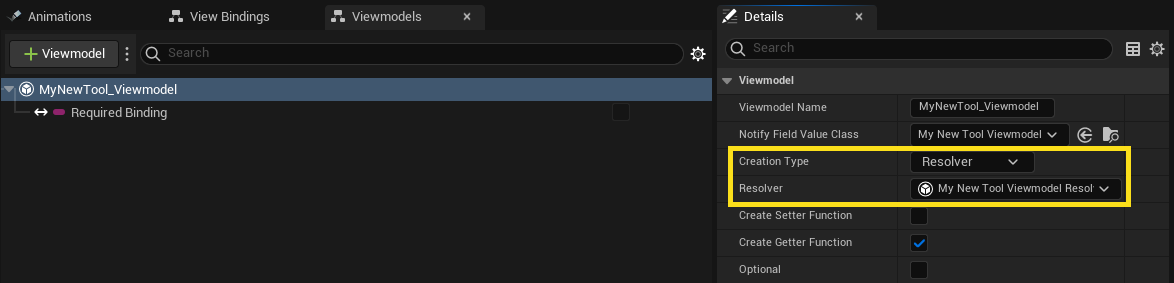
- Open the Viewmodels tab and click your viewmodel class.
-
In the Details panel, set the Creation Type to Resolver, and set Resolver to your viewmodel resolver.
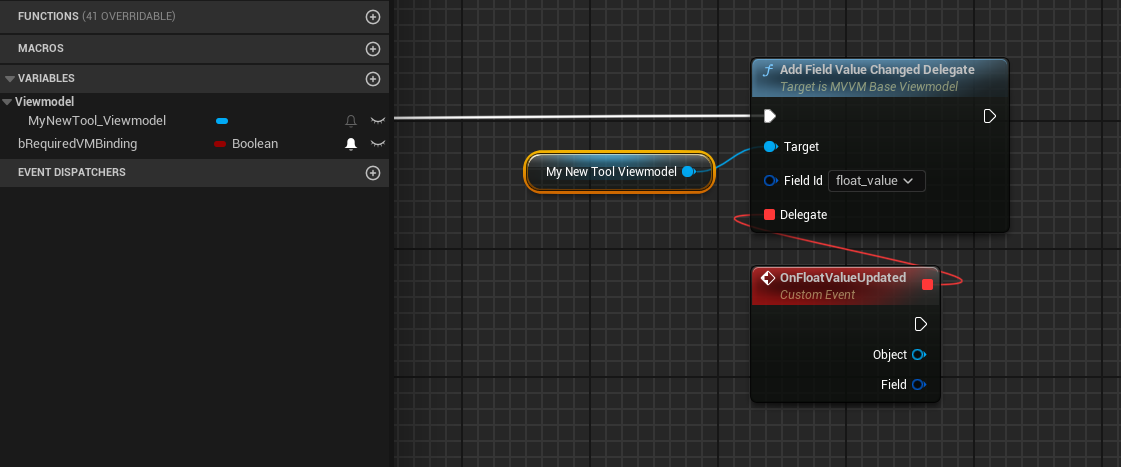
In your Tool Actor, and in any of your widgets that use a viewmodel, you can bind to field notification delegates as shown in the following diagram.
Advanced Topics
Creating a new XR Creative Palette system
To create a new XR Creative Palette system, you must create your UI from the following classes:
XRCreativePalette: You should use this class as the main container for all other sub widgetsXRCreativePaletteTab: Any sub-widget you want to create that's associated with a particular toolXRCreativePaletteToolTab: A subwidget associated with a tool. Your tool object will contain a reference to this class.
Beyond these classes, you can use UMG widgets in your palette and palette tabs. We recommend you use the CommonUI base classes, as these contain much of the boilerplate functionality to build clean, maintainable, and interactive UIs.
XRCreativeAvatar
The XRCreativeAvatar class is blueprintable and provides a starting place for custom avatar development. For an example of how to create a custom avatar, see the BP_VScoutAvatar class. The content of the class is divided into the following categories:
- Lifecycle management - setting up the avatar on entering VR and cleaning up when exiting VR
- Input for movement, selection & simulated mouse-clicks
- Tool lifecycle management
- Per-frame updates for pointers and cosmetics
- Dedicated movement component
Running in VRPie
You can run the Virtual Scouting toolset in VRPreview (VRPie). There are some minor differences and this route has not yet been fully developed. In VRPie you have access to runtime simulation systems like physics and collision.
Instead of using VRMode Scouting_Default, when you launch into VRPie you must use BP_VscoutGameMode. You can also create your own GameMode from the parent class XRCreativeGameMode. This class has all the functionality of GameModeBase with the added variable of an XRCreativeToolset data Asset to define the tools and UI/UX. To build for runtime, use both an XRCreativeAvatar and an XRCreativeGameMode.
Packaging a Game
You can package XR Creative experiences into a game using standard VR development processes. The previously mentioned consideration about editor utility actors and regular actors applies when packaging for runtime.