
개요
직접 액터 커뮤니케이션(Direct Actor Communication)은 레벨에서 액터 간 정보를 공유하는 일반적인 방법입니다. 이 방법을 사용하려면 작업 중인 액터에서 타깃 액터에 액세스할 수 있도록 타깃 액터에 대한 레퍼런스가 필요합니다. 이 커뮤니케이션 방법은 작업 중인 액터와 타깃 액터 사이의 일대일 관계를 사용합니다. 이 퀵스타트 가이드에서는 직접 액터 커뮤니케이션을 사용하여 타깃 액터의 정보에 액세스하고 해당 액터의 기능을 사용하는 방법을 살펴봅니다.
1 - 필수 구성
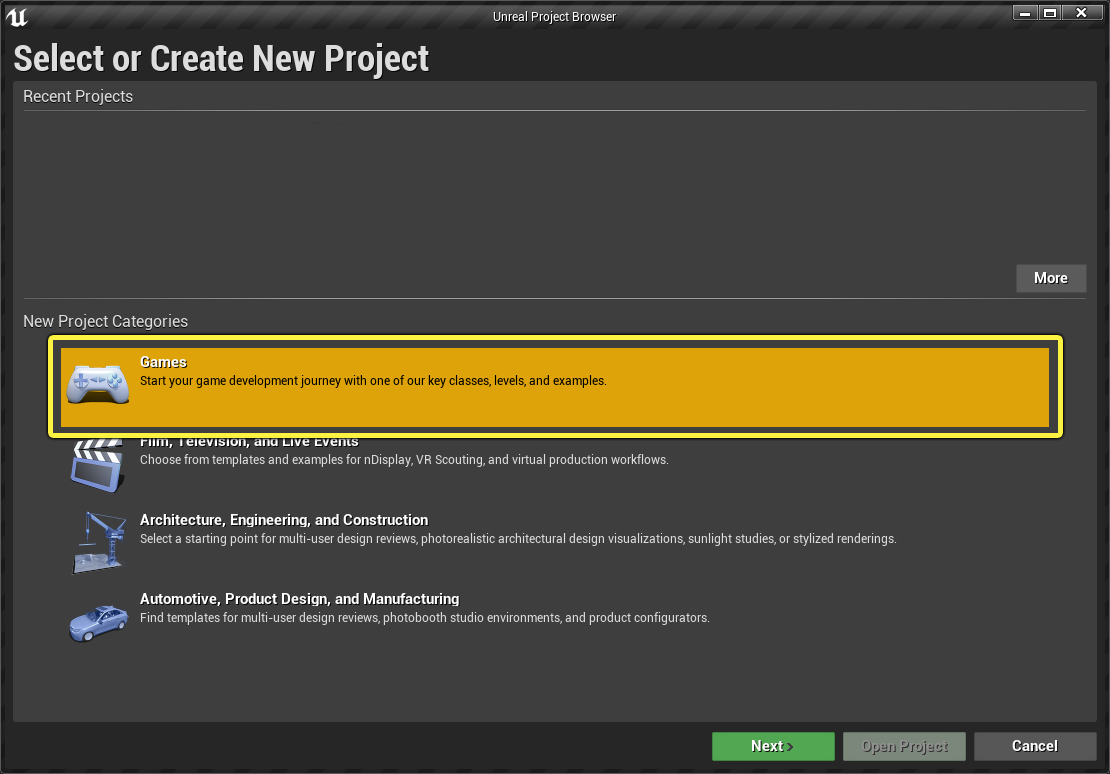
-
메뉴의 새 프로젝트 카테고리(New Project Categories) 섹션에서 게임(Games) 을 선택하고 다음(Next) 을 클릭합니다.
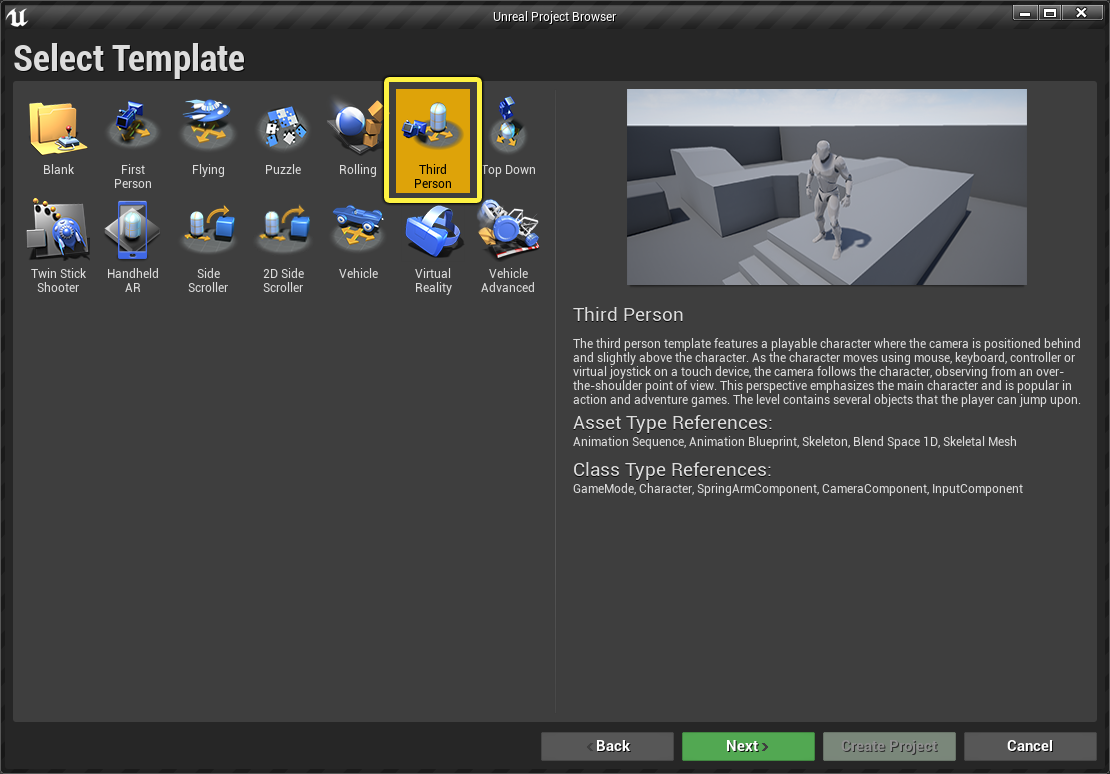
-
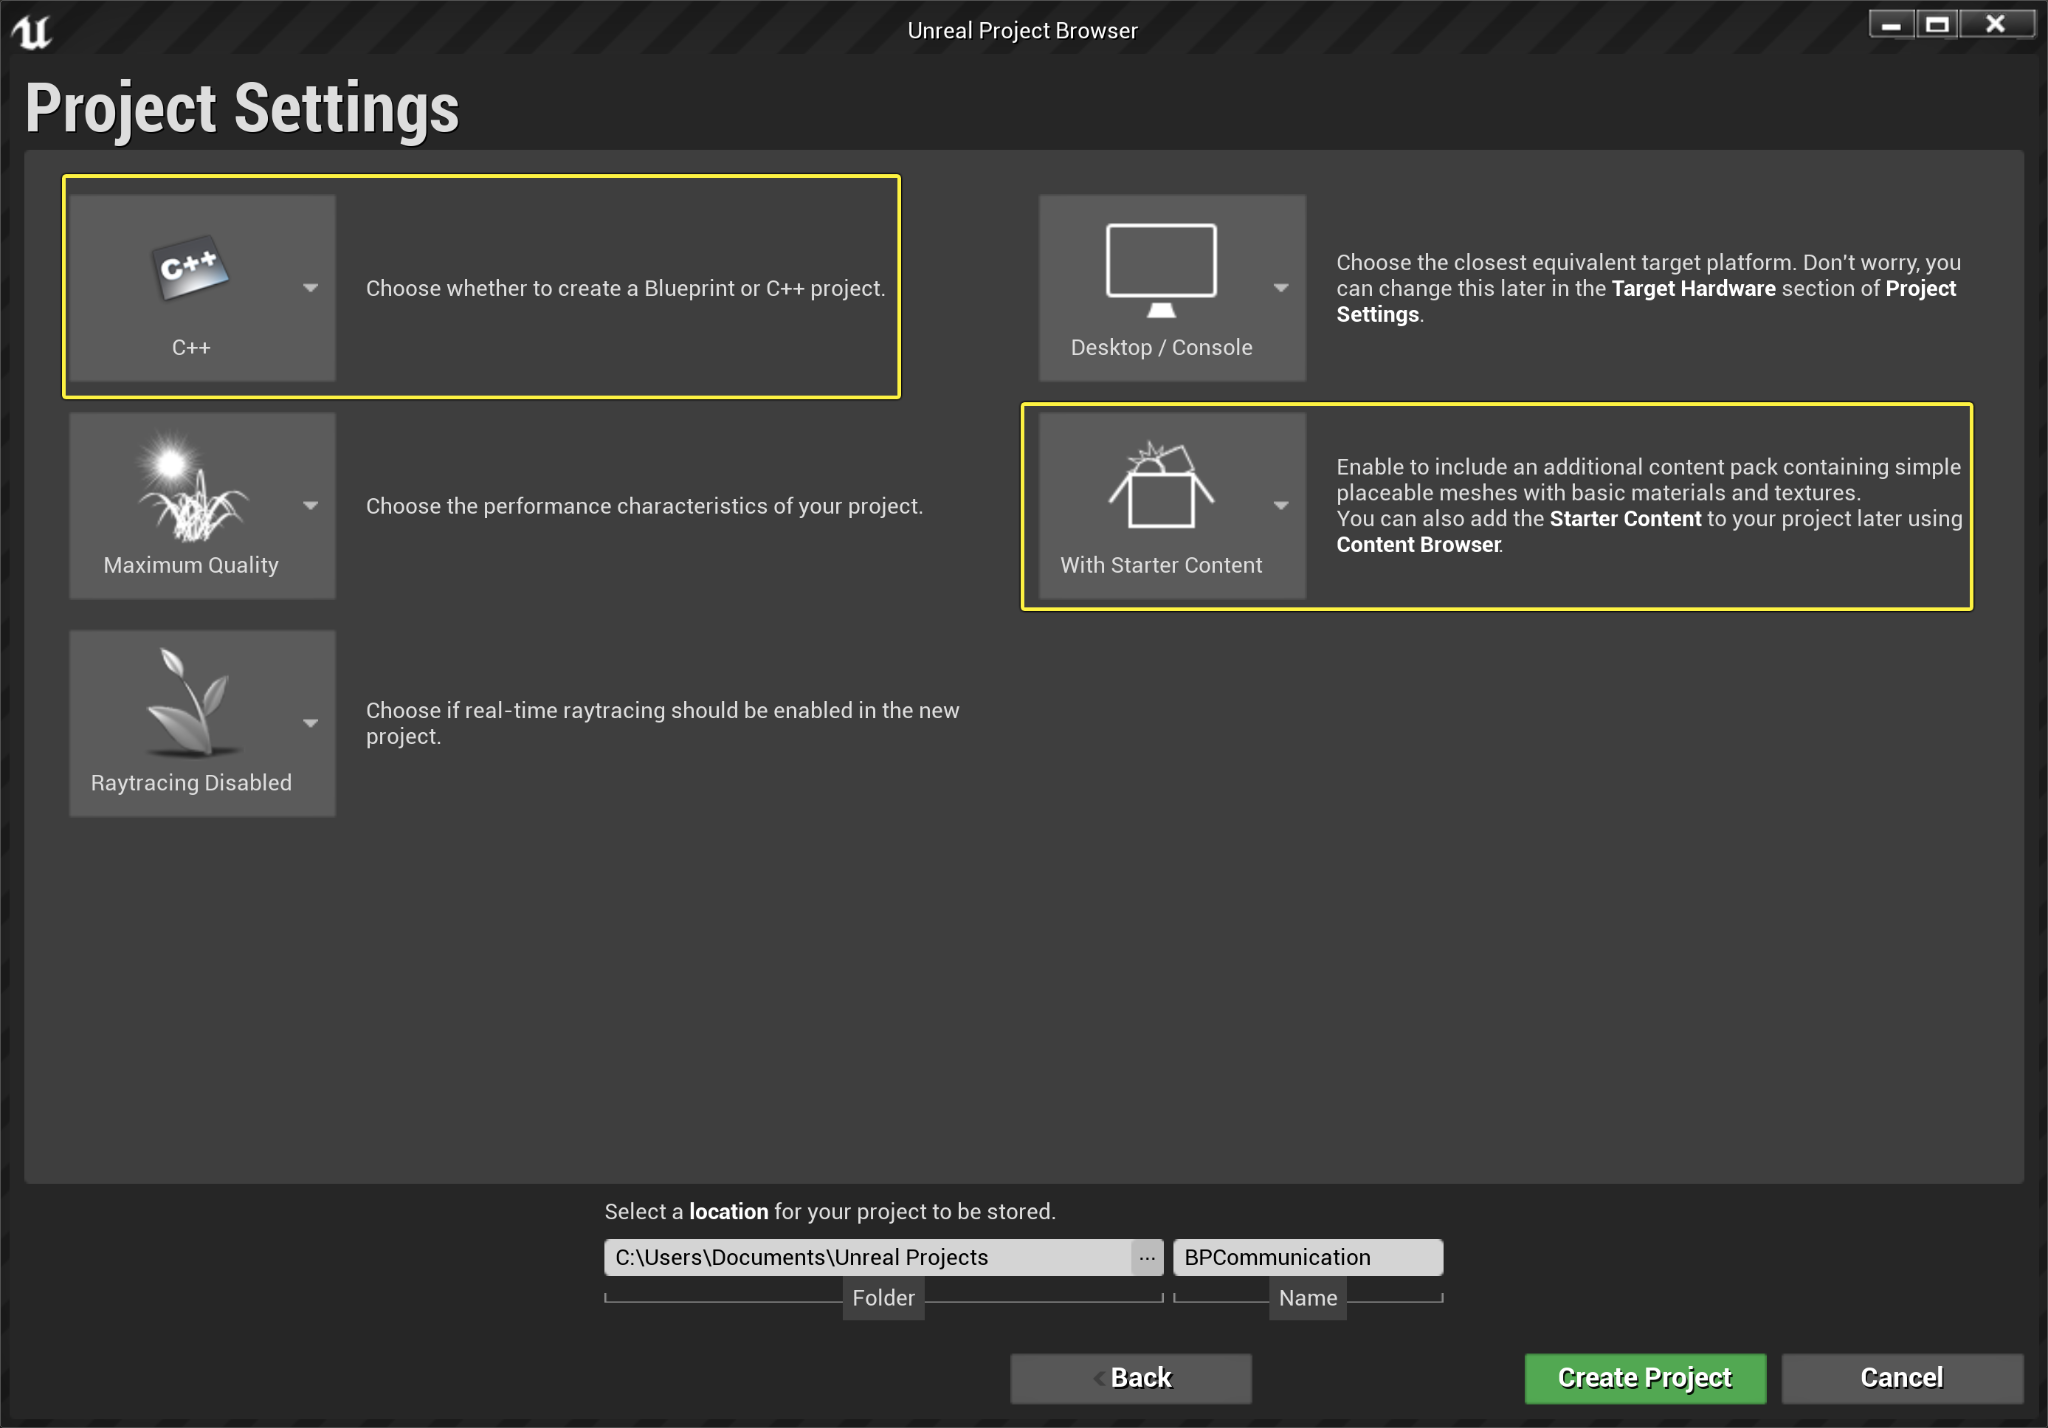
삼인칭(Third Person) 템플릿을 선택하고 다음 을 클릭합니다.
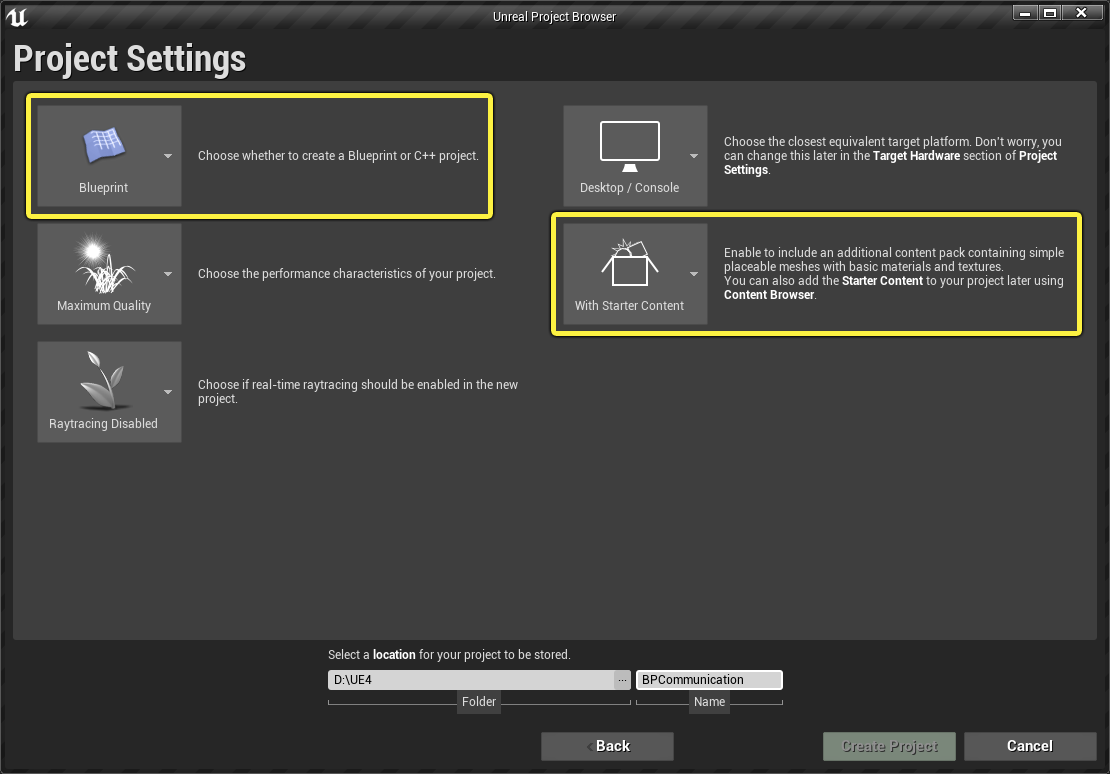
-
블루프린트(Blueprint) 및 시작용 콘텐츠 포함(With Starter Content) 옵션을 선택하고 프로젝트 생성(Create Project) 을 클릭합니다.
섹션 결과
이제 새로운 삼인칭 프로젝트가 생성되었으며, 직접 액터 커뮤니케이션에 대해 배울 준비가 되었습니다.
2 - 직접 액터 커뮤니케이션 추가
-
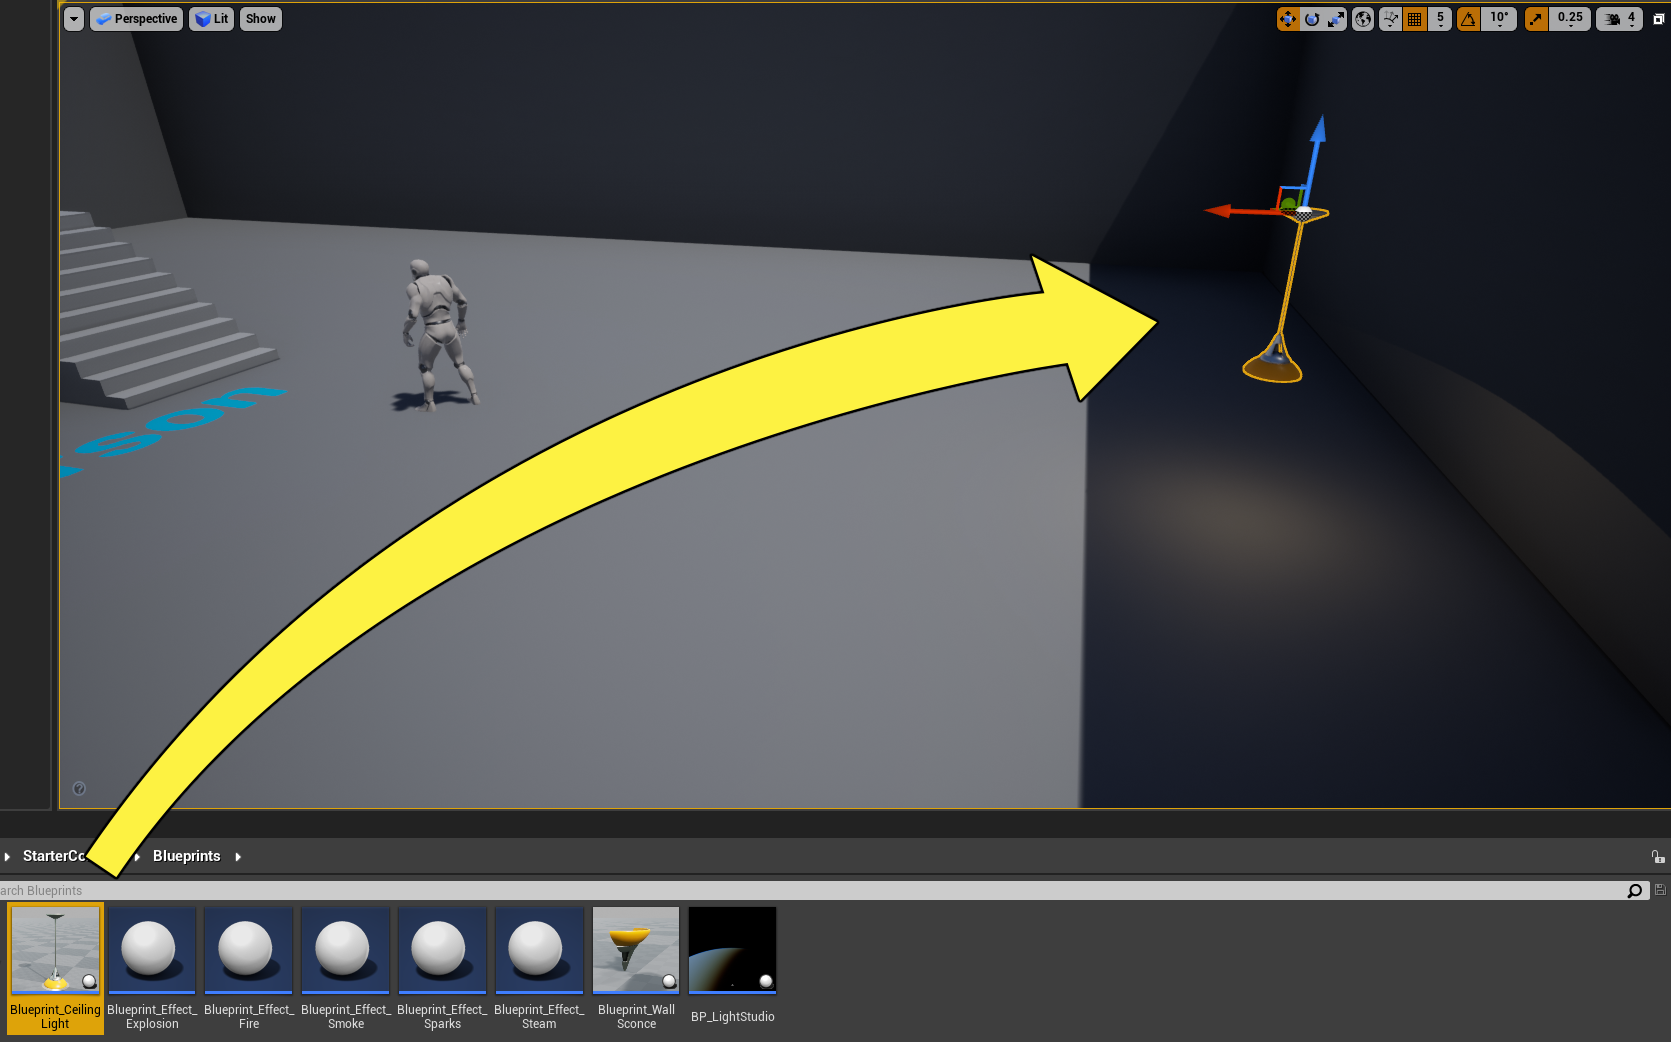
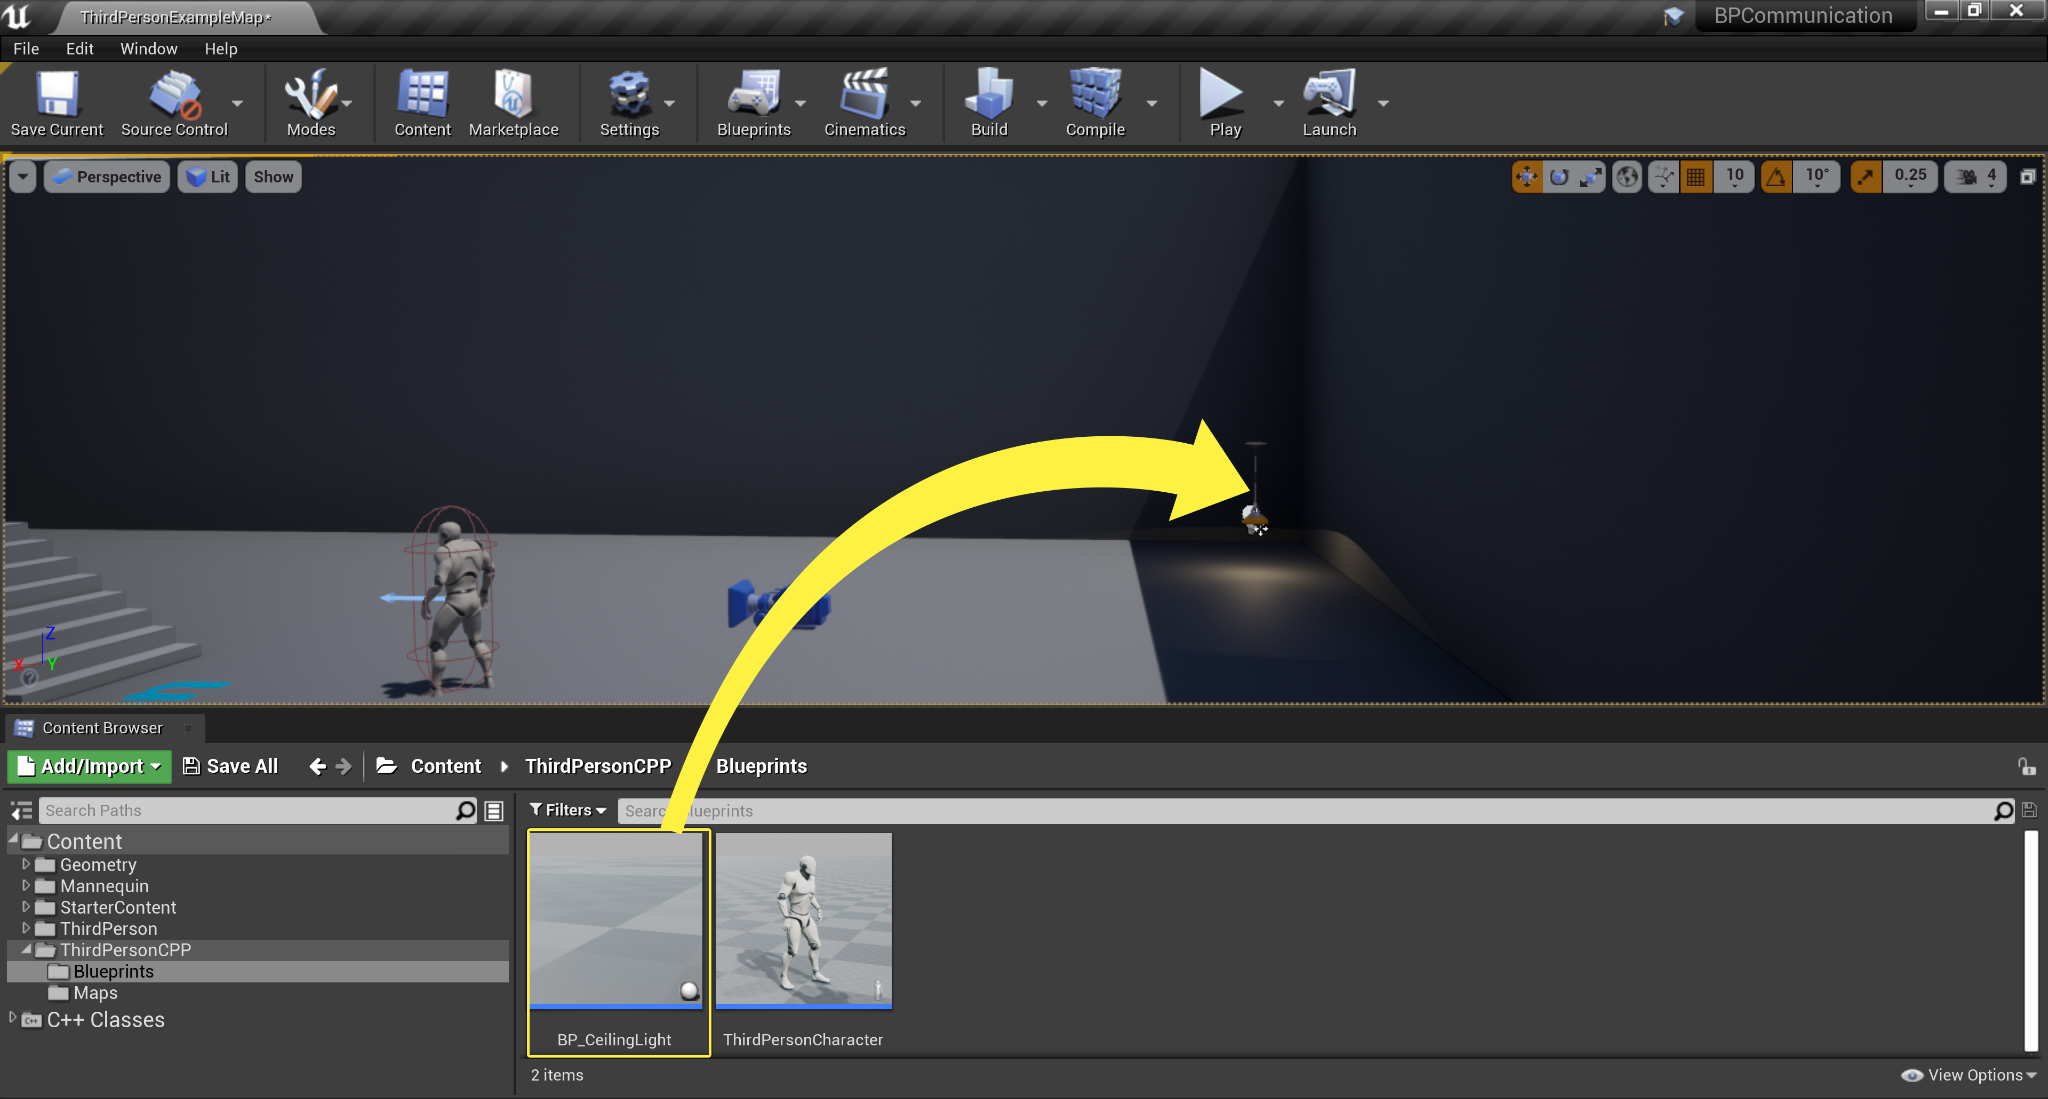
콘텐츠 브라우저(Content Browser) 에서 시작용 콘텐츠(Starter Content) > 블루프린트(Blueprints) 로 이동하고 Blueprint_CeilingLight 액터를 레벨로 드래그합니다.
-
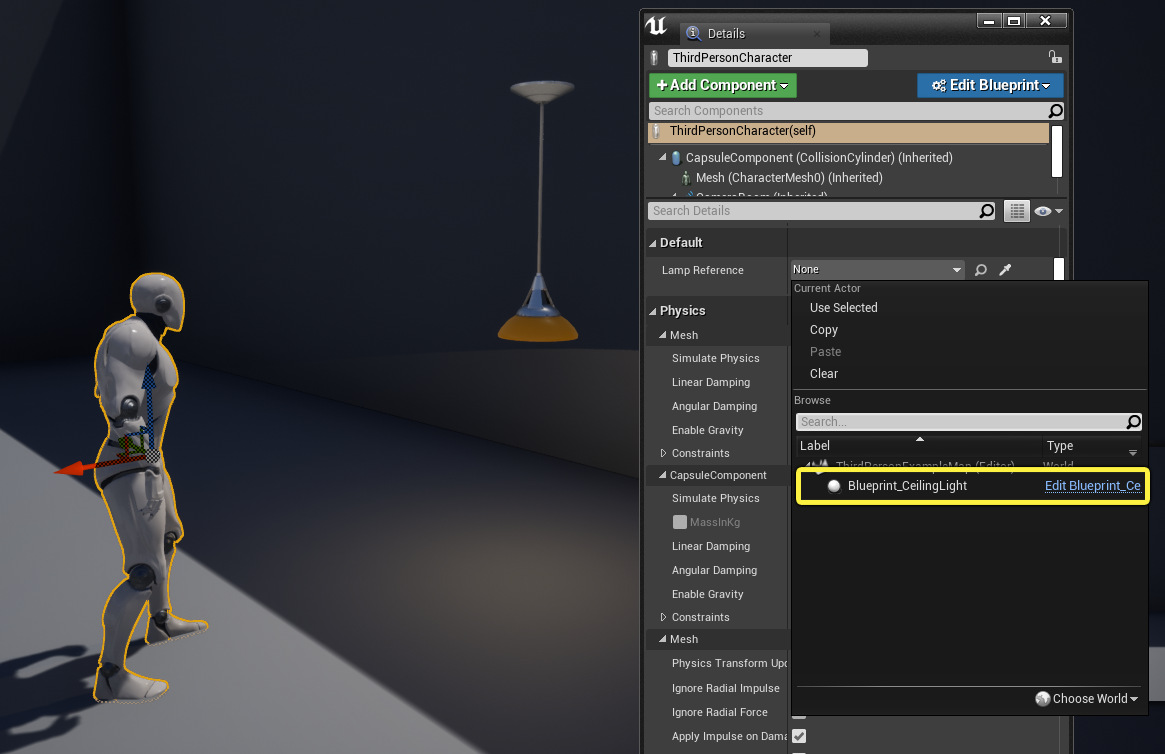
레벨에서 ThirdPersonCharacter 액터를 선택하고 램프 가까이에 배치합니다.

-
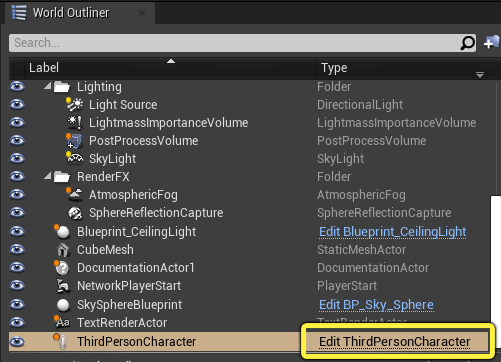
ThirdPersonCharacter 액터가 선택된 상태에서 월드 아웃라이너(World Outliner) 로 이동한 후 ThirdPersonCharacter 편집(Edit ThirdPersonCharacter) 을 클릭하여 블루프린트 에디터를 엽니다.
-
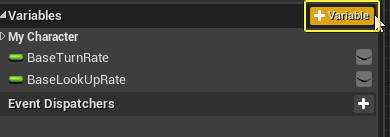
변수(Variables) 섹션으로 이동한 뒤 + 변수(+ Variable) 버튼을 클릭하여 새 변수를 생성합니다.
-
변수의 이름을 LampReference 로 지정합니다.
-
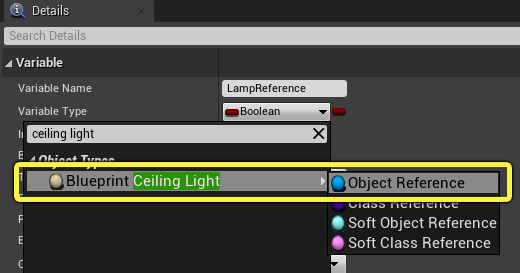
디테일(Details) 패널로 이동하여 변수 타입(Variable Type) 드롭다운을 클릭합니다. 아래와 같이 Blueprint Ceiling Light 에 대한 오브젝트 레퍼런스(Object Reference) 를 검색하여 선택합니다.
-
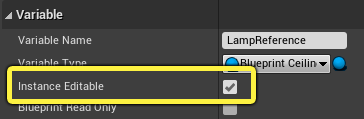
마지막으로, 인스턴스 편집가능(Instance Editable) 체크 박스를 활성화한 후 블루프린트를 컴파일(Compile) 하고 저장(Save) 합니다.
-
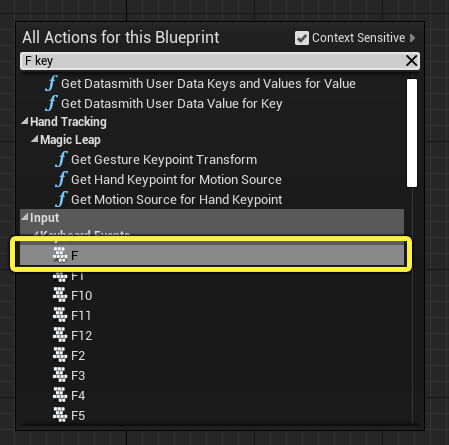
이벤트 그래프(Event Graph) 에서 우클릭한 뒤 F 키를 검색하고 선택하여 입력 노드를 생성합니다.
-
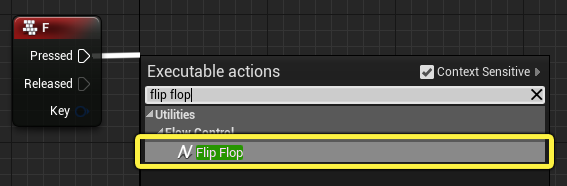
F 키 노드의 Pressed 핀에서 드래그하여 Flip Flop 을 검색하여 선택합니다.
-
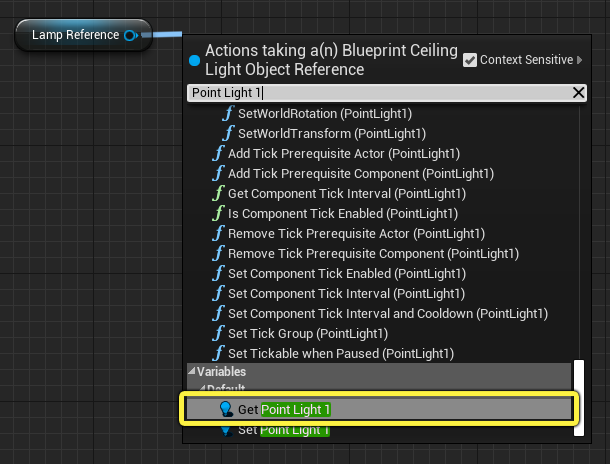
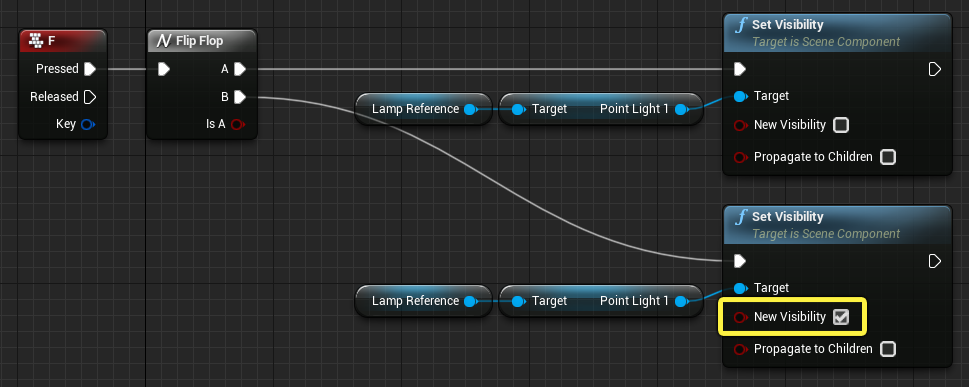
Lamp Reference 변수를 이벤트 그래프(Event Graph) 로 드래그한 뒤 Get LampReference 를 선택합니다. 해당 핀에서 드래그한 다음 Get Point Light 1 을 검색하여 선택합니다.
-
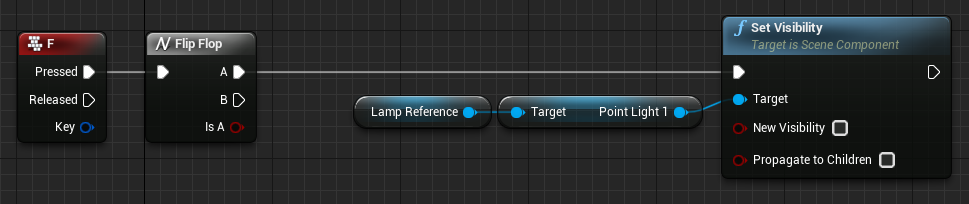
Point Light 1 핀에서 드래그한 다음 Set Visibility 를 검색하여 선택합니다. 아래와 같이 Flip Flop 노드의 A 핀 을 Set Visibility 노드로 연결합니다.
-
Lamp Reference, Point Lamp 1, Set Visibility 노드를 복사한 다음 Flip Flop 노드의 B 핀으로 연결합니다. 아래와 같이 New Visibility 체크 박스를 활성화합니다.
-
블루프린트를 컴파일 하고 저장 합니다.
섹션 결과
이 섹션에서는 ThirdPersonCharacter 블루프린트 액터를 수정하여 램프 액터에 대한 레퍼런스를 사용하고 F를 눌러 램프를 켜고 꺼 보았습니다.
3 - 램프 액터와 상호작용하기
-
레벨에서 ThirdPersonCharacter 액터를 선택하고 디테일 패널에서 Lamp Reference 드롭다운을 클릭합니다. Blueprint_CeilingLight 블루프린트를 검색하여 선택합니다.
-
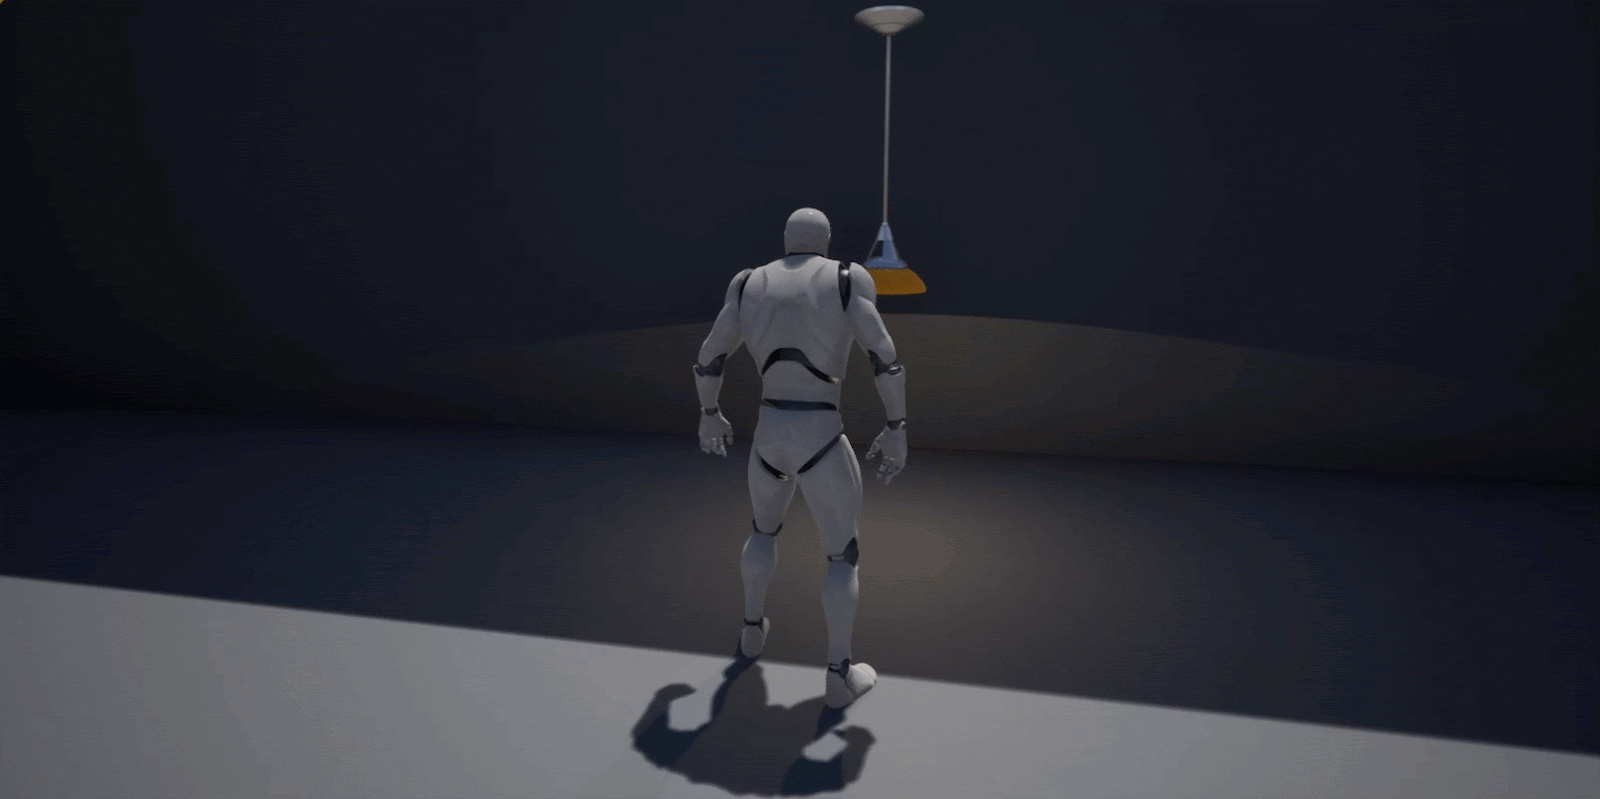
플레이 버튼을 눌러 플레이 모드로 이동하고 F 를 눌러 램프를 켜고 끕니다.
섹션 결과
이 섹션에서는 ThirdPersonCharacter 블루프린트 액터에 천장 램프 액터 레퍼런스를 추가하고 F를 눌러 조명을 켜고 꺼 보았습니다.
다음 단계
지금까지 직접 액터 커뮤니케이션 사용법을 알아보았습니다. 액터 커뮤니케이션 문서 페이지에 나와 있는 다른 커뮤니케이션 타입도 살펴보세요.
개요
직접 액터 커뮤니케이션(Direct Actor Communication)은 레벨에서 액터 간 정보를 공유하는 일반적인 방법입니다. 이 방법을 사용하려면 작업 중인 액터에서 타깃 액터에 액세스할 수 있도록 타깃 액터에 대한 레퍼런스가 필요합니다. 이 커뮤니케이션 방법은 작업 중인 액터와 타깃 액터 사이의 일대일 관계를 사용합니다. 이 퀵스타트 가이드에서는 직접 액터 커뮤니케이션을 사용하여 타깃 액터의 정보에 액세스하고 해당 액터의 기능을 사용하는 방법을 살펴봅니다.
1 - 필수 구성
-
메뉴의 새 프로젝트 카테고리(New Project Categories) 섹션에서 게임(Games) 을 선택하고 다음(Next) 을 클릭합니다.

-
삼인칭(Third Person) 템플릿을 선택하고 다음(Next) 을 클릭합니다.

-
C++ 및 시작용 콘텐츠 포함(With Starter Content) 옵션을 선택하고 프로젝트 생성(Create Project) 을 클릭합니다.
섹션 결과
이제 새로운 삼인칭 프로젝트가 생성되었으며, 직접 블루프린트 커뮤니케이션에 대해 배울 준비가 되었습니다.
2 - 천장 라이트 액터 생성하기
-
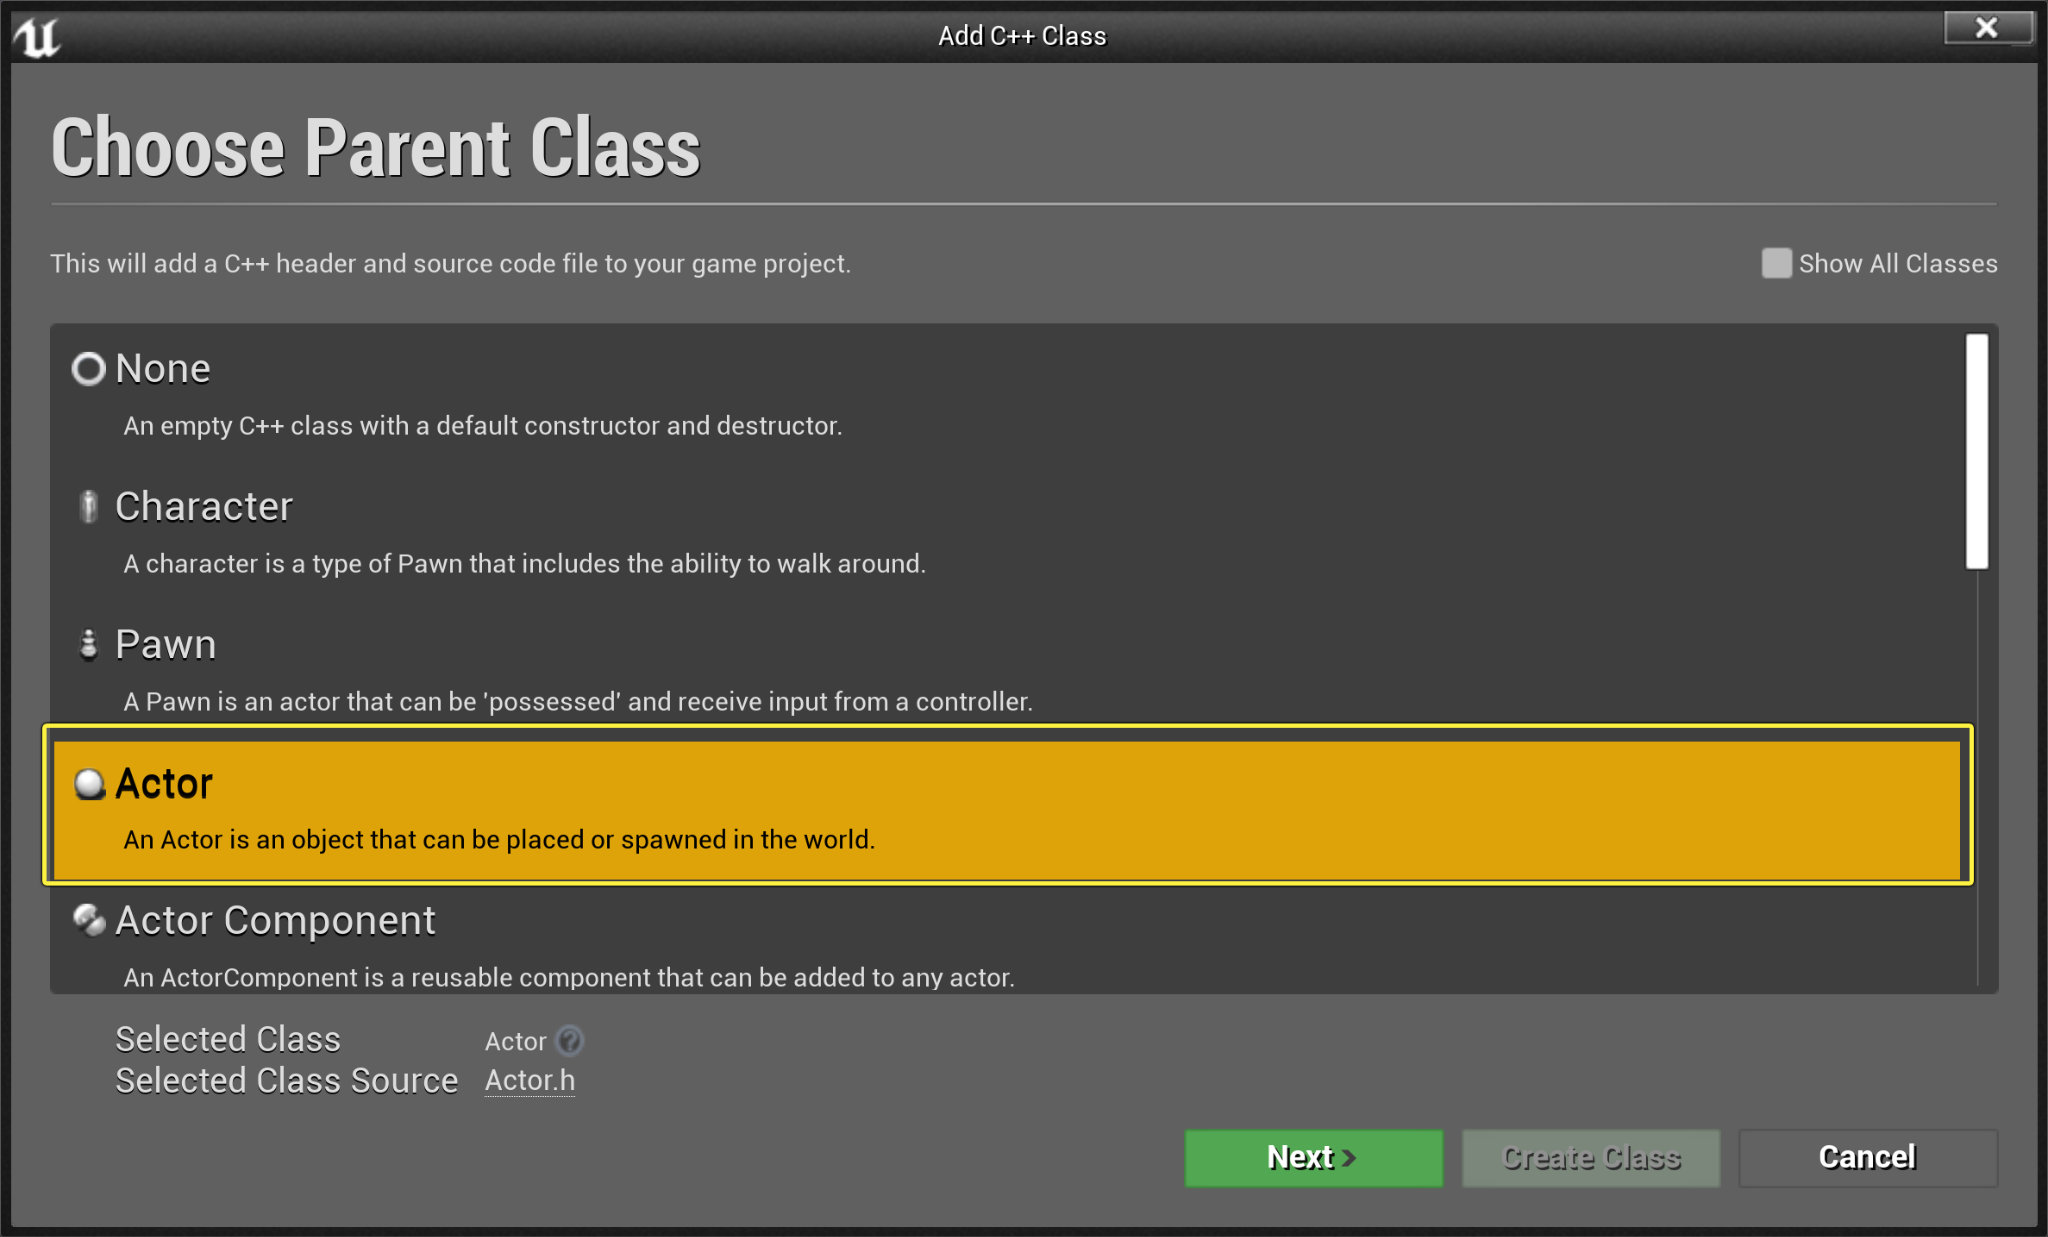
C++ 클래스 마법사에서 CeilingLight 로 명명한 새 액터 클래스를 생성합니다.
-
CeilingLight.h 클래스 디폴트에서 다음 코드를 구현합니다.
protected: UPROPERTY(EditInstanceOnly, BlueprintReadWrite) USceneComponent* SceneComp; UPROPERTY(EditInstanceOnly, BlueprintReadWrite) class UPointLightComponent* PointLightComp; UPROPERTY(EditInstanceOnly, BlueprintReadWrite) UStaticMeshComponent* StaticMeshComp; UPROPERTY(EditInstanceOnly, BlueprintReadWrite) float Brightness; UPROPERTY(EditInstanceOnly, BlueprintReadWrite) float SourceRadius; UPROPERTY(EditInstanceOnly, BlueprintReadWrite) FLinearColor Color; UPROPERTY(EditInstanceOnly, BlueprintReadWrite) bool IsLightOn; -
그다음, CeilingLight.Cpp 로 이동하여 다음이 포함된 라이브러리를 선언합니다.
#include "Components/PointLightComponent.h" -
ACeilingLight::CeilingLight 생성자에서 다음 사항을 선언합니다.
ACeilingLight::ACeilingLight() { // 이 액터가 프레임마다 Tick()을 호출하도록 설정합니다. 필요 없는 경우 퍼포먼스 향상을 위해 이 설정을 끌 수 있습니다. PrimaryActorTick.bCanEverTick = true; SceneComp = CreateDefaultSubobject<USceneComponent>(TEXT("SceneComp")); PointLightComp = CreateDefaultSubobject<UPointLightComponent>(TEXT("PointLightComp")); StaticMeshComp = CreateDefaultSubobject<UStaticMeshComponent>(TEXT("StaticMeshComp")); SceneComp = RootComponent; PointLightComp->AttachToComponent(SceneComp,FAttachmentTransformRules::KeepRelativeTransform); StaticMeshComp->AttachToComponent(SceneComp, FAttachmentTransformRules::KeepRelativeTransform); PointLightComp->SetWorldLocation(FVector(0, 0, -130)); Brightness = 1700.f; Color = FLinearColor(1.f, 0.77f, 0.46f); SourceRadius = 3.5f; PointLightComp->SetIntensity(Brightness); PointLightComp->SetLightColor(Color); PointLightComp->SetSourceRadius(SourceRadius); } -
코드를 컴파일합니다.
완료된 코드
CeilingLight.h
// 프로젝트 세팅의 설명 페이지에 저작권 고지를 작성합니다.
#pragma once
#include "CoreMinimal.h"
#include "GameFramework/Actor.h"
#include "CeilingLight.generated.h"
UCLASS()
class BPCOMMUNICATION_API ACeilingLight : public AActor
{
GENERATED_BODY()
public:
// 이 액터 프로퍼티의 디폴트값 설정
ACeilingLight();
protected:
// 게임 시작 시 또는 스폰 시 호출
virtual void BeginPlay() override;
UPROPERTY(EditInstanceOnly, BlueprintReadWrite)
USceneComponent* SceneComp;
UPROPERTY(EditInstanceOnly, BlueprintReadWrite)
class UPointLightComponent* PointLightComp;
UPROPERTY(EditInstanceOnly, BlueprintReadWrite)
UStaticMeshComponent* StaticMeshComp;
UPROPERTY(EditInstanceOnly, BlueprintReadWrite)
float Brightness;
UPROPERTY(EditInstanceOnly, BlueprintReadWrite)
float SourceRadius;
UPROPERTY(EditInstanceOnly, BlueprintReadWrite)
FLinearColor Color;
UPROPERTY(EditInstanceOnly, BlueprintReadWrite)
bool IsLightOn;
public:
// 모든 프레임에서 호출
virtual void Tick(float DeltaTime) override;
UFUNCTION()
void TurnOffLight();
};
CeilingLight.cpp
//Copyright Epic Games, Inc. All Rights Reserved.
#include "CeilingLight.h"
#include "Components/PointLightComponent.h"
// 디폴트값 설정
ACeilingLight::ACeilingLight()
{
// 이 액터가 프레임마다 Tick()을 호출하도록 설정합니다. 필요 없는 경우 퍼포먼스 향상을 위해 이 설정을 끌 수 있습니다.
PrimaryActorTick.bCanEverTick = true;
SceneComp = CreateDefaultSubobject<USceneComponent>(TEXT("SceneComp"));
PointLightComp = CreateDefaultSubobject<UPointLightComponent>(TEXT("PointLightComp"));
StaticMeshComp = CreateDefaultSubobject<UStaticMeshComponent>(TEXT("StaticMeshComp"));
SceneComp = RootComponent;
PointLightComp->AttachToComponent(SceneComp,FAttachmentTransformRules::KeepRelativeTransform);
StaticMeshComp->AttachToComponent(SceneComp, FAttachmentTransformRules::KeepRelativeTransform);
PointLightComp->SetWorldLocation(FVector(0, 0, -130));
Brightness = 1700.f;
Color = FLinearColor(1.f, 0.77f, 0.46f);
SourceRadius = 3.5f;
PointLightComp->SetIntensity(Brightness);
PointLightComp->SetLightColor(Color);
PointLightComp->SetSourceRadius(SourceRadius);
}
// 게임 시작 시 또는 스폰 시 호출
void ACeilingLight::BeginPlay()
{
Super::BeginPlay();
}
void ACeilingLight::TurnOffLight()
{
if (IsLightOn)
{
PointLightComp->SetVisibility(false);
IsLightOn = false;
}
else
{
PointLightComp->SetVisibility(true);
IsLightOn = true;
}
}
// 모든 프레임에서 호출
void ACeilingLight::Tick(float DeltaTime)
{
Super::Tick(DeltaTime);
}
-
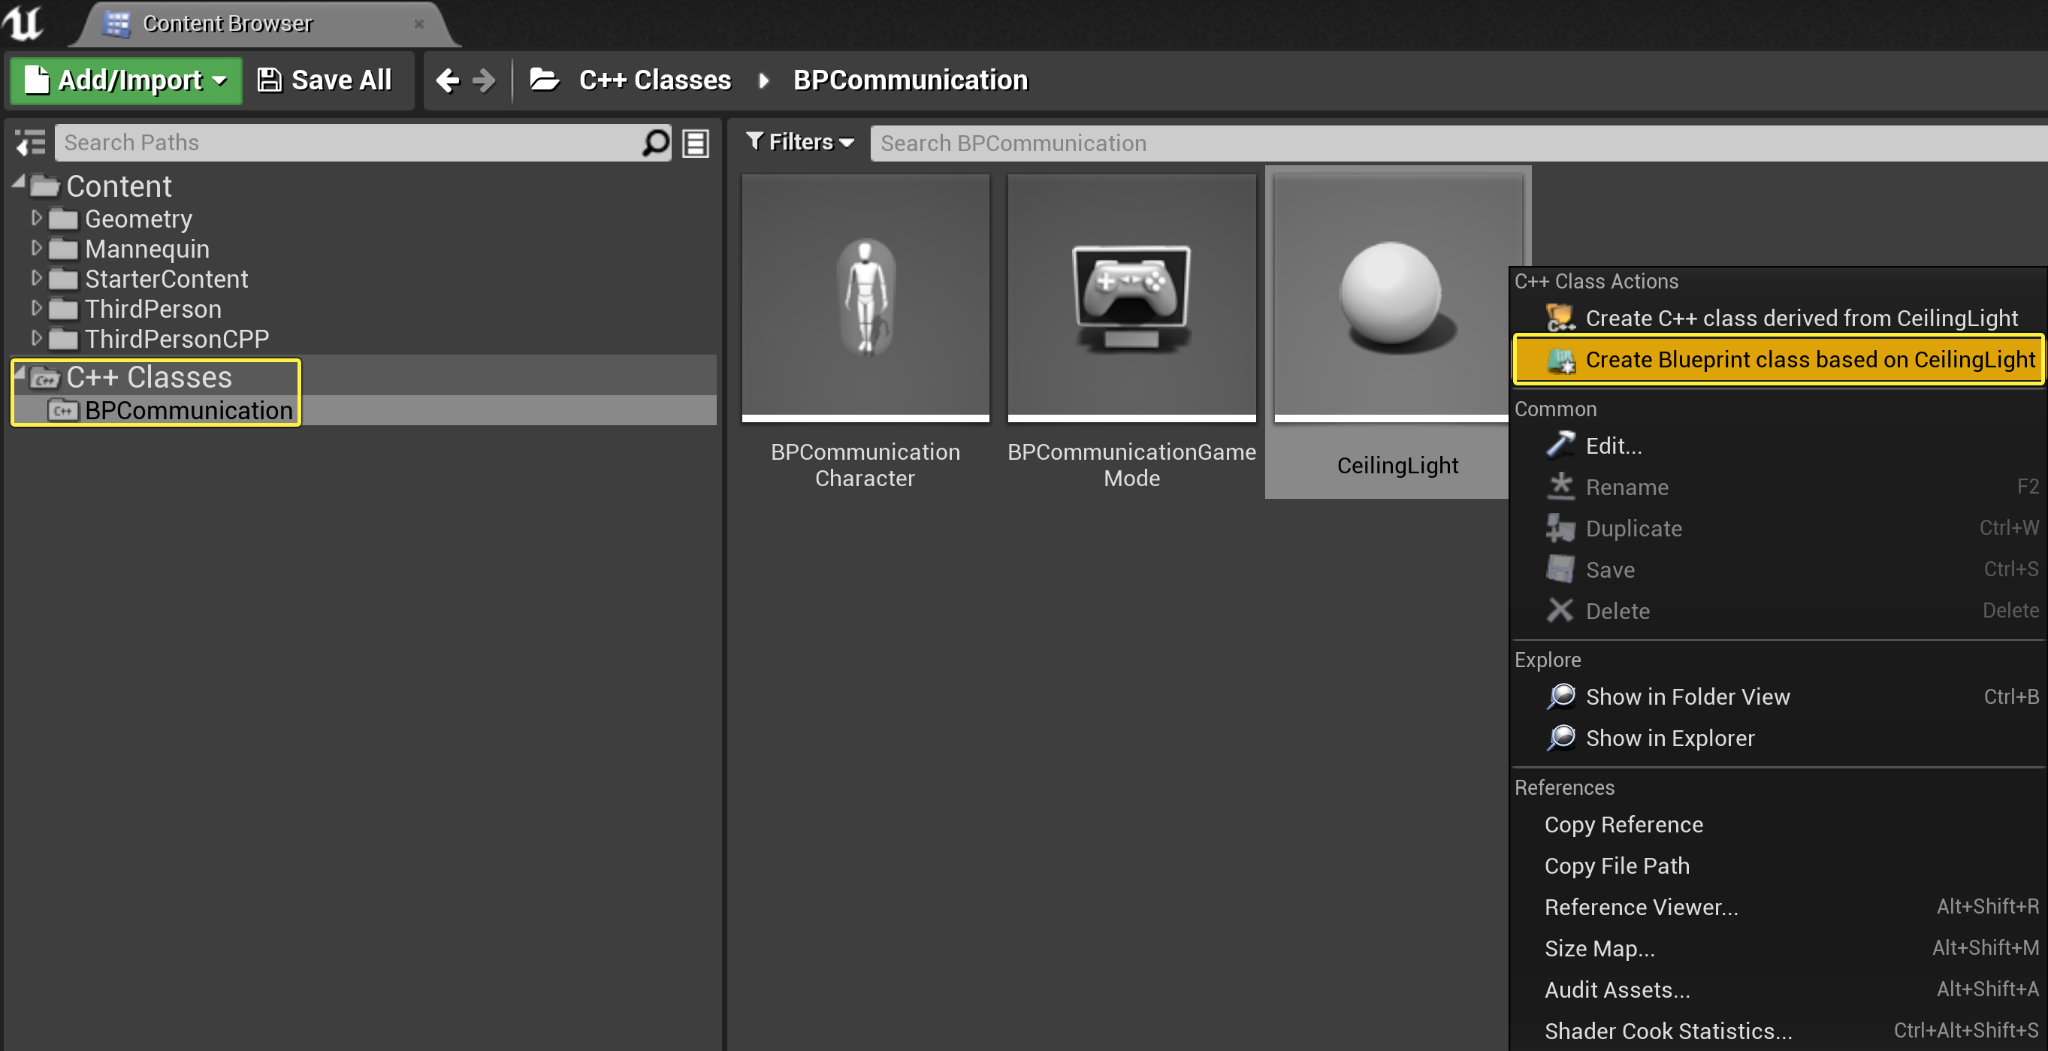
C++ 클래스(C++ Classes) 폴더 에서 CeilingLight 액터를 우클릭한 후, C++ 클래스 액션(C++ Class Actions) 드롭다운 메뉴에서 CeilingLight를 기반으로 블루프린트 클래스 생성(Create Blueprint class based on CeilingLight) 을 선택합니다. 블루프린트를 BP_CeilingLight 로 명명합니다.
-
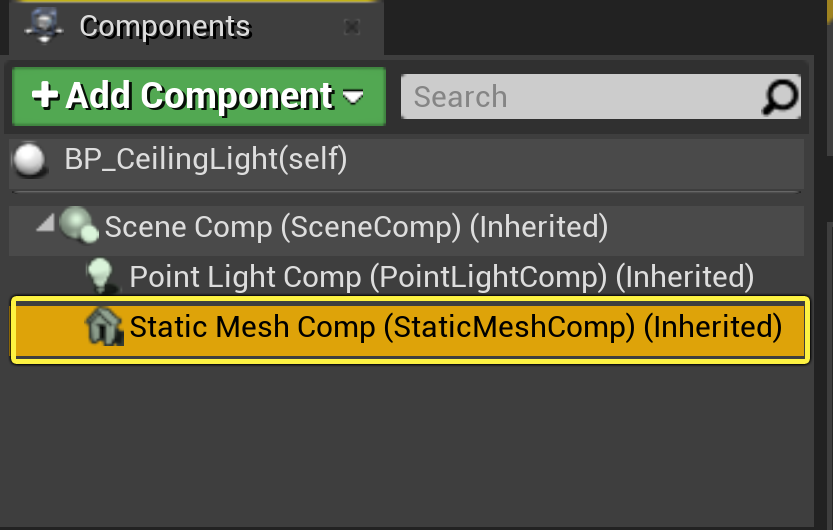
BP_CeilingLight 클래스 디폴트에서 컴포넌트(Components) 패널로 이동한 다음 StaticMeshComp 를 선택합니다.
-
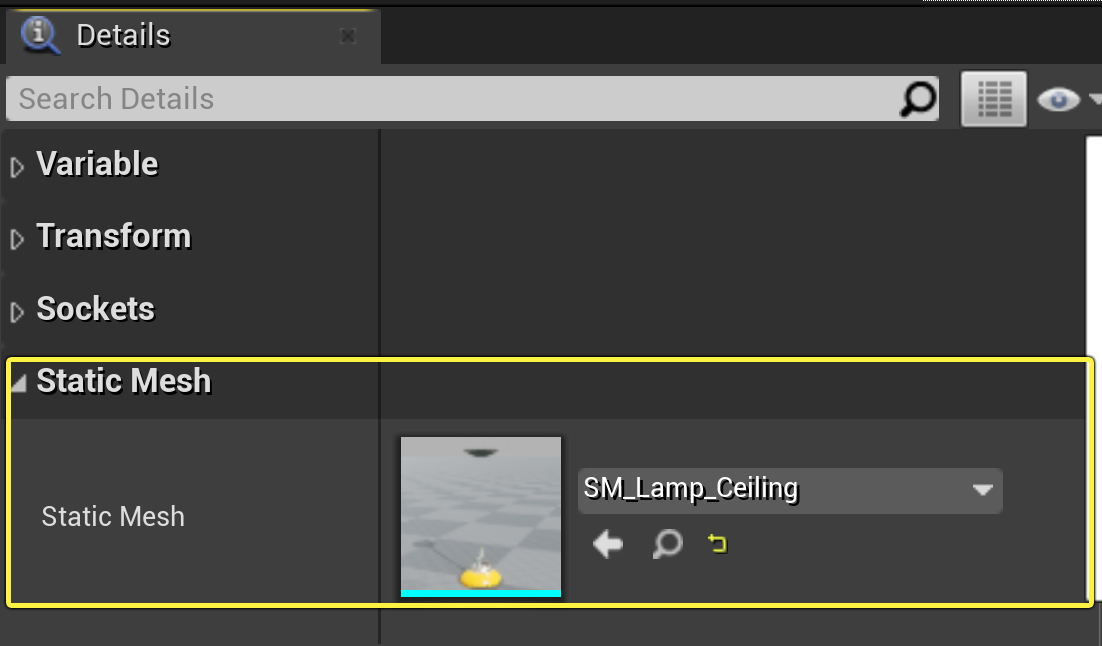
디테일(Details) 패널에서 스태틱 메시(Static Mesh) 카테고리 로 이동하여 스태틱 메시 변수 옆 드롭다운 화살표를 선택한 다음 SM_Lamp_Ceiling 을 선택합니다.
-
블루프린트를 컴파일하고 저장합니다.
-
콘텐츠 브라우저(Content Browser) 에서 BP_CeilingLight Actor 인스턴스를 레벨로 드래그합니다.
ThirdPersonCharacter 클래스 수정
-
C++ 클래스 폴더로 이동한 후, BPCommunicationCharacter 클래스를 더블클릭하여 해당 BPCommunicationCharacter.h 를 열고 클래스 디폴트에서 다음 코드를 선언합니다.
protected: UPROPERTY(EditInstanceOnly, BlueprintReadWrite) class ACeilingLight* CeilingLightToToggle; void ToggleCeilingLight(); -
BPCommunicationCharacter.cpp 로 이동하고, 다음을 선언합니다.
#include "CeilingLight.h" -
ABPCommunicationCharacter::ToggleCeilingLight 메서드를 구현합니다.
void ABPCommunicationCharacter::ToggleCeilingLight() { if (CeilingLightToToggle) { CeilingLightToToggle->TurnOffLight(); } } -
ABPCommunicationCharacter::SetupPlayerInputComponent 메서드로 이동하여 다음을 선언합니다.
PlayerInputComponent->BindAction("Use", IE_Pressed, this, &ABPCommunicationCharacter::ToggleCeilingLight); -
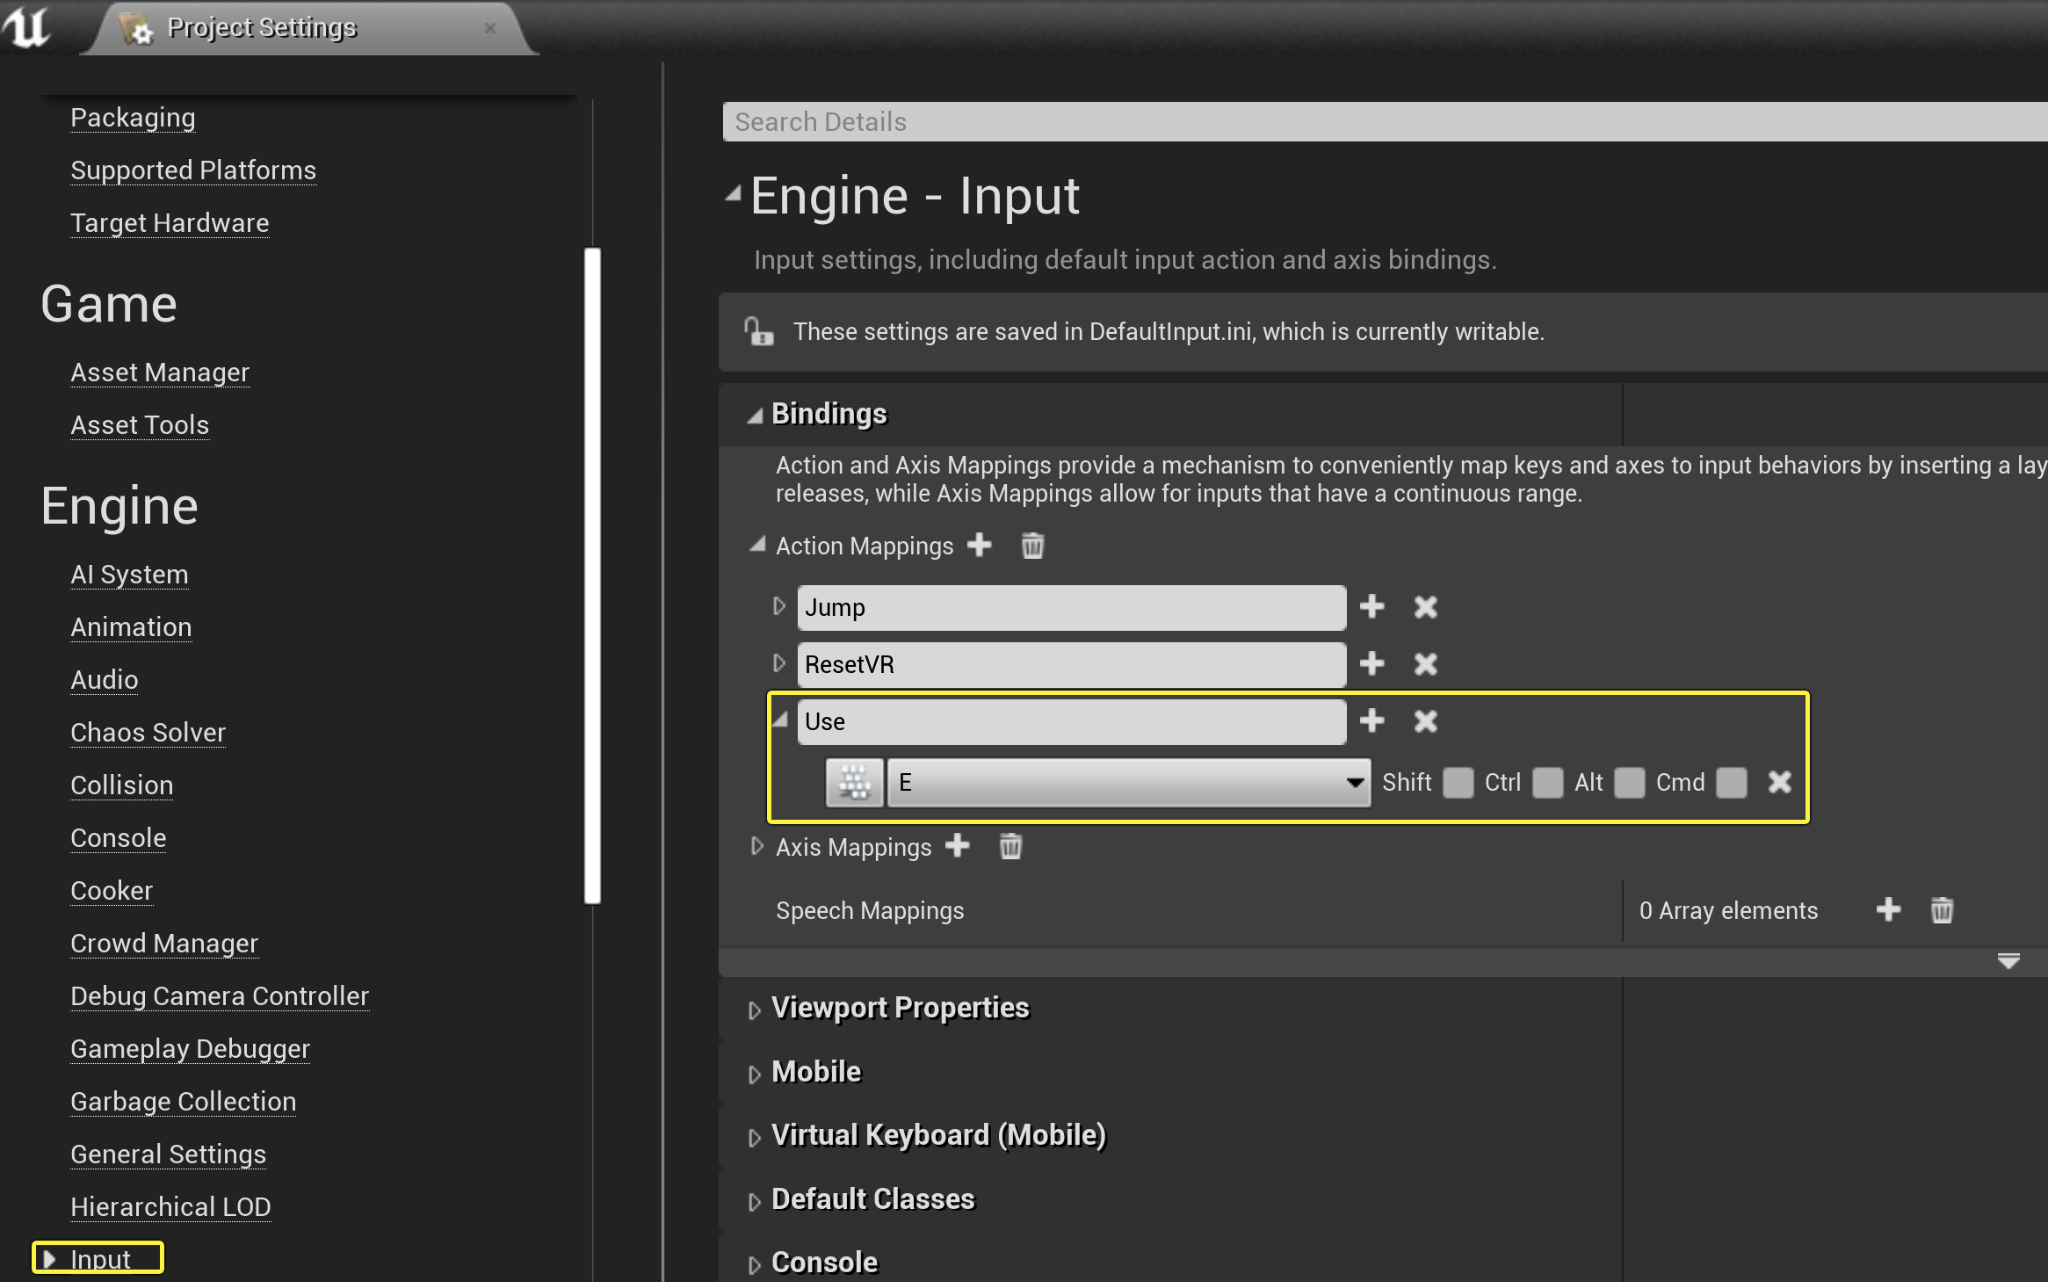
에디터 에서 편집(Edit) > 프로젝트 세팅(Project Settings) > 입력(Input) 으로 이동합니다. 바인딩(Bindings) 카테고리에서 액션 매핑(Action Mappings) 으로 이동한 다음 추가(+) 버튼을 클릭하여 Use 라는 이름의 새로운 액션 매핑 을 생성하고, 키 값 으로 E 를 선택합니다.
-
코드를 컴파일합니다.
완료된 코드
BPCommunicationCharacter.h
// Copyright Epic Games, Inc. All Rights Reserved.
#pragma once
#include "CoreMinimal.h"
#include "GameFramework/Character.h"
#include "BPCommunicationCharacter.generated.h"
UCLASS(config=Game)
class ABPCommunicationCharacter : public ACharacter
{
GENERATED_BODY()
/** 캐릭터 뒤의 카메라 위치를 조정하는 카메라 붐 */
UPROPERTY(VisibleAnywhere, BlueprintReadOnly, Category = Camera, meta = (AllowPrivateAccess = "true"))
class USpringArmComponent* CameraBoom;
/** 카메라 따라가기 */
UPROPERTY(VisibleAnywhere, BlueprintReadOnly, Category = Camera, meta = (AllowPrivateAccess = "true"))
class UCameraComponent* FollowCamera;
public:
ABPCommunicationCharacter();
/** 각도/초 단위의 베이스 턴 속도입니다. 다른 스케일 값 조절로 인해 최종 턴 속도가 영향을 받을 수 있습니다. */
UPROPERTY(VisibleAnywhere, BlueprintReadOnly, Category=Camera)
float BaseTurnRate;
/** 각도/초 단위의 베이스 위/아래 보기 속도입니다. 다른 스케일 값 조절로 인해 최종 속도가 영향을 받을 수 있습니다. */
UPROPERTY(VisibleAnywhere, BlueprintReadOnly, Category=Camera)
float BaseLookUpRate;
protected:
UPROPERTY(EditInstanceOnly, BlueprintReadWrite)
class ACeilingLight* CeilingLightToToggle;
void ToggleCeilingLight();
/** VR의 HMD 방향을 리셋합니다. */
void OnResetVR();
/** 전방/후방 입력에 대해 호출됨 */
void MoveForward(float Value);
/** 좌우 입력에 대해 호출됨 */
void MoveRight(float Value);
/**
* 턴 속도 입력을 통해 호출됩니다.
* @param Rate 정규화된 속도이며, 1.0은 원하는 턴 속도의 100%를 의미합니다.
*/
void TurnAtRate(float Rate);
/**
* 위/아래 보기 턴 속도 입력을 통해 호출됩니다.
* @param Rate 정규화된 속도이며, 1.0은 원하는 턴 속도의 100%를 의미합니다.
*/
void LookUpAtRate(float Rate);
/** 터치 입력 시작 시의 핸들러입니다. */
void TouchStarted(ETouchIndex::Type FingerIndex, FVector Location);
/** 터치 입력 중지 시의 핸들러입니다. */
void TouchStopped(ETouchIndex::Type FingerIndex, FVector Location);
protected:
// APawn 인터페이스
virtual void SetupPlayerInputComponent(class UInputComponent* PlayerInputComponent) override;
// APawn 인터페이스 종료
public:
/** CameraBoom 서브오브젝트 반환 ** /
FORCEINLINE class USpringArmComponent* GetCameraBoom() const { return CameraBoom; }
/** FollowCamera 서브오브젝트 반환 ** /
FORCEINLINE class UCameraComponent* GetFollowCamera() const { return FollowCamera; }
};
BPCommunicationCharacter.cpp
// Copyright Epic Games, Inc. All Rights Reserved.
#include "BPCommunicationCharacter.h"
#include "HeadMountedDisplayFunctionLibrary.h"
#include "Camera/CameraComponent.h"
#include "Components/CapsuleComponent.h"
#include "Components/InputComponent.h"
#include "GameFramework/CharacterMovementComponent.h"
#include "GameFramework/Controller.h"
#include "GameFramework/SpringArmComponent.h"
#include "CeilingLight.h"
ABPCommunicationCharacter::ABPCommunicationCharacter()
{
// 콜리전 캡슐 크기 설정
GetCapsuleComponent()->InitCapsuleSize(42.f, 96.0f);
// 입력에 대한 턴 속도 설정
BaseTurnRate = 45.f;
BaseLookUpRate = 45.f;
// 컨트롤러 회전 시 회전하지 않습니다. 카메라에만 영향을 미치도록 합니다.
bUseControllerRotationPitch = false;
bUseControllerRotationYaw = false;
bUseControllerRotationRoll = false;
// 캐릭터 무브먼트 환경설정
GetCharacterMovement()->bOrientRotationToMovement = true; // 캐릭터가 입력 방향으로 이동
GetCharacterMovement()->RotationRate = FRotator(0.0f, 540.0f, 0.0f); // 위의 캐릭터가 이동하는 회전 속도
GetCharacterMovement()->JumpZVelocity = 600.f;
GetCharacterMovement()->AirControl = 0.2f;
// 카메라 붐 생성(충돌이 있을 시 플레이어 쪽으로 들어옴)
CameraBoom = CreateDefaultSubobject<USpringArmComponent>(TEXT("CameraBoom"));
CameraBoom->SetupAttachment(RootComponent);
CameraBoom->TargetArmLength = 300.0f; // 캐릭터 뒤의 카메라가 이 거리에서 따라옴
CameraBoom->bUsePawnControlRotation = true; // 컨트롤러 기반으로 암 회전
// 카메라 따라가기 생성
FollowCamera = CreateDefaultSubobject<UCameraComponent>(TEXT("FollowCamera"));
FollowCamera->SetupAttachment(CameraBoom, USpringArmComponent::SocketName); // 카메라를 붐 끝에 어태치하여 붐이 컨트롤러 방향에 맞춰 조정되도록 함
FollowCamera->bUsePawnControlRotation = false; // 카메라가 암 기준으로 회전하지 않음
// 참고: 메시 컴포넌트의 스켈레탈 메시 및 애님 블루프린트 레퍼런스(캐릭터에서 상속됨)는
// 이름이 MyCharacter인 파생 블루프린트 에셋에서 설정됨(C++ 직접 콘텐츠 레퍼런스 방지 목적)
}
void ABPCommunicationCharacter::SetupPlayerInputComponent(class UInputComponent* PlayerInputComponent)
{
// 게임플레이 키 바인딩 구성
check(PlayerInputComponent);
PlayerInputComponent->BindAction("Jump", IE_Pressed, this, &ACharacter::Jump);
PlayerInputComponent->BindAction("Jump", IE_Released, this, &ACharacter::StopJumping);
PlayerInputComponent->BindAction("Use", IE_Pressed, this, &ABPCommunicationCharacter::ToggleCeilingLight);
PlayerInputComponent->BindAxis("MoveForward", this, &ABPCommunicationCharacter::MoveForward);
PlayerInputComponent->BindAxis("MoveRight", this, &ABPCommunicationCharacter::MoveRight);
// 2가지 버전의 회전 바인딩이 있어 서로 다른 종류의 디바이스를 다양한 방식으로 처리할 수 있습니다.
// 'turn'은 마우스와 같이 절대 델타를 제공하는 디바이스를 처리합니다.
// 'turn rate'는 아날로그 조이스틱과 같이 속도 변경으로 취급할 디바이스용입니다.
PlayerInputComponent->BindAxis("Turn", this, &APawn::AddControllerYawInput);
PlayerInputComponent->BindAxis("TurnRate", this, &ABPCommunicationCharacter::TurnAtRate);
PlayerInputComponent->BindAxis("LookUp", this, &APawn::AddControllerPitchInput);
PlayerInputComponent->BindAxis("LookUpRate", this, &ABPCommunicationCharacter::LookUpAtRate);
// 터치 디바이스 처리
PlayerInputComponent->BindTouch(IE_Pressed, this, &ABPCommunicationCharacter::TouchStarted);
PlayerInputComponent->BindTouch(IE_Released, this, &ABPCommunicationCharacter::TouchStopped);
// VR 헤드셋 기능
PlayerInputComponent->BindAction("ResetVR", IE_Pressed, this, &ABPCommunicationCharacter::OnResetVR);
}
void ABPCommunicationCharacter::ToggleCeilingLight()
{
if (CeilingLightToToggle)
{
CeilingLightToToggle->TurnOffLight();
}
}
void ABPCommunicationCharacter::OnResetVR()
{
// 언리얼 에디터의 '기능 추가하기'를 사용하여 프로젝트에 BPCommunication을 추가한 경우 BPCommunication.Build.cs 내 HeadMountedDisplay의 종속성이 자동 전파되지 않습니다.
// 또한 링커 오류가 발생합니다.
// 다음 중 하나를 실행해야 합니다.
// 빌드에 성공하려면 [YourProject].Build.cs PublicDependencyModuleNames에 'HeadMountedDisplay'를 추가합니다(VR 지원 시 적합함).
// 또는
// 아래의 ResetOrientationAndPosition에 대한 호출에 코멘트를 달거나 이 호출을 삭제합니다(VR 미지원 시 적합함).
UHeadMountedDisplayFunctionLibrary::ResetOrientationAndPosition();
}
void ABPCommunicationCharacter::TouchStarted(ETouchIndex::Type FingerIndex, FVector Location)
{
Jump();
}
void ABPCommunicationCharacter::TouchStopped(ETouchIndex::Type FingerIndex, FVector Location)
{
StopJumping();
}
void ABPCommunicationCharacter::TurnAtRate(float Rate)
{
// 속도 정보로부터 이 프레임에 대한 델타 계산
AddControllerYawInput(Rate * BaseTurnRate * GetWorld()->GetDeltaSeconds());
}
void ABPCommunicationCharacter::LookUpAtRate(float Rate)
{
// 속도 정보로부터 이 프레임에 대한 델타 계산
AddControllerPitchInput(Rate * BaseLookUpRate * GetWorld()->GetDeltaSeconds());
}
void ABPCommunicationCharacter::MoveForward(float Value)
{
if ((Controller != nullptr) && (Value != 0.0f))
{
// 어디가 앞인지 찾기
const FRotator Rotation = Controller->GetControlRotation();
const FRotator YawRotation(0, Rotation.Yaw, 0);
// 전방 벡터 구하기
const FVector Direction = FRotationMatrix(YawRotation).GetUnitAxis(EAxis::X);
AddMovementInput(Direction, Value);
}
}
void ABPCommunicationCharacter::MoveRight(float Value)
{
if ( (Controller != nullptr) && (Value != 0.0f) )
{
// 어디가 오른쪽인지 찾기
const FRotator Rotation = Controller->GetControlRotation();
const FRotator YawRotation(0, Rotation.Yaw, 0);
// 오른쪽 벡터 구하기
const FVector Direction = FRotationMatrix(YawRotation).GetUnitAxis(EAxis::Y);
// 해당 방향으로 이동 추가
AddMovementInput(Direction, Value);
}
}
3 - 램프 블루프린트와의 상호작용
-
레벨에서 ThirdPersonCharacter 블루프린트를 선택하고 램프 가까이에 배치합니다.
-
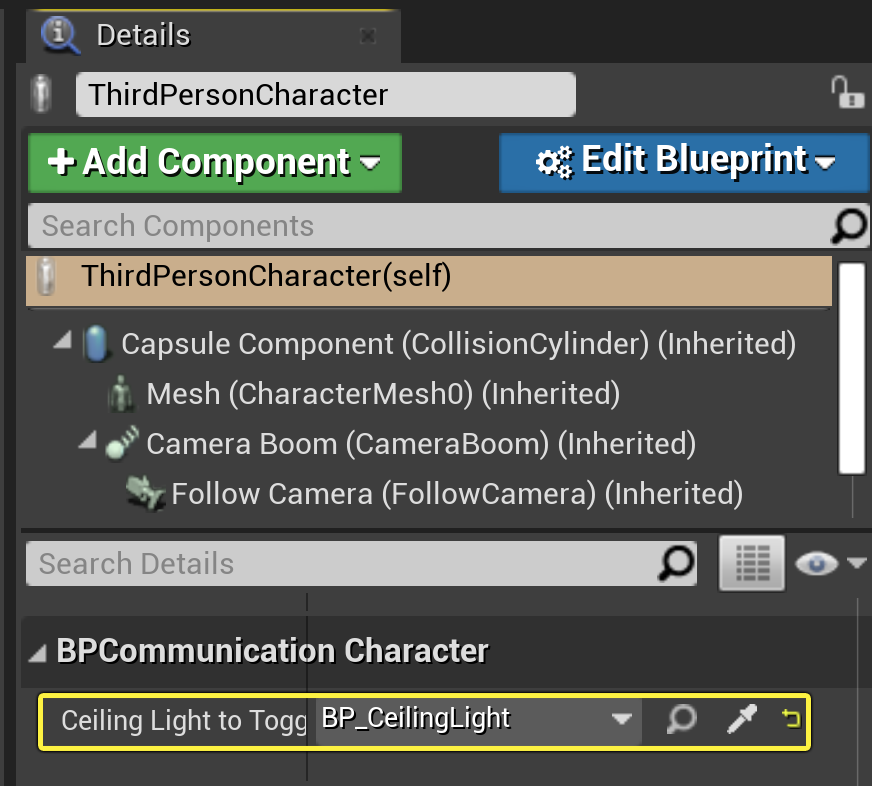
ThirdPersonCharacter 를 선택하고 디테일 패널로 이동한 후 BPCommunication Character 카테고리에서 Ceiling Light To Toggle 변수를 찾아 해당 변수 옆의 화살표를 선택합니다. 드롭다운 메뉴에서 BP_CeilingLight 액터를 검색하여 선택합니다.
-
플레이 를 눌러 PIE (에디터에서 플레이) 모드로 이동하고 E 를 눌러 램프를 켜고 끕니다.

섹션 결과
이 섹션에서는 ThirdPersonCharacter 블루프린트에 천장 라이트 액터 레퍼런스를 추가하고 E를 눌러 조명을 켜고 꺼 보았습니다.
다음 단계
지금까지 직접 블루프린트 커뮤니케이션 타입 사용법을 알아보았습니다. 액터 커뮤니케이션 문서 페이지에 나와 있는 다른 커뮤니케이션 타입도 살펴보세요.