

このセクションの最後でできあがる画面です。
目標
このセクションでは、ファースト パーソン シューター キャラクターを実装する方法を学びます。
目的
このチュートリアル セクションを読み終えると、次のことができるようになります。
- 新しいキャラクターを作成する
- 軸マッピングを設定する
- キャラクター移動関数を実装する
- マウス カメラ コントロールを実装する
- キャラクター ジャンプを実装する
- メッシュをキャラクターに追加する
- カメラ ビューを変更する
- ファース トパーソン メッシュをキャラクターに追加する
手順
- 2.1 - 新しいキャラクターを作成する
- 2.2 - 軸マッピングを設定する
- 2.3 - キャラクター移動関数を実装する
- 2.4 - マウス カメラ コントロールを実装する
- 2.5 - キャラクター ジャンプを実装する
- 2.6 - メッシュをキャラクターに追加する
- 2.7 - カメラ ビューを変更する
- 2.8 - ファースト パーソン メッシュをキャラクターに追加する
2.1 - 新しいキャラクターを作成する
このステップでは、Unreal Engine (UE) でエンジンの Character ベース クラスを使用して、新キャラクターを作成します。Character クラス (Pawn クラスから派生) には、歩行、走行、跳躍といった二足歩行移動向けのビルトイン機能があります。
Character クラスを追加する
.h および .cpp ファイルを手動で、Visual Studio (VS) ソリューションに追加できますが、便利なのは C++ クラス ウィザードを使用して、新クラスをプロジェクトに追加する方法です。
C++ Class Wizard を使用することで、UE では固有のマクロをセットアップするヘッダーとソース テンプレートを作成します。
-
FPSproject を UE で起動します (起動していない場合)。
-
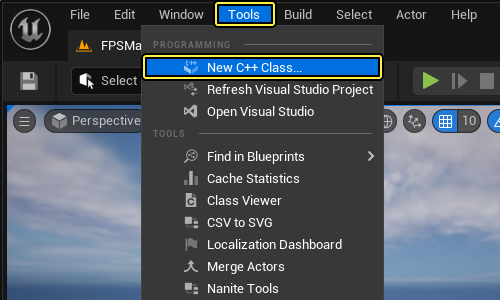
[Tools (ツール)] を メイン メニュー パネルでクリックし、[New C++ Class... (新規 C++ クラス...)] を選択します。
-
[Choose Parent Class (親クラスを選択)] ウィンドウが表示されます。親クラスとして [Character] を選択し、[Next (次へ)] をクリックします。
クリックしてフルサイズで表示
- 新規クラスに「FPSCharacter」という名前を付けてから、[Create Class (クラスを作成)] をクリックします。
クリックしてフルサイズで表示
Character クラスを検証する
-
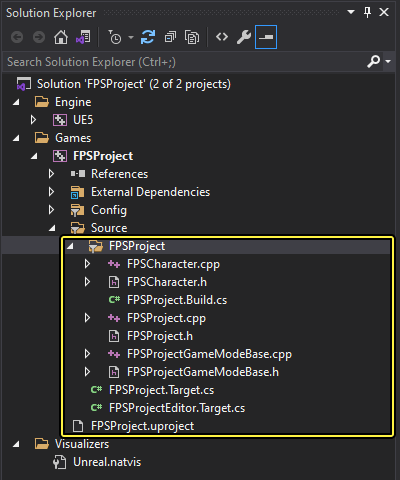
VS の [Solution Explorer] で、[FPSProject] > [Source] > [FPSProject] の順に展開します。
-
FPSCharacter.cppをクリックして、FPSCharacter クラス用の実装ファイルを開きます。 -
void AFPSCharacter::BeginPlay()関数 (Super::BeginPlay();の下) に次のコードを追加します。これにより、FPSCharacterクラスが使用されていることを確認できます。
FPSCharacter.cpp
check(GEngine != nullptr);
// Display a debug message for five seconds.
// The -1 "Key" value argument prevents the message from being updated or refreshed.
GEngine->AddOnScreenDebugMessage(-1, 5.0f, FColor::Red, TEXT("We are using FPSCharacter."));
FPSCharacter.cppは以下のようになります。
FPSCharacter.cpp
// Copyright Epic Games, Inc.All Rights Reserved.
#include "FPSCharacter.h"
// Sets default values
AFPSCharacter::AFPSCharacter()
{
// Set this character to call Tick() every frame.You can turn this off to improve performance if you don't need it.
PrimaryActorTick.bCanEverTick = true;
}
// Called when the game starts or when spawned
void AFPSCharacter::BeginPlay()
{
Super::BeginPlay();
check(GEngine != nullptr);
// Display a debug message for five seconds.
// The -1 "Key" value argument prevents the message from being updated or refreshed.
GEngine->AddOnScreenDebugMessage(-1, 5.0f, FColor::Red, TEXT("We are using FPSCharacter."));
}
// Called every frame
void AFPSCharacter::Tick(float DeltaTime)
{
Super::Tick(DeltaTime);
}
// Called to bind functionality to input
void AFPSCharacter::SetupPlayerInputComponent(UInputComponent* PlayerInputComponent)
{
Super::SetupPlayerInputComponent(PlayerInputComponent);
}
-
Visual Studio で
FPSCharacter.cppファイルを保存します。 -
[Solution Explorer] に移動して [FPSProject] を選択します。
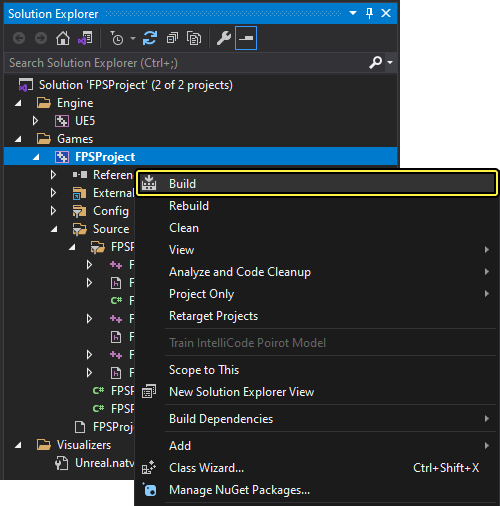
ここまで、エディタの [Build (ビルド)] ボタンで、プロジェクトをコンパイルしました。このステップでは、Visual Studio のビルド機能をつかってコードをコンパイルしてみましょう。Visual Studio 内からコードをコンパイルするには、[FPSProject] 上で 右クリックして、[Build (ビルド)] を選択し、プロジェクトをコンパイルします。
-
VS を使用してコードをコンパイルするには、[FPSProject] を [Solution Explorer] で右クリックし、[Build] を選択してプロジェクトをコンパイルします。

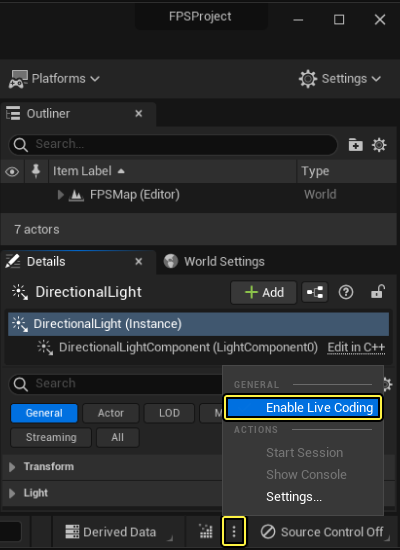
このステップを行う前に、必ず Unreal Engine の [Enable Live Coding (ライブ コーディングの有効化)] を無効にしてください。
デフォルト設定で VS を使用している場合は、プログラムの下の方にダイアログボックスがあります (コードを編集した場所の下)。[Build (ビルド)] をクリックすると、処理中にいくつかのメッセージがダイアログに表示され、通常、最後にビルド完了メッセージが表示されます。 ビルドが失敗しても、心配はありません。ステップを最初から見直して、こちらと プロジェクトを設定する のコードが一致しているかどうか確認してください。
-
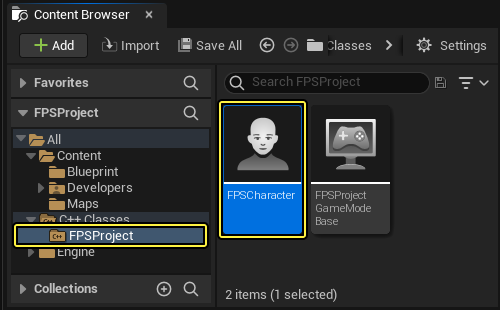
ビルド終了後に Unreal Editor を開いて、新しくコンパイルした FPSCharacter クラスが コンテンツ ブラウザ で見えることを確認します。
C++ FPS Character クラスをブループリントに拡張する
ここで、C++ FPS Character クラスをブループリントに拡張します (前に プロジェクトを設定する の FPSProject ゲーム モードで実行したものと同様)。C++ クラスからブループリントへの拡張の詳細については、「C++ とブループリント」リファレンス ページを参照してください。
-
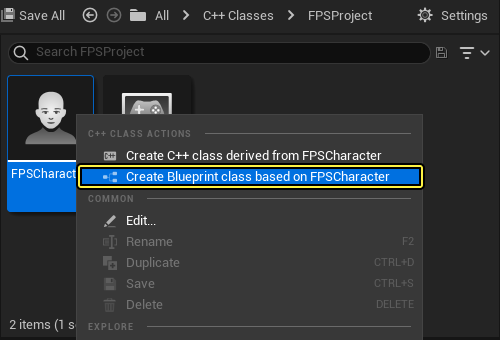
FPSCharacter クラスを コンテンツ ブラウザ で右クリックし、[Actions (アクション)] メニューを開きます。
-
[Create Blueprint class based on FPSCharacter (FPSCharacter に基づくブループリントクラスを作成します)] をクリックして、[Add Blueprint Class (ブループリントクラスを追加)] ダイアログ メニューを開きます。
-
新規ブループリント クラスに「BP_FPSCharacter」という名前を付け、「Blueprints」フォルダを選択してから、[Create Blueprint Class (ブループリントクラスを作成)] ボタンをクリックします。
クリックしてフルサイズで表示
- 新しく BP_FPSCharacter ブループリント クラスが「Blueprints」フォルダに作成されました。
クリックしてフルサイズで表示
-
必ず BP_FPSCharacter ブループリントを 保存 してから、ブループリント エディタ を閉じます。

デフォルトの Pawn クラスを設定する
新しく変更したゲーム モードをブループリントに拡張したので、このステップで BP_FPSCharacter をデフォルトの Pawn として使用するように、プロジェクトを設定する必要があります。
-
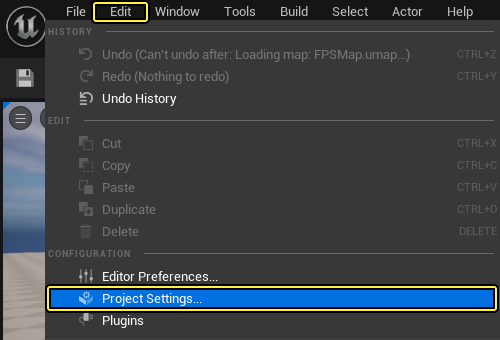
メイン メニュー パネルで [Edit] を開き、[Project Settings] を選択します。

-
[Project Settings] タブの左側にある [Project (プロジェクト)] セクションで、[Maps & Modes] をクリックします。
-
[Selected GameMode (選択したゲームモード)] セクションを展開して、[BP_FPSCharacter] を [Default Pawn Class] ドロップダウン メニューで選択します。
クリックしてフルサイズで表示
-
[Project Settings] メニューを閉じます。
-
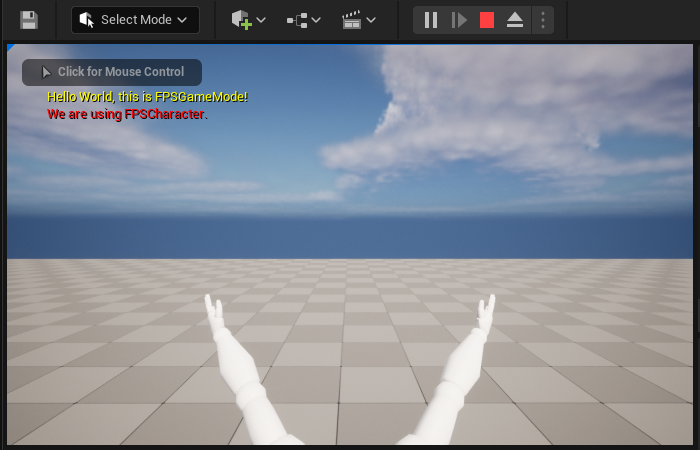
レベル エディタのツールバー で、[Play (プレイ)] ボタンをクリックします。ビューポートの左上に 5 秒間、「Hello World, this is FPSGameMode!」が表示され、その下に赤色のテキストで、「We are using FPSCharacter.」が表示されます。
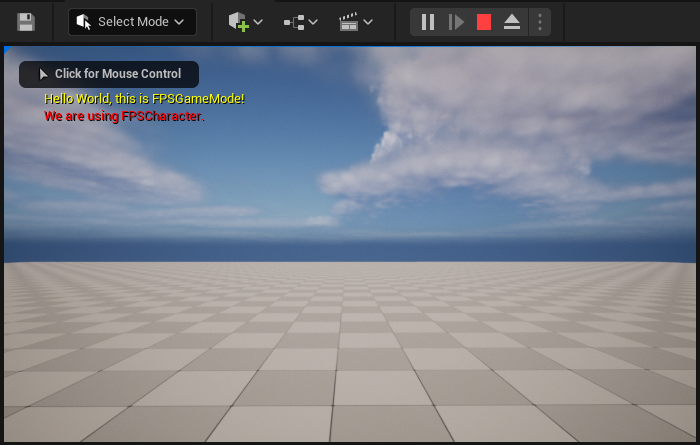
移動はできませんが、FPSCharacter は Pawn として正しく使用されています。新しい Character にはまだ移動コントロールが何もないので、レベル内を動き回ることはできません。
- 次のステップに進む前に、Shift キーと Escape キー を押すか レベル エディタのツールバー にある [Stop (停止)] をクリックし、PIE モードを終了します。
2.2 - 軸マッピングを設定する
一般的に軸マッピングでは、キーボード、マウス、およびコントローラーの入力を「フレンドリーネーム」にマッピングします。この「フレンドリーネーム」は後でゲームの挙動 (移動など) にバインドすることができます。軸マッピングは継続的にポーリングされ、移動のシームレスな遷移と滑らかなゲームの挙動を実現します。ハードウェア軸 (コントローラー ジョイスティックなど) では、オンオフの入力 (押された場合は 1 で、いない場合は 0 など) ではなく、入力の度合いが得られます。コントローラー ジョイスティック入力メソッドは、動きの入力の大きさを取得するのに効果的ですが、軸マッピングでも、一般的な移動キー (W、A、S、D の各キーや矢印キー) を継続的にポーリングされるゲームの動作にマッピングすることもできます。
If you want to learn more about Player Input before moving forward with this step, please refer to the プレイヤー入力と Pawn クラス tutorial.このステップでは、新しいキャラクターをマップで動き回らせるために、W、A、S、D、 の各キーに対する入力軸マッピングを設定します。
MoveForward 軸マッピング
-
メイン メニュー パネルで [Edit] を開き、[Project Settings] を選択します。
-
[Project Settings] タブの左側にある [Engine] の見出しで、 [Input] をクリックします。
-
[Bindings (バインディング)] セクションで、[Axis Mappings (軸マッピング)] の隣にある [+ (プラス)] 記号をクリックします。
-
[Axis Mappings] の左側にある矢印をクリックします。
-
表示されるテキスト フィールドに「MoveForward」と入力します。
-
ドロップダウン メニューで [Keyboard] ドロップダウン リストから [W] を選択します。
-
入力設定は以下のようになります。
クリックしてフルサイズで表示
-
[MoveForward] の隣にあるプラス記号を クリック します。
-
2 番目のドロップダウン メニューで、[Keyboard] ドロップダウン リストから [S] を選択します。
-
[S] の隣にある [Scale (スケール)] フィールドに「-1.0」を入力します。
-
入力設定は以下のようになります。
クリックしてフルサイズで表示
MoveRight 軸マッピング
-
[Bindings (バインディング)] セクションで、[Axis Mappings (軸マッピング)] の隣にある [+ (プラス)] 記号をクリックします。
-
表示されるテキスト フィールドに「MoveRight」と入力します。
-
ドロップダウン メニューで [Keyboard] ドロップダウン リストから [D] を選択します。
-
入力設定は以下のようになります。
クリックしてフルサイズで表示
-
[MoveRight] の隣にある [+] 記号をクリックします。
-
2 番目のドロップダウン メニューで、[Keyboard] ドロップダウン リストから [A] を選択します。
-
[A] の隣にある [Scale] フィールドに「-1.0」を入力します。
-
入力設定は以下のようになります。
クリックしてフルサイズで表示
- これで、移動軸マッピングの設定が完了しました。[Project Settings] メニューを閉じます。
2.3 - キャラクターに移動関数を実装する
このステップでは、プレイヤー入力コンポーネントを設定して、FPSCharacter クラスで次の関数を実装します。
MoveForwardMoveRight
移動関数インターフェース
FPSCharacter の軸マッピングを設定したので、VS のプロジェクトに切り替えます。
FPSCharacter.hで、次の関数宣言をSetupPlayerInputComponentの下のpublicアクセス指定子の下に追加します。
FPSCharacter.h
// Handles input for moving forward and backward.
UFUNCTION()
void MoveForward(float Value);
// Handles input for moving right and left.
UFUNCTION()
void MoveRight(float Value);
UFUNCTION マクロ (各関数の上にある) により、エンジンがこれらの関数を認識して、シリアル化と他のエンジン機能に含められるようになります。
FPSCharacter.hは以下のようになります。
FPSCharacter.h
// Copyright Epic Games, Inc.All Rights Reserved.
#pragma once
#include "CoreMinimal.h"
#include "GameFramework/Character.h"
#include "FPSCharacter.generated.h"
UCLASS()
class FPSPROJECT_API AFPSCharacter : public ACharacter
{
GENERATED_BODY()
public:
// Sets default values for this character's properties
AFPSCharacter();
protected:
// Called when the game starts or when spawned
virtual void BeginPlay() override;
public:
// Called every frame
virtual void Tick( float DeltaTime ) override;
// Called to bind functionality to input
virtual void SetupPlayerInputComponent(class UInputComponent* PlayerInputComponent) override;
// Handles input for moving forward and backward.
UFUNCTION()
void MoveForward(float Value);
// Handles input for moving right and left.
UFUNCTION()
void MoveRight(float Value);
};
移動関数の実装
一般的な FPS コントロール スキームでは、キャラクターの移動軸はカメラを基準にしたものになります。
「前進」の動きは「カメラが向いている方向」への動きで、「右」は「カメラの向きに対して右方向」への動きです。
キャラクターのコントール回転を取得するには、PlayerController を使用します。
さらに、MoveForward 関数はコントロール回転のピッチ コンポーネントを無視し、入力を XY 平面内に制限します。これは上や下を向いたときに、キャラクターが床から離れずに移動するようにするためです。
FPSCharacter.cppで、以下の行をSuper::SetupPlayerInputComponent(PlayerInputComponent)の下のSetupPlayerInputComponent関数に追加します。
FPSCharacter.cpp
// Set up "movement" bindings.
PlayerInputComponent->BindAxis("MoveForward", this, &AFPSCharacter::MoveForward);
PlayerInputComponent->BindAxis("MoveRight", this, &AFPSCharacter::MoveRight);
InputComponent は入力データを処理する方法を定義するコンポーネントです。InputComponent は入力を受け取りたいアクタにアタッチすることができます。
SetupPlayerInputComponent関数定義の下に、次のMoveForward関数定義 (FPSCharacter.cpp内) を追加します。
FPSCharacter.cpp
void AFPSCharacter::MoveForward(float Value)
{
// Find out which way is "forward" and record that the player wants to move that way.
FVector Direction = FRotationMatrix(Controller->GetControlRotation()).GetScaledAxis(EAxis::X);
AddMovementInput(Direction, Value);
}
- Below
MoveForwardfunction definition, add the followingMoveRightfunction definition inFPSCharacter.cpp.
FPSCharacter.cpp
void AFPSCharacter::MoveRight(float Value)
{
// Find out which way is "right" and record that the player wants to move that way.
FVector Direction = FRotationMatrix(Controller->GetControlRotation()).GetScaledAxis(EAxis::Y);
AddMovementInput(Direction, Value);
}
FPSCharacter.cppは以下のようになります。
FPSCharacter.cpp
// Copyright Epic Games, Inc.All Rights Reserved.
#include "FPSCharacter.h"
// Sets default values
AFPSCharacter::AFPSCharacter()
{
// Set this character to call Tick() every frame.You can turn this off to improve performance if you don't need it.
PrimaryActorTick.bCanEverTick = true;
}
// Called when the game starts or when spawned
void AFPSCharacter::BeginPlay()
{
Super::BeginPlay();
check(GEngine != nullptr);
// Put up a debug message for five seconds.
// The -1 "Key" value argument prevents the message from being updated or refreshed.
GEngine->AddOnScreenDebugMessage(-1, 5.0f, FColor::Red, TEXT("We are using FPSCharacter."));
}
// Called every frame
void AFPSCharacter::Tick( float DeltaTime )
{
Super::Tick( DeltaTime );
}
// Called to bind functionality to input
void AFPSCharacter::SetupPlayerInputComponent(UInputComponent* PlayerInputComponent)
{
Super::SetupPlayerInputComponent(PlayerInputComponent);
// Set up "movement" bindings.
PlayerInputComponent->BindAxis("MoveForward", this, &AFPSCharacter::MoveForward);
PlayerInputComponent->BindAxis("MoveRight", this, &AFPSCharacter::MoveRight);
}
void AFPSCharacter::MoveForward(float Value)
{
// Find out which way is "forward" and record that the player wants to move that way.
FVector Direction = FRotationMatrix(Controller->GetControlRotation()).GetScaledAxis(EAxis::X);
AddMovementInput(Direction, Value);
}
void AFPSCharacter::MoveRight(float Value)
{
// Find out which way is "right" and record that the player wants to move that way.
FVector Direction = FRotationMatrix(Controller->GetControlRotation()).GetScaledAxis(EAxis::Y);
AddMovementInput(Direction, Value);
}
キャラクターの移動をテストする
新規で実装したキャラクターの移動関数をコンパイルし、テストします。
-
FPSCharacter ヘッダ (
.h) と実装.cppファイルを VS で保存します。 -
[Solution Explorer] に移動して [FPSProject] を選択します。
-
[FPSProject] を右クリックして [Build] を選択してプロジェクトをコンパイルします。

-
ビルドが終了したら Unreal Editor で FPSProject を開きます。
-
レベル エディタのツールバー で、[Play (プレイ)] ボタンをクリックします。W、A、S、D の各キーを使用して前後左右に移動できるようになりました。
-
次のステップに進む前に、Shift キーと Escape キー を押すか レベル エディタのツールバー にある [Stop (停止)] をクリックし、PIE モードを終了します。
2.4 - マウスによるカメラ制御の実装
このステップでは、マウスで操作して、キャラクターが周囲を見回す機能を追加します。
Turn 軸マッピング
-
メイン メニュー パネルで [Edit] を開き、[Project Settings] を選択します。

-
[Project Settings] タブの左側にある [Engine] の見出しで、 [Input] をクリックします。
-
[Bindings (バインディング)] セクションで、[Axis Mappings (軸マッピング)] の隣にある [+ (プラス)] 記号をクリックします。
-
[Axis Mappings] の左側にある矢印をクリックします。
-
表示されるテキスト フィールドに「Turn」と入力します。
-
ドロップダウン メニューで、[Mouse X (マウスの X 軸)] を [Mouse (マウス)] ドロップダウン リストから選択します。
-
入力設定は以下のようになります。
クリックしてフルサイズで表示
Lookup 軸マッピング
-
[Bindings (バインディング)] セクションで、[Axis Mappings (軸マッピング)] の隣にある [+ (プラス)] 記号をクリックします。
-
表示されるテキスト フィールドに「LookUp」と入力します。
-
ドロップダウン メニューで [Mouse] ドロップダウン リストから [Mouse Y] を選択します。
-
[Mouse Y] の隣にある [Scale] フィールドに「-1.0」を入力します。
-
入力設定は以下のようになります。
クリックしてフルサイズで表示
- [Project Settings] メニューを閉じます。
入力処理を実装する
このタイミングで回転や見上げるためのマウス入力を処理するためのコードを追加します。
Character 基本クラスでは、次の 2 つの必須関数を定義します。
AddControllerYawInputAddControllerPitchInput
感度や軸の反転に対する追加サポートなど、追加処理が必要な場合、独自の関数を準備して、入力値を関数に渡す前に調整することもできます。ただしこの場合は、入力を直接 AddControllerYawInput と AddControllerPitchInput 関数にバインドします。
- 次のコード行を
SetupPlayerInputComponent関数 (FPSCharacter.cpp内) に追加します。
FPSCharacter.cpp
// Set up "look" bindings.
PlayerInputComponent->BindAxis("Turn", this, &AFPSCharacter::AddControllerYawInput);
PlayerInputComponent->BindAxis("LookUp", this, &AFPSCharacter::AddControllerPitchInput);
- The
SetupPlayerInputComponentfunction should now look like the following:
FPSCharacter.cpp
// Called to bind functionality to input
void AFPSCharacter::SetupPlayerInputComponent(UInputComponent* PlayerInputComponent)
{
Super::SetupPlayerInputComponent(PlayerInputComponent);
// Set up "movement" bindings.
PlayerInputComponent->BindAxis("MoveForward", this, &AFPSCharacter::MoveForward);
PlayerInputComponent->BindAxis("MoveRight", this, &AFPSCharacter::MoveRight);
// Set up "look" bindings.
PlayerInputComponent->BindAxis("Turn", this, &AFPSCharacter::AddControllerYawInput);
PlayerInputComponent->BindAxis("LookUp", this, &AFPSCharacter::AddControllerPitchInput);
}
マウス カメラ コントロールをテストする
-
FPSCharacter 実装ファイルを VS で保存します。
-
[Solution Explorer] に移動して [FPSProject] を選択します。
-
[FPSProject] を右クリックして [Build] を選択してプロジェクトをコンパイルします。

-
ビルドが終了したら Unreal Editor で FPSProject を開きます。
-
レベル エディタのツールバー で、[Play (プレイ)] ボタンをクリックします。カメラをマウスでコントロールできるようになりました。
-
次のステップに進む前に、Shift キーと Escape キー を押すか レベル エディタのツールバー にある [Stop (停止)] をクリックし、PIE モードを終了します。
2.5 - キャラクター ジャンプを実装する
一般に、アクション マッピングは個別のイベントに対して入力を処理します。これにより入力を「フレンドリーネーム」にマップして、イベント駆動型の動作にバインドできるようにします。 その結果、キー、マウス ボタン、キーパッド ボタンを押して放す、あるいいずれかの操作によって、直接ゲーム ビヘイビアをトリガーできるようになります。 このステップでは、キャラクターがジャンプする機能を追加するために、スペース キーの入力アクション マッピングを設定します。
ジャンプ アクション マッピング
-
メイン メニュー パネルで [Edit] を開き、[Project Settings] を選択します。

-
[Project Settings] タブの左側にある [Engine] の見出しで、 [Input] をクリックします。
-
[Bindings] セクションで、[Action Mappings (アクション マッピング)] の隣にある [+] 記号をクリックします。
-
[Action Mappings] の左にある 矢印 をクリックします。
-
表示されるテキスト フィールドに「Jump」と入力します。
-
ドロップダウン メニューで、[Space Bar (スペースバー)] を [Keyboard] ドロップダウン リストから選択します。
-
入力設定は以下のようになります。
クリックしてフルサイズで表示
- [Project Settings] メニューを閉じます。
入力処理を実装する
ヘッダ ファイル (.h) の内部で ACharacter 基本クラスを確認すると、キャラクターのジャンプに対するビルトイン サポートがあることがわかると思います。キャラクター ジャンプは bPressedJump 変数に結び付けられているため、ジャンプ アクションが押されたときに、boolean を true に、ジャンプ アクションが解除されたときに false にする必要があります。これを実行するには次の 2 つの関数を追加する必要があります。
StartJumpStopJump
Visual Studio に戻り、コードを FPSCharacter クラスに追加します。
FPSCharacter.hで、次の関数宣言をpublicアクセス指定子の下に追加します。
FPSCharacter.h
// Sets jump flag when key is pressed.
UFUNCTION()
void StartJump();
// Clears jump flag when key is released.
UFUNCTION()
void StopJump();
FPSCharacter.hは以下のようになります。
FPSCharacter.h
// Copyright Epic Games, Inc.All Rights Reserved.
#pragma once
#include "CoreMinimal.h"
#include "GameFramework/Character.h"
#include "FPSCharacter.generated.h"
UCLASS()
class FPSPROJECT_API AFPSCharacter : public ACharacter
{
GENERATED_BODY()
public:
// Sets default values for this character's properties
AFPSCharacter();
protected:
// Called when the game starts or when spawned
virtual void BeginPlay() override;
public:
// Called every frame
virtual void Tick( float DeltaTime ) override;
// Called to bind functionality to input
virtual void SetupPlayerInputComponent(class UInputComponent* PlayerInputComponent) override;
// Handles input for moving forward and backward.
UFUNCTION()
void MoveForward(float Value);
// Handles input for moving right and left.
UFUNCTION()
void MoveRight(float Value);
// Sets jump flag when key is pressed.
UFUNCTION()
void StartJump();
// Clears jump flag when key is released.
UFUNCTION()
void StopJump();
};
- ここで、次のコードを
SetupPlayerInputComponentに追加して、ジャンプ アクションを新しく記述した関数にバインドします。
FPSCharacter.cpp
void AFPSCharacter::StartJump()
{
bPressedJump = true;
}
void AFPSCharacter::StopJump()
{
bPressedJump = false;
}
- 次のコード行を
SetupPlayerInputComponent関数に追加し、ジャンプ アクションを新しく記述した関数にバインドします。
FPSCharacter.cpp
// Set up "action" bindings.
PlayerInputComponent->BindAction("Jump", IE_Pressed, this, &AFPSCharacter::StartJump);
PlayerInputComponent->BindAction("Jump", IE_Released, this, &AFPSCharacter::StopJump);
FPSCharacter.cppshould now look like the following:
FPSCharacter.cpp
// Copyright Epic Games, Inc.All Rights Reserved.
#include "FPSCharacter.h"
// Sets default values
AFPSCharacter::AFPSCharacter()
{
// Set this character to call Tick() every frame.You can turn this off to improve performance if you don't need it.
PrimaryActorTick.bCanEverTick = true;
}
// Called when the game starts or when spawned
void AFPSCharacter::BeginPlay()
{
Super::BeginPlay();
check(GEngine != nullptr);
// Display a debug message for five seconds.
// The -1 "Key" valueargument prevents the message from being updated or refreshed.
GEngine->AddOnScreenDebugMessage(-1, 5.0f, FColor::Red, TEXT("We are using FPSCharacter."));
}
// Called every frame
void AFPSCharacter::Tick( float DeltaTime )
{
Super::Tick( DeltaTime );
}
// Called to bind functionality to input
void AFPSCharacter::SetupPlayerInputComponent(UInputComponent* PlayerInputComponent)
{
Super::SetupPlayerInputComponent(PlayerInputComponent);
// Set up "movement" bindings.
PlayerInputComponent->BindAxis("MoveForward", this, &AFPSCharacter::MoveForward);
PlayerInputComponent->BindAxis("MoveRight", this, &AFPSCharacter::MoveRight);
// Set up "look" bindings.
PlayerInputComponent->BindAxis("Turn", this, &AFPSCharacter::AddControllerYawInput);
PlayerInputComponent->BindAxis("LookUp", this, &AFPSCharacter::AddControllerPitchInput);
// Set up "action" bindings.
PlayerInputComponent->BindAction("Jump", IE_Pressed, this, &AFPSCharacter::StartJump);
PlayerInputComponent->BindAction("Jump", IE_Released, this, &AFPSCharacter::StopJump);
}
void AFPSCharacter::MoveForward(float Value)
{
// Find out which way is "forward" and record that the player wants to move that way.
FVector Direction = FRotationMatrix(Controller->GetControlRotation()).GetScaledAxis(EAxis::X);
AddMovementInput(Direction, Value);
}
void AFPSCharacter::MoveRight(float Value)
{
// Find out which way is "right" and record that the player wants to move that way.
FVector Direction = FRotationMatrix(Controller->GetControlRotation()).GetScaledAxis(EAxis::Y);
AddMovementInput(Direction, Value);
}
void AFPSCharacter::StartJump()
{
bPressedJump = true;
}
void AFPSCharacter::StopJump()
{
bPressedJump = false;
}
キャラクター ジャンプをテストする
新規で実装したキャラクターの移動関数をコンパイルし、テストします。
-
FPSCharacter ヘッダ (
.h) と実装.cppファイルを VS で保存します。 -
[Solution Explorer] に移動して [FPSProject] を選択します。
-
[FPSProject] を右クリックして [Build] を選択してプロジェクトをコンパイルします。

-
ビルドが終了したら Unreal Editor で FPSProject を開きます。
-
レベル エディタのツールバー で、[Play (プレイ)] ボタンをクリックします。W、A、S、D の各キーを使用して前後左右に移動できるようになりました。
-
次のステップに進む前に、Shift キーと Escape キー を押すか レベル エディタのツールバー にある [Stop (停止)] をクリックし、PIE モードを終了します。
2.6 - キャラクターにメッシュを追加する
次のリンクからサンプル メッシュをダウンロードして展開してください。
このステップでは、キャラクターにスケルタル メッシュを加えます。Character クラスはデフォルトで SkeletalMeshComponent オブジェクトを作成します。つまり必要なのは、どの SkeletalMesh アセットを使用するのかということです。
スケルタルメッシュをインポートする
-
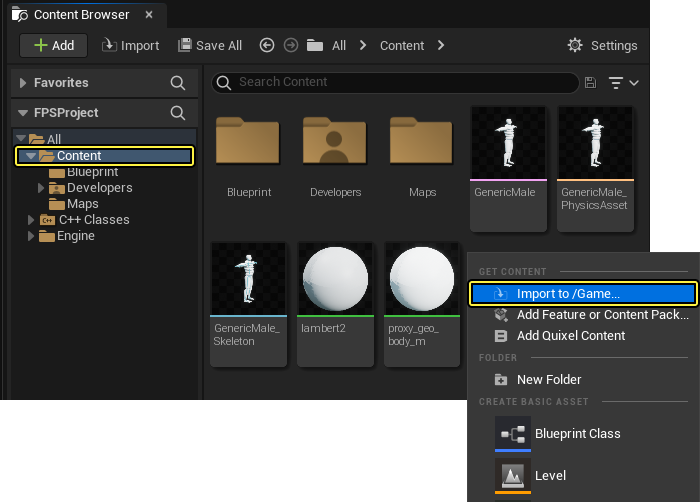
コンテンツ ブラウザ に移動して「Content」フォルダを開きます。
-
コンテンツ ブラウザ のファイル ウィンドウ内を右クリックして、[Import Asset (アセットのインポート)] ダイアログ ウィンドウを開きます。
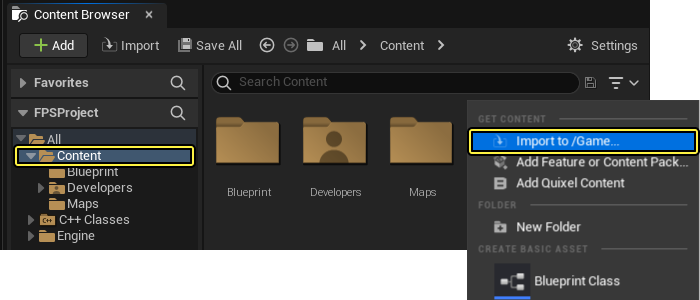
-
[Import to /Game... (/Game にインポート...)] をクリックして、[Import (インポート)] ダイアログ ウィンドウを開きます。
-
「
GenericMale.fbx」メッシュ ファイルをダウンロードしたフォルダで見つけて選択します。 -
プロジェクトへのメッシュのインポートを開始するには、[Open (開く)] をクリックします。
-
コンテンツ ブラウザ に [FBX Import Options (FBX インポート オプション)] ダイアログ ウィンドウが表示されます。[Import All (すべてインポート)] をクリックすると、メッシュがプロジェクトに追加されます。
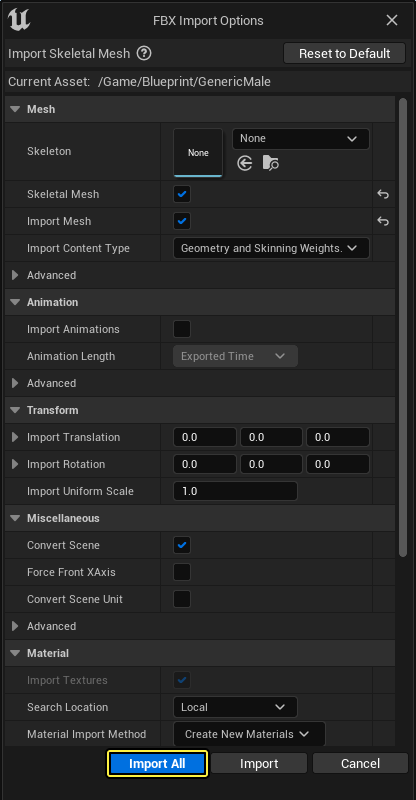
-
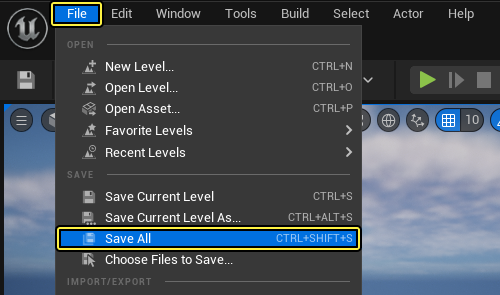
メイン メニュー パネルの [File (ファイル)] をクリックして、インポートされたメッシュを保存します。

サードパーソン メッシュを設定する
- BP_FPSCharacter ブループリント クラス アイコンを「Content (コンテンツ)」 > 「Blueprints」でダブルクリックして、ブループリント エディタ で開きます。
このブループリントがデータ専用ブループリントであると表示されている場合は、[Open Full Blueprint Editor (フルブループリントエディタを開く)] をクリックします。
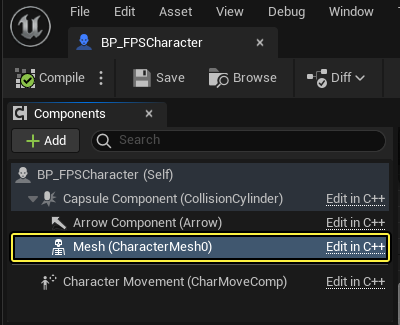
-
[Components] タブで Mesh コンポーネントをクリックします。
-
[Details (詳細)] パネルに移動し、[Mesh (メッシュ)] までスクロールします (画面の右側にない場合は、[Window (ウィンドウ)] > [Details] を選択します)。
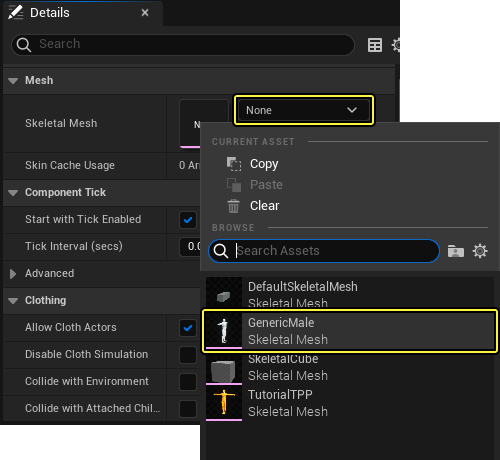
-
[Skeletal Mesh (スケルタルメッシュ)] の下にあるドロップダウン ウィンドウを開き、[GenericMale] スケルタルメッシュを選択します。
-
[Details] パネルの [Transform (トランスフォーム)] セクションまでスクロールし、
SkeletalMeshComponentをCapsuleComponentに合わせるために、[Location (位置)] オプションを「X = -5.0; Y = 0.0; Z = -88.0」に設定します。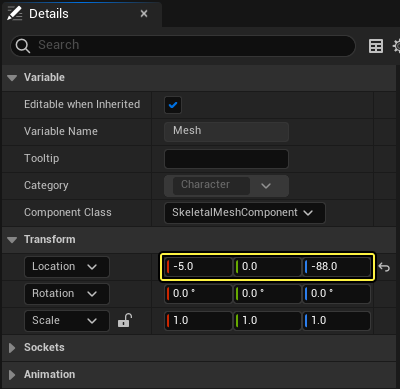
-
ブループリント エディタ の ビューポート をクリックしてスケルタルメッシュをプレビューします。次のようになります。
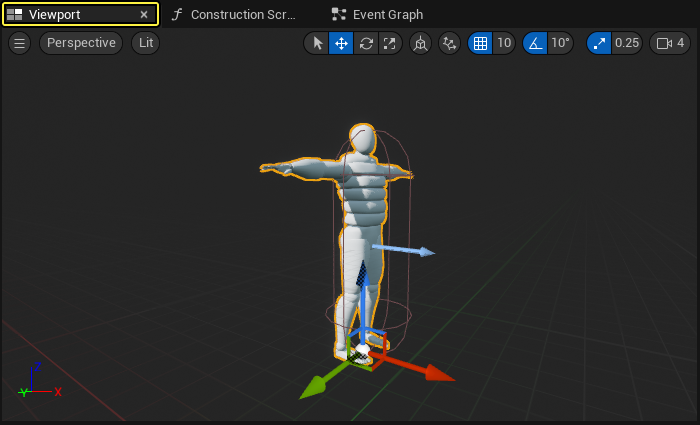
スケルタル メッシュが CapsuleComponent 内部にあり、メッシュが ArrowComponent と同じ方向を向いていることを確認します。スケルタル メッシュ コンポーネントの向きを正しく設定することで、キャラクターがワールド内を正しく移動するようになります。
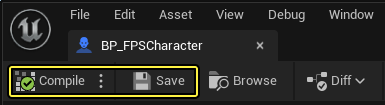
- 必ず BP_FPSCharacter ブループリントを コンパイル して 保存 してから、ブループリント エディタ を閉じます。
新しいメッシュを PIE モードで検証する
新規追加したメッシュをエディタ内で見ます。
-
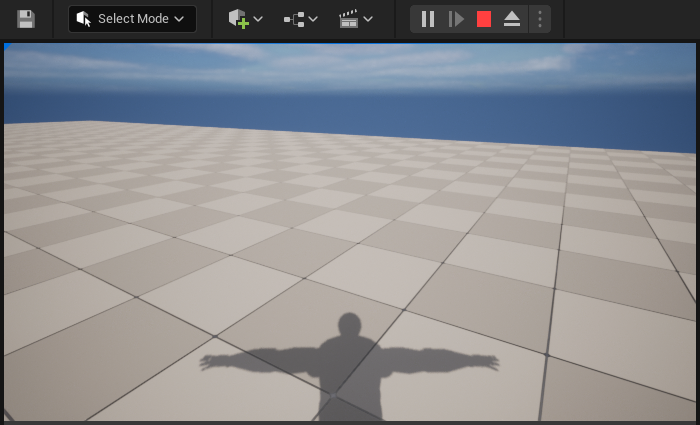
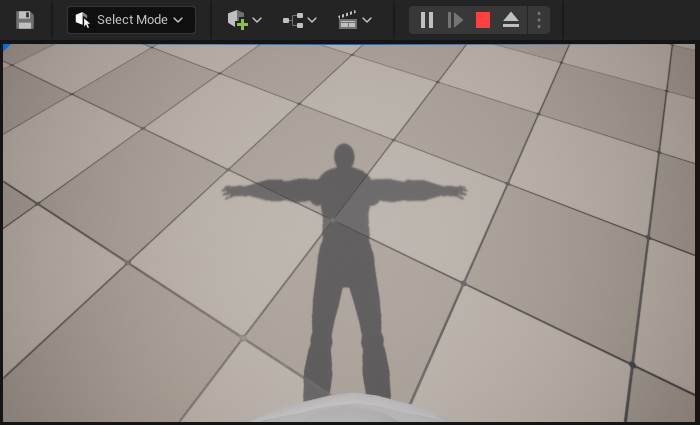
レベル エディタのツールバー で、[Play (プレイ)] ボタンをクリックします。動き回るとキャラクターのシャドウが見えます。
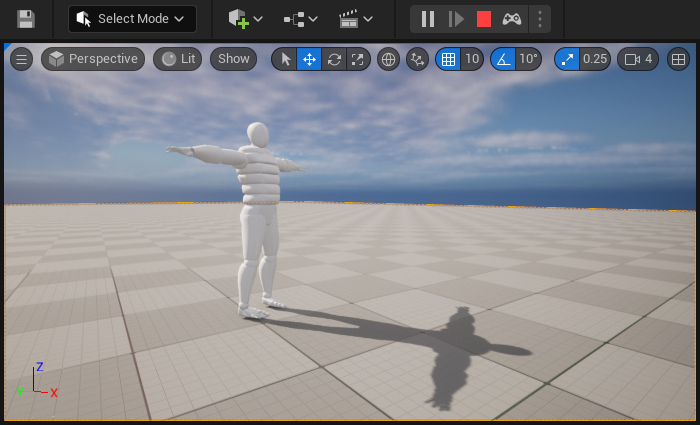
エディタのビューポート内でキャラクターのメッシュを確認する場合は、F8 キーを押してポーンから自身を切り離します。F8 キーを押した後に、レベルでカメラを自由に動かすことができます。カメラを動かすには、マウスの左ボタンを押したまま、マウスを動かします。
- Shift + Escape キーを押す、または レベル エディタ で **[Stop (停止)] をクリックして、PIE モードを終了します。
2.7 - カメラ ビューを変更する
前のステップの最後で、デフォルトのカメラはメッシュの首に配置されていました。
このステップでは、カメラのプロパティ (位置や視野角など) を調整するために使用する FPS カメラを設定します。
開始する前に、FPSCharacter.h にインクルードされたファイルのリストを展開する必要があります。
これにより、コードでさらに多くのカメラ関連関数にアクセスできるようになり、最終的にカメラの配置を操作できます。
-
Visual Studio プロジェクトを開き、
FPSCharacter.hに移動します。 -
次のヘッダ ファイルを
FPSCharacter.hにインクルードします。
FPSCharacter.h
#include "Camera/CameraComponent.h"
#include "Components/CapsuleComponent.h"
カメラ コンポーネントをアタッチする
FPSCharacter.hを開いて、次のコードをpublicアクセス指定子の下に追加します。
FPSCharacter.h
// FPS camera.
UPROPERTY(VisibleAnywhere)
UCameraComponent* FPSCameraComponent;
FPSCharacter.hは以下のようになります。
FPSCharacter.h
// Copyright Epic Games, Inc.All Rights Reserved.
#pragma once
#include "CoreMinimal.h"
#include "GameFramework/Character.h"
#include "Camera/CameraComponent.h"
#include "Components/CapsuleComponent.h"
#include "FPSCharacter.generated.h"
UCLASS()
class FPSPROJECT_API AFPSCharacter : public ACharacter
{
GENERATED_BODY()
public:
// Sets default values for this character's properties
AFPSCharacter();
protected:
// Called when the game starts or when spawned
virtual void BeginPlay() override;
public:
// Called every frame
virtual void Tick( float DeltaTime ) override;
// Called to bind functionality to input
virtual void SetupPlayerInputComponent(class UInputComponent* PlayerInputComponent) override;
// Handles input for moving forward and backward.
UFUNCTION()
void MoveForward(float Value);
// Handles input for moving right and left.
UFUNCTION()
void MoveRight(float Value);
// Sets jump flag when key is pressed.
UFUNCTION()
void StartJump();
// Clears jump flag when key is released.
UFUNCTION()
void StopJump();
// FPS camera
UPROPERTY(VisibleAnywhere)
UCameraComponent* FPSCameraComponent;
};
FPSCharacter.cppを開き、次のコードをコンストラクタのPrimaryActorTick.bCanEverTick = true:の下に追加します。
FPSCharacter.cpp
// Create a first person camera component.
FPSCameraComponent = CreateDefaultSubobject<UCameraComponent>(TEXT("FirstPersonCamera"));
check(FPSCameraComponent != nullptr);
// Attach the camera component to our capsule component.
FPSCameraComponent->SetupAttachment(CastChecked<USceneComponent, UCapsuleComponent>(GetCapsuleComponent()));
このコードは UCameraComponent を作成し、キャラクターの CapsuleComponent にアタッチします。
- コンストラクタで記述したブロックの下に次のコードを追加します。
FPSCharacter.cpp
// Position the camera slightly above the eyes.
FPSCameraComponent->SetRelativeLocation(FVector(0.0f, 0.0f, 50.0f + BaseEyeHeight));
// Enable the pawn to control camera rotation.
FPSCameraComponent->bUsePawnControlRotation = true;
このコードは、ポーンでカメラの回転をコントロールできるようにしながら、キャラクターの目の少し上にカメラの位置を調整します。
SetRelativeLocation はコンポーネントのデフォルトを設定します。ただし、前の値はまだエディタに設定されます。これを修正するには、ブループリント エディタ を開きます。FPSCameraComponent をクリックし、[Details] パネルで [Transform] > [Location] の値を見つけます。その値の隣にある [Reset to Default (デフォルトにリセット)] アイコンをクリックします。
FPSCharacter.cppshould now look like the following:
FPSCharacter.cpp
// Copyright Epic Games, Inc.All Rights Reserved.
#include "FPSCharacter.h"
// Sets default values
AFPSCharacter::AFPSCharacter()
{
// Set this character to call Tick() every frame.You can turn this off to improve performance if you don't need it.
PrimaryActorTick.bCanEverTick = true;
// Create a first person camera component.
FPSCameraComponent = CreateDefaultSubobject<UCameraComponent>(TEXT("FirstPersonCamera"));
check(FPSCameraComponent != nullptr);
// Attach the camera component to our capsule component.
FPSCameraComponent->SetupAttachment(CastChecked<USceneComponent, UCapsuleComponent>(GetCapsuleComponent()));
// Position the camera slightly above the eyes.
FPSCameraComponent->SetRelativeLocation(FVector(0.0f, 0.0f, 50.0f + BaseEyeHeight));
// Enable the pawn to control camera rotation.
FPSCameraComponent->bUsePawnControlRotation = true;
}
// Called when the game starts or when spawned
void AFPSCharacter::BeginPlay()
{
Super::BeginPlay();
check(GEngine != nullptr)
// Display a debug message for five seconds.
// The -1 "Key" value (first argument) indicates that we will never need to update or refresh this message.
GEngine->AddOnScreenDebugMessage(-1, 5.0f, FColor::Red, TEXT("We are using FPSCharacter."));
}
// Called every frame
void AFPSCharacter::Tick( float DeltaTime )
{
Super::Tick( DeltaTime );
}
// Called to bind functionality to input
void AFPSCharacter::SetupPlayerInputComponent(UInputComponent* PlayerInputComponent)
{
Super::SetupPlayerInputComponent(PlayerInputComponent);
// Set up "movement" bindings.
PlayerInputComponent->BindAxis("MoveForward", this, &AFPSCharacter::MoveForward);
PlayerInputComponent->BindAxis("MoveRight", this, &AFPSCharacter::MoveRight);
// Set up "look" bindings.
PlayerInputComponent->BindAxis("Turn", this, &AFPSCharacter::AddControllerYawInput);
PlayerInputComponent->BindAxis("LookUp", this, &AFPSCharacter::AddControllerPitchInput);
// Set up "action" bindings.
PlayerInputComponent->BindAction("Jump", IE_Pressed, this, &AFPSCharacter::StartJump);
PlayerInputComponent->BindAction("Jump", IE_Released, this, &AFPSCharacter::StopJump);
}
void AFPSCharacter::MoveForward(float Value)
{
// Find out which way is "forward" and record that the player wants to move that way.
FVector Direction = FRotationMatrix(Controller->GetControlRotation()).GetScaledAxis(EAxis::X);
AddMovementInput(Direction, Value);
}
void AFPSCharacter::MoveRight(float Value)
{
// Find out which way is "right" and record that the player wants to move that way.
FVector Direction = FRotationMatrix(Controller->GetControlRotation()).GetScaledAxis(EAxis::Y);
AddMovementInput(Direction, Value);
}
void AFPSCharacter::StartJump()
{
bPressedJump = true;
}
void AFPSCharacter::StopJump()
{
bPressedJump = false;
}
新規カメラをテストする
ここでは、新しく実装されたカメラ コードをコンパイルしてテストします。
-
FPSCharacter ヘッダ (
.h) と実装.cppファイルを VS で保存します。 -
[Solution Explorer] に移動して [FPSProject] を選択します。
-
[FPSProject] を右クリックして [Build] を選択してプロジェクトをコンパイルします。

-
ビルドが終了したら Unreal Editor で FPSProject を開きます。
-
レベル エディタのツールバー で、[Play (プレイ)] ボタンをクリックします。
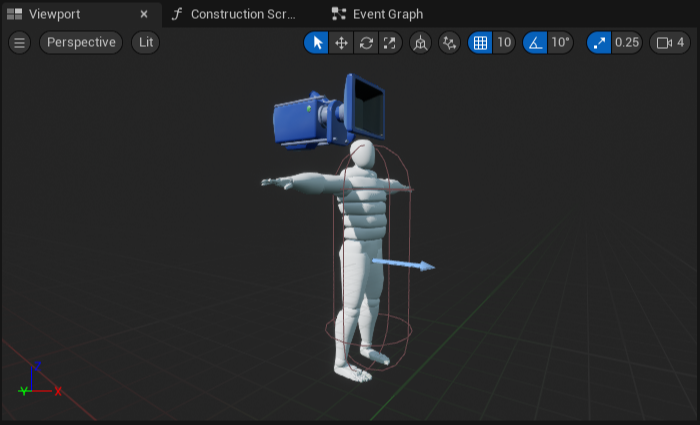
カメラはキャラクターの頭部の少し上にあります。
BP_FPSCharacter を ビューポート で開き、新しく追加されたカメラ コンポーネントを確認することもできます。
BP_FPSCharacter を コンテンツ ブラウザ で開いて ビューポート に移動すると、キャラクターは次のように表示されます。
2.8 - ファースト パーソン メッシュをキャラクターに追加する
FPS ゲーム作成での一般的なアプローチとして、フルボディ メッシュと「武器と腕」メッシュの 2 つの別々のキャラクター メッシュを使用します。フルボディ メッシュは第三者の視点からキャラクターを見るために使用しますが、プレイヤー自身の視点で見ているときは表示されません。「武器と腕」メッシュは一般にカメラにアタッチされ、プレイヤー自身の視点でマップを見ているときに、プレイヤーにだけ見えるものです。このステップでは、ファースト パーソン メッシュをキャラクターに追加します。
ファースト パーソン キャラクター メッシュを追加する
- Visual Studio に戻って
FPSCharacter.hを開き、次のコードをpublicの下に追加します。
FPSCharacter.h
// First-person mesh (arms), visible only to the owning player.
UPROPERTY(VisibleDefaultsOnly, Category = Mesh)
USkeletalMeshComponent* FPSMesh;
FPSCharacter.cppを開き、コンストラクタに移動して次のコードを追加し、ファースト パーソン メッシュを作成して設定します。
FPSCharacter.cpp
// Create a first person mesh component for the owning player.
FPSMesh = CreateDefaultSubobject<USkeletalMeshComponent>(TEXT("FirstPersonMesh"));
check(FPSMesh != nullptr);
// Only the owning player sees this mesh.
FPSMesh->SetOnlyOwnerSee(true);
// Attach the FPS mesh to the FPS camera.
FPSMesh->SetupAttachment(FPSCameraComponent);
// Disable some environmental shadows to preserve the illusion of having a single mesh.
FPSMesh->bCastDynamicShadow = false;
FPSMesh->CastShadow = false;
SetOnlyOwnerSee で示しているのは、このメッシュが、このキャラクターを所有している PlayerController のみから見えるということです。このコードはこのメッシュをカメラにアタッチし、一部の環境シャドウイングも無効にしています。腕がシャドウを投げかけられるようにしてしまうと、ファースト パーソン キャラクターが単一メッシュであるという錯覚が損なわれます。
- 最後に、次のコードを
PSCharacter.cppのコンストラクタに追加し、既存のサードパーソン メッシュを所有するキャラクターから非表示にします。
FPSCharacter.cpp
// The owning player doesn't see the regular (third-person) body mesh.
GetMesh()->SetOwnerNoSee(true);
-
FPSCharacter ヘッダ (
.h) と実装.cppファイルを Visual Studio で保存します。 -
[Solution Explorer] に移動して [FPSProject] を選択します。
-
[FPSProject] を右クリックして [Build] を選択してプロジェクトをコンパイルします。
-
ビルドが終了したら Unreal Editor で FPSProject を開きます。
-
レベル エディタのツールバー で、[Play (プレイ)] ボタンをクリックします。これで、PIE モードでキャラクターのシャドウが見えなくなりました。次のようになります。
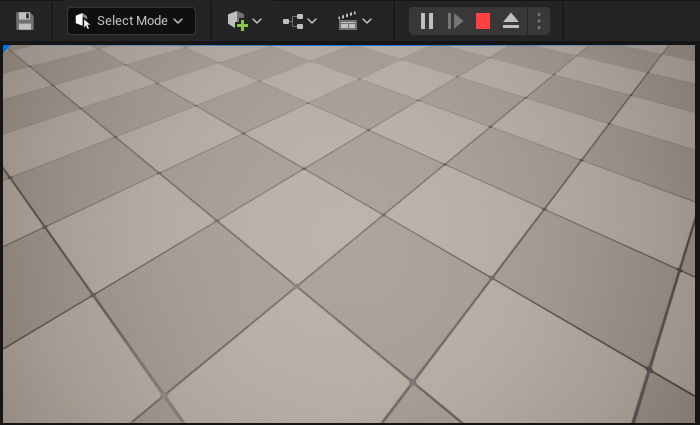
この時点で、キャラクター メッシュはエディタ内で見えなくなります。
メッシュとそのシャドウのキャストがまだ見える場合は、エディタを閉じて再起動します。
メッシュ ブループリントをビルドする
先に進む前に、「発射物メッシュ」から
-
コンテンツ ブラウザ に移動して「Content」フォルダを開きます。
-
コンテンツ ブラウザ のファイル ウィンドウ内を右クリックして、[Import Asset (アセットのインポート)] ダイアログ ウィンドウを開きます。
-
[Import to /Game...] をクリックして、[Import] ダイアログ ウィンドウを開きます。
-
「HeroFPP.fbx」メッシュ ファイルをダウンロードしたフォルダで見つけて選択します。
-
プロジェクトへのメッシュのインポートを開始するには、[Open (開く)] をクリックします。
-
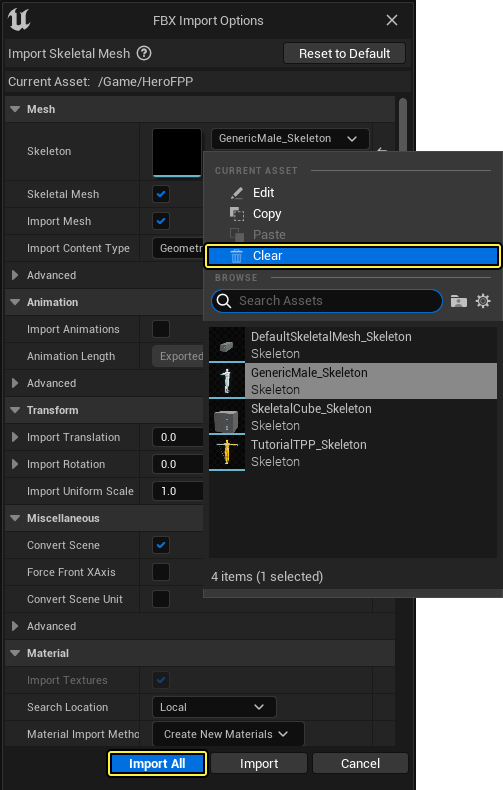
コンテンツ ブラウザ に [FBX Import Options (FBX インポート オプション)] ダイアログ ウィンドウが表示されます。
-
[FBX Import Options] ダイアログ ウィンドウで、[Skeleton (スケルトン)] セクションの下のドロップダウン メニューで [Clear (クリア)] を選択し、次に [Import All] をクリックします。
-
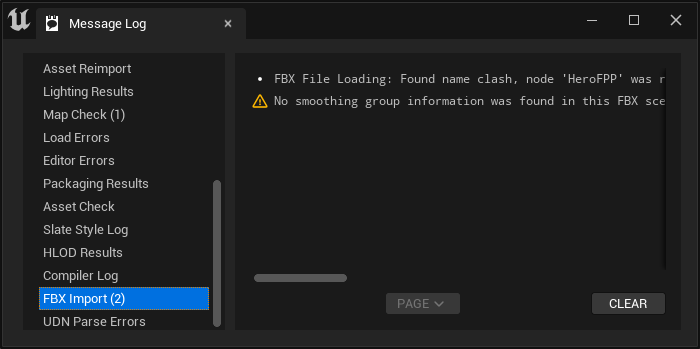
次の [Message Log (メッセージ ログ)] ウィンドウを閉じます。
このメッシュではファースト パーソン メッシュ セットアップがまだ表示されます。後のセクションでセットアップするアニメーションと連動します。
-
メイン メニュー パネルの [File (ファイル)] をクリックして、インポートされたメッシュを保存します。
-
コンテンツ ブラウザ の「Blueprints」 フォルダに戻ります。
-
[BP_FPSCharacter] アイコンをダブルクリックして、ブループリント エディタ で開きます。
-
ブループリント エディタ で [Components] タブに移動し、新しい FPSMesh コンポーネントを選択します。場合により フルブループリント エディタ を先に開きます。
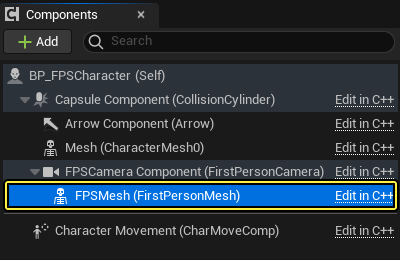
FPSMesh コンポーネントは FPSCameraComponent, の子であるため、常にカメラにアタッチされます。
-
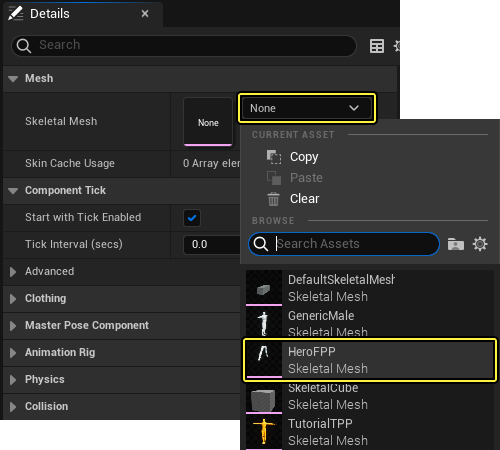
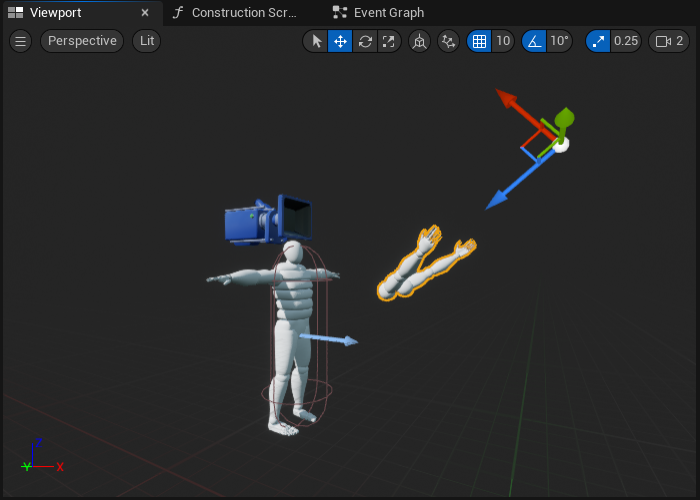
[Details] パネルに移動して [Mesh] セクションまでスクロールし、[Skeletal Mesh] にあるドロップダウン メニューをクリックします。ドロップダウン メニューで [HeroFPP] スケルタルメッシュを選択肢、腕を ビューポート に追加します。
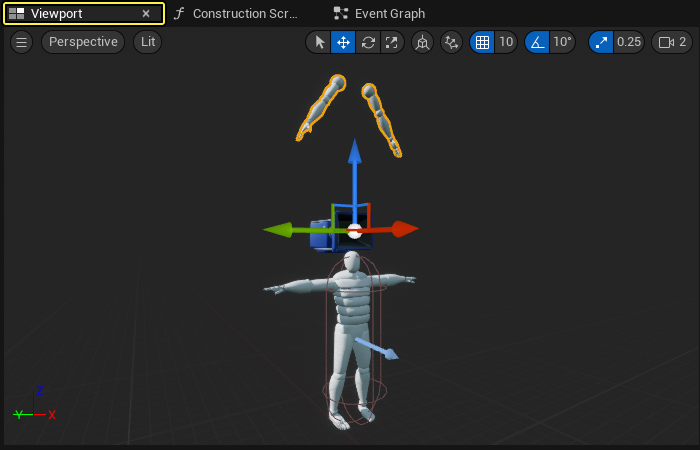
-
追加された HeroFPP スケルタルメッシュは、ビューポート 内で次のようになります。
-
追加されたメッシュの [Transform] オプションを調整します。[Location] を「{220, 0, 35}」に、[Rotation (回転)] を「{180, 50, 180}」に設定します。
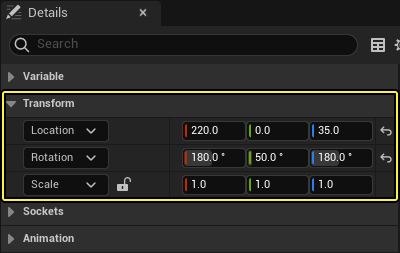
-
この設定により、HeroFPP スケルタルメッシュがカメラの前にトランスフォームします。
-
必ず BP_FPSCharacter ブループリントを コンパイル して 保存 してから、ブループリント エディタ を閉じます。
新規メッシュをゲーム内で確認する
-
レベル エディタのツールバー で [Play (プレイ)] ボタンをクリックして、ゲーム内で新規メッシュを表示します。
-
Shift + Escape キーを押す、または レベル エディタ で **[Stop (停止)] をクリックして、PIE モードを終了します。
このセクションで完了したコード
FPSCharacter.h
// Copyright Epic Games, Inc.All Rights Reserved.
#pragma once
#include "GameFramework/Character.h"
#include "Camera/CameraComponent.h"
#include "Components/CapsuleComponent.h"
#include "FPSCharacter.generated.h"
UCLASS()
class FPSPROJECT_API AFPSCharacter : public ACharacter
{
GENERATED_BODY()
public:
// Sets default values for this character's properties
AFPSCharacter();
protected:
// Called when the game starts or when spawned
virtual void BeginPlay() override;
public:
// Called every frame
virtual void Tick( float DeltaTime ) override;
// Called to bind functionality to input
virtual void SetupPlayerInputComponent(class UInputComponent* PlayerInputComponent) override;
// Handles input for moving forward and backward.
UFUNCTION()
void MoveForward(float Value);
// Handles input for moving right and left.
UFUNCTION()
void MoveRight(float Value);
// Sets jump flag when key is pressed.
UFUNCTION()
void StartJump();
// Clears jump flag when key is released.
UFUNCTION()
void StopJump();
// FPS camera
UPROPERTY(VisibleAnywhere)
UCameraComponent* FPSCameraComponent;
// First-person mesh (arms), visible only to the owning player.
UPROPERTY(VisibleDefaultsOnly, Category = Mesh)
USkeletalMeshComponent* FPSMesh;
};
FPSCharacter.cpp
// Copyright Epic Games, Inc.All Rights Reserved.
#include "FPSCharacter.h"
// Sets default values
AFPSCharacter::AFPSCharacter()
{
// Set this character to call Tick() every frame.You can turn this off to improve performance if you don't need it.
PrimaryActorTick.bCanEverTick = true;
// Create a first person camera component.
FPSCameraComponent = CreateDefaultSubobject<UCameraComponent>(TEXT("FirstPersonCamera"));
check(FPSCameraComponent != nullptr);
// Attach the camera component to our capsule component.
FPSCameraComponent->SetupAttachment(CastChecked<USceneComponent>(GetCapsuleComponent()));
// Position the camera slightly above the eyes.
FPSCameraComponent->SetRelativeLocation(FVector(0.0f, 0.0f, 50.0f + BaseEyeHeight));
// Enable the pawn to control camera rotation.
FPSCameraComponent->bUsePawnControlRotation = true;
// Create a first person mesh component for the owning player.
FPSMesh = CreateDefaultSubobject<USkeletalMeshComponent>(TEXT("FirstPersonMesh"));
check(FPSMesh != nullptr);
// Only the owning player sees this mesh.
FPSMesh->SetOnlyOwnerSee(true);
// Attach the FPS mesh to the FPS camera.
FPSMesh->SetupAttachment(FPSCameraComponent);
// Disable some environmental shadowing to preserve the illusion of having a single mesh.
FPSMesh->bCastDynamicShadow = false;
FPSMesh->CastShadow = false;
// The owning player doesn't see the regular (third-person) body mesh.
GetMesh()->SetOwnerNoSee(true);
}
// Called when the game starts or when spawned
void AFPSCharacter::BeginPlay()
{
Super::BeginPlay();
check(GEngine != nullptr);
// Display a debug message for five seconds.
// The -1 "Key" value argument prevents the message from being updated or refreshed.
GEngine->AddOnScreenDebugMessage(-1, 5.0f, FColor::Red, TEXT("We are using FPSCharacter."));
}
// Called every frame
void AFPSCharacter::Tick( float DeltaTime )
{
Super::Tick( DeltaTime );
}
// Called to bind functionality to input
void AFPSCharacter::SetupPlayerInputComponent(UInputComponent* PlayerInputComponent)
{
Super::SetupPlayerInputComponent(PlayerInputComponent);
// Set up "movement" bindings.
PlayerInputComponent->BindAxis("MoveForward", this, &AFPSCharacter::MoveForward);
PlayerInputComponent->BindAxis("MoveRight", this, &AFPSCharacter::MoveRight);
// Set up "look" bindings.
PlayerInputComponent->BindAxis("Turn", this, &AFPSCharacter::AddControllerYawInput);
PlayerInputComponent->BindAxis("LookUp", this, &AFPSCharacter::AddControllerPitchInput);
// Set up "action" bindings.
PlayerInputComponent->BindAction("Jump", IE_Pressed, this, &AFPSCharacter::StartJump);
PlayerInputComponent->BindAction("Jump", IE_Released, this, &AFPSCharacter::StopJump);
}
void AFPSCharacter::MoveForward(float Value)
{
// Find out which way is "forward" and record that the player wants to move that way.
FVector Direction = FRotationMatrix(Controller->GetControlRotation()).GetScaledAxis(EAxis::X);
AddMovementInput(Direction, Value);
}
void AFPSCharacter::MoveRight(float Value)
{
// Find out which way is "right" and record that the player wants to move that way.
FVector Direction = FRotationMatrix(Controller->GetControlRotation()).GetScaledAxis(EAxis::Y);
AddMovementInput(Direction, Value);
}
void AFPSCharacter::StartJump()
{
bPressedJump = true;
}
void AFPSCharacter::StopJump()
{
bPressedJump = false;
}
おつかれさまでした!以下の内容を学習しました。
✓ 新しいキャラクターを作成する ✓ 軸マッピングを設定する ✓ キャラクター移動関数を実装する ✓ マウス カメラ コントロールを実装する ✓ キャラクター ジャンプを実装する ✓ メッシュをキャラクターに追加する ✓ カメラ ビューを変更する ✓ ファースト パーソン メッシュをキャラクターに追加する
次のセクションで発射物の実装方法を学習する準備ができました。