The Virtual Scouting tools are similar to editor modes in the Level Editor. You can only select one tool at a time, except for the Navigation tool, which is always available.`
Main Menu Palette
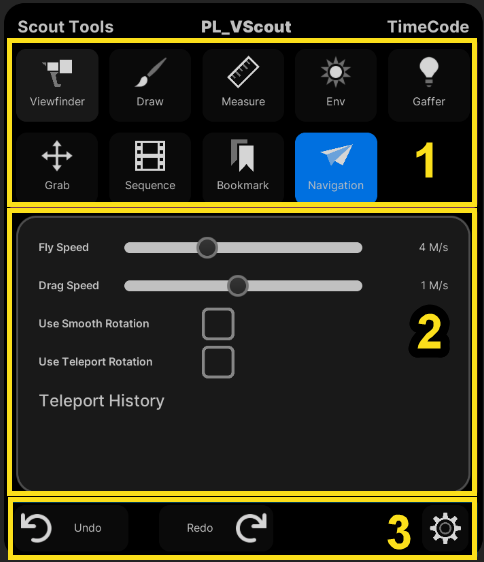
Use the Main Menu Palette to select tools, adjust the settings of each tool, and undo and redo your actions.
Controls
To view the Main Menu Palette, pull and hold the trigger on your left motion controller (or right motion controller if you have set handedness to Left). The Main Menu stays visible as long as you keep the left trigger pulled.
To interact with the Main Menu, use your right motion controller to point with the green cursor and the right motion controller trigger to click and/or drag on the Main Menu UI elements.
Settings
The Main Menu has the following sections:
- Section 1: Icons for each tool. Clicking these will switch to the selected tool.
- Section 2: Each tool's specific settings.
- Section 3: Undo/Redo and the settings menu.
Navigation Toolbar
Use the Navigation tool to move around your level. You can adjust settings for movement speed and rotation in the Main Menu Palette.
Navigation is always available while you use other tools. Navigation uses the left controller and sometimes the right controller, depending on whether the selected tool overrides the navigation input controls.
Controls
The table below lists the controls for navigation.
| Control | Action | Preview |
|---|---|---|
| Right Thumbstick, all directions (pink) | Fly-in stick direction. |  |
| Left Thumbstick, on Y-axis (pink) | Fly-in stick direction. You can use both left and right thumbsticks to fly faster. | |
| Left Thumbstick (pink) | Snap rotate, or smooth rotate if Use Smooth Rotation is selected. | 
Snap rotate |
| Left or Right side grip (Yellow button) | Drag. Press and hold to drag in the direction of your hand movement. |  |
| Left and Right side grips (both yellow buttons together) | Move the controllers together or apart to modify your size in the size in the scene. Move the controllers like you're holding a wheel to rotate yourself in the scene. |
Change size 
Rotate |
| Blue Button | Press and hold to summon the teleporter. Release to teleport to the end of your laser pointer. If Use Teleport Rotation is enabled you will be able to roll your wrist and adjust the direction you will be facing when you finish teleporting. |
Teleport 
Teleport with rotation |
Settings
In the Main Menu Palette, you can change the fly and drag speed, whether to use snap-rotate or smooth rotation on the left thumbstick, and whether to use rotation from your wrist's roll axis (forward axis) when teleporting. You can also see a history of times that you've teleported in the scene.

Draw Tool
Use the Draw tool to draw on your scene (Laser Draw), draw in space (Free Draw), and delete your drawings.
Controls
To draw on the scene, select the draw tool and pull the right trigger. Move the right controller to create a line, and release the trigger to stop drawing.
Settings
In the Main Menu Palette, you can switch between the three modes: Laser Draw, Free Draw, and Delete. You can also control the color, width, and spacing of the lines.

Measurement
Use the Measurement tool to measure the distance between two points.
Controls
To create measurements point the laser pointer, pull and hold the trigger and drag from the start position to the end point. The measurement updates as you drag.
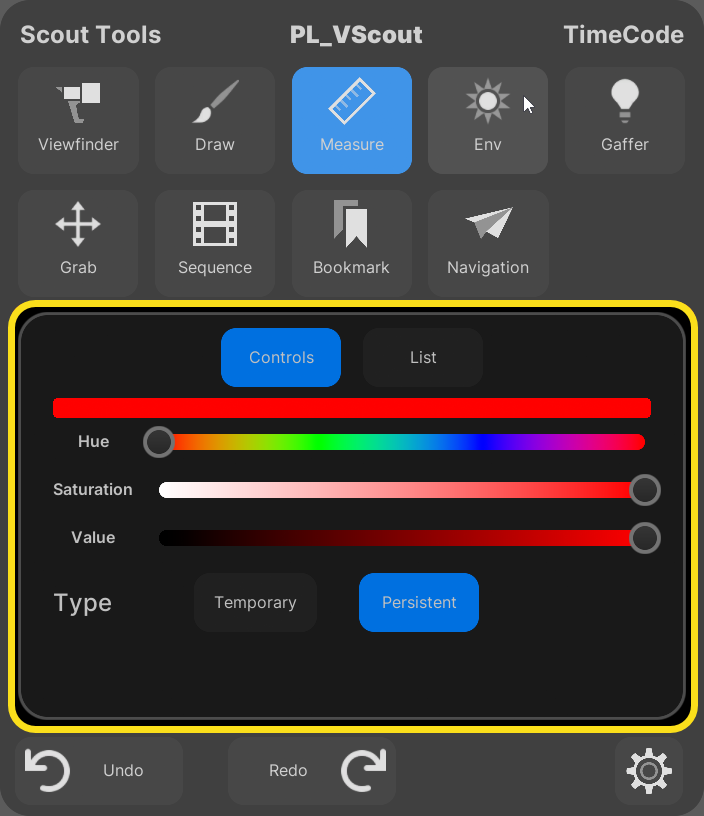
Settings
In the Main Menu Palette, you can modify the color of your measurements or swap the tool type. Use the Persistent type to create measurements that are visible to all users in a multi-user session and remain in the environment after you stop using the measurement tool. Use the Temporary type to make measurements that are only visible to you, and are removed as soon as you swap to another tool.
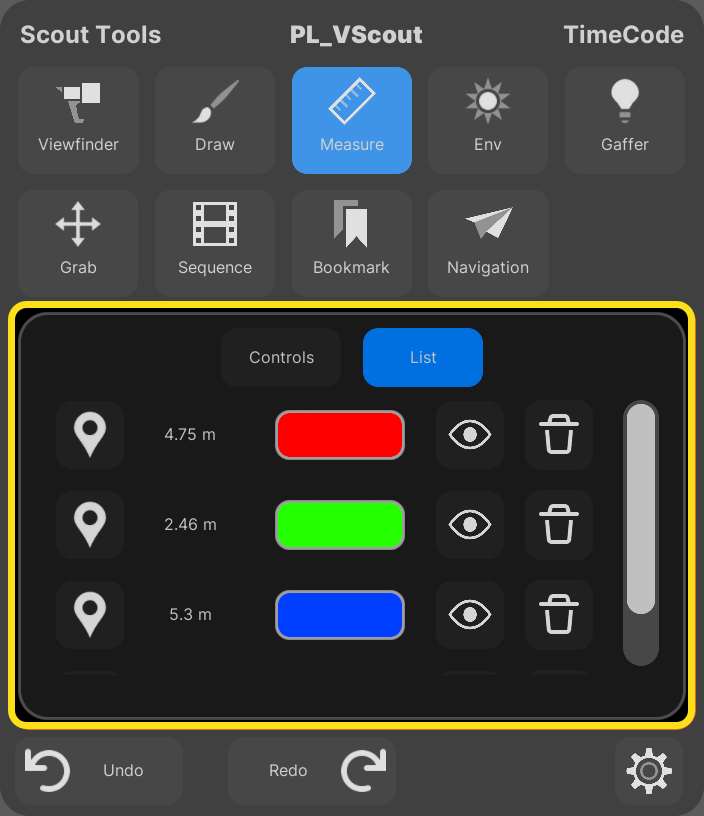
The Measurement tool List tab displays all the measurements currently in the level. For each measurement, you can toggle its visibility, see a line from your location to the measurement, teleport to the measurement, and delete the measurement.
Environment Light
Use the Environment (Env) tool to control the placement of the Sun and Moon light in your level.
For this placement to work you must have two directional lights in your level and your Sun and Moon must have the following properties set:
Atmosphere Sun Light=TrueAtmosphere Sun Light Index=0(for the Sun)Atmosphere Sun Light Index=1(for the Moon)Forward Shading Priority=0(for the Sun)Forward Shading Priority=1(for the Moon)
Controls
By default, the tool starts with the sun selected. To move the sun, point your laser pointer and pull the right-hand motion controller trigger. Hold the trigger and move your laser pointer, and the sun follows the direction of your pointer.
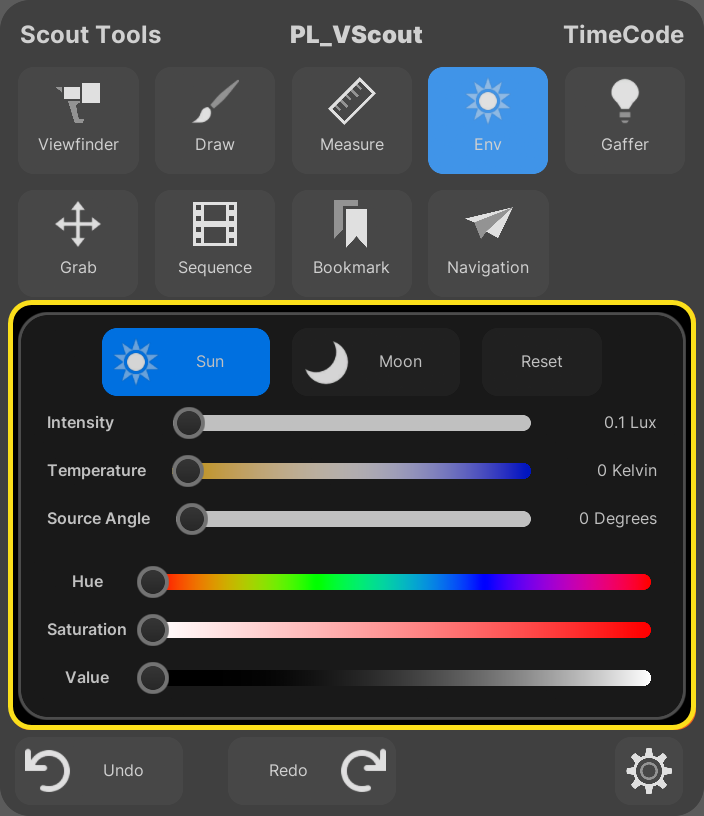
Settings
In the Main Menu Palette, you can control the properties of the Sun and Moon lights, such as Intensity, Temperature, Color, and Source Angle, and also reset the properties to default values.
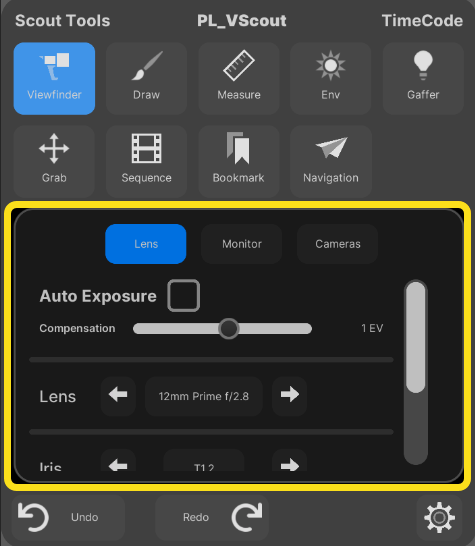
Viewfinder
Use the Viewfinder tool to take screenshots of the environment with an on-screen camera. You can control various properties of the shot, such as aperture and focus.
Controls
You can modify properties, take screenshots, and create camera objects using the controls in the following table.
| Control | Action |
|---|---|
| Green Button | Summons on-screen lens controls. |
| Trumbstick (left/right) | Swaps the controlled property (Lens, Aperture, Focus). |
| Thumbstick (up/down) | Modifies the controlled property. |
| Blue Button | Captures a screenshot. |
| Trigger + Blue Button | Creates a camera object. |
| Trigger (hold) | Picks up a camera when overlapping it with the laser pointer. Camera must be near the motion controller. |
Settings
In the Main Menu Palette, use the Lens tab to change settings for the lens, such as Exposure, the type of Lens, and Iris.
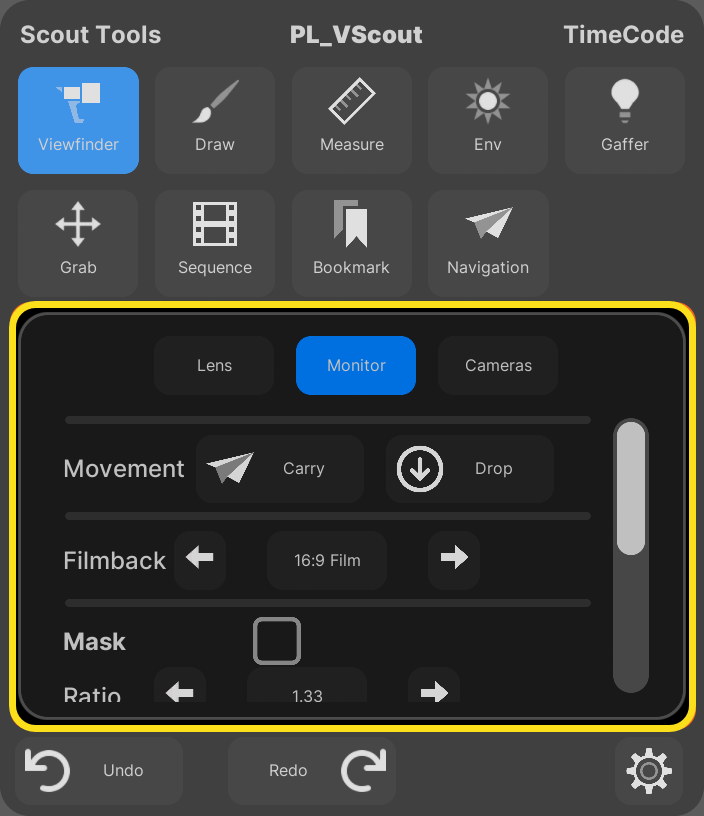
Use the Monitor tab to pick up and drop the monitor, as well as change monitor settings like Filmback and Mask.
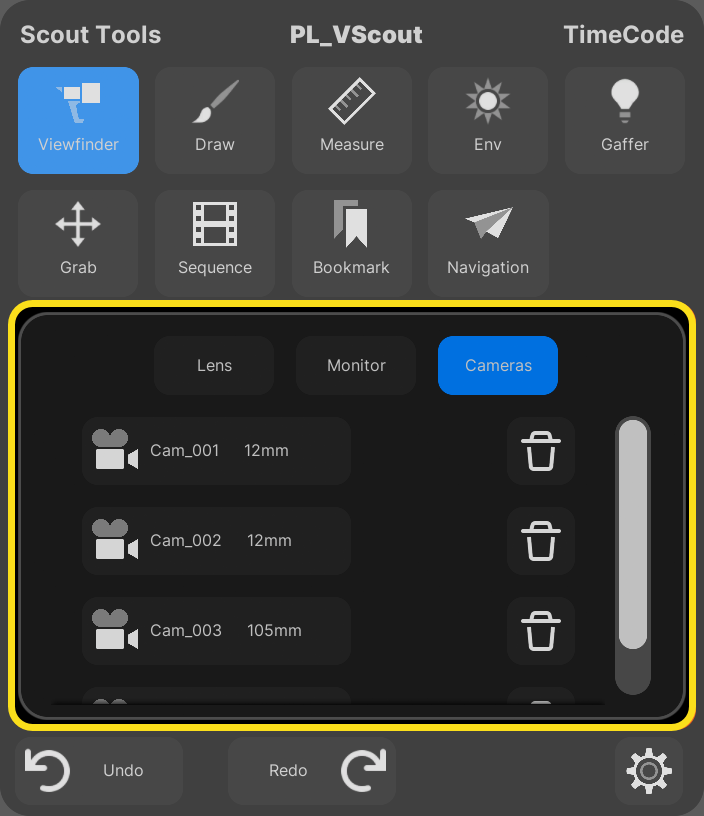
Use the Camera tab to view a list of created camera objects and delete them.
Screenshots are saved to your /[ProjectName]/Saved/Screenshots/ directory.
Sequencer
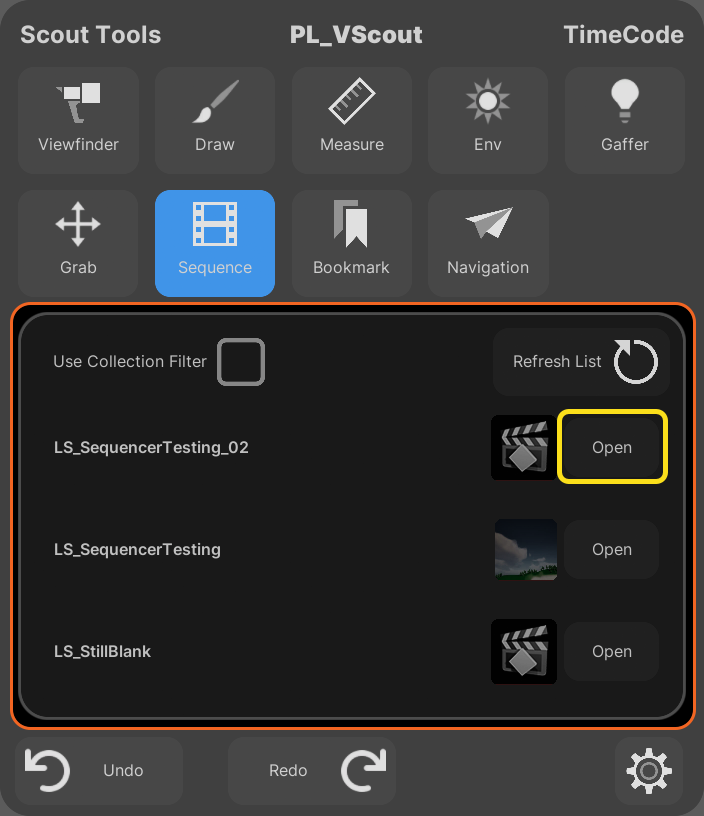
Use the Sequencer tool to load a level sequence and control playback.
Controls
To open a sequence, click the Open button next to its thumbnail in the Main Menu Palette.
The level sequence opens in the editor and a small console widget appears above your right motion controller.
In a multi-user session, to make the level sequence open for the other users, enable the Concert.EnableOpenRemoteSequencer variable.
To close the sequence, click the Close button with your laser pointer.
When a sequence is open, you can use the controls in the following table.
| Control | Action |
|---|---|
| Green Button | Stop/start playback |
| Right Thumbstick (left/right) | Scrub backward/forward |
| Right Trigger + Move (left/right) | Scrub backward/forward |
| Right Thumbstick Button | Drop/Pickup Sequence console |
Settings
In the Main Menu Palette, the Sequencer tool has Use Collection Filter set to true by default. Use the setting to curate which Level Sequences are available in Virtual Scouting. If Use Collection Filter is set to false, then all Level Sequences in the project are visible to the Sequencer tool.
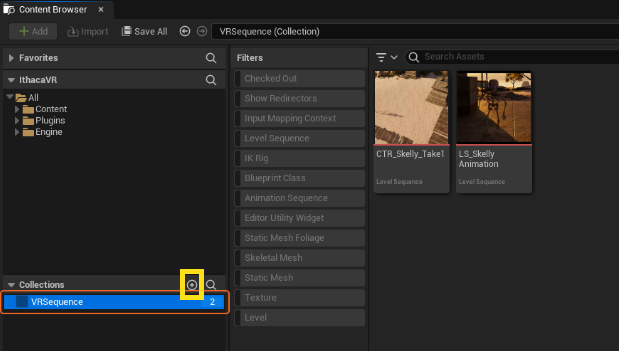
To create a collection of sequences for Virtual Scouting, follow these steps:
- In the Content Browser, go to Collections and click the Add (+) button.
- Name the collection.
-
Drag some Level Sequences into the collection.
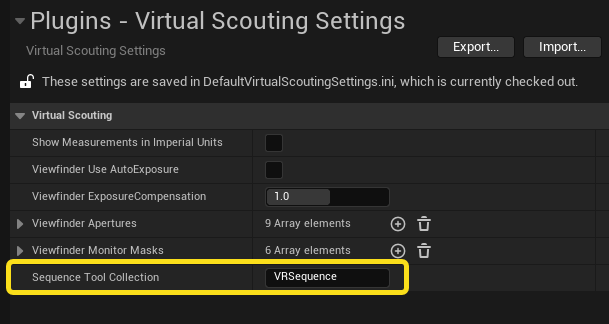
-
In Project Settings > Virtual Scouting Settings, input the name of your collection into the Sequence Tool Collection field.
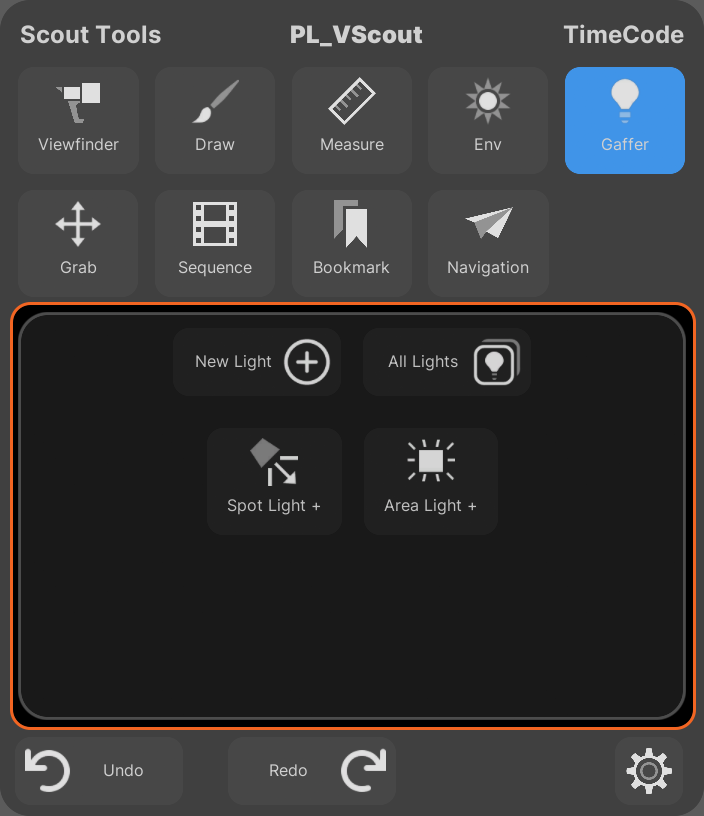
Gaffer
Use the Gaffer tool to create spot and area (or "rect") lights.
Controls
| Control | Action | Preview |
|---|---|---|
| Right Trigger |
|
Creating and placing a light 
Moving a light 
Moving a light's point of interest |
| Thumbstick (up/down) + Right Trigger Held | Pulls or pushes the light along your laser pointer. | |
| Thumbstick Button | Swaps from 3D control of the light position to the light sticking to any collision geometry. |
Settings
In the Main Menu Palette, you can select whether to create a Spot Light or an Area Light.
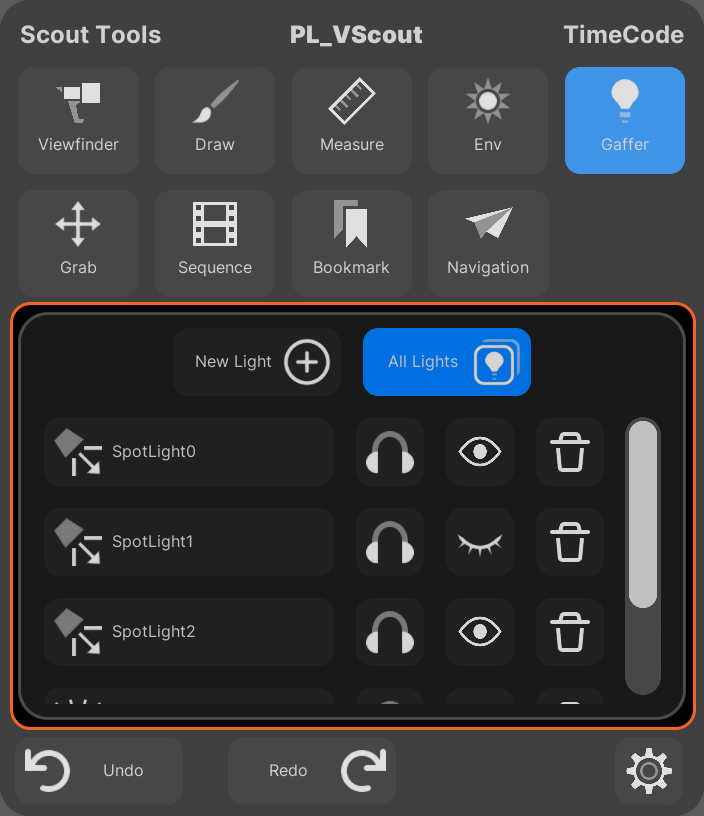
The All Lights tab has buttons to toggle visibility, solo, delete, and select a light. If you hover over a light's name, a line appears in the environment pointing to the light you're highlighting.
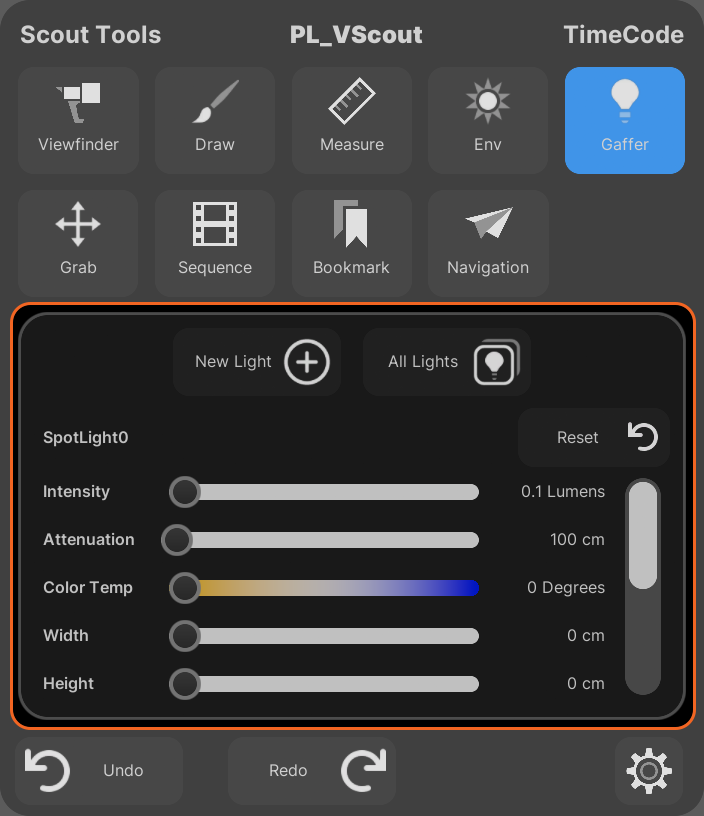
When you select a light you can modify its properties using the sliders. You can control the following properties:
- Intensity
- Attenuation
- Cone Angle
- Source Size
- Width
- Height
- Barndoor angle
- Color Temperature
- Color
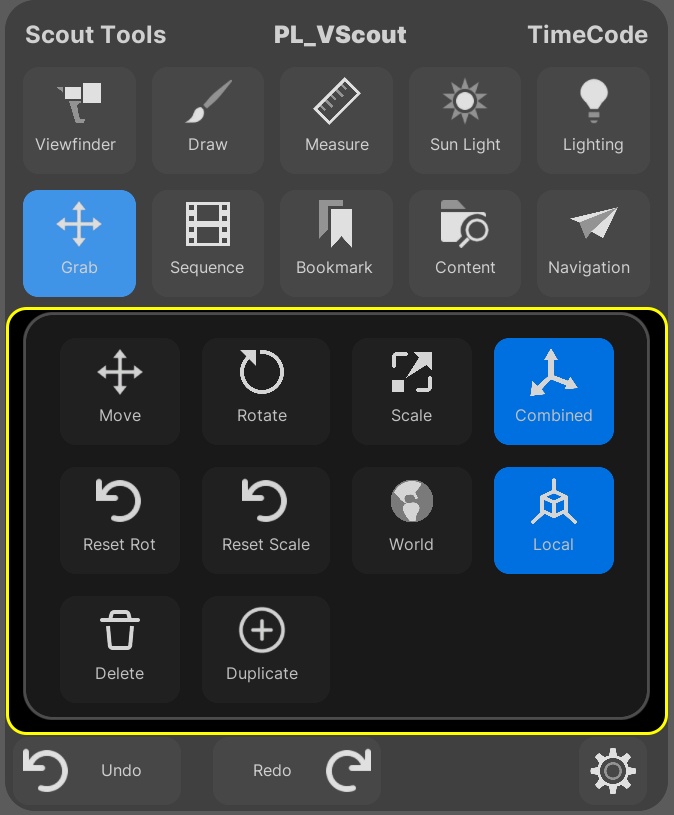
Grab Tool
Use the Grab tool to manipulate the selected actors in the environment with a transform Gizmo.
Controls
To manipulate actors and gizmos, use the controls in the following table.
| Control | Action |
|---|---|
| Right Trigger | Selects an Actor. |
| Right Trigger | Moves the selected Gizmo handle. |
| Green Button | Swaps the Gizmo mode between the following modes:
|
| Blue Button | Swaps the Axis between Local and World alignment. |
Settings
Use the Main Menu Palette to change the Gizmo between local and world space, swap between modes, duplicate or delete a selected actor, or reset the selected actor's rotation or scale back to default.
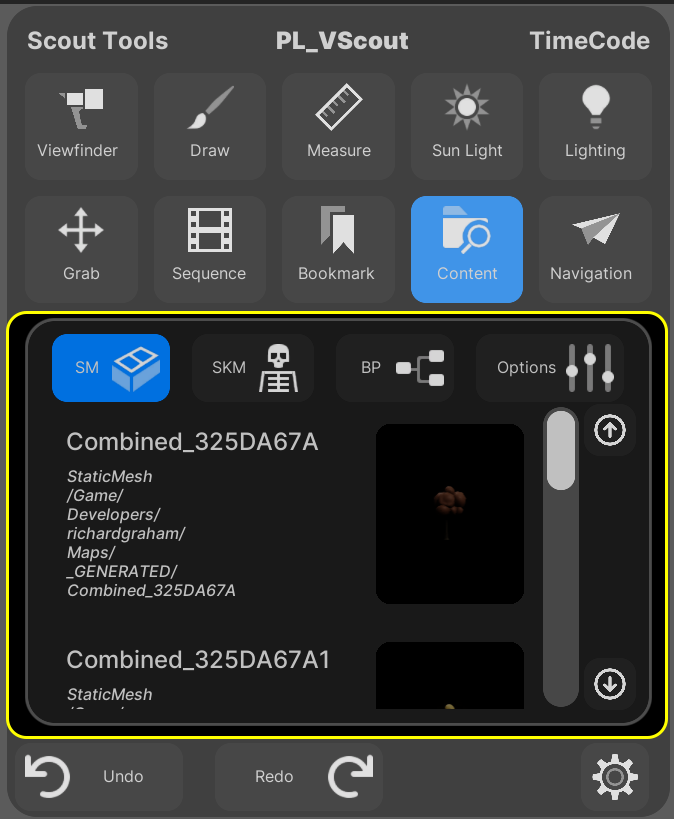
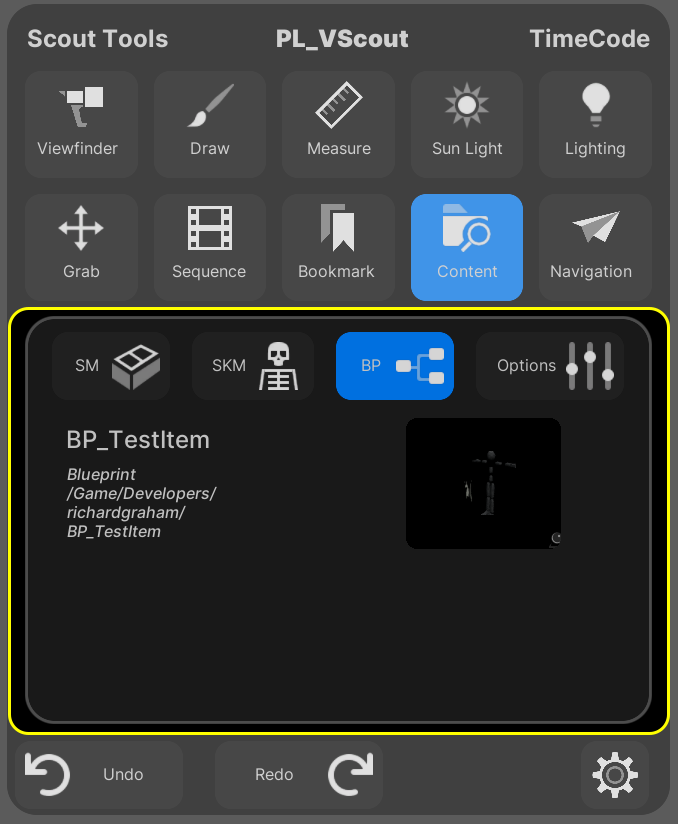
Content Placement Tool
Use the Content (or Placement) tool to place static and skeletal meshes and Blueprints in your level. Select an asset from the Palette menu. This will spawn a preview copy of the asset attached to your laser pointer. Pull the trigger again to drop the asset into the level.
 (convert:false)
Controls
| Control | Action |
|---|---|
| Right Trigger | Selects an asset from the Main Menu Palette. |
| Right Trigger | Spawns the placed asset in your level. |
| Right Thumbstick (left/right) | Rotate the object while placing. |
| Right Thumbstick (up/down) | Move the object away or towards your controller when in free placement mode. |
| Right Thumbstick Button | Swap between surface snapping mode and free placement mode. |
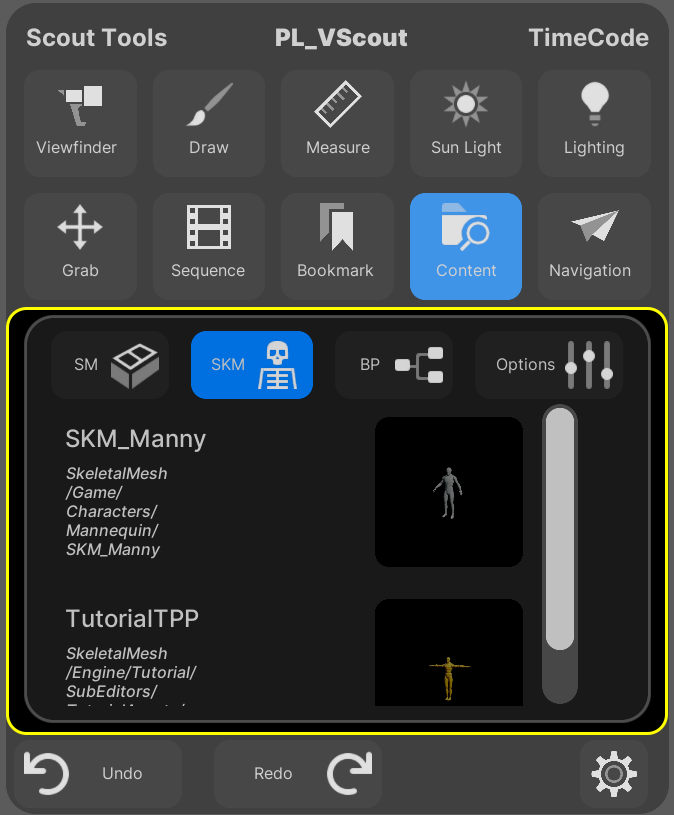
Content Browser
In the Main Menu Palette, under Content, you can use the SM (static meshes), SKM (skeletal meshes), and BP (Blueprints) buttons to browse assets of those types in the environment.
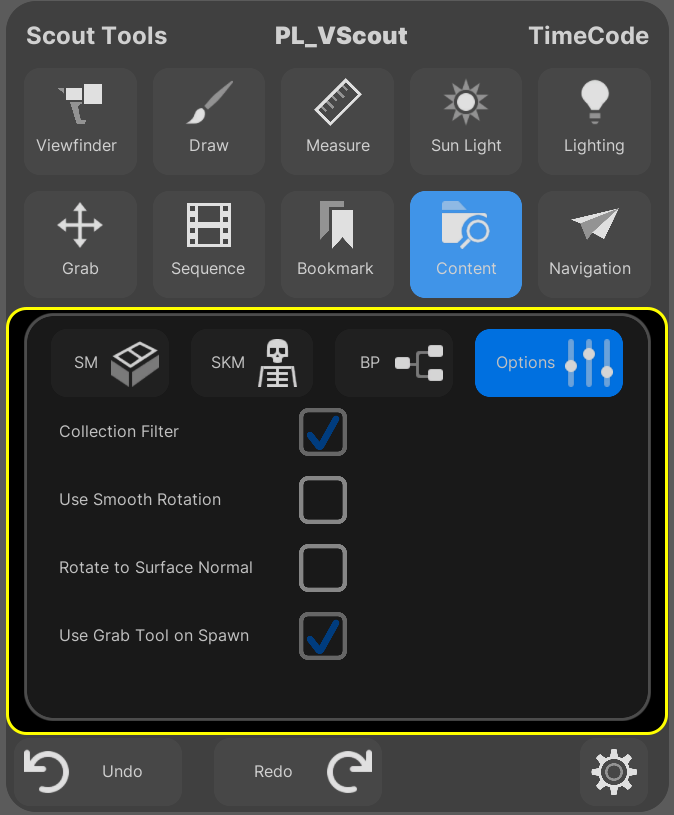
Settings
In the Main Menu Palette, under Content, click Options to toggle the following settings:
- Collection Filter - Whether the assets listed come from the Placement Tool collection or all of your project content.
- Use Smooth Rotation - Whether to rotate smoothly the yaw axis of assets while you place them.
- Rotate to Surface Normal - Whether the roll and pitch rotations snap to the surface of level objects.
- Use Grab Tool on Spawn - Whether to automatically swap to the Grab tool after placing an asset. This lets you immediately use a transform gizmo on the asset.
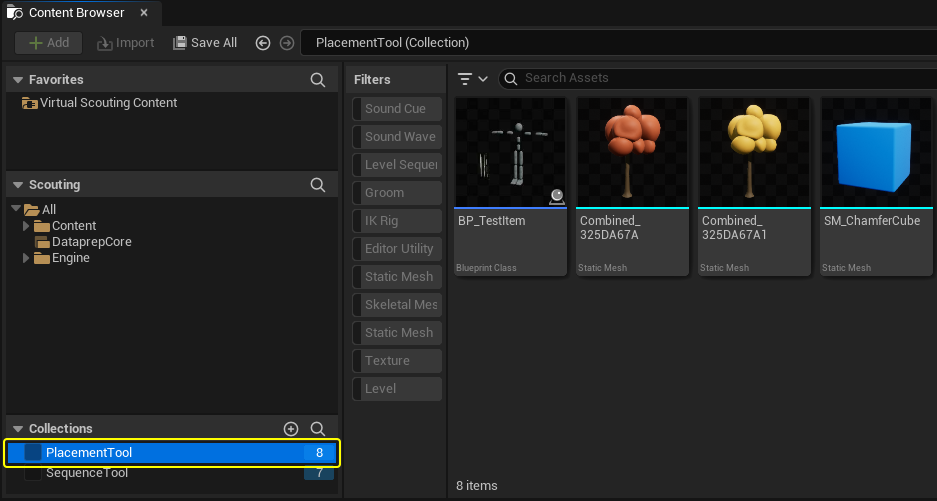
Create a Placement Tool Collection
The Placement tool has Collection Filter set to True by default. Use a named collection to curate what assets are available for placement. If Collection Filter is set to False, then all mesh assets in the project are visible to the Placement tool.
To create a Placement Tool collection, follow these steps:
- In the Content Browser, go to Collections and click the Add (+) button.
- Name the collection.
-
Drag some assets into the collection.
To learn more about content browser collections, see Creating Collections.
-
In Project Settings > Virtual Scouting Settings, input the name of your collection into the Placement Tool Collection field.
