
Setting Up SMPTE 2110 in Unreal Engine
This page contains everything you need to know to set up and deploy SMPTE 2110 in Unreal Engine using Nvidia Rivermax. This guide is intended for users who require high bandwidth SMPTE 2110 functionality, including the Broadcast and Film industry.
Prerequisites
The following are the hardware and licensing requirements to integrate SMPTE 2110 using NVidia Rivermax:
Hardware
Rivermax is an SDK developed by NVIDIA that works with Mellanox Connect-X network cards.
Although there are other 2110 producers, Unreal Engine 5.4 SMPTE 2110 features (at the time of publication) specifically require NVIDIA Rivermax.
Supported Network Cards
Driving an LED wall requires Bluefield for PTP (precision time protocol) accuracy. The list below describes the network cards (NICs) currently supported by Unreal Engine:
| Network Card (NIC) | Information |
|---|---|
| Connect-X 6 BlueField-2 | We recommend this family of supported NICs, as it has PTP (precision time protocol) accuracy on Windows systems. PTP is required if driving an LED wall. |
| Connect-X 6 | This family of NICs is supported, but is limited because it does not have PTP accuracy on Windows systems. |
| Connect-X 5 | This family of NICs is supported by Rivermax SDK, but we do not recommend it for new installations. |
For a more detailed view, see the NVIDIA website (you need an NVIDIA account to view the site).
GPUDirect capabilities are restricted to professional GPUs starting from the 4000 class and up, and require Ampere architecture or a future architecture generation (for example, RTX 6000 Ada, RTX 5000 Ada, RTX 4500 Ada, or RTX 4000 Ada). For a full list of GPUs that support GPUDirect, please refer to the NVIDIA website.
Additionally, you need a motherboard supporting a resizable bar option, which may require a BIOS firmware update.
Software
To use Rivermax with Unreal Engine, we recommend you follow the deployment guide found on the NVIDIA Rivermax website, Windows DPU Deployment (version 2.51).
| Unreal Engine Version | Rivermax SDK Version | WinOF-2 Version | DPU Version | BlueField-2 Firmware Version |
|---|---|---|---|---|
| 5.3 | 1.20.10 | 3.10.52010 | 2.21 | 24.35.1012 |
| 5.4 | 1.41.11 | 24.1.50000 | 2.51 | 24.40.1000 |
Rivermax SDK Installation Path
The default installation path for the RIvermax SDK is ‘C:\Program Files\Mellanox\Rivermax\lib’.
In Unreal Engine 5.4 and onward, in addition to using the default path, you can specify the installation path for the Rivermax SDK using the environment variable $RIVERMAX_PATH.
License
You need a license to use NVIDIA’s Rivermax SDK with Unreal Engine. Contact NVIDIA to obtain a license.
By default, the system expects to find the license next to Rivermax DLL. You can use the environment variable $RIVERMAX_LICENSE_PATH to specify a different location (such as a network drive) to look for the license.
Deployment Steps
The following deployment steps are based on the official NVIDIA documentation.
NIC Options
Connect-X 6
Connect-X 6 deployment requires you to install the WinOF2 driver and Nvidia’s firmware tool before moving to the next step:
-
Install Mellanox MLNX WinOF2 driver for your operating system.
-
Install Nvidia’s firmware tool to update the NIC’s firmware.
-
Reboot your system.
Connect-X 6 BlueField-2
Like the Connext-X 6 network cards, BlueField-2 NICs require you to install the WinOF2 driver and Nvidia’s firmware tool. It also needs Putty, Python, and the deployment package you will install on the NIC’s DPU.
-
Install Putty
- The deployment script uses Plink and requires Putty.
-
Install Python 3.10.1
- Add Python to PATH.
-
Install the Mellanox MLNX WinOF-2 driver.
-
Install Nvidia’s firmware tool.
-
The MFT version is specified in the WinOF-2 Release Notes on the WinOF-2 Download page.
-
Reboot your system.
-
Make sure the management port of the BlueField-2 card is wired with internet access. It will be required during the deployment.
-
Download the Rivermax BlueField-2 (DPU) package.
-
Browse and log in to Rivermax Getting Started.
-
Go to the Archive section.
-
Find the recommended Rivermax SDK version.
-
Download
DPU.zip. -
Extract it to
C:\DPU.
-
-
Download the BlueField-2 BFB image. Nvidia’s deployment guide provides the download link.
-
Download the BFB image and place it in
C:\DPU\BFB.These paths are hard-coded in deployment scripts.
-
-
Set up the configuration file used during deployment.
-
The file is located in
C:\DPU\configuration_file.txt -
You need to configure the PTP IP option if you want to use PTP.
-
-
Launch DPU deployment.
-
Run the following file from an administrator command line:
C:\DPU\DPU_Install.bat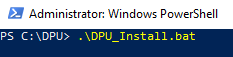
-
-
Power down the computer, and then power it on again. Do not only reboot.
-
Configure your DPU.
-
Run the following file from an administrator command line:
C:\DPU\configure_dpu_setting.bat
-
Mellanox Firmware Update
-
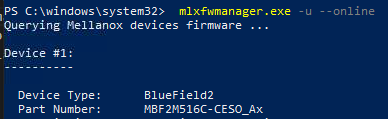
Update Mellanox’s firmware to the latest version.
-
Open a command prompt window with administrator privilege
- Run
mlxfwmanager.exe -u --online
If you don’t have administrative privileges, you will get this error:

- Run
-
-
If the firmware needed an update, power off your computer once it is done, then power it up again.
PTP Setup for BF2 Cards
You need to connect through ssh to the management port of the BF2 card. Make sure you have the username and password used during the deployment of BF2.
-
For PTP to work, you need to have your cable wired to the p0 interface which corresponds to the QSFP in the middle of the card.
-
The expected domain for BF2 PTP setup is 127.
-
Using a command line window, enter the following:
Command Line
putty -ssh root@Your_BlueField_2_Managment_IP 22 -pw Your_BlueField-2_Password
-
Set up a DOCA container:
-
In the command line window, enter the command:
./create_container.sh -
To validate functionality, run:
tail -f /var/log/doca/firefly/ptp4l.log | grep -E 'ptp|phc' -
If PTP is found, the output will resemble the following image and display the clock ID of the GrandMaster it is using. If PTP isn’t found, the output will display a message saying it’s using the local clock.

-
You can also run
firefly_monitor.shfrom root’s home directory and see if PTP is locked to the expected GM: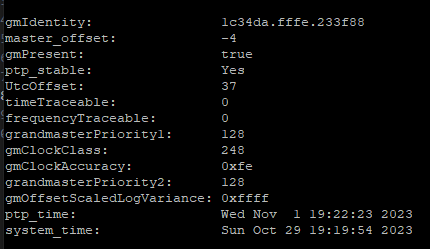
The output of firefly_monitor.sh.
-
Rivermax Setup
-
Enable support for dynamic RTP headers in the Mellanox driver:
-
Find the device you want to configure by running the following from a command line with admin privileges:
mlxconfig.exe query -
In the outputs, look for the line:
Device: (MST_DEVICE)
-
Using a command line with admin privileges, run the following command to enable dynamic header support for this device:
mlxconfig.exe -d (MST_DEVICE) set FLEX_PARSER_PROFILE_ENABLE=4 PROG_PARSE_GRAPH=1
Running a command to enable dynamic header support for your device.
-
-
Power down the system, then power it on again.
-
Set up the Rivermax license:
-
By default, Rivermax will look in its installation directory for a license file.
- For example
C:\Program Files\Mellanox\Rivermax\lib\Rivermax.lic
- For example
-
You can change the installation directory using an environment variable pointing to your license file.
RIVERMAX_LICENSE_PATH
-
Optional: GPUDirect Setup
-
Enable the resizable bar option in your BIOS.
-
For optimal performance, you should place the Network Card and GPU on the same root complex.
-
Validate the BAR1 available memory.
- Use the Nvidia Control Panel - System information to validate it’s enabled.
-
Create a new environment variable to use CUDA with Rivermax.
-
RIVERMAX_ENABLE_CUDA -
Set its value to 1.
-
-
During initialization, if the system finds a compatible GPUDirect device, it will initialize the library with this support. If not, it will fall back to the system memory path.