
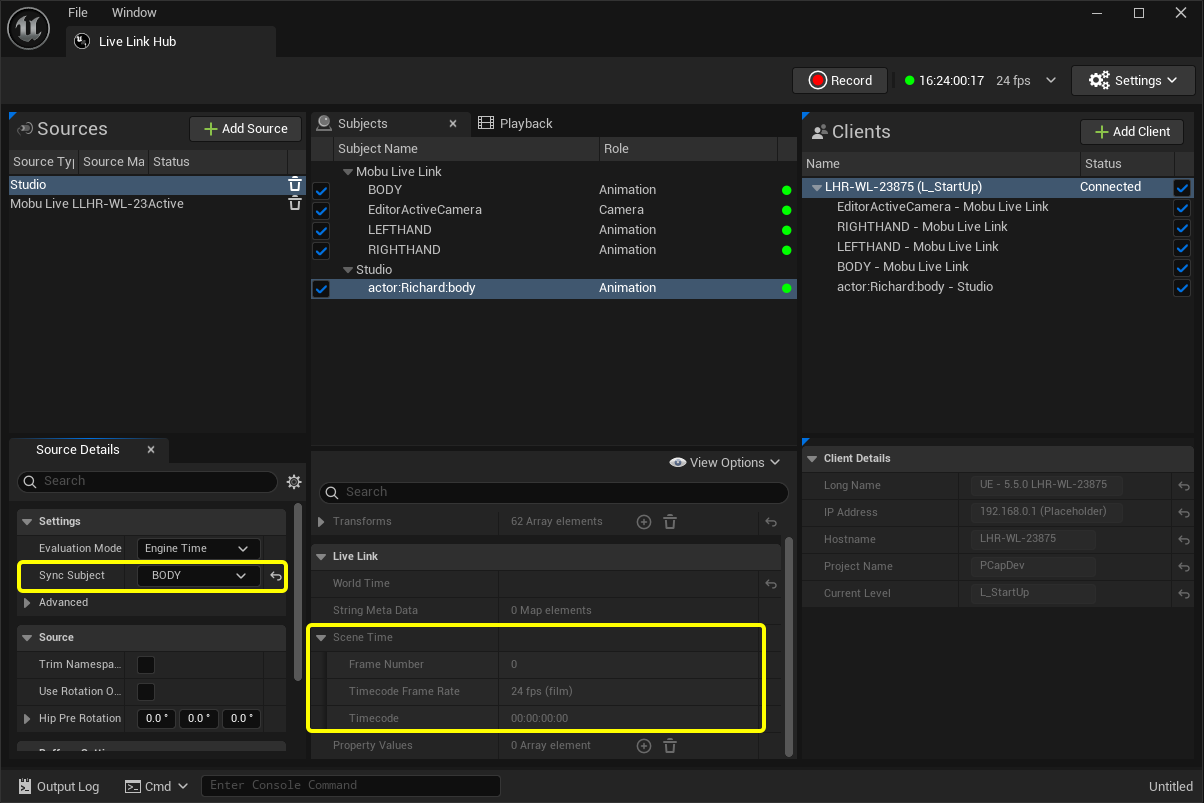
This reference provides information about the layout and functionality of each panel in the Live Link UI
Live Link Hub UI

-
Sources: Clicking on an individual source will load its details in the Source Details panel below.
-
Source Details
-
Subject List: Clicking to highlight an individual subject will load its details in the Subject Details panel below.
-
Subject Details: Use this panel to modify a subject’s data with Translators, Preprocessors, and Remappers.
-
Clients: Clicking to highlight a source will list its details in the panel below.
-
Client Details: A read-only list of a client’s IP, Hostname, UE Project Name, and the level open when first connected to Live Link Hub.
-
Record button
-
Timecode options
-
Settings and Plugins dialogs
Subject Details
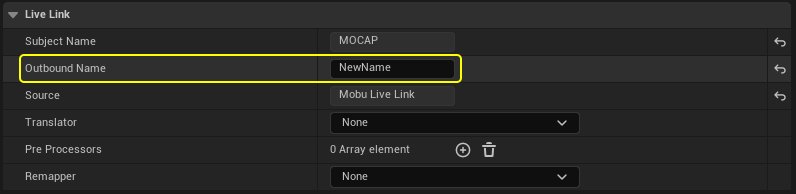
Outbound Name
You can modify the name of a subject. The modified outbound name will be what is received in the connected clients.
Translators
Translators provide a way for you to mutate animation role data into transform role data and vice versa.
Animation to Transform is a way for you to pick a single bone from an animation role’s hierarchy and stream just that bone’s transform. Transform Roles can be consumed by Live Link Controllers and Blueprints.
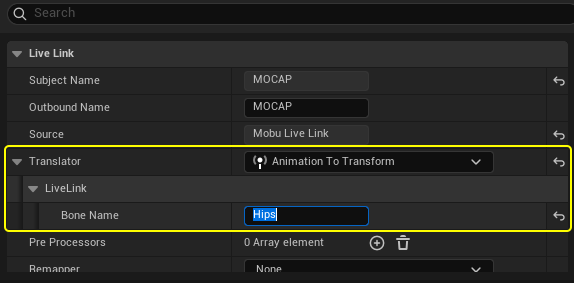
Example Translator taking the "Hips" transform from a skeleton and converting it to a Live Link transform
Transform to Animation takes a transform and reformats it as a single bone hierarchy. Animation roles can be consumed by Anim Instances
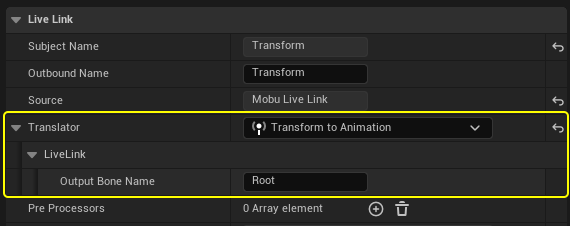
Example Translator taking a transform source and reformatting it as a single bone "root" animation role.
Pre-processors
Pre-processors provide a way for you to modify all data flowing through a role. You can swizzle axes, add a world-space offset and/or rotation.
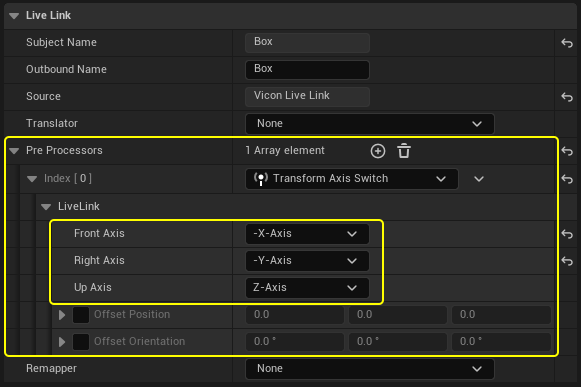
Example of a pre-processor showing swapping a right-handed coordinate system to UE’s left-handed coordinate system.
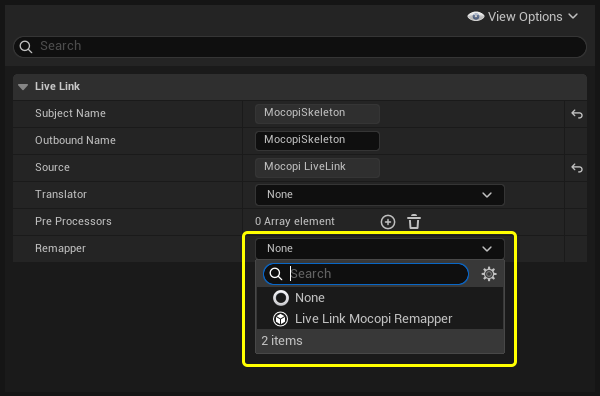
Live Link Remappers
Live Link Remappers are code-only assets that provide a way for plugin developers to remap data in the same way as ULive LinkRetarget and ULive LinkRemap assets do in UE. Developers can provide users with bone name remapping and conversion functions (for example, Quaternion rotation to Euler rotation conversion.)
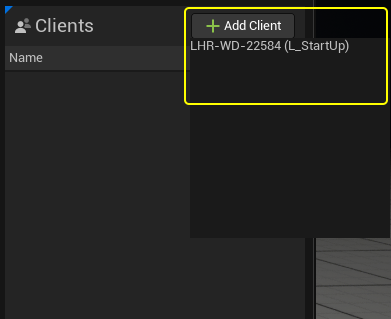
Clients
Clients are the Unreal Engine sessions Live Link Hub is or has been connected to in the current session. You can add clients by navigating to the Add Client button. You can remove a client by clicking to highlight it and pressing delete on your keyboard.
Virtual Subjects
Virtual subjects let you merge two or more subject’s data into a single subject for consumption in Unreal Engine.
To create a virtual subject, navigate to Add Source and select Add Virtual Subject.
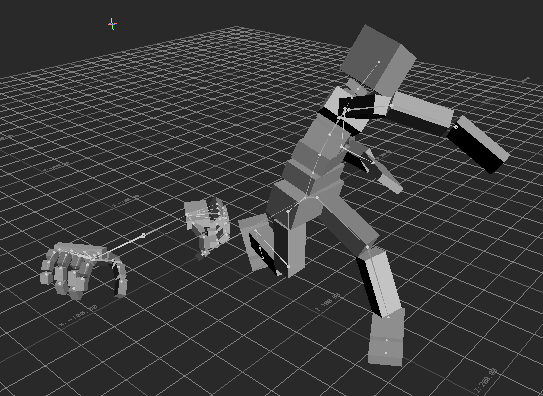
Attachments
A LiveLinkHubAnimationVirtualSubject provides a way for you to merge skeletal data and also reparent bones in the hierarchy using Attachments.
To create an attachment, add an entry to the attachments array in the details of a LiveLinkHubAnimationVirtualSubject:
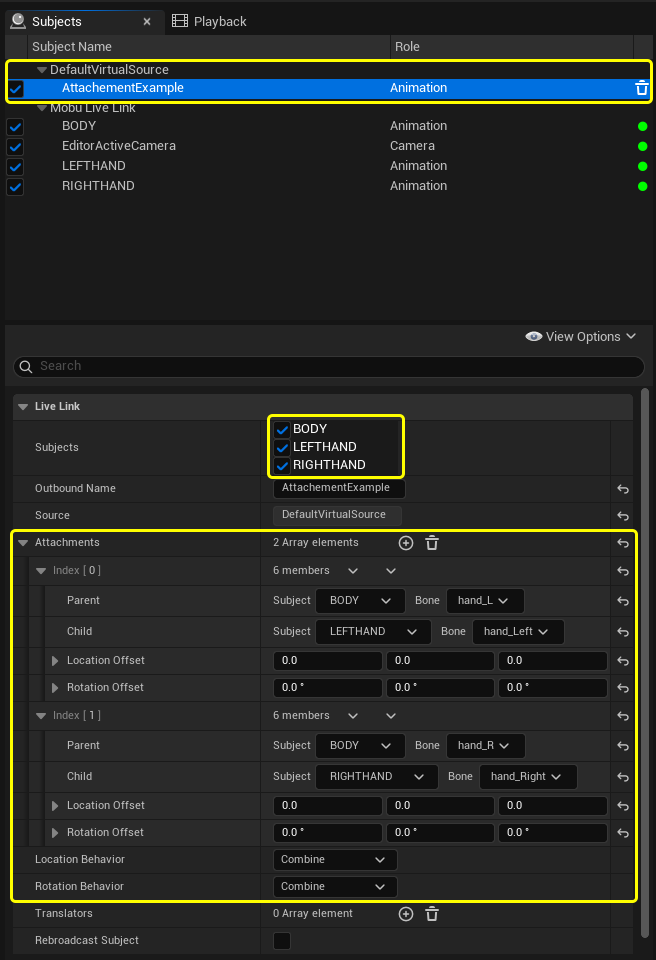
In this entry you must define the parent subject and the bone to attach to, the child subject and the bone to be attached and any offsets you need.
If you have a system with separate motion capture gloves and body hardware, you can use attachments to merge the two subjects into a single subject and apply that to a skeletal mesh in Unreal Engine.

You will need a skeleton that is compatible with the merged bone hierarchy.
Sync Parent
On a source you can set the Sync Parent and this will retime all of the data coming from that source. For example, this means you can take a 60fps source and retime it to 30fps. The Sync Parent’s frame rate will define the frame rate for all of a source’s subjects.
This Rokoko subject has a default rate of 24fps and no timecode embedded.

The same subject in UE, with its rate retimed and timecode embedded.
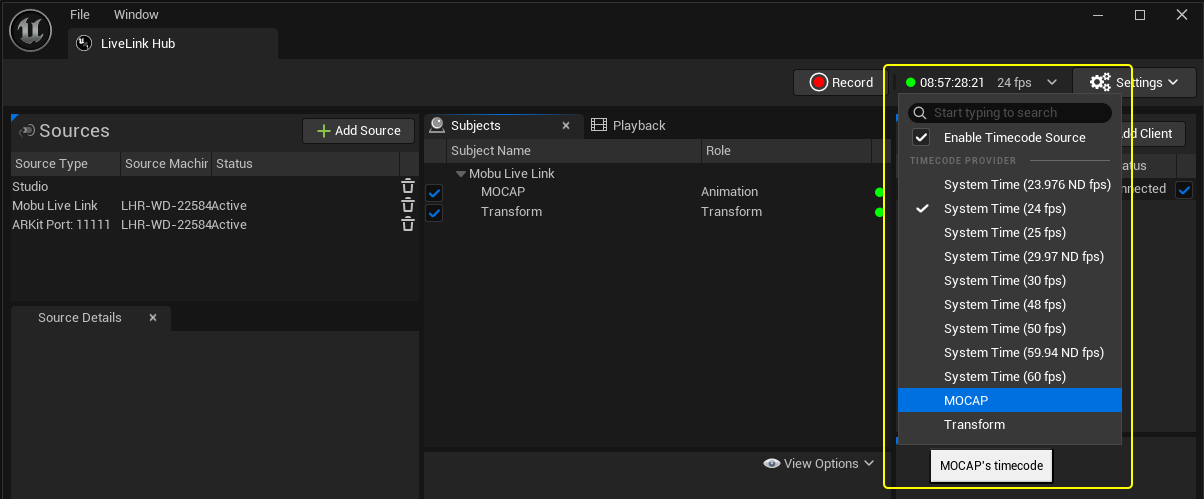
Timecode
The timecode dropdown lets you choose a timecode rate from a list of common rates. You can also make a single subject your timecode source. Selecting "Enable Timecode Source" will ensure any connected clients have their timecode provider overridden - this option makes Live Link Hub the source of timecode for the connected clients.
Plugins
Many third-party manufacturers of motion capture hardware publish Live Link plugins. These plugins (which can be loaded into an Unreal Engine project) can also be accessed by Live Link Hub.
Plugins you acquire from Fab are installed here:
…/Engine/Plugins/Marketplace/…
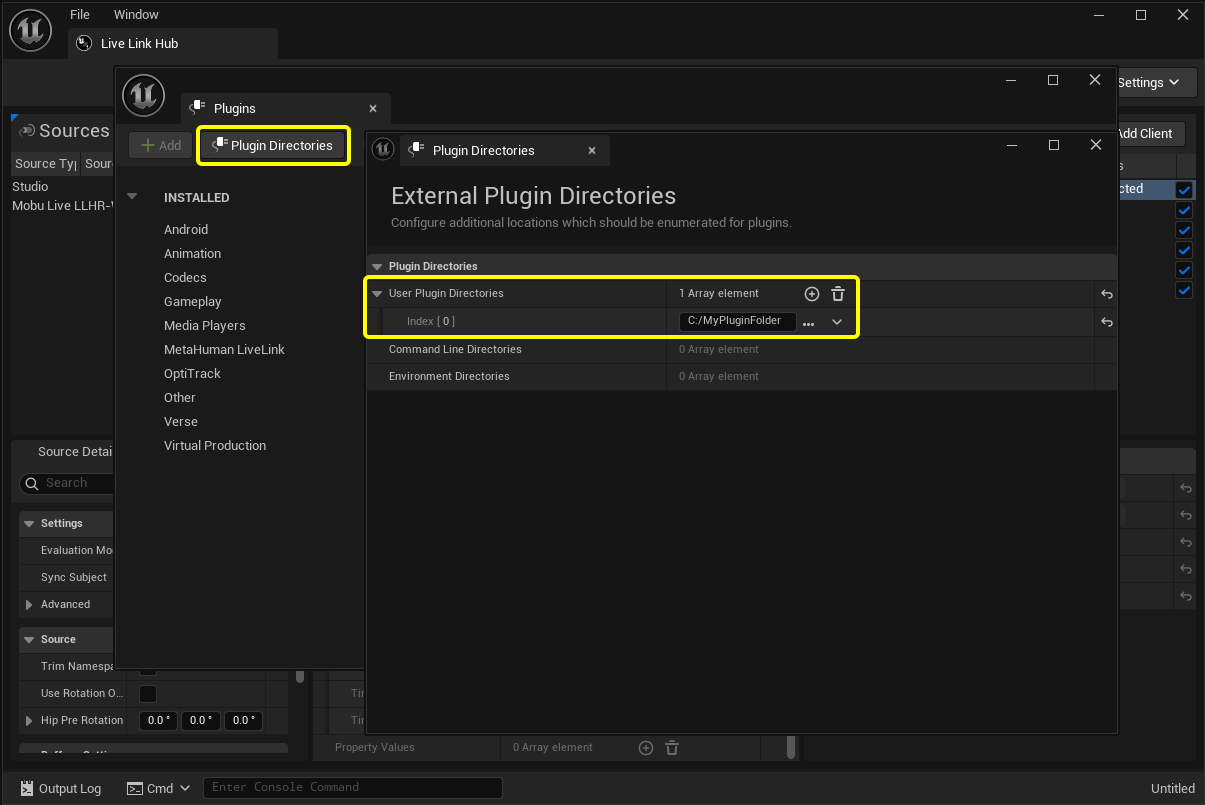
If you are using UEFN or have a plugin installed in a non-default location, you can load your plugin into Live Link Hub by the following these steps:
-
Open the Plugin Browser window.
-
Click Plugin Directories
-
Add an entry to the User Plugin Directories array. The entry should point to a folder containing the plugin(s) you want to access.
Only uplugins with the
"SupportedPrograms": [ "Live Link Hub" ]property will be Loaded. -
Restart Live Link Hub.
-
The plugin’s sources will be available from the Add Source button.
The list of External Directories is saved in an INI file, in the following location:
%LocalAppData%\UnrealEngine\LiveLinkHub\Config\LiveLinkHubPlugins.ini
Saved Configurations
Live Link Hub allows users to save the state of the sources, subjects and clients. To load a previously saved config, go to File > Open Config…
To save a config, navigate to File > Save Config.
Selecting New Config will clear all the sources, subjects, and clients, as if the application has just been started.
Live Link Hub configs are stored as .json files. They are human-readable and can be opened and edited in a text editor.
Live Link Hub Settings
To access the settings of Live Link Hub navigate to the Settings button and choose settings from the drop-down.
Recording Live Link Data
Live Link Hub lets you record the raw data stream for easy playback. This feature is intended as a back-stop against data-loss and for easy QA of motion capture processes without needing to run all the hardware for QA and development tasks.
Record
To begin recording simply press the record button. To end the recording press the same button again.
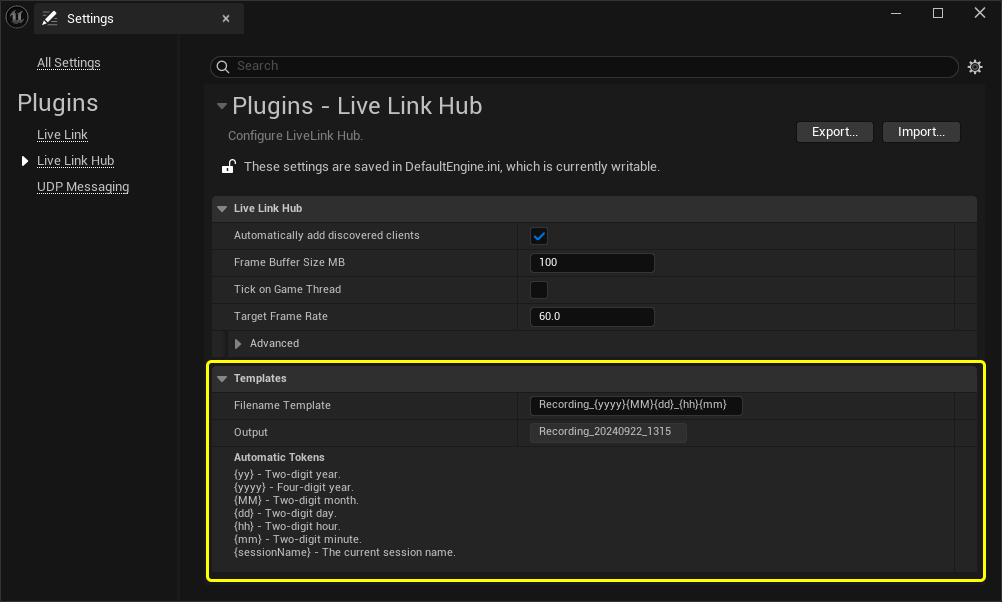
Naming Tokens
When you save you will be prompted to give a file name. To automatically populate this filename you can set a filename template. Go to Settings > Live Link Hub. In the template section you can define a string that will generate the filename.
The session name, slate name, and take are defined on the top bar of the UI
Playback
To play a recording back, navigate to the Playback tab. Double-click on a recording to load it. All of your current sources will be temporarily removed and replaced by virtualized Sources and Subjects from your recording.
The play controls at bottom of the Recording panel provide ways for you to play, pause, and scrub.
You can duplicate, rename, and open a recording file’s location on disk using the right-click menu.