
Take Recorder enables the recording of gameplay animation, live performances, and other sources directly into Unreal Engine. By recording and managing takes into Sequencer, you can achieve a highly iterative workflow in your virtual production. This guide gives an overview of the Take Recorder feature, and demonstrates it's workflow.
Prerequisites
-
Take Recorder is a Plugin that must be enabled prior to use. From Unreal Engine's main menu, go to Edit > Plugins, locate Take Recorder in the Virtual Production section, and click the checkbox to enable it. Then, restart Unreal Engine.

-
In order to record animation from motion capture and other live performances, you can optionally enable Live Link. From Unreal Engine's main menu, go to Edit > Plugins, locate Live Link in the Animation section, and click the checkbox to enable it. Then, restart Unreal Engine.

-
You should also have created a project with a playable character and Actors to record. Alternatively, you can use a project created using the template.
Opening Take Recorder
To start using Take Recorder, click Window > Cinematics > Take Recorder. This will open the Take Recorder window and open a new sequence, if one is not open already.

The new sequence will have its time display set to a timecode matching the Take Recorder's time display.
Interface Overview
There are four main sections of the Take Recorder user interface:

- Toolbar: The Take Recorder toolbar contains several buttons and toggles which control Sequencer integration, takes browsing, and option displays.
- Slate: The Slate section contains information on the pending take and timecode. You can specify the take name, take number, frames per second (fps), recording speed, and write a description. The Start Recording button is also located here and initiates the recording of the take.
- Sources: The Sources section contains options to specify the sources to record into your sequence. Sources can be captured from any Actor in the Level as well as Live Link sessions, other sequences, a microphone, or World states.
- Details: The Details section contains user and project settings for Take Recorder, as well as settings for your sources.
Toolbar
The Take Recorder toolbar contains buttons and toggles for controlling Sequencer integration, takes browsing, and option displays.
| Name | Icon | Description |
|---|---|---|
| Clear Pending Take |  |
Reverts the currently opened sequence to an empty pending sequence. Removes any sequences specified in the Record to Sequence button. |
| Review Last Recording |  |
Opens the most recent sequence that was recorded. Does not become clickable until after a recording has been created. |
| Record to Sequence |  |
Contains a dropdown menu from which you can specify another sequence to record your take into. Can be cleared by clicking the Clear Pending Take button. |
| Take Browser |  |
Opens a Content Browser window for navigating to your saved takes. When using the columns view mode, take-related metadata information will be displayed. 
|
| Show / Hide Sequence |  |
Shows or hides the Level Sequence that is used for setting up this take. |
| Settings |  |
Shows or hides project and user settings in the Take Recorder's details area. |
| Return |  |
Returns to the pending take sequence, when reviewing a previous take. |
| Slate Info Lock |  |
Locks or unlocks the modifying of a slate, when reviewing a previous take. |
Slate
The Slate area displays information on the current pending take, the current time, and recording functions. You can set custom names and numerical entries for your slate and take number by clicking the Slate or Take text fields and modifying the text. The same can be done by clicking the \
You can also start a new recording by clicking the red Record button. When the Take Recorder plugin is enabled, the record button will also be available in Sequencer's playback controls. Sequencer's record button allows you to start recording any selected Actor into the current sequence, and does not require the Take Recorder window to be open. Clicking the button again or pressing Esc will stop the recording and save the current take.

During a recording session, you can click the Add Marked Frame button to add custom marks to the current time of the recording.

Click the Frames Per Second (fps) menu for a dropdown list of different frame rates to select for your pending take.

You can also change the recording speed and overall time dilation of the engine by editing the Record Speed. This can be useful when recording to a populated sequence by making the animation play at a slower speed, ensuring you can observe and match the animation at a more comfortable pace.

Sources
The sources area is where you specify various recording sources. Sources are displayed in a list here and can be enabled or disabled from the recording.

To add a source, click Add Source (+) and choose from a list of sources. You can choose from any Actor in the Level, other sequences, a microphone, camera cuts, or World / Level information.

| Source | Description |
|---|---|
| Any Actor | Selecting Any Actor as a source will create an Actor source with the following details.

|
| Camera Cuts | If Camera Cuts is added as a source, Take Recorder will record all active cameras during the session. Any time the active camera is changed, a new camera Actor and camera cut section will be created. |
| Level Sequence | Selecting a Level Sequence as a source will allow for other sequences to be played during your recording session. You can specify any number of sequences to play from the details area of this source. Playback of sequences only is supported during recording within gameplay or simulation sessions. |
| Level Visibility | The Level visibility source will record the visibility states of all Levels at the start of the recording. It does not record any changes during the recording session. |
| Live Link | Live Link will connect to any currently active Live Link sessions. The Live Link session must be specified in the Subject Name details field. You can shortcut to selecting a session directly by navigating to + Source > From Live Link. 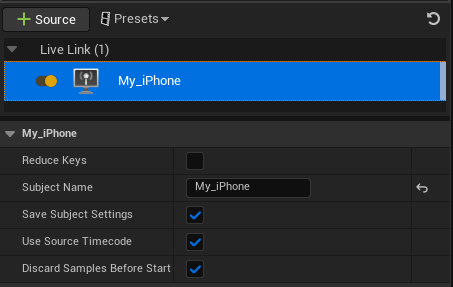
|
| Microphone Audio | Selecting Microphone Audio will allow your device's microphone to be recorded during the recording session. A sound file will be created upon completion containing your recorded audio. The details area contains settings for audio recording, track name, and the recording directory. 
|
| Nearby Spawned Actors | The Nearby Spawned Actors source will record all spawned Actors located within a specified radius from the player's location to the take. The details panel includes options for defining the range and specifying filters. If you are using filters, then only the filtered Actors will be added to the take. Only Actors that spawn during a gameplay session are added. Actors that have already spawned are not affected by this. 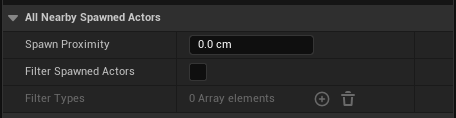
|
| Player | Selecting the Player source records the Player Actor. Using this source might be useful if your player is dynamically spawned and does not exist as an Actor in the Level until gameplay starts. |
| World | If World is added as a source, everything in the Level will be recorded. Particles that are created using Spawn Emitter functions can only be captured when using this source. |
Your source list can also be saved as a preset and can be reused later. To do this, click the Presets button and select Save As Preset. Any saved presets will be listed in the Presets menu.

You can remove all sources from the list or revert to your preset's selection by clicking the Revert button.

Details
The details area of Take Recorder contains project properties and settings for your sources as well as the Take Recorder. It can be enabled by clicking the Settings button in the toolbar. You can specify default settings for sources here which will propagate to the source. However, individual sources can still be customized from the project.

Other project related settings are:
| Name | Description |
|---|---|
| Take Recorder | |
| Root Take Save Dir | The root directory in which to save recorded takes. Supports any of the following format tokens that will be substituted when a take is recorded:
|
| Take Save Dir | A sub-directory relative to the root to further organize saved takes. |
| Default Slate | The project's default name for slates when opening Take Recorder. |
| Recording Clock Source | The clock source to use when recording. You can select from the following options:
|
| Start at Current Timecode | If enabled, recording will begin at the current date's timecode depicted in your slate. Otherwise, the recording will begin at time 0. |
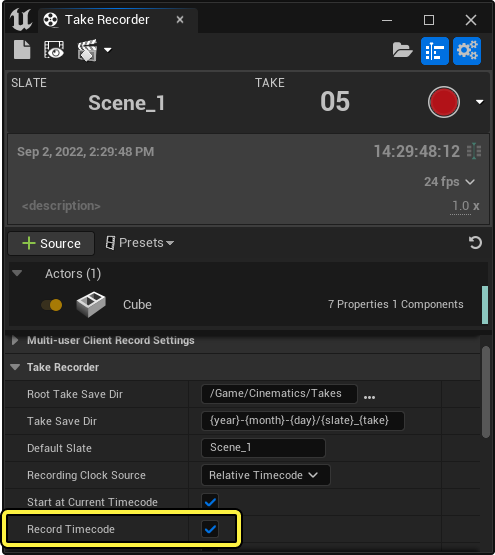
| Record Timecode | If enabled, this will write timecode metadata into every track section for every Actor. This information can be viewed by right-clicking a track section and navigating to Properties > Section > Section Range Start/End. |
| Record Sources Into Sub Sequences | If enabled, records each actor into their own subscene track, allowing for swapping of different takes per actor. If this property is disabled, all actors will record into a single sequence. |
| Record to Possessable | If enabled, records all Actors to possessable type tracks instead of spawnables. This can be overwritten per actor source. |
| Default Tracks | Specify Actor classes and their components so that those components will always be captured during a recording session. |
| Show Notifications | Shows or hides Take Recorder notifications while recording.  |
| Movie Scene Take Settings | |
| Movie Scene Take Settings | Specify your project's names for Hours, Minutes, Seconds, Frames, Sub Frames, and Slates. This will also affect the names of tracks created in the Takes Track for your Actors. |
| Animation Recorder | |
| Animation Track Name | The name of the recorded animation track. |
| Animation Asset Name | The name of the saved Animation Sequence. |
| Animation Sub Directory | The name of the subdirectory that Animation Sequences will be saved to. If this is empty, then sequences will be saved in the Root Take Save Dir. |
| Remove Root Animation | If enabled, Skeletal Meshes will move based on a Transform track. If disabled, motion will occur on the root bone in the Animation Sequence. |
| Timecode Bone Method | Controls for recording Timecode on Skeletal Meshes. |
| World Recorder | |
| Record World Settings | Whether to record the World Settings Actor in the Sequence (some projects use this to attach world sound effects). |
| Autotrack Actors | Adds bindings and tracks for all Actors that are not explicitly being recorded. |
| User Settings | |
| Maximize Viewport | Enables Immersive Mode during a recording. |
| Countdown | The time in seconds the take recorder will count down to before starting the recording session after the Record button is pressed. |
| Engine Time Dilation | The amount of time dilation to apply to the recording session. |
| Stop at Playback End | The recording will stop upon reaching the end time of the sequence. On new sequences the end time defaults to 5 seconds. |
| Remove Redundant Tracks | By default, Take Recorder records all possible tracks from sources. When this option is enabled, only tracks with changes will be kept by the recording. |
| Reduce Keys Tolerance | Tolerance to use when reducing keyframes created during a recording. Higher numbers will cause more keyframes to be removed if they contain values differences within the tolerance. |
| Save Recorded Assets | Automatically saves recorded sequences and subscenes upon completing a recording. These assets will be lost if they are not saved. |
| Auto Lock | Locks the take to prevent editing after the recording session ends. The take can be unlocked by toggling the lock button in the Sequencer Toolbar |
| Auto Serialize | Stores capture data as it's recorded, as opposed to all at once at the end of the recording. This is an experimental feature and should be used at your own risk, as it has not been tested fully. |
| Preset Save Location | The directory in which to save source preset files to. |
Recording Example
Take Recorder can be used to record from various sources in both editor and gameplay contexts. The examples below illustrate how you can record your actions in Take Recorder.
Editor
Take Recorder can be used to record your manipulation of Actors in the editor viewport.
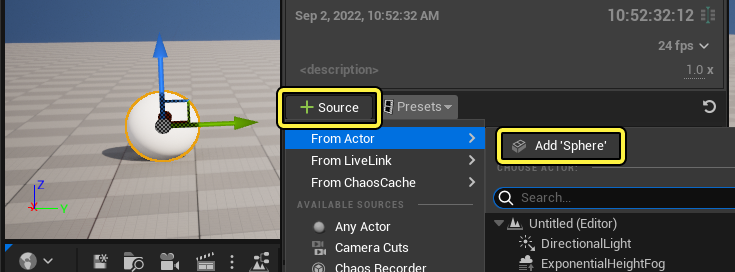
First, you will need to add the object you want to record to the Sources list. Select the Actor in the viewport and click + Source > From Actor > Add 'Sphere'.
Next, click Record. A countdown and notification will appear. When it reaches 0, the sequence will start to record. Select your Actor in the viewport and move it around to capture its editor motion. When finished, click Stop .

Click the Review Last Recording button to view the recording.

Click Play in Sequencer to observe your recorded editor movements on the Actor.

You may see a duplicate Actor performing the actions instead of the editor object. This is because the record type for the Actor was set to record as a Spawnable. You can change this on the source object or globally on the project by changing the Record to Possessable property in the Take Recorder details. If you record to a possessable, then you will only see the original Actor animate.
Gameplay
Take Recorder can also be used to record Gameplay actions such as the player's movement and animation in a Level.
From the Take Recorder, select Add Source (+) > Player to add the Player to the Sources list.

Next, click Play in the Unreal Engine toolbar to start a Play in Editor session.

Once the session has started, click Record. When the countdown reaches 0, the sequence will start to record. Move the character around your Level to capture its animation. When finished, click Stop or press Esc.

Click the Review Last Recording button to view the recording.

Click Play in Sequencer to preview your recorded player's animation.

Reviewing Subscenes and Assets
You can double-click the subscene section to open an Actor's sequence and view its recorded keyframes, such as transform and animation.

Clicking Take Browser will open a Content Browser from which you can navigate to your saved takes and subscenes.

Record Timecode
Take Recorder can also be used to record Timecode metadata. It provides controls for recording Timecode relative to the Scene, individual Actors, and Skeletal Mesh bones. Such a way of recording Timecode can be useful to allow for performances to be changed relative to other performances within the same take, while maintaining other Timecode values.
To record Timecode with Take Recorder, ensure that Record Timecode is enabled
For Cameras and non-Skeletal Mesh Actors, recorded Timecode information will be displayed under a Take Track in the Subsequence.

Skeletal Mesh Timecode
With Skeletal Meshes, Take Recorder provides a few options for where to record and save Timecode. The Bone Mode property, located under Animation Recorder > Timecode Bone Method, provides the following options:

| Bone Mode | Description |
|---|---|
| All | Records Timecode metadata on every bone in the Skeleton as an Animation Attribute. |
| Root | Records Timecode metadata on the top-most bone in the Skeleton hierarchy. In most cases this will be the "root" bone. |
| User Defined | Records Timecode metadata on the bone specified in the Bone Name property. |
After recording, you can view Skeletal Mesh Timecode data within the Animation Sequence timeline under the Attributes track.
