
During the course of project development, the need might arise for a self-illuminated, or glowing Material. In Unreal Engine, self-illuminated Materials are known as emissive Materials. In the following tutorial, you will learn how to create Materials that use the Emissive Color input, and how you can create emissive Materials that actually cast light into the world you are creating.
Emissive Lighting
In Unreal Engine, emissive Materials give artists a very cheap and effective way to create the impression that a surface is glowing or casting light without using using any of Unreal's standard Light Types. Depending on your settings, Emissive Materials can act as a real light source that casts illumination into the environment around them, or they can self-illuminate without emitting light into the scene.
Emissive Materials are created by inputting values higher than 1.0 into the Emissive Color input on the Main Material Node. This pushes the Material into the HDR range, producing a bloom effect.
Lit and Unlit Emissive Materials
Emissive Materials are self-illuminating, which means you can use them with both the Lit and Unlit Shading Models. When you create a Material that is fully emissive, you can use the Unlit Shading Model, as it will result in a shader that is cheaper to render. You can use the Default Lit Shading Model in cases where you need some aspect of the Material to receive illumination from the scene.

-
When to use the Unlit Shading Model: You should use the Unlit Shading Model if your Emissive Material does not need to interact with the lighting in the Level. For example, if you are using the emissive Material strictly to simulate a light source, such as a light card or the surface area of a light bulb.
-
When to use the Default Lit Shading Model: You should use the Lit Shading Model if you need your Emissive Material to use any of the other shader inputs on the Main Material Node. For example, if you are using texture masks so that only part of the Material is emissive. If you were creating a Material for a gun that had lights on it, you would use the Default Lit Shading Model so the Normal Map, Base Color, and other shader inputs still work. You must use theDefault Lit Shading Model if you want your emissive Material to illuminate the objects around it.
Creating a Fully Emissive Material
This section demonstrates how to create a fully emissive Material, used strictly to simulate a light source. The Material will have two parameters to control the color and brightness of the light.
-
Right-click in the Content Browser and select Material in the Create Basic Asset section of the context menu. Rename the new Material EmissiveLightSource.

-
Add the following nodes to your Material Graph.
- Vector Parameter
- Scalar Parameter
- Multiply
Rename the Vector Parameter Emissive Color, and rename the Scalar Parameter Emissive Strength. When finished your graph should look like the image below.

-
Connect the nodes as shown in the image below and connect the Multiply output to the Emissive Color input. Select each parameter and set a default value in the Details Panel. In the example below the Emissive Color set to red and the Emissive Strength is set to 6.

-
Click Save in the toolbar to compile the Material and save the asset. Close the Material Editor.

-
Right-click the EmissiveLightSource Material in the Content Browser and select Create Material Instance.

-
Double-click the EmissiveLightSource_Inst asset to open it in the Material Instance Editor. Enable both parameters by checking the box next to the parameter name. Once enabled, you can override the Emissive Color and Emissive Strength values in real time.
Creating a Masked Emissive Material
This example shows how to create a Material that uses a texture mask to define which parts of the Material are emissive. Since this Material is only partially emissive, it is necessary to use the Default Lit Shading Model.
This tutorial uses assets from the Unreal Engine Starter Content. The techniques shown here will work with any textures, but if you want to recreate the example make sure to include the Starter Content in your project. If you did not include the Starter Content when your project was created, read the Migrating Assets page to learn how to migrate the content into your current project.
-
Create a new Material and open it in the Material Editor. This Material should use the Default Lit Shading Model.

-
Add the following Material Expressions to your graph.
- Vector Parameter x 2
- Scalar Parameter x 2
- Texture Sample - T_Tech_Panel_M
- Texture Sample - T_Tech_Panel_N
- Multiply x 4
- Add x 1
The parameters will be used to control the emissive intensity and color, as in the previous example. Rename the Vector Parameters Emissive Color 1 and Emissive Color 2. Rename the Scalar Parameters Emissive Power 1 and Emissive Power 2. Change the default values to colors and powers of your choosing.

-
The T_Tech_Panel_M Texture contains four different image masks in each of its channels. This Material will use the Red and Blue channels to create two different emissive sections on the Material.

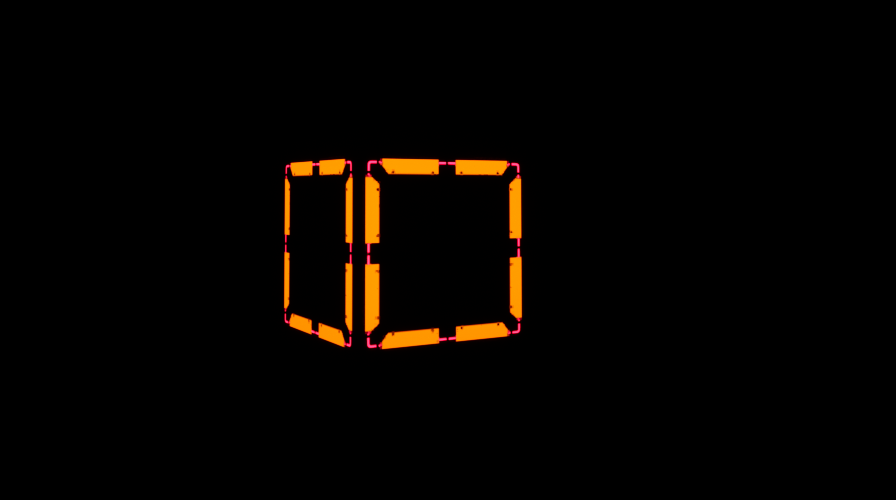
Connect the nodes as shown in the image below. This logic works because the texture masks contain pure black and white values. When the color parameters are multiplied against the values in the texture mask, any black pixel in the mask will output an emissive value of 0. Only the white parts of the mask are emissive, as shown in the preview below. You can independently change the color and intensity of each of the two emissive regions in a Material Instance.
Click the image to enlarge.
-
Click Save in the toolbar to compile the Material and save the asset. Close the Material Editor.

-
Right-click the EmissiveMaterialMasked asset in the Content Browser and select Create Material Instance.

-
Double-click the EmissiveMaterialMasked_Inst asset to open it in the Material Instance Editor. Check the box next to all four parameters to override them in the Material Instance. Once enabled, you can individually control the appearance of the two emissive regions, including turning them on or off by setting the Emissive Power parameters to 0.
Creating a Test Map
In the rest of the examples, the simple test map shown below is used to demonstrate how emissive light propagates through an Unreal environment.

Use the following steps to create a similar test map. All the assets in this scene are from the Unreal Starter Content.
-
Create a new level by going to File > New Level and select the Time of Day option in the New Level dialog.

You can also create a new level by pressing CRTL + N on the keyboard.
-
The demo scene was created with the assets listed below.
- Wall_500x500 - Five instances arranged in the shape of a room, as shown below.
- M_Brick_Clay_New - Material applied to all five wall instances.
- Shape_sphere - Placed in the center of the test room.

-
When the room is completed, save your map by pressing CTRL + S on the keyboard.
Emissive Materials with Lumen
Whem Lumen Global Illumination is enabled, light from emissive Materials propagates through the scene automatically with no additional performance cost. This is a powerful and highly dynamic approach to lighting, however you should be cautious when using emissive light sources that are very small or very bright, as both can cause noise artifacts.
Lumen Global Illumination is enabled by default in newly-created Unreal Engine 5 projects. If you are converting an older UE4 project to UE5, you will need to manually enable Lumen. Read about enabling Lumen here.
The video below shows how emissive Materials cast illumination into in a scene with Lumen enabled. One thing to note is how the size of an emissive light source changes the apparent brightness and falloff distance of the illumination.
Emissive Materials with Static Lighting
Emissive Materials can cast light into the level when you are using Static Lighting, however this functionality is not enabled by default. If a CPU Lightmass build is created with no other lighting in the scene, the self-illuminated portions of the emissive Material are visible, but the Material does not illuminate any of the objects around it.

To make this Material cast light into the scene, you must enable a setting in the Details Panel. Select the Static Mesh on which the emissive Material is applied. In this case, the cube.
In the Details Panel search for "emissive", and under Lightmass Settings, check the box to enable Use Emissive for Static Lighting.
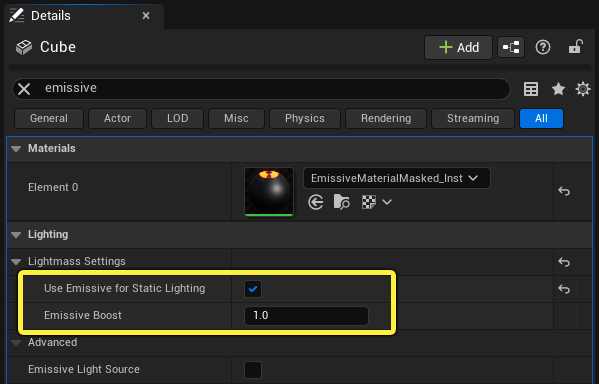
There is also an Emissive Boost setting. If you create a Lightmass build and the emissive light is too dim, you can input a value higher than 1 to boost the result. Another way to increase the brightness is to increase the Emissive Power parameter in the Material Instance.
The slider below shows how the static lighting changes when the Use Emissive for Static Lighting option is turned on, and then boosted to 2.


(1) Use Emissive for Static Lighting off, (2) Emissive for Static Lighting enabled, (3) Emissive Boost set to 2.
Emissive and GPU Lightmass
The Use Emissive for Static Lighting setting is not necessary when baking lighting with GPU Lightmass. Light from Emissive Materials automatically propagates into the GPU Lightmass result. If you need to increase or decrease the brightness of emissive lighting in a GPU Lightmass bake, you can modify the brightness values in the Material or Material Instance.
Emissive Influence & Bloom
As you increase the brightness of an emissive Material, the post-process Bloom effect that is generated from the emissive sections of the Material will get brighter and brighter. There are times when you may want to increase emissive values in the Material, but don't want the bloom effect to overwhelm the image.
You can control the Bloom effect indenpent of the emissive power in the Post Process Volume. This gives you a way to keep the Bloom effect at a reasonable level while you either increase or decrease the emissive brightness.
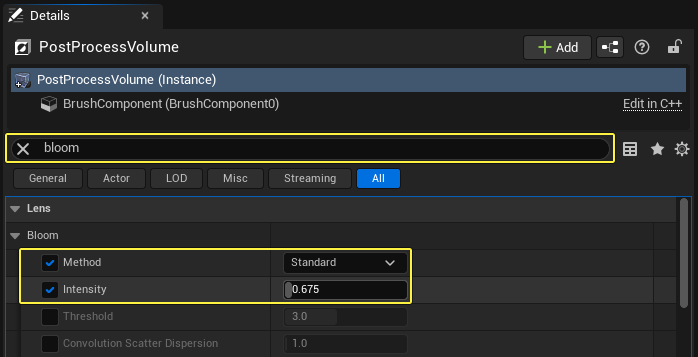
Adjusting this value will help to compensate when you push the Emissive values very high to get more static light from an Emissive Material cast in the world.
In the video below, one of the Emissive Power values is increased to 100, and the Bloom effect becomes quite overwhelming. To compensate you can select the Post Process volume, search for "bloom" and reduce the value to get a more visually appealing result. You can also change the Bloom setting to Convolution to mimic a camera starburst effect.
Multiple Bounces of Indirect Lighting
When Use Emissive for Static Lighting is enabled, you can use multiple bounces of indirect light to smooth out and improve the lighting. In the World Settings* panel, expand Lightmass Settings and increase the Num Sky Lighting Bounces nces** value.


Example scene with emissive static lighting providing multiple bounces of indirect lighting.