
Subsurface scattering is the term used to describe the lighting phenomenon where light scatters as it passes through a translucent / semi translucent surface.
Unreal Engine offers a special Shading Model called Subsurface that is used specifically for Materials that need this interaction like skin or wax.
The following tutorial will walk you through all you need to know about how to use subsurface scattering in your Materials.
Enabling the Subsurface Shading Model
Enabling a Material to use the Subsurface shading model can be done a few steps.
-
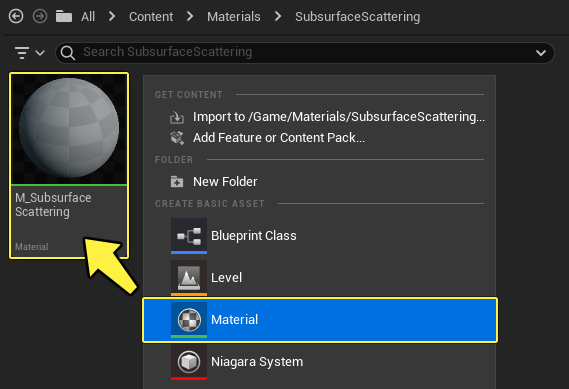
First create a new Material by Right-Clicking in the Content Browser and then selecting Material from the Create Basic Asset list. Give the Material a descriptive name like M_Subsurface_Scattering. When completed, your Content Browser should look like this.
- Open up the Material by Double-Clicking the asset in the Content Browser.
-
In the Details Panel of the Material Editor, change the Material's Shading Model from Default Lit to Subsurface.

- The Material is now ready to be used as a Subsurface Material.
Setting up a Subsurface Material
Continuing with our Material from above that has Subsurface Scattering enabled, let's setup a basic Material so that we can see the Subsurface scattering in action in a level.
-
We need to place down some Material Expression nodes so that we have something to work with. For this example, we are going to be adding the following nodes.
- Vector Parameter x 2
- Scalar Parameter x 2

The reason that we are using Parameter Material nodes instead of regular Material nodes is so that we can make a Material Instance out of this Material for easier tweaking inside the editor.
-
Before we start to connect the nodes, we first need to name them as well as set default values for them. The names and default values for the nodes are as follows.

Property Name Value Base_Color r:1.0, g:1.0, b:1.0 Roughness 0.35 Opacity 0.5 Subsurface_Color r:1.0, b:0, g:0 -
After renaming all four parameter expressions and setting their default values, connect them to their corresponding inputs on the Main Material Node as shown above.
-
Once the nodes have been connected, make sure that you compile the Material by pressing the Apply button, and Save the Material. Once compiled, you should have something that looks like this.

-
Once the Material has been compiled, you can close the Material Editor window. Then inside of the Content Browser, select the Material, Right-Click on it, and then select the Create Material Instance option from the menu.

Testing the Subsurface Material
Now that the Material Instance has been created, you can test the Material in a Level.
-
To do this, you first need to create a new blank level to work in by going to the main menu and under the File option select New Level. When prompted what type of level to select, select the Empty Level.

-
To test the Material, we will use a Static Mesh from the Starter Content, lit in front by a Point Light, and from behind with a very bright Spot Light. This strong backlighting will help demonstrate how Subsurface Materials can transmit and scatter light. The lighting configuration should look something like the image below.

-
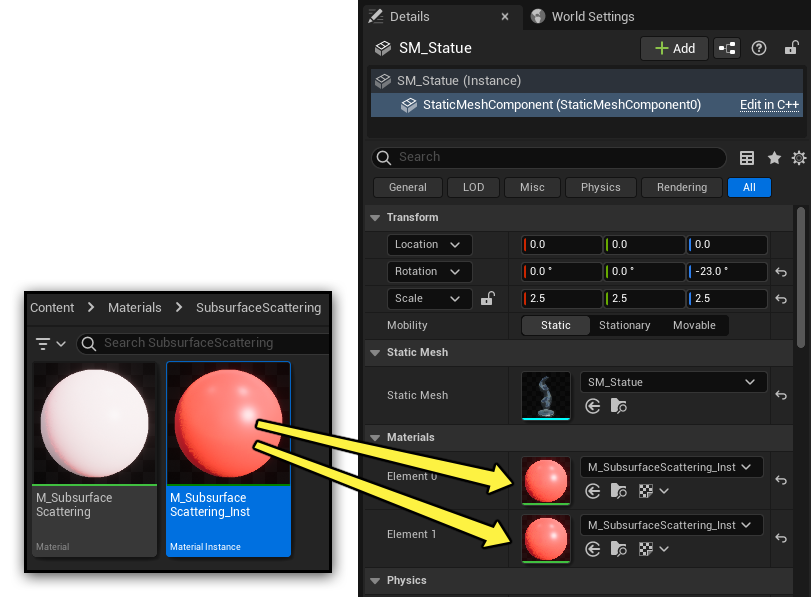
Find the SM_Statue Asset in the Content Browser under StarterContent > Props and add it to your Level. The location and rotation settings in our example are shown below.
Property Name Value Location: X:0, Y: 0, Z:0 Location: X:0, Y: 0, Z:-23 -
Apply the M_Subsurface_Scatterin_Inst Material instance to the statue by dragging it from the Content Browser onto the Static Mesh in the level, or onto both of the statue's Material Elements in the details panel.
-
Open the Place Actors menu and add both a Point Light and a Spot Light to your level.

-
Select the Point light and configure it with the following settings in the Details Panel.
Property Name Value Location: X:380, Y: 0, Z:80 Intensity: 8.0 cd 
-
Select the Spot Light and configure it with the following settings in the Details Panel.
Property Name Value Location: X:-650, Y: 100, Z:-75 Rotation: X:0, Y:20, Z:0 Intensity: 1500 cd 
Working with the Subsurface Material
Now that the Subsurface Material has been applied, it is time to tweak the settings of the Material Instance.
In the following sections, we will go over how we can control how our Subsurface Material will look and how to tweak the various options in the Material Instance to get the results that we want.
Opacity Controls
In the current setup of our Subsurface Material, the Opacity input controls the amount of light that we want our object to scatter.
A setting of 0 will allow all light to scatter where a setting of 1 will let no light scatter. The following example shows light being scattered through the statue mesh with the Opacity value set at 0 in the image on the left, 0.35, 0.65, and and 1.0 in the image on the right. Notice as the numbers go from 0 to 1, the amount of light we see passing through the object becomes less and less.

While the Opacity does help to get rid of a lot of the scattered light, you might notice that there is still some Subsurface scattering happening. To get completely rid of the effect, you are also going to have to adjust the Value of the Subsurface Color (More on this in the Subsurface Color Value section below.)
Subsurface Color Value
While you can adjust the amount of Subsurface scattering that happens via the Opacity input, you can also adjust this using the Value slider in the Color Picker.
For example, setting the Opacity to a value of 1.0 and setting the Subsurface Colors Value from White to Black will effectively turn off Subsurface Scattering like in the example below.


Subsurface color value at 0, 0.5, and 1.0.
Here is an example of adjusting the value in real time. Notice how as the Value of the color is adjusted from Red to Black, the amount of Subsurface scattering influence is affected.
Using a Texture as a Subsurface Influence Mask
You can use a Texture as a Mask to have more control over what areas receive or do not receive Subsurface scattering. To do this, all you need to do is plug the Texture you want to use as the Mask into the Opacity Channel of your Material. In the following example, not only are we using a Mask texture, we are also using a Scalar value to control the intensity of the Mask so that we can have more control over the amount of Subsurface scattering that is happening.

Mask textures work based on values going from Black to White. Values that are closer to Black will allow the Subsurface effect to come through while values that are closer to White will not allow the Subsurface effect to come through.
Here is what the Material above, using the Mask Texture, looks like in the level. Notice the Black spots on the cube. Those Black spots are the result of using a pure white value in the Mask Texture.
