
This page describes how Datasmith imports scenes from McNeel Rhinoceros (Rhino) into Unreal Engine. It follows the basic process outlined in the Datasmith Overview and Datasmith Import Process, but adds some special translation behavior that is specific to Rhino. If you plan to use Datasmith to import scenes from Rhino into Unreal Editor, reading this page can help you understand how your scene is translated, and how you can work with the results in Unreal Editor.
Rhino Workflows
Export Workflow
Datasmith uses an export workflow for Rhino. This means that to get your Rhino content into Unreal Engine using Datasmith, you need to:
-
Install the Datasmith Exporter plugin for Rhino. See the Installation Notes section below.
-
Export your Rhino content using the Save As or Export process. See Exporting Datasmith Content from Rhino.
-
Use the Datasmith importer available in the Toolbar of the Unreal Editor to import your
.udatasmithfile. See Importing Datasmith Content into Unreal Engine.
Direct Link Workflow
To preview changes to your Rhino scene in Unreal Engine in real time, you can set up a Datasmith Direct Link between the two. This way, you don't need to manually re-import the entire scene into Unreal Engine every time you want to make a change. For more information, see Using Datasmith Direct Link documentation.
Using the Datasmith Toolbar
Installing the Datasmith plugin adds a dockable toolbar in Rhino.

Datasmith Toolbar in Rhino
You can trigger the same operations by entering their associated commands in Rhino's command line.
To see all of Datasmith's commands, open the Plugin Manager window in Rhino (run PlugInManager in the command line), and select the Datasmith Exporter plugin.
| Button | Description | Command Line |
|---|---|---|
| Synchronize | Push the selected models through the Direct Link connection. To quickly select everything in your scene, press Ctrl + A (Windows) or Cmd + A (Mac). |
` DatasmithDirectLinkSync` |
| Connections | Launches the Connection Status dialog. | DatasmithDirectLinkConnections |
| Export 3D View | Launches the existing .udatasmith exporter to save a .udatasmith file to disk. |
DatasmithExport |
| Messages | Launches the messages and logging window. This is useful for reporting errors, missing textures, and other information. | DatasmithMessages |
After installing the plugin, Rhino will add the Datasmith toolbar to the interface. If you uninstall the plugin, this toolbar will automatically be removed. Any copy of the Datasmith toolbar added to your default toolbar by dragging from the Toolbar section of the Options menu will not be removed by the uninstall process and will need to be removed manually.
Installation Notes
Before you can export Rhino content, you must download and install the Datasmith Exporter for Rhino plugin from the Datasmith Export Plugins page.
To see what versions of Rhino the plugin supports, see Datasmith Supported Software and File Types.
We encourage you to share the download link to the Datasmith Exporter plugins with any number of people, both inside and outside of your organization. Please note that you are not permitted to distribute the Datasmith Exporter plugins themselves.
Before you install the Datasmith Exporter for Rhino plugin, make sure that:
-
Rhino is not running.
-
You downloaded the installer for the exporter plugin that matches the Unreal Engine version you intend to use.
-
You uninstalled all previous versions of the Datasmith Exporter for Rhino plugin.
After you downloaded the installer, double-click it to open, then follow the instructions on-screen.
If you need to uninstall the Datasmith Exporter for Rhino plugin, you can do this like you would any other application:
-
Windows: Uninstall the plugin from the Control Panel.
-
macOS: Find the plugin in Finder and drag it to the trash icon on your Dock, or right-click and select Move to Trash.
Converting Geometry into Static Meshes
Datasmith creates a separate Static Mesh Asset for each separate mesh, solid, or surface in the Rhino file. If the object has its Name property set in the Properties panel in Rhino (shown on the left in the image below), Datasmith uses that name for the Static Mesh Asset (shown on the right in the image below). Any Actors that Datasmith creates in your Level that refer to that Static Mesh Asset also use the same name.
Click for full image.
Instancing
When Datasmith detects multiple instances of the same block in your Rhino scene, it only creates one set of Static Mesh Assets for the geometry in that block. It then places multiple instances of those Static Meshes into the scene. This is typically better for the runtime memory requirements and performance of your Project. It also makes it easier to manage the number of Static Meshes in your Content Browser.
Wherever possible, we recommend taking advantage of this by making any repeating elements in your scene (such as windows, doors, or chairs) into blocks in Rhino.
For details, see the Rhino documentation.
Tessellation and Render Meshes
Unreal Engine always renders objects using triangular meshes. If you have objects in your Rhino file that are defined as parametric surfaces, or NURBS, these surfaces need to be transformed, or tessellated, into triangular meshes. Datasmith will utilize the Rhino tessellation options located in File > Properties > Document Properties | Mesh:
Click for full image.
| Name | Description |
|---|---|
| Jagged and Faster | Creates a lower density mesh to shade objects quickly at the cost of some quality. |
| Smoother and Slower | Creates a higher density mesh to shade objects more accurately at the cost of speed. |
| Custom | Allows for greater control over the mesh created. The density slider roughly controls the density and number of polygons created from NURBS surfaces. Additional controls are available by clicking the Detailed controls button. |
For more information on using custom render options in Rhino, see Polygon Mesh Detailed Options in the Rhino documentation.
Mesh Modifiers
Rhino supports a number of ways to change the appearance of a mesh without the need to directly edit the mesh.
The following mesh modifiers are preserved when you export your data from Rhino using Datasmith:
Click for full image.
Triangle Facing Direction
The surface maintains orientation when exporting to Datasmith. A way to visualize surface orientation within Rhino is to set the colors of backfaces to a bright green color. Do this by opening the Document Properties and selecting View > Display Modes > Rendered. In that menu, in the Shading Settings, the options for Backface settings appear. Finally, change the Single color for all backfaces color to bright green:
Click for full image.
This way you can check before exporting to Datasmith whether or not faces orient correctly:
For a complete discussion and recommended solutions, see Datasmith Import Process.
Rhino Materials
For each different surface material that Datasmith finds in your Rhino scene, it creates a separate Material Asset in Unreal Engine with the same name. Each Material is then placed in the Materials folder next to your Datasmith Scene Asset.
-
Each Material in the
Materialsfolder is a Material Instance that exposes properties set in the Rhino file: color values, texture maps, and so on. You can change these exposed properties to modify the way the Material looks when applied to a surface. Datasmith assigns these Material Assets to the Static Mesh Assets it creates to shade their surfaces the same way they appear in your Rhino renders. Datasmith only imports materials from Rhino objects into the Unreal Engine. It ignores Rhino display colors completely. This makes the visual result of your import into the Unreal Engine match the result of rendering in Rhino as closely as possible. -
Datasmith also creates a set of parent Materials in the
Materials/Masterfolder. Each of these is the parent of at least one of the Material Assets in the Materials folder. You can edit these parent Materials if you want greater control over the Material graphs that define how each surface appears, expose additional parameters to child instances, or change the way the exposed parameters are taken into account during rendering. Note that changing a parent Material also changes all Material Instances that inherit from that parent automatically. Consider duplicating a parent Material before you modify it, make your changes to the duplicate, then finally update specific Material Instances to use your new duplicate as their parent. For details, see Modifying a Datasmith Master Material.
Named Views
Named Views in Rhino are the equivalent of Cameras in Unreal Engine. When imported into Unreal Engine via Datasmith, each Named View becomes a separate CineCameraActor in the Scene.
Click for full image.
Rhino Metadata
Data input in the Attribute User Text menu exports as Datasmith Metadata:
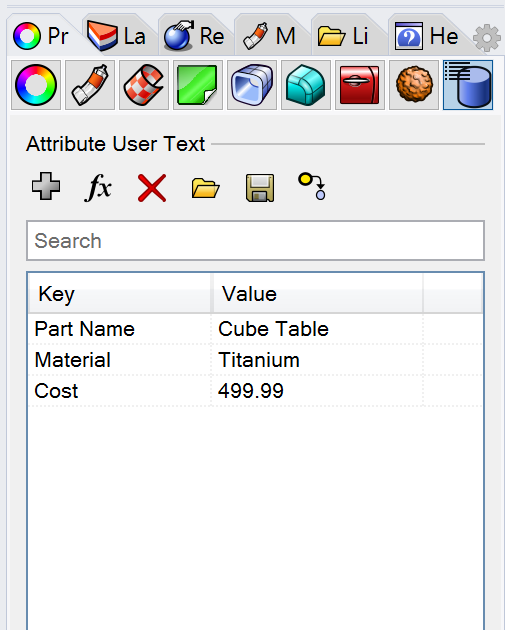
Data is entered into the table as a key value pair. For more information on using Attribute User Text, see Attribute User Text in the Rhino documentation
Building the Datasmith Scene Hierarchy
Datasmith builds its scene hierarchy from your Rhino model as follows:
-
For each layer in your Rhino scene, Datasmith creates an Actor in Unreal Engine to act as the parent for all objects on that layer. Note that unlike the layers it creates in the Layers panel of the Unreal Editor, this hierarchy of Actors is not flattened. The Actors are nested exactly like the layers in your Rhino scene.
-
Under the Actor that represents each layer, every instanced block on the corresponding layer is represented by another Actor.
-
Finally, the Actor that represents each layer and each block contains Static Mesh Actors that represent the actual geometry objects that make up that layer or block. Points in Rhino are represented as empty Actors in Unreal Engine. This preserves the points as
-
Groups in Rhino do not affect the Unreal Engine scene hierarchy, as they are considered selection helpers rather than important elements in the scene hierarchy.
For example, in the image below, you can see that every layer in the Rhino hierarchy has a counterpart Actor in the Unreal Editor. Layers like lights > turn signals, which contain only geometry objects in Rhino, contain only the corresponding Static Mesh Actors in the Unreal Editor. The lights layer in Rhino also contains two block instances, named left_headlight and right_headlight. Each of these is represented by a nested Actor in the Unreal Editor that in turn contains the geometry objects that make up those blocks.
Click for full image.
The model used on this page is courtesy of Turbosquid user tomashorin.design.