
The Media Plate Actor is a pre-built Actor that you can add to your scene to play video, image sequences, and any URL towards a Media framework supported asset.

The Media Plate Actor supports:
- A simplified process for importing video
- Optimized streaming for tiled EXR image sequences with the built-in Sphere and Plane meshes. Requires DX12 or higher.
- Media Playlists
- Drag and drop assets and Actors
- Sequencer integration
- View frustum culling
Creating a Media Plate Actor
There are multiple ways to create a Media Plate Actor.
You can either:
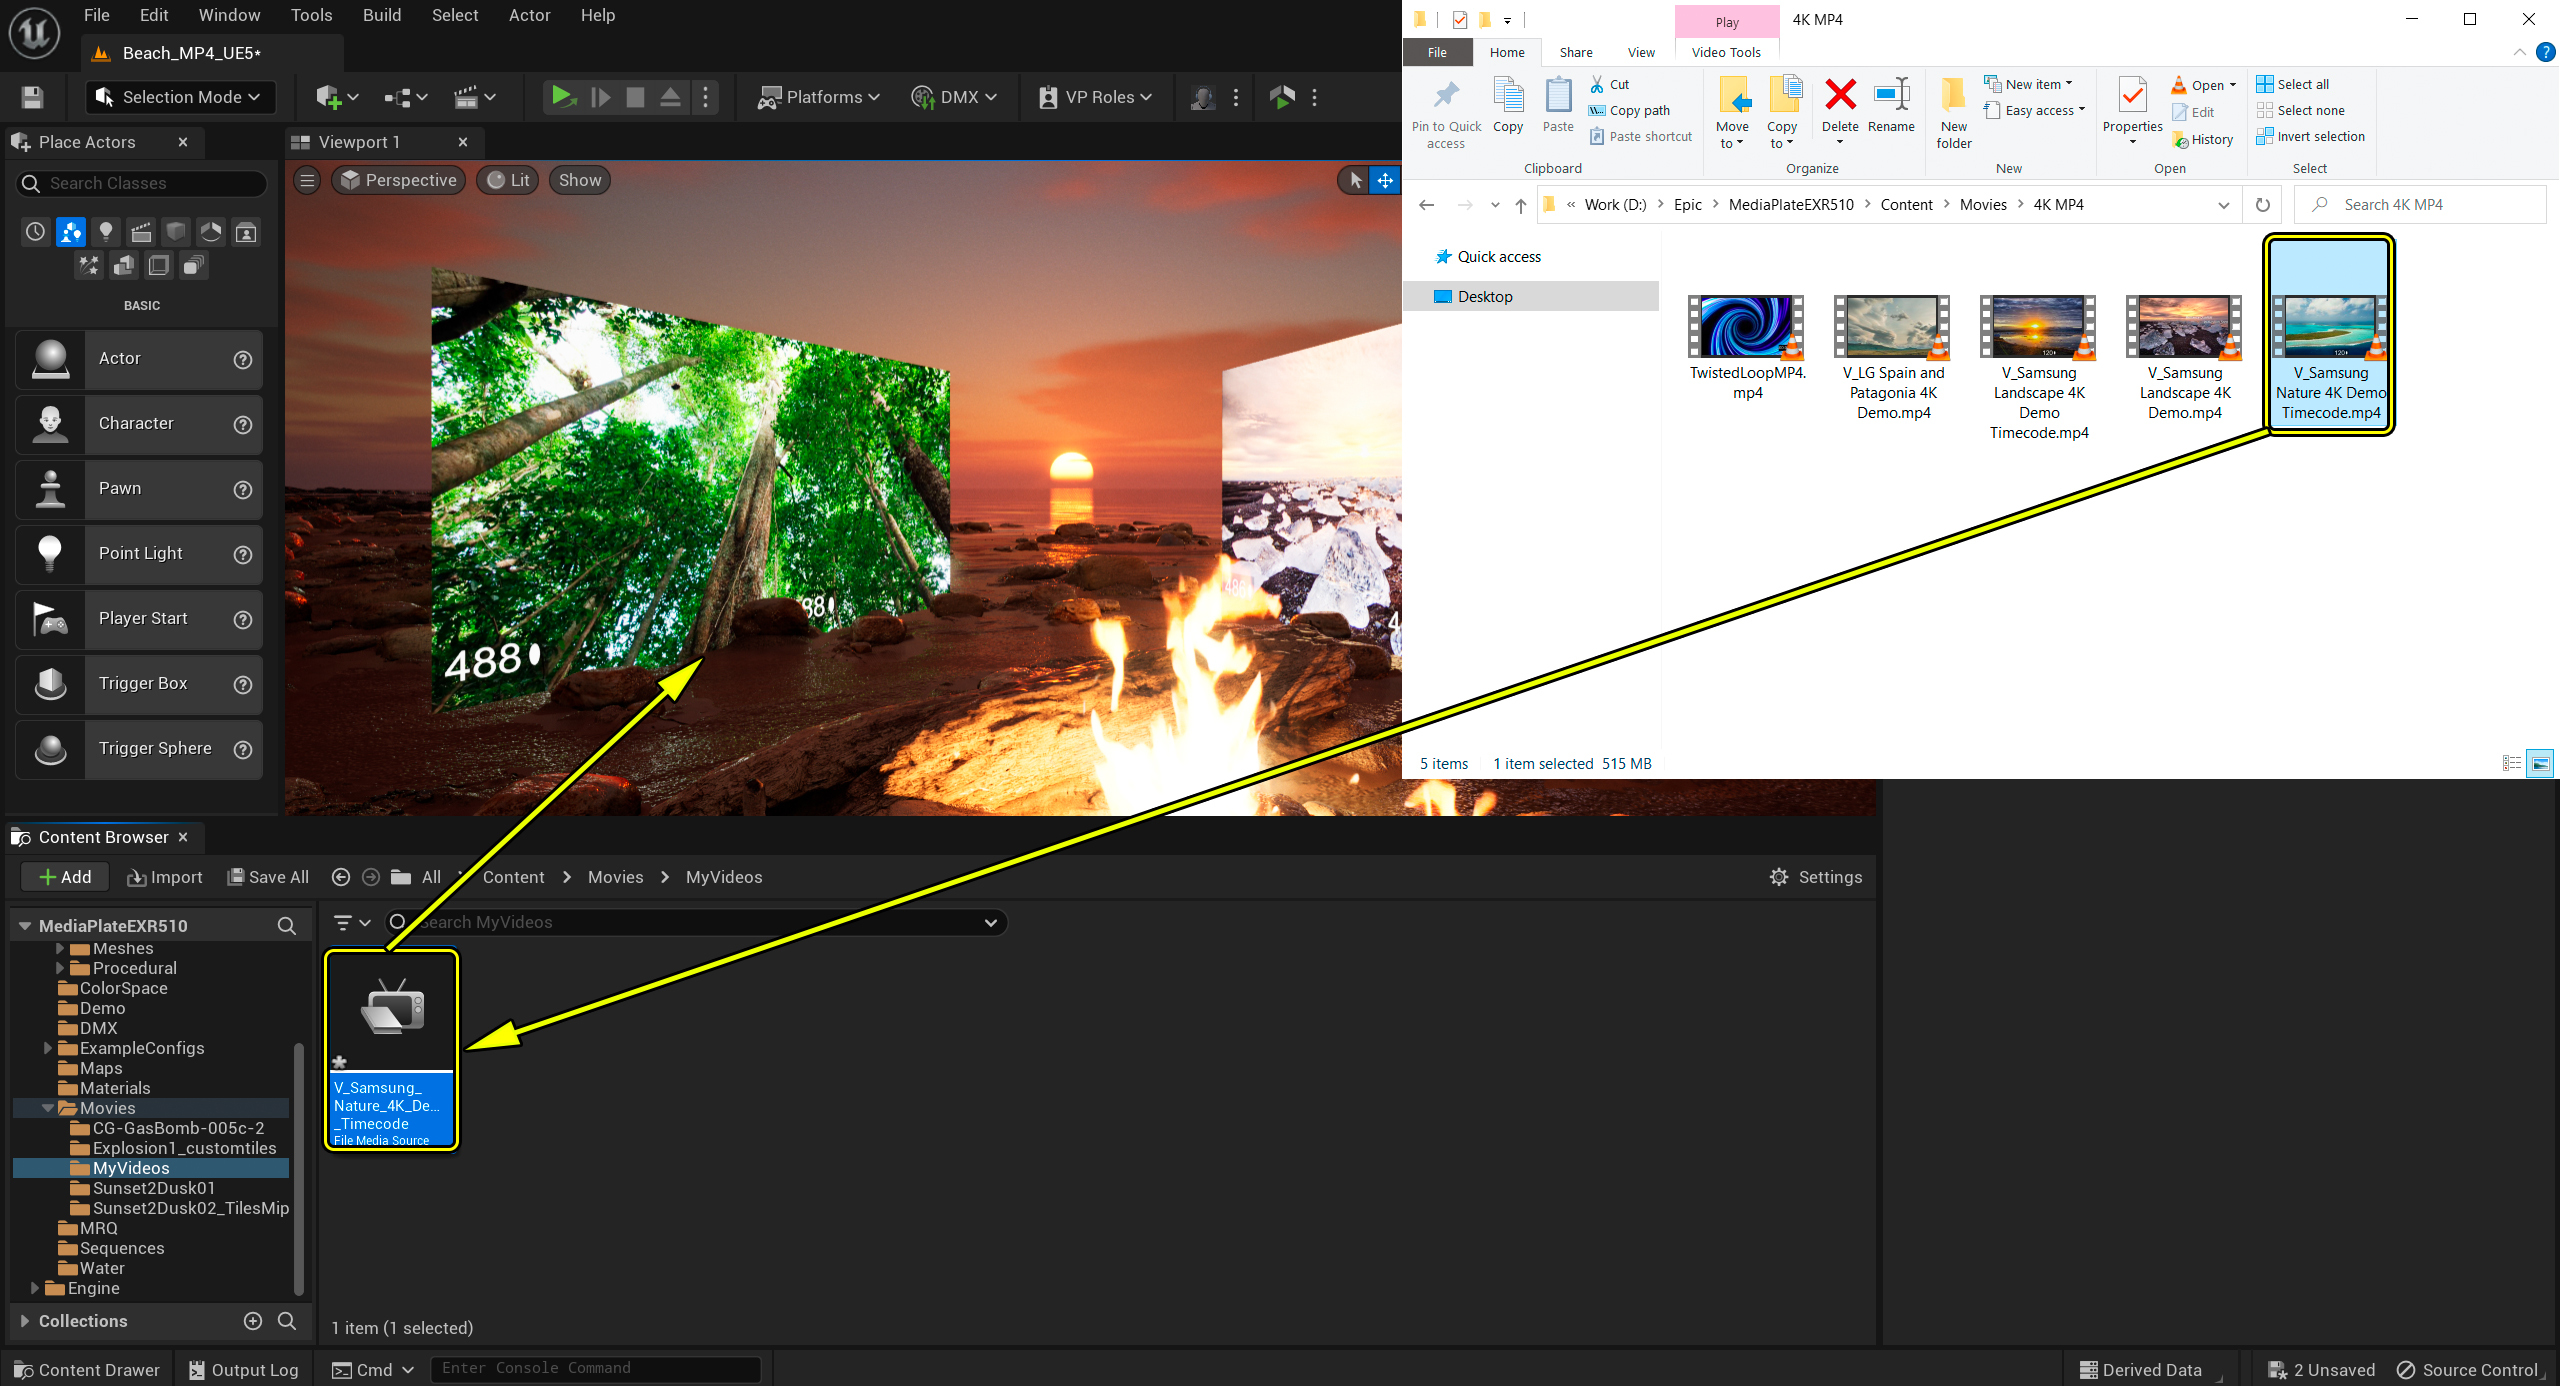
- Drag a media file (video file or an image from a sequence) directly into the Viewport.
- Drag a media source asset from your Content Browser into the Viewport.
- Use the Place Actors menu
Importing Media Sources
Media Plate supports both video files and image sequences. Depending on which media type you use, there are different ways to import them and denote the reference path of the related assets in Unreal Editor.
Common to both of these ways is that they immediately create the Media Plate Actor, which you can then configure using the Media Plate Controls.
Import Video Files
To import a video file:
- Open the Content Browser.
- Drag your video file into the Content Browser and drop it there.
- Drag the file from the Content Browser into the Viewport. This creates the Media Plate Actor.
Import Media Sequences
To import a media sequence:
- In the Content Browser, create an Img Media Source.
- Under Sequence > Sequence Path, assign the path to the folder containing your images.
- Optional: Under Advanced > Frame Rate Override, set the image sequence frame rate. If you don't specify anything here, the Media Plate Actor uses the default frame rate under your global settings.
- Drag the Img Media Source from the Content Browser into the Viewport. This creates the Media Plate Actor.
Media Plate Settings
In the Media Plate Actor settings, you can adjust the look and playback of your video or image sequence. You do not need to create a Media Texture or Media Player.
The Media Plate has the following settings
Mesh
Here, you can select whether to use a Plane, Sphere, or a Custom mesh. When you select one, the referenced mesh automatically appears and the relevant settings for that mesh type become available for you to configure.
If you are using a tiled EXR image sequence and have DX12, or above, graphics capability, we recommend you select a Plane or Sphere mesh. Both these pre-built meshes use the Media Plate Actor's optimized streaming, so only the tiles visible to the camera are streamed. Custom meshes stream all tiles, regardless of their visibility to the camera. If you want to convert your media to the EXR format, you can use the Process EXR tool.
Playlist
When you add a video or image sequence, Unreal Editor automatically creates a Media Playlist to hold the video asset reference, visible in the Media Playlist section. This section also displays the references to the initial Media Source as well as the Media Path.
This section also contains clickable icons you can use to Restart, Rewind, Play, Pause, Fast Forward, Open, and Close the playlist.
The pen Media Plate button lets you open a media plate window with a flat-facing mesh that shows you more in-depth information about the media. In this window, you can also use the Previous and Next icons to access other media in your playlist.
General Settings
| Property | Description |
|---|---|
| Media Details | Expand this to see the details about your media's resolution, frame rate, size, method, format, combined level of detail bias, and its number of mips and tiles. |
| Play on Open | Makes the video or image automatically start playing when opened. |
| Auto Play | Automatically opens the video or image sequence when you enter game mode. |
| Enable Audio | If an audio track exists, this setting enables audio for the active video decode engine. |
| Start time | You can use this to set a custom start time. This allows different Media Plate Actors that use the same source video to start at different times. You can then use the same loopable clip in multiple instances in your level, appearing different each time. |
| Play Only when Visible | Applies frustum culling to the Media Plate Actor so the whole video decode and streaming stops when the Actor is outside of the frustum. This is typically useful for large installations with clustered rendering like nDisplay. Especially if you're using several large and resource heavy Media Plates. |
| Loop | Automatically loops the video when it reaches the last frame. |
Advanced Settings
| Property | Description |
|---|---|
| Sound Component | Contains details of any sound components used. |
| Static Mesh Component | Contains advanced details and properties of the mesh component used. |
| Letterboxes | Contains details of any letterboxes used. |
| Cache Settings | Override makes the Media Plate cache settings override global cache settings. Enabled by default. The Time to Look Ahead is expressed in seconds. For adequate caching, we suggest 2-4 frames. At 24fps, 2 frames should take 0.084 seconds. The default value is 0.2s. Caching with tiles is a balancing act. The more frames you cache, the more frames need to be invalidated and reloaded when the camera moves. |
| Visible Mips Tiles Calculations | By default, this setting matches the static mesh you've chosen. If you want to use a Plane or Sphere, but do not want the Media Plate to only stream pixels visible to the camera, you can set this to None. This can be useful for debugging, but we recommend that you do not use this for production. |
| Mip Map Bias | Sometimes, a PC is unable to playback a certain EXR sequence because of bandwidth, even though the sequence is split in tiles and mips. This setting lets you hint the Media Plate Actor in one direction or the other in order to load higher mips (lower resolution), which saves on input / output bandwidth. The estimated mip level matches the renderer by default, which makes it FOV / resolution dependent. |
Transform Settings
In the Transform section, you can adjust the position, scale, and orientation of the Media Plate Actor. To read more about these settings, refer to Transforming Actors in Unreal Engine.
Materials
The Materials section allows you to pick another Material to override the existing default Media Plate Material. The default is a translucent and non-lit Material that renders pixels in the emissive channel. This Material is bundled within the Media Plate Plugin content directory.
You can drag the default or custom Materials within the Materials section of the Media Plate actor.
The Media Plate Actor looks for a special Texture parameter called MediaTexture. This parameter must exist within the chosen Material so that it can bind and access the pixels received from the video decoder MediaTexture.
Media Plate comes with the following default materials:
For 2D plates:
| Material name | Description |
|---|---|
| M_MediaPlate | Is translucent. This is the default selection. If you move away from a translucent material, you might experience TSR ghosting artifacts. |
| M_MediaPlateCC | Color correction material. |
For Skies:
| Material name | Description |
|---|---|
| M_Sky | Opaque, with the IsSky boolean enabled. |
| M_SkyCC | Color correction material for skies. |
Sequencer integration
Sequencer integration is important to precisely control when video or image sequence clips start, end, or loop. You can also use it to make sure all clips are framelocked to the exact Sequencer time, providing you the means to finely control sequences with the overall level animation and logic.
To add your Media Plate Actor to Sequencer:
- Drag the Actor from within the World Outliner and drop it in your Sequencer Track.

For proper sync in Sequencer, you must disable audio in the Media Plate Controls (general settings > uncheck Enable Audio) or any manually-created Blueprint using Electra Media Player.
Considerations and Limitations
When you use the Media Plate Actor, be aware of the following considerations and limitations:
- Media Players: Only Electra and IMGMedia Players support synchronization. By default, the engine picks the first player it finds. To guarantee sync playback, you can manually force Electra as your player by selecting it inside FileMediaSource > Player Overrides > Windows > Electra player (ElectraPlayer).
-
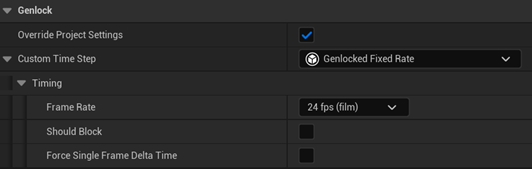
Genlock: If you are using a clustered setup and want to optimize image playback frame accuracy, you must either use an unlocked custom timestep or select Genlock > Custom Time Step > Genlocked Fixed Rate. If you want to always increment time by the fixed rate delta time, select Force Single Frame Delta Time.
- Real-time skylights and reflections: If you want to use the mips and tiles outside of your viewport to contribute to real-time skylights and reflections, you must use the [anchor link upscalehigherlevelmip]console variable.
Useful Console Variables
-
ImgMedia.FieldOfViewMultiplier: (
ImgMedia.FieldOfViewMultiplier=1)Since Media Plate only loads tiles visible by the current views, in some cases a fast-panning shot can cause temporary missing tiles around the edges. This console variable lets you increase the number of tiles loaded around the edges of the view.
-
ImgMedia.MipMapLevelPadding: (
ImgMedia.MipMapLevelPadding=0)If the mipmap estimation doesn't match the renderer with sufficient precision, this value is padded onto the calculated minimum and maximum mipmap levels.This increases the number of loaded tiles but can help eliminate artifacts under exceptional conditions.
-
Concert.EnableLoopingOnPlayer: (
Concert.EnableLoopingOnPlayer=1) (Default)By default, the Multi-User Sequence Manager ensures media playback is looped when looping is enabled on the Sequencer player. Prior to 5.1 Multi-user would not enable looping on the nDisplay sequence player and the looping would be handled by the reset of the play head with sequencer. This allows the playhead to remain in sync with the content on an ICVFX wall. If you prefer the playhead to be synchronized between the editor and nDisplay cluster then set this value to 0.
-
r.EXRReaderGPU.UpscaleHigherLevelMip: (
r.EXRReaderGPU.UpscaleHigherLevelMip=-1)Normally, Media Plate only loads the required quality mips and tiles in the viewport. However in some cases, such as reflections and skylights, you might want to load lower-quality tiles outside of the viewport for the areas of the EXR texture that are not filled with any data, in order for them to contribute to lighting and reflection.
For example, if you set this console variable to a mip level of 3, then mip level 3 will be fully read, loaded and upscaled into mip 0, 1, 2. Mip levels including and above 3 (4, 5, 6 etc) will be fully read into the texture. When recording, the area visible by the camera contains the proper quality mips, while everything not directly visible by the active views contains lower quality mips.
Debugging
You can use the following Stat commands for debugging the Media Plate Actor:
- Stat Media: Displays information about the current Media being played.
- ImgMedia.MipMapDebug 1: Prints visible tile and mip debug information to the screen in game mode. Only usable for files in the
.exrmedia format. - Log LogImgMedia Verbose: Enables verbose log data specific to ImgMedia.