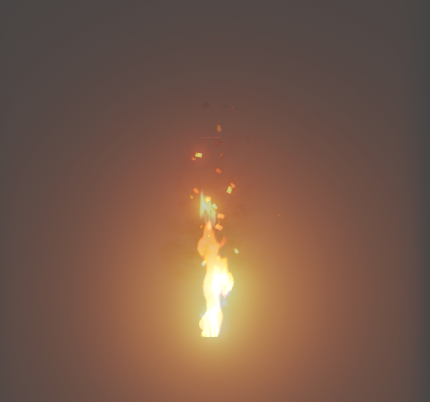
Levels of detail (LODs) provide a way for effects artists to create particle effects that make the most efficient use of screen space, depending on player range. Consider a particle system of a camp fire: there may be several emitters involved, such as:
- A core flame
- An outward flame
- A core glow
- Sparks and embers
- One or more layers of smoke
Your system may look something like this when viewed up-close:
However, when the player gets far away, it will take up a lot less screen space, like so:
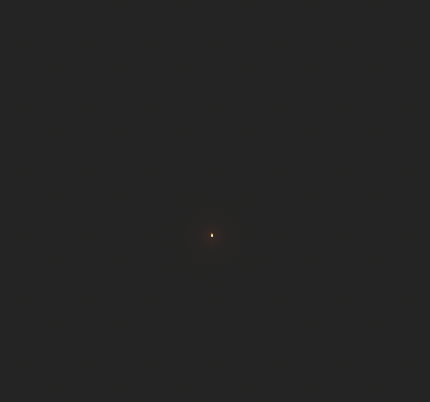
In such a case, there would be aspects of the particle system that are too small to render (smaller than a pixel), such as the embers. However, those particles would still be calculated and processed. This is where LODs come in. LODs allow a particle system to be simplified based on distance, so that emitters and modules within the system can have their setting shut down - or turned off entirely - once the player is too far away to effectively appreciate the effect.
This document will cover the creation of levels-of-detail (LODs) in your particle system as well as the in-game usage of them.
Cascade LOD Controls
The following section of the Cascade toolbar covers the LOD controls.
Cascade LOD Controls

A breakdown of each control follows:
| Button | Name | Description |
|---|---|---|
 |
Regenerate Lowest LOD Duplicating Highest Button | When the Regenerate Lowest LOD Duplicating Highest button is pressed, the particle system will remove all existing lower LOD levels and regenerate a new the lowest that is an exact copy of the highest level. |
 |
Regen Lowest LOD Button | When the Regen Lowest LOD button is pressed, the particle system will remove all existing lower LOD levels and regenerate a new the lowest. |
 |
Jump to Lowest LOD Button | When the Jump to Lowest LOD button is pressed, the system will be set to the lowest available static LOD. |
 |
Jump to Lower LOD Button | When the Jump Lower to LOD button is pressed, the system will be set to the next available lower static LOD than the current LOD setting. |
 |
Add LOD before current Button | When the Add LOD before current button is pressed, the system will insert a new static LOD level before the currently loaded LOD. |
 |
Current LOD | The current LOD info boxes show which LOD is currently loaded as well as how many LODs exist in the particle system. |
 |
Add LOD after current Button | When the Add LOD after current button is pressed, the system will insert a new static LOD level after the currently loaded LOD. |
 |
Jump to Higher LOD Button | When the Jump to Higher LOD button is pressed, the system will be set to the next available higher static LOD than the current LOD setting. |
 |
Jump to Highest LOD Button | When the Jump to Highest LOD button is pressed, the system will be set to the highest available static LOD. |
 |
Delete LOD Button | When the Delete LOD button is pressed, the currently selected static LOD level will be deleted from the particle system. |
Creating LOD Levels in a Particle System
The following section will go over the intended design flow for creating particle systems will full LOD support. The process can be broken down like so:
- Create your overall desired effect. This will be the highest LOD level.
- Next, create the lowest LOD level.
- Add any other LOD levels between the two in order to create a smooth transition from highest quality to lowest.
Modules can only be added/deleted when editing at the highest LOD level.
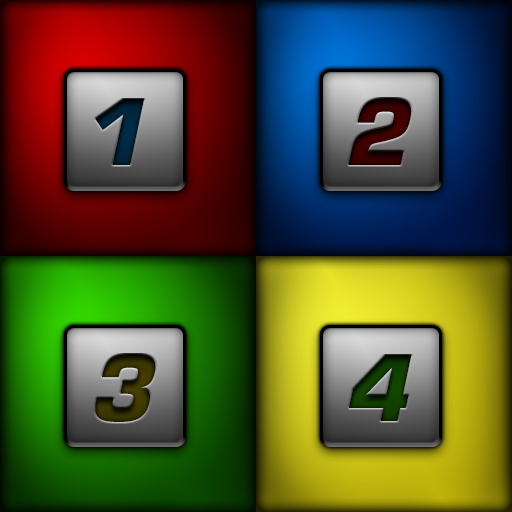
In this example, we have a single SubUV emitter. It is set up in such a way that SubUV coordinate 0 shows a number 1, coordinate 1 shows a number 2, and so on. The texture applied looks like this:
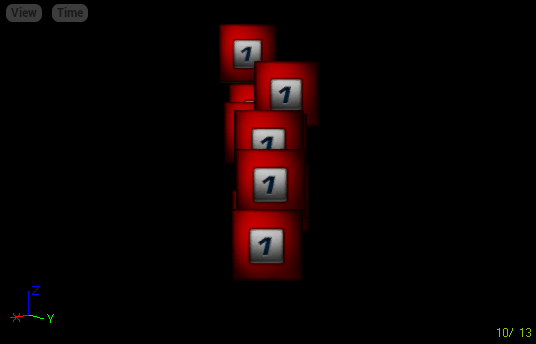
We set up the highest LOD level
Highest LOD Level
Once the designer feels the particle system is ready for LOD development, they should select Regenerate Lowest LOD from the toolbar. This will cause the system to regenerate the lowest LOD level. (It will also delete any static LOD levels that were created in the interim.) At the current time, this will simply duplicate the highest LOD level with a lower spawn rate.
After selecting the lowest LOD level, tweaking of values can commence on it to get the appropriate look. One thing to note is that by default, all modules in the static LOD level are marked un-editable. This is represented by the module showing a marbled background.
| Modules viewed at highest LOD | Modules viewed at lowest LOD |
|---|---|
 |
 |
To edit a module in a static LOD level, it must be enabled. This is done by right-clicking the module and selecting Duplicate from Higher from the context menu.
The available options work as follows:
| Option | Description |
|---|---|
| Duplicate from Higher | Enables the module for editing by duplicating the settings of the next higher LOD. |
| Share from Higher | Enables the module for editing by sharing the settings of the next higher LOD. This means that editing one will automatically edit the other in the same way. |
| Duplicate from Highest | Enables the module for editing by duplicating the settings of the highest LOD. |
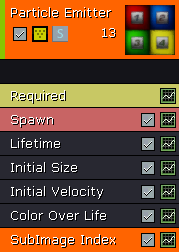
In our example, we have enabled the SubImage Index module for editing and set the index to 3. This results in an emitter showing a yellow 4, and is shown below:
Lowest LOD Level
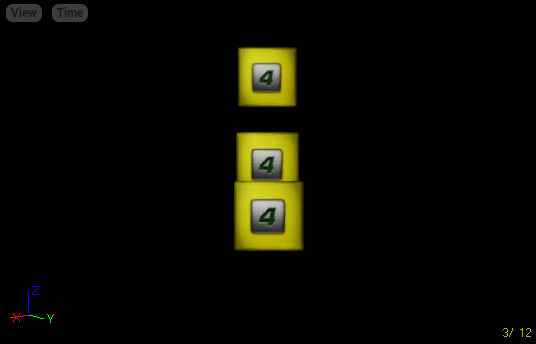
Note that the spawn rate was automatically set to 10% of the highest LOD level.
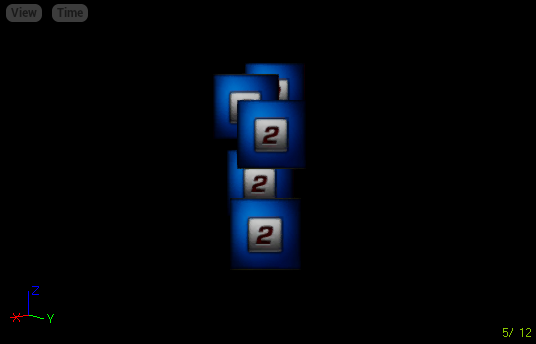
The next step would involve adding a static LOD in-between the highest and lowest by pressing the Add LOD before current button (assuming you are still viewing the lowest LOD). The SubImage Index module is enabled and has the index set to 1. This results in the emitter showing a blue 2, as shown below:
LOD Level 1
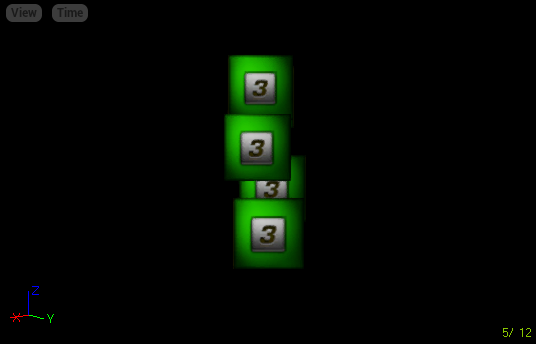
The same was done for another static LOD between the first static LOD and the lowest LOD by pressing the Add LOD after current button and enabling the SubImage index module. The SubImage Index was set to 2 resulting in an emitter displaying a green 3, as shown below:
LOD Level 2
LOD Method and Distance Settings
There are several methods for accomplishing in-game control of particle system LOD. An enumeration in each particle system called LODMethod provides the method for determining this mode, which in turn controls how LOD distances will be handled.
The following image shows the property window for our particle system example:
The LODDistances Property Window

In this example, LOD 0 (the highest) would be used when the emitter is from [0..1249] units from the camera. LOD 1 would be from [1250..1874], LOD2 from [1875..2499], and LOD3 when the distance is greater than 2500 units.
The LODDistanceCheckTime is used to set how often (in seconds) each ParticleSystemComponent set to Automatic mode will perform distance checks for LOD determination at run-time. In this case, each instance of this particle system in the level will perform its distance check every quarter of a second.
| Property | Description | ||||||||||||||||
|---|---|---|---|---|---|---|---|---|---|---|---|---|---|---|---|---|---|
| LOD | |||||||||||||||||
| LOD Distance Check Time | This is how often (in seconds) the system should perform a distance check to determine the LOD level to utilize. (Only used when LODMethod is set to Automatic.) | ||||||||||||||||
| LOD Method | This enumeration indicates the method the system should utilize for selecting appropriate LOD levels. Several methods are available:
|
||||||||||||||||
| LODDistances | An array of distances for determining which LOD level to utilize. (Only used when LODMethod is set to Automatic.) These numbers recommend the minimum distance away for the LOD level to be selected. For example, consider a system with 3 LOD levels:
|
||||||||||||||||
| LODSettings | An array of structs determining specific settings to use for each individual LOD. Currently, the only setting Lit controls whether the ParticleSystem accepts lights when the given LOD is in use. |