
Hardware and Software Requirements
This page covers the hardware and software requirements for Unreal Engine 5. It also describes what is installed by the pre-requisites installer included in the Unreal Engine installer.
Recommended Hardware
| Operating System | Windows 10 64-bit version 1909 revision .1350 or higher, or versions 2004 and 20H2 revision .789 or higher. |
| Processor | Quad-core Intel or AMD, 2.5 GHz or faster |
| Memory | 8 GB RAM |
| Graphics Card | DirectX 11 or 12 compatible graphics card |
| RHI Version |
|
| Operating System | Latest MacOS Monterey |
| Processor | Quad-core Intel, 2.5 GHz or faster |
| Memory | 8 GB RAM |
| Video Card | Metal 1.2 Compatible Graphics Card |
| Operating System | Ubuntu 22.04 |
| Processor | Quad-core Intel or AMD, 2.5 GHz or faster |
| Memory | 32 GB RAM |
| Video Card | NVIDIA GeForce 960 GTX or Higher with latest NVIDIA binary drivers |
| Video RAM | 8 GB or more |
| RHI Version |
|
To get the most out of rendering features of Unreal Engine 5 such Nanite and Lumen, see the Requirements for UE5 Rendering Features section of this page.
Minimum Software Requirements
Minimum requirements for running the engine or editor are listed below.
| Running the Engine | |
|---|---|
| Operating System | Windows 10 |
| DirectX Runtime | DirectX End-User Runtimes (June 2010) |
| Running the Engine | |
|---|---|
| Operating System | macOS latest Monterey |
| Running the Engine | |
|---|---|
| Operating System | Any reasonable new Linux distro from CentOS 7.x and up |
| Linux Kernel Version | kernel 3.x or newer |
| Additional Dependencies | glibc 2.17 or newer |
The requirements for programmers developing with the engine are listed below.
| Developing with the Engine | |
|---|---|
| All 'Running the Engine' requirements (automatically installed) | |
| Visual Studio Version |
|
| iOS App Development | |
| iTunes Version | iTunes 12 or higher |
| Developing with the Engine | |
|---|---|
| Xcode Version | 12.4 |
| Developing with the Engine | |
|---|---|
| Operating System | Ubuntu 20.04 |
| Compiler | clang 11.0.1 |
| Optional | |
| IDE | Visual Studio Code, CLion, QtCreator |
Software Installed by the Prerequisite Installer
The Unreal Engine includes a prerequisite installer that installs everything needed to run the editor and engine, including several DirectX components and Visual C++ redistributables. When you install Unreal Engine through the Epic Games Launcher, the Launcher automatically installs these prerequisites for you. However, you may need to run the prerequisite installer yourself if you build Unreal Engine from source, or if you need to prepare a computer with all the Unreal Engine prerequisites for a specific purpose—for example, if you are setting up a fresh computer to act as a Swarm Agent.
You can find the installer in the Engine/Extras/Redist/en-us folder under your Unreal Engine installation location.
Support for 32-bit platforms has been removed in Unreal Engine 5.
If you use Perforce to get the Unreal Engine source code, you'll also find precompiled binaries in the same Engine/Extras/Redist/en-us folder of the Perforce repository. The source for the installer is under Engine/Source/Programs/PrereqInstaller.
The following table lists the software that is installed by the prerequisite installer.
| DirectX Components | Visual C++ Redists |
|---|---|
| XInput 1.3 (April 2007) | Visual C++ 2010 CRT |
| X3DAudio 1.7 (February 2010) | Visual C++ 2010 OpenMP library |
| XAudio 2.7 (June 2010) | Visual C++ 2012 CRT |
| D3D Compiler 4.3 (June 2010) | Visual C++ 2013 CRT |
| D3DCSX 4.3 (June 2010) | Visual C++ 2015 CRT |
| D3DX9 4.3 (June 2010) | Visual Studio 2019 redistributable |
| D3DX10 4.3 (June 2010) | |
| D3DX11 4.3 (June 2010) |
The most important DirectX components from that list are the XInput, X3DAudio, and XAudio dependencies. These aren't included in standard installations of DirectX (and aren't distributed with Windows by default), so they have to be installed manually or distributed with the application.
Some features of Unreal Engine that require DirectX 12, require at minimum Windows 10 version 1703 (Window Creator Update). For the best experience that supports features like Nanite, Virtual Shadow Maps, and Lumen when using Hardware Ray Tracing, we recommend using Windows 10 version 2004 or 20H2.
Graphics Card Drivers
We currently recommend using the latest stable releases from each card manufacturer:
Performance Notes
This list represents a typical system used at Epic, providing a reasonable guideline for developing games with Unreal Engine 5:
-
Windows 10 64-bit (Version 20H2)
-
64 GB RAM
-
256 GB SSD (OS Drive)
-
2 TB SSD (Data Drive)
-
NVIDIA GeForce RTX 2080 SUPER
-
Xoreax Incredibuild (Dev Tools Package)
-
Six-Core Xeon E5-2643 @ 3.4GHz
If you don't have access to Xoreax Incredibuild (Dev Tools Package), we recommend compiling with a machine having 12 to 16 cores.
Requirements for UE5 Rendering Features
Some rendering features of Unreal Engine 5 have different requirements than the minimum specifications.
| UE5 Feature | System Requirements |
|---|---|
| Lumen Global Illumination and Reflections | Software Ray Tracing:
Hardware Ray Tracing:
|
| Nanite Virtualized Geometry |
|
| Virtual Shadow Maps |
|
| Temporal Super Resolution | Runs on any video card that supports Shader Model 5, but the limit of 8UAVs per shader has performance implications. Temporal Super Resolution shaders compile with 16bit types enabled on D3D12 that supports Shader Model 6. |
Acquiring Unreal Engine
Unreal Engine can be downloaded by licensees from Epic's Perforce (P4V) proxy server. The login credentials for the Perforce server are provided to your team's technical lead by Epic Games in your UDN welcome email. Only one set of login credentials is provided to each team.
Source Code Branches
You'll notice that we've published UE's source code in several branches.
Branches whose names contain dev, staging, and test are typically for internal Epic processes, and are rarely useful for end-users Other short-lived branches may appear from time to time as we stabilize new releases or hotfixes.
Release Branch
The Release branch always reflects the current official release. These are extensively tested by our QA team, so they make a great starting point for learning Unreal Engine and for making your own projects. We work hard to make releases stable and reliable, and aim to publish a new release every few months.
Main Branch
Most active development on UE happens in the ue5-main branch. This branch reflects the latest release of the engine and may be buggy or it may not compile. We make it available for developers who are eager to test new features or work in lock-step development with us.
If you choose to work in this branch, be aware that it is likely to be ahead of the branches for the current official release and the next upcoming release. Therefore, content and code that you create to work with the ue5-main branch may not be compatible with public releases until we create a new branch directly from ue5-main for a future official release.
Setting up a Perforce Server on your Local Machine
To avoid potential integration issues with our tools, such as UnrealGameSync, we recommend running a case-insensitive Perforce server.
There are two ways of running the Perforce server, P4D and P4S. P4D runs while an instance of the command line is running, so it is usually only used for spot-maintenance tasks. P4S is the service-based equivalent of P4D as it allows you to run the server in the background. The service is usually installed and started when you install the Perforce server tools.
Sometimes the service does not get run automatically. To turn the service on in Windows, first go into the Control Panel -> Administrative Tools ->Services applet. Then find the Perforce service in the list and start it:
Once the service is running, you can connect to your server using P4Admin. If this is the first connection to your server, then you can make a new user in the initial connection dialog:

Fill in the connection information for your Perforce server and press okay. Once you have connected to the server in P4Admin, you can make new depots, users, and groups pretty easily. Use P4V and the Unreal Editor to connect to the server with the credentials you supplied in the initial connection dialog.
Check out the P4Admin Documentation for more in-depth information on the ins and outs of Perforce.
P4 Typemap
Before you start adding files to your depot, you should set up your P4 Typemap so Perforce knows how to treat Unreal file types. Setting the typemap will affect how files get set to read only or writable inside of Perforce. However to do this, you will need to open a new command prompt and set up some p4 environment variables.
p4 set P4USER=your.username
p4 set P4PORT=localhost:1666
Replace the values above with your respective username and connection address. Open the typemap by entering the following in the command prompt.
p4 -P YourPassword typemap
You will then see a text window open; this is your server's typemap. The typemap below is an example that we have used in the past:
# Perforce File Type Mapping Specifications.
#
# TypeMap: a list of filetype mappings; one per line.
# Each line has two elements:
#
# Filetype: The filetype to use on 'p4 add'.
#
# Path: File pattern which will use this filetype.
#
# See 'p4 help typemap' for more information.
TypeMap:
binary+w //depot/....exe
binary+w //depot/....dll
binary+w //depot/....lib
binary+w //depot/....app
binary+w //depot/....dylib
binary+w //depot/....stub
binary+w //depot/....ipa
binary //depot/....bmp
text //depot/....ini
text //depot/....config
text //depot/....cpp
text //depot/....h
text //depot/....c
text //depot/....cs
text //depot/....m
text //depot/....mm
text //depot/....py
binary+l //depot/....uasset
binary+l //depot/....umap
binary+l //depot/....upk
binary+l //depot/....udk
binary+l //depot/....ubulk
Once edited, save the file by pressing Ctrl+S on your keyboard and then exit. The command prompt should then show Typemap saved.
Server on your Local Network
You can set up a server on your local network for people to use to collaborate with one another. To do this, follow the steps above on the server and connect using the server's name or IP from your clients.
Cloud Provider
There are various cloud providers that allow you to host Perforce servers off-site and to collaborate remotely. A quick search online for Perforce Hosting should turn up a few results. Each hosting provider is different, but all should end up with a set of credentials that you can use to connect. See also Connecting from Unreal Editor below for a note about connecting to Perforce cloud providers.
Setting up a Local Workspace
To work with files that are under Perforce control, you will need to set up a Workspace so that the files can be managed on your local machine. You can do this via P4V by opening up the Workspaces tab in the View dropdown:

To create a new workspace, right-click in the Workspace window and select the New Workspace option. Then enter a name for your workspace and a location where you want the files to be on your local machine, the Workspace Root.

Once you have a server and a workspace, you will want to start adding files to it. For the moment, this needs to be done initially outside the Editor via P4V. If you already have a workspace that someone else has set up with some files already, you can skip ahead. When you create a new project, you can choose whether it incorporates C++ code and Blueprint elements. If you are using C++ code in your project, you will see a Source/ directory as well. You should initially add only the following directories of your project:

Folders and files highlighted in Green should be added to your depot. The Binaries folder in Yellow is optional, depending on how your team wants to work together. It is not required if every team member is going to compile their editor/game themselves, but should be included in the initial add if any team members will just be grabbing a version from the depot to create content. Note that the server typemap setup above should mean that coders can compile their binaries without them being set to be Read-Only by Perforce.
Adding Files to Perforce
Adding files to Perforce is something that can be accomplished in the few following steps.
-
To add files/folders to Perforce, first select the files/folders in P4V and then right-click and select the Mark For Add option.

-
This will add the files to your default change list. All files that you add can be seen in the Pending change lists tab:

-
To submit something, first right-click on the change list and then select Submit. Then enter a change list description and click the Submit button.

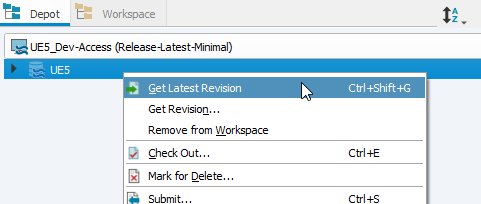
If you want to start work on a project that someone else has already started, you will need to get the latest revision from Perforce using P4V. To do this, find the project in the Depot View in P4V and then Right-click on the project you want to get and select Get Latest Revision. This will download all the files to the location you specified for your Workspace Root above.
Connecting from Unreal Editor
You can connect to your Perforce server right from the Editor by clicking on the Source Control icon on the Toolbar:

Once open, choose Perforce as the provider from the Source Control Login dialog and enter your login credentials. If you have a workspace already set up (that the current project is inside of), your login credentials should be populated automatically.

When using some servers, including many cloud providers - you may need to enter the Host and Password to access your depot from the Editor. You can do this by opening the advanced field at the bottom of the Perforce login dialog:

Downloading the Source Code
Please follow these instructions to download the Unreal Engine source code.
Please make sure you are running Visual Studio 2019 or higher for Windows Desktop installed before proceeding.
-
Install GitHub for Windows then fork and clone our repository.
To use Git from the command line, see the Setting up Git and Fork a Repo articles.
If you'd prefer not to use Git, you can get the source with the 'Download ZIP' button on the right. The built-in Windows zip utility will mark the contents of zip files downloaded from the Internet as unsafe to execute, so right-click the zip file and select 'Properties...' and 'Unblock' before decompressing it. Third-party zip utilities don't normally do this.
-
Install Visual Studio 2019.
All desktop editions of Visual Studio 2019 can build UE5, including Visual Studio Community 2019, which is free for small teams and individual developers. Be sure to include C++ support as part of the install, which is disabled by default.
-
Open your source folder in Explorer and run
Setup.bat.This will download binary content for the engine, as well as installing prerequisites and setting up Unreal file associations. On Windows, a warning from SmartScreen may appear. Click More info, then Run anyway to continue.
A clean download of the engine binaries may take some time to complete. Subsequent checkouts only require incremental downloads and will be much quicker.
-
Run
GenerateProjectFiles.batto create project files for the engine. It should take less than a minute to complete. -
Load the project into Visual Studio by double-clicking on the
UE5.slnfile. Set your solution configuration to Development Editor and your solution platform to Win64, then right click on the UE target and select Build. It may take anywhere between 10 and 40 minutes to finish compiling, depending on your system specs. -
After compiling finishes, you can load the editor from Visual Studio by setting your startup project to UE5 and pressing F5 to debug.
-
Install a Git client like GitHub for Mac, then fork and clone our repository.
To use Git from the Terminal, see the Setting up Git and Fork a Repo articles. If you'd rather not use Git, use the 'Download ZIP' button on the right to get the source directly.
-
Install the latest version of Xcode.
-
Open your source folder in Finder and double-click on Setup.command to download binary content for the engine. You can close the Terminal window afterwards.
If you downloaded the source as a .zip file, you may see a warning about it being from an unidentified developer (because .zip files on GitHub aren't digitally signed). To work around it, right-click on Setup.command, select Open, then click the Open button.
-
In the same folder, double-click GenerateProjectFiles.command. It should take less than a minute to complete.
-
Load the project into Xcode by double-clicking on the UE5.xcworkspace file. Select the ShaderCompileWorker for My Mac target in the title bar, then select the 'Product > Build' menu item. When Xcode finishes building, do the same for the UE5 for My Mac target. Compiling may take anywhere between 15 and 40 minutes, depending on your system specs.
-
After compiling finishes, select the 'Product > Run' menu item to load the editor.
Our developers and support teams currently use the latest version of Ubuntu; as a result, we may not be able to provide support for other Linux distributions (including other versions of Ubuntu).
-
Install a visual Git client and fork our repository. If you'd prefer not to use Git, use the Download ZIP button on the right to get the source as a zip file.
-
Open your source folder and run Setup.sh to download binary content for the engine.
-
Both cross-compiling and native builds are supported.
Cross-compiling is handy when you are a Windows (Mac support planned too) developer who wants to package your game for Linux with minimal hassle, and it requires a cross-compiler toolchain to be installed (refer to the Linux cross-compiling page).
Native compilation is discussed in a separate README.
This page shows Licensees how to download and build Unreal Engine from our source code repository on GitHub. If you'd like to download the binary version of Unreal Engine, read our Installing Unreal Engine documentation to learn how to Get Unreal.
Additional target platforms
-
Android support will be downloaded by the setup script if you have the Android NDK installed. See the Android Quick Start guide.
-
iOS development requires a Mac. Instructions are in the iOS Quick Start guide.
-
Development for consoles and other platforms with restricted access, like Sony PlayStation, Microsoft Xbox, and Nintendo Switch, is only possible if you have a registered developer account with those third-party vendors.
Depending on the platform, additional documentation or guidance may be available in the Unreal Developer Network support site, or as a downloadable archive in the section of the Unreal Engine Forums that is dedicated to your platform.
If you don't have access to these resources, first register a developer account with the third party vendor. Then contact your Epic Games account manager if you have one, or fill out and submit the Console Development Request form for Unreal Engine if you don't. Epic will contact you with a formal agreement to digitally sign. Once this is approved, you will receive instructions on how to access source code, binaries, and additional instructions for your platform.
Licensing and Contribution
Your access to and use of Unreal Engine on GitHub is governed by the Unreal Engine End User License Agreement. If you don't agree to those terms, as amended from time to time, you are not permitted to access or use Unreal Engine.
We welcome any contributions to Unreal Engine development through pull requests on GitHub. Most of our active development is in the master branch, so we prefer to take pull requests there (particularly for new features). We try to make sure that all new code adheres to the Epic coding standards. All contributions are governed by the terms of the EULA.
Next Steps
Now that you've downloaded and set-up Unreal Engine, you're ready to build the engine from source.
Footnotes
The first time you start the editor from a fresh source build, you may experience long load times. The engine is optimizing content for your platform to the derived data cache, and it should only happen once.
Your private forks of the Unreal Engine code are associated with your GitHub account permissions. If you unsubscribe or switch GitHub user names, you'll need to re-fork and upload your changes from a local copy.
Building Unreal Engine from Source
Read about Hardware and Software Specifications, and make sure that Microsoft Visual Studio is installed prior to building Unreal Engine (UE) from source. Also, depending on your system's specifications, it may take between 10 and 40 minutes to compile the Engine.
-
Inside the root directory, where you downloaded and adjusted the UE Source Code run
GenerateProjectFiles.batto set-up your project files.
All project files are intermediate (
[UERoot]\Engine\Intermediate\ProjectFiles). You must generate project files each time you sync a new build to ensure they are up to date. If you delete yourIntermediatefolder, you must regenerate project files using theGenerateProjectFilesbatch file. -
Load the project into Visual Studio by double-clicking
UE5.sln.
-
Set your solution configuration to Development Editor.

-
Set your solution platform to Win64.

-
Right-click the UE5 target and select Build.

For instructions on building the engine and creating executables on platforms other than Windows, please see Building Unreal Engine from Source.
Connecting to Perforce
Connect to Epic's Perforce Server
Connecting to the Epic Games Perforce server requires using the SSL feature, and you must be running a 2017.2 or later version of a Perforce client (P4V, p4, or API). You can take advantage of latency based routing to automatically connect to the closest Perforce regional proxy by using the global DNS name. Alternatively, you can connect directly to a regional proxy to ensure you always connect to the closest one.
If you are running a local proxy, you must connect through a broker instead of using the region proxy servers. You can connect to the global broker using the address below:
ssl:p4-licensee.epicgames.com:1666
-
Install the P4V Perforce client for Windows. The client can be downloaded from the Perforce Downloads page.
-
In the Open Connection dialog, enter the following connection info:
-
Server: ssl:p4-licensee.epicgames.com:1666
The address above should automatically direct you to a regional proxy with the best latency based on your geographic location. If, for some reason, you need to connect to a specific regional proxy, you can connect to them using the addresses below: United States East (Virginia): ssl:p4-licensee-east.us.epicgames.com:1666 United States West (Oregon): ssl:p4-licensee-west.us.epicgames.com:1666 Asia Pacific Northeast (Tokyo): ssl:p4-licensee-northeast.ap.epicgames.com:1666 Europe Central (Frankfurt): ssl:p4-licensee-central.eu.epicgames.com:1666
- User: Perforce username provided by Epic Games.
- Password: Perforce password provided by Epic Games.
-
-
Click OK to connect to the Perforce Server.
Click the image for full size.
-
When connecting to an endpoint for the first time, you must explicitly trust that endpoint.
- The Epic SSL fingerprint is
45:0D:78:E2:0E:9E:E4:82:45:80:16:36:29:5E:54:4D:66:31:6C:43. - P4V will prompt you to trust the new endpoint.
- Command line p4 uses the p4 trust command:
$ p4 trust -y.
- The Epic SSL fingerprint is
-
In P4V, choose Connection > New Workspace to create a new workspace for the engine. Enter the information below and click OK to create the workspace:
- Workspace name: Give your new workspace a name.
- Stream: Click Browse and select
//UE5/Release-Latestfrom the list of available streams.

-
In the Depot pane, expand the Filter Depot menu and select Tree Restricted to Workspace View.

Download Unreal Engine
Epic Games distributes Unreal Engine to licensees via the //UE5/Release-Latest stream in the Perforce depot. This contains the entire engine along with several additional projects in the form of example games, samples, and demos. You have the option of downloading everything or picking and choosing only the parts you want or need.
To get set up as quickly as possible, we recommend you only download the bare minimum to start with and then download other parts on an as-needed basis. This can dramatically reduce idle time spent waiting for the download to finish. We also provide a //UE5/Release-Latest-Minimal stream to help with this.
Because there are a large number of files in the //UE5/Release-Latest stream and the total download size is many gigabytes, the download can take a long time when syncing the entire branch.
-
Right-click on the stream you want to download and choose Get Latest Revision.
-
The latest version of all files will be downloaded.
Launching the Editor
The process of running the editor requires passing the name of the project to run as an argument to the executable.
You can add the -debug switch to force the executable to load the debug version of the modules for your project, which contain all of the debugging symbols. This is necessary even when debugging through Xcode with the configuration set to Debug because the main executable is always compiled using the Development configuration. Of course, you must first compile your modules using the Debug configuration so they exist for the executable to load.
The process of running the editor requires passing the name of the project to run as an argument to the executable.
You can add the -debug switch to force the executable to load the debug version of the modules for your project, which contain all of the debugging symbols. This is necessary even when debugging through Visual Studio with the configuration set to Debug because the main executable is always compiled using the Development configuration. Of course, you must first compile your modules using the Debug configuration so they exist for the executable to load.
Running the Editor from the Command Line
-
From a command prompt, navigate to your
[LauncherInstall]/[VersionNumber]/Engine/Binaries/Macdirectory. -
Run the
UEEditor.apppassing it the path to your project:open UEEditor.app --args "[ProjectPath]/[ProjectName].uproject"
-
From a command prompt, navigate to your
[LauncherInstall][VersionNumber]\Engine\Binaries\Win64directory. -
Run the
UEEditor.exe,passing it the path to your project.UEEditor.exe "[ProjectPath][ProjectName].uproject"
Running the Editor from the Executable
-
Navigate to your
[LauncherInstall][VersionNumber]\Engine\Binaries\Win64directory. -
Right-click on the
UEEditor.exeexecutable and choose Create shortcut. -
Rename the shortcut to something like MyProject - Editor.exe as this reflect that this shortcut runs the MyProject game editor.
-
Right-click on the newly created shortcut and choose Properties.
-
Add the name of the game to run as an argument at the end of the Target property:
[LauncherInstall][VersionNumber]\Engine\Binaries\Win64\UEEditor.exe "[ProjectPath][ProjectName].uproject" -
Press OK to save the changes.
-
Double-click the shortcut to launch the editor.
The editor must be run from the command prompt to load a specific project directly or with no arguments to access the Project Browser.
Running the Editor with No Arguments (Stand-alone)
If the editor is not set to open the most recent project at startup, running the editor executable without any arguments will launch the Project Browser. From here, you can create a new project , open your existing projects , or open content examples and sample games .
Creating Your First Project
When you open Unreal Editor, the Project Browser will appear. The Project Browser provides a jumping off point from which you can create projects, open your existing projects, or open sample content like sample games and Showcases.
When you launch Unreal Engine, the Unreal Project Browser opens automatically. This is where you can:
-
Create a new project.
-
Open an existing project.
-
Manage existing projects.
The diagram below illustrates the steps to create a new project in Unreal Engine.

Creating a new project in Unreal Engine from the Project Browser window.
To create a new project, follow these steps:
-
Select the development category (1) that best matches your industry and project goals.
You can select from the following categories:
- Games
- Film, Television, and Live Events
- Architecture, Engineering, and Construction (AEC)
- Automotive, Product Design, and Manufacturing (APM)
-
Select a template (2) for your project. The templates you can choose from are based on the category you selected in step 1.
Unreal Engine contains a number of project templates you can use as a starting point for your own projects. To learn more about the different project templates available, refer to the Templates Reference page.
-
Configure the Project Defaults (3). In this section, you can select your target platform (that is, the hardware where your game or application will run, like a computer or a mobile device), configure quality and ray tracing settings, and more.
Some of the settings below may not be available for certain templates. For example, the Handheld AR template can only use Blueprint implementation.
You can configure the following settings:
Setting Description Implementation Select how you want to implement your project's logic, such as character movement, level transitions, and so on.
You can choose from the following options:
-
Blueprint, if you want to build your project in the Unreal Editor, and use the Blueprint Visual Scripting system to create interactions and behavior.
-
C++, if you want to build your project by programming with C++ in Visual Studio.
For more information about these implementation methods, refer to the following pages:
Target Platform Select the kind of platform your project is intended for:
- Desktop
- Mobile
Quality Preset Select the maximum quality level, based on which platform your project targets. We recommend that you choose:
- Maximum, if you are developing your project for a computer or game console.
- Scalable, if you are developing your project for mobile devices.
Starter Content Select whether you want your new project to include starter content. Starter content includes some simple Static Meshes with basic textures and Materials. It is useful if you want to start learning and experimenting straight away, without worrying about sourcing and importing custom content.
Ray Tracing Select whether to enable or disable ray tracing for your project.
For more information about ray tracing in Unreal Engine, refer to the Hardware Ray Tracing and Path Tracing Features page.
-
-
Select where you want to store your project, and give your project a name (4).
-
Click Create (5) to finish creating your new project.
Result
Unreal Engine creates a new project with the settings you configured, and then automatically opens the project.
Compiling Code Projects
If you create a project with the Blank template, or any of the Blueprints Only templates, you can immediately begin working with your project in Unreal Editor. When working with any game or engine C++ code, however, you will need to compile your code in order to see any changes reflected in the game.
Unreal Engine (UE) uses a custom building method using the UnrealBuildTool (UBT) which handles all the complex aspects of compiling the project and linking it with the engine. This process occurs transparently allowing you to simply build the project through the standard Visual Studio build workflow.
UnrealBuildTool uses the *.build.cs and *.target.cs files to build the game project. These are automatically generated when a project is created using a C++ template, or when the CPP Class Wizard is used to add code to a project created from a Blueprints Only template.
Build Configuration
Unreal projects have multiple targets, including Editor, Client, Game, and Server, described by *.target.cs files. Furthermore, each of these can be built to different configurations. In Visual Studio, this manifests as a Visual Studio *.vcxproj file with different configurations for each target. The solution configurations are named as [Configuration][Target Type] (for example, "DevelopmentEditor" for the default editor target, and "Development" for the default standalone game target). The configuration you use will be determined by the purposes of the build you want to create.
Every build configuration contains two keywords, and the first keyword indicates the state of the engine and your game project. For instance, if you compile using a Debug configuration, you will be able to debug your game's code. The second keyword indicates the target you are building for. For example, if you want to open a project in Unreal, you need to build with the Editor target keyword.
| Build Configuration - State | Description |
|---|---|
| Debug | This configuration contains symbols for debugging. This configuration builds both engine and game code in debug configuration. If you compile your project using the Debug configuration and want to open the project with the Unreal Editor, you must use the -debug flag in order to see your code changes reflected in your project. |
| DebugGame | This configuration builds the engine as optimized, but leaves the game code debuggable. This configuration is ideal for debugging only game modules. |
| Development | This configuration enables all but the most time-consuming engine and game code optimizations, which makes it ideal for development and performance reasons. Unreal Editor uses the Development configuration by default. Compiling your project using the Development configuration enables you to see code changes made to your project reflected in the editor. |
| Shipping | This is the configuration for optimal performance and shipping your game. This configuration strips out console commands, stats, and profiling tools. |
| Test | This configuration is the Shipping configuration, but with some console commands, stats, and profiling tools enabled. |
| Build Configuration - Target | Description |
|---|---|
| Game | This configuration builds a stand-alone executable version of your project, but requires cooked content specific to the platform. Please refer to the Packaging Projects Reference page to learn more about cooked content. |
| Editor | To open a project in Unreal Editor and see all code changes reflected, the project must be built in an Editor configuration. |
| Client | If you are working on a multiplayer project using UE networking features, this target designates the specified project as being a Client in UE's client-server model for multiplayer games. If there is a <GAME_NAME>Client.Target.cs file, the Client build configurations will be valid. |
| Server | If you are working on a multiplayer project using UE networking features, this target designates the specified project as being a Server in UE's client-server model for multiplayer games. If there is a <GAME_NAME>Server.Target.cs file, the Server build configurations will be valid. |