Niagara systems create visually stunning effects. However, when designing simulations it's important to balance the visual look with the performance. At times, you may create a nice effect, but find it takes up too much memory to use on a target device.
One solution to this is to bake out the Niagara simulation to a flipbook. This creates a tiled image that can then be loaded onto any material.
For example, you want to create a 3D fluid effect, but you are not able to run it in realtime on your target platform. So, after creating the 3D fluid effect, you can use the Baker to bake it to a flipbook, and then apply this back to a 2D sprite emitter. This way, you have very efficient performance for games or for non-hero effects that may be farther in the background.
Goals
In this tutorial, use the Niagara Baker to export a flipbook from a simulation.
Objectives
-
Set up the capture for the flipbook
-
Perform the capture
-
Connect the flipbook to a new emitter
Set Up the Capture
-
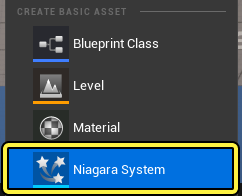
Open an existing Niagara system in the Niagara Editor. In this example, the Grid 3D Gas Colored Smoke example is used, however you can use any Niagara system. To use Grid 3D Gas Colored Smoke, right-click in the Content Drawer and select Create Basic Asset > Niagara System.
-
Create a flipbook from a Niagara Fluids template. These templates are available when you have the Niagara Fluids plugin enabled. However, a flipbook can be generated from any Niagara system. Select Niagara Fluids > 3D Gas from the left menu, then select Grid 3D Gas Colored Smoke and click Create.
Click image for full size.
-
On the main toolbar, there is a new button called Baker. Select Open Baker Tab to display the Baker panel.
Click image for full size.
Navigating the User Interface
The Baker panel user interface has the following parts.
Click image for full size.
-
Bake button
-
Niagara Preview
-
Flipbook Preview
-
Playback Toolbar
-
Flipbook Options
Frame the Niagara Preview
To get started, you need to frame the simulation within the Niagara Preview window. It will bake out the simulation to a series of flat, 2D frames, so make sure that you set up the desired angle and size.
To adjust the framing, you can click and drag directly in the Niagara Preview window.
-
Left-click and drag to orbit.
-
Middle-click and drag to pan.
-
Right-click and drag to zoom.
-
Click F to center the frame on the system origin.
You can also enter the values numerically in the Camera settings. Select the Camera Viewport Mode as desired, then edit the numerical values in the corresponding field.
Click image for full size.
Adjust the Timing
Use the Playback Toolbar to play, pause, step forward, and step backward in the simulation to preview what will be baked out.
Click image for full size.
You can also adjust the timing in the Timeline settings, so that you only bake out a portion of the simulation. For example, adjust Start Seconds to start the flipbook partway through the simulation playback. Adjust Duration Seconds to change when it will end.
Set the Frames Per Second to adjust the tick rate of the component. You usually should not need to adjust this value. Set it to the same value as for the content you author. The Niagara System Editor defaults to 30 fps. Setting this value too low can result in the same flipbook frame being rendered multiple times, for example if you were to render a flipbook over 1 second with 30 frames captured and you set the Frames Per Second to 20 you would only record 20 unique frames rather than 30.
Adjust the Texture Size
The way the flipbook bakes, it will export a tiled image where each tile represents a frame of the flipbook. You need to set how many tiles you want to map onto the texture, as well as the total texture size. By default, the texture is set up with 8 tiles along the X axis, 8 tiles along the Y axis, and a total texture size of 1024 x 1024 pixels.
Click image for full size.
That means that each tile will be a size of 128 x 128 pixels. You can adjust these values under the Texture settings.
Click image for full size.
Set the number of tiles by adjusting Frames Per Dimension. Adjust the size of the overall texture by changing Texture Size.
The baker does not scale your tiles to fit into the final resolution. For an ideal result, make sure that the number of tiles divides evenly into the overall texture size.
For example, if you set Frames Per Dimension to be 10 x 10, but kept the Texture Size at 1024 x 1024, then the system would try to map 10 tiles into 1024. However, that would result in each tile being 102.4 pixels wide, and the system cannot account for a partial pixel. Therefore, it would map each tile to a size of 102, and you would end up with 4 extra pixels of padding at the right and bottom of your texture.
This can cause the sub UV mapping to be slightly off, and cause your atlas to jitter as it plays. For ideal behavior, set your Texture Size to be a power of 2, and the Frames Per Dimension to be a number that divides evenly into that texture size.
Set Additional Texture Properties
By default, when Source Binding is set to None, the Baker will output the SceneColorHDR values. Usually, this is the desired outcome. However, all available GBuffers and particle attributes are available, and you can choose from any of them from the dropdown menu for Source Binding.
Click image for full size.
Before you generate your first flipbook, the Generated Texture is set to None. After you perform your first capture, this is replaced by the new texture that you create.
Perform a Capture
Now that you have set up the texture to look the way you want, with the correct framing and timing, you can perform a capture.
-
From the Niagara Preview window, click Bake.
Click image for full size.
-
You now see a progress bar as the system renders out the flipbook. When complete, a dialog opens and you can name your texture file.
Click image for full size.
-
Now that it has rendered out, your new texture replaces the active texture in the Texture settings of the Baker window.
Click image for full size.
If you generate another capture, with this texture selected under Generated Texture, it will overwrite this texture.
-
If you would like to generate a new variation of the texture, click the dropdown for the Generated Texture, then select Clear. You can then adjust any of the settings and create a new texture.
Click image for full size.
Now that you exported the texture, you can add it into any new emitter. You can also see the final preview of what the flipbook texture looks like.
Use the Flipbook Texture in an Emitter
To use the flipbook in an emitter, you must use a Sprite Renderer.
-
To set this up, right-click in the Content Drawer and create a new Niagara System.
-
Select New system from selected emitter(s), and then Simple Sprite Burst.
-
Click plus (+) to add the emitter, then click Finish.
Click image for full size.
Add the Sub UV Animation Module
To add in your flipbook, you need to add a new module in the Particle Update group, as well as adjust some parameters on the Sprite Renderer.
-
First, click plus (+) next to Particle Update, and select Sub UVAnimation. This will add the module to the stack.
Click image for full size.
-
Adjust the start frame and end frame in the module properties to match the number of frames in your animation. In this example, there were 8 x 8 frames, for a total of 64. Since the frame starts on frame 0, leave the settings at 0 and 63.
Click image for full size.
Adjust the Settings on the Sprite Renderer
-
Select the Sprite Renderer to adjust the properties. In the Sub UV section, specify the number of tiles in the grid in the Sub Image Size field. In this example, leave this as 8 x 8.
Click image for full size.
-
Now you need to create a new Material to link your Sub UV texture to, and add that into the Sprite Renderer. Click the dropdown menu next to Material, then select Create New Asset > Material.
Click image for full size.
-
A dialog box appears. Name your Material and choose where to save it.
Click image for full size.
-
Double-click the Material in the Content Browser to open it in the Material Editor. In the Details panel, set the Blend Mode to Translucent.
Click image for full size.
-
In the Material Editor, right-click and search for 'texture sample' to add the TextureSample node.
Click image for full size.
-
Select the TextureSample node. In the Details panel, set the Texture to be the one you saved from the flipbook baker.
Click image for full size.
By default, the color channels are premultiplied with black. To avoid black fringing around the sprites, you can use a divide node to remove this from the RGB channels.
-
Right-click to add a Divide node.
-
Conenct the RGB value from the TextureSample node to the A pin on Divide node, and the alpha A from the TextureSample value to the B pin on Divide node.
-
Connect the output of the Divide node to Emissive Color.
-
Finally, connect the alpha A value from the TextureSample to the Opacity on the material.
Click image for full size.
Final Result
Now that your Material is properly set in the Sprite Renderer, open the Niagara System in the Niagara Editor. You now see the flipbook that you rendered out playing in the Preview window.