
Motion Matching in Unreal Engine is a query-based animation pose selection system. Contained within the Pose Search plugin, you can use the Motion Matching Animation Blueprint node as a dynamic alternative to State Machines, or Blendspaces. Unlike traditional animation systems, Motion Matching can make informed animation pose selections from a set of animation data, to create a responsive and reactive animation system, without the need to set up transition or blending logic between Animation Sequences.

The Motion Matching node queries a dynamic character system, such as a movement model, chooser system, or variable states, and makes informed animation pose selection, from a set of animation data stored in a Database asset, to match the query. Motion Matching character animation results are more reactive and responsive to gameplay systems than traditional State Machines or blend logic.
With Motion Matching, you can increase your character's animation fidelity, by just adding more animation data to the Database asset. With more animation data, the Motion Matching node has access to more data to select from, without the need to alter or implement additional transition logic.
Unreal Engine's Motion Matching system also contains a suite of settings and debugging tools that you can use to tune your animation system to match the goals of your project. With these tools, you can observe selection choices, edit the query process, and set selection criteria weights.
This document provides an overview of Motion Matching in Unreal Engine as well as an example workflow of how to set up a character's locomotion animation system using Motion Matching.
Prerequisites
- Enable the Pose Search Plugin. Navigate in the Menu Bar to Edit > Plugins and locate the Animation Locomon Library in the Animation section, or use the Search Bar. Enable the Plugin and restart the editor.

- Enable the Motion Trajectory Plugin. Navigate in the Menu Bar to Edit > Plugins and locate the Animation Locomon Library in the Animation section, or use the Search Bar. Enable the Plugin and restart the editor.

The Motion Trajectory plugin contains a modified version of the Movement Component, designed to be used in conjunction with Motion Matching. This component is not required for every Motion Matching implementation, but serves as the character's system to query.
- Your project contains a Character, with a set of locomotion animation such as walking, running, and turning.
Motion Matching Setup
Here you can follow an example workflow about how to set up a locomotion based Motion Matching system in your project.
Create a Motion Trajectory Component
For a locomotion Motion Matching implementation, a character trajectory is needed to query, in order to match selected poses with. Adding a Motion Trajectory Component to your character is an optional step when setting up a Motion Matching system. The Motion Trajectory Component is serving as a system for the Motion Matching node to query, in order to match selected poses with.
In an alternative Motion Matching implementation, such as a climbing, dialogue, or other system, you will need to add or define the character system you want to query, instead of setting up a Motion Trajectory component.
In your Character Blueprint, add a Character Trajectory Blueprint Component using Add (+) in the Components panel, and selecting Character Trajectory.

You can now create a reference variable for the Character Trajectory component in your Character Blueprint, or Animation Blueprint that will be needed to drive the Motion Matching node.

Motion Trajectory Settings
Here you can reference a list of the Motion Trajectory components properties:
| Property | Settings |
|---|---|
| History Length Seconds | Set the amount of time in the past that we store for selection evaluation, in seconds. |
| History Samples Per Second | Set the amount of samples, or points in time, in the History Length Seconds that are stored across the History Time. For example, if the History Length is The default values will likely work for 99% of use cases. |
| Rotate Towards Movement Speed | When enabled, this property controls how quickly the trajectory will rotate to face the acceleration of the character. This property is used in a non strafe setup locomotion setups. |
| Maximum Controller Rotation Rate | Set the maximum rotation rate the controller can input the motion trajectory will track. Higher values increase the rotation that will be allowed. Negative values will disable this feature. |
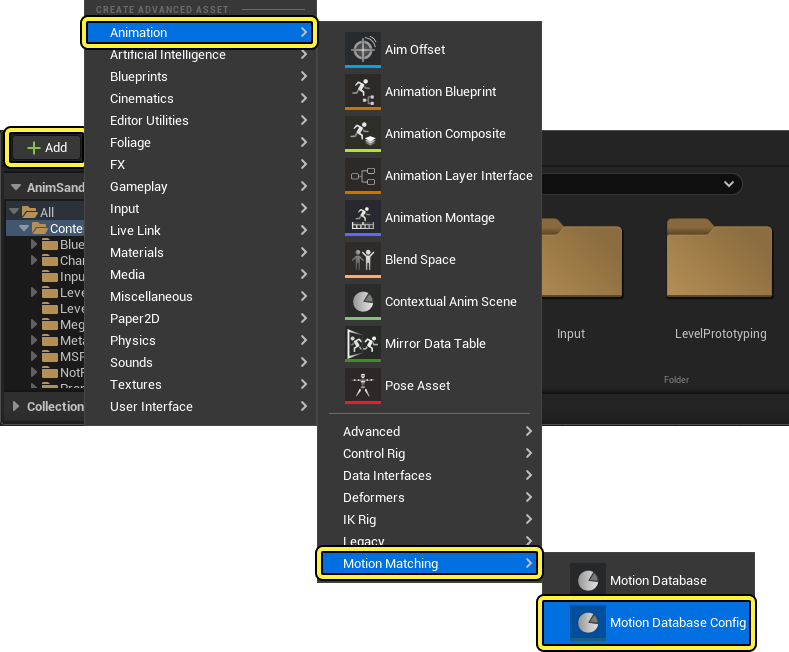
Create a Motion Database Config Asset
The Motion Database Config asset is the control center for a Motion Matching animation system in Unreal Engine. Using the Motion Database Config asset you can define the associated Animation Database assets, as well as define the selection process behavior to fine tune the Motion Matching system to meet your animation system's needs.
To create a Motion Database Config asset, right-click in the Content Browser and navigate to Animation > Motion Matching and select the Motion Database Config asset.
Double-click the Motion Database Config asset in the Content Browser to open the asset. In the Details panel, select your character's Skeleton asset from the Skeleton property drop-down menu.

Use the Sample Rate property to set the frequency, in frames, the node will query the character system. In this workflow example, a value of 30 is used.

New Motion Database Config assets come preconfigured with two channels, the Trajectory channel and the Pose Search channel. With the Trajectory channel you can set points on the Motion Trajectory Component to sample in order to make pose selections. The default settings will work for this example workflow, however you can add additional samples using (+) Add in the Samples property, to provide more usable data for the Motion Matching system to make selections.
It is recommended that you use as few samples as possible. While more samples can provide the Motion Matching node with more accurate data, it can distort the system's results.

Each Index within the Trajectory Channel, you can assign Flags, to determine what type of data the sample point will look for when querying the Motion Trajectory Channel. The default values will work for this workflow example. For more information about the Trajectory Channel's settings and Flags, see the Trajectory Channel Reference section.

With the Pose Channel, you can set bone definitions for the Motion Matching system to match poses with the query system. The default asset comes pre-configured with bone definitions for the Mannequin Skeleton's foot bones foot_l and foot_r. If you are using a different skeleton replace these bone definitions with your skeleton asset's left and right foot bones.

You can also set Flags for each sampled bone to determine what type of data from the sampled bone the motion matching system will look at in order to make selections. For more information about the Pose Channel's settings and the difference Flags, see the Pose Channel section.
The Pose Channel can use any bone as a reference point. For a locomotion motion matching animation system, you will want to select a pair of bones that will be useful to track motion data related to motion, such as the characters feet. In an alternative system, such as a climbing system, you will want to select bones that make more sense in containing valuable data, such as the characters' hand bones.
Save the Motion Database Config asset.
Optionally, you can also set a Mirror Data Table asset in the Mirror Data Table property using the drop-down menu. Setting a Mirror Data Tabel asset will allow the schema to search a mirrored version of your characters Animation assets.

You can add more channels to add additional channels you want to influence the selection, such as the hands.
Adding additional channels and samples within the channels you have will result in a higher performance cost for the Motion Matching system to run. For optimal performance it is recommended to only add channels and samples for necessary elements.
Motion Database Config Asset Reference
Here you can reference a list of the Motion Database Config asset's properties and settings.
| Property | Description |
|---|---|
| Skeleton | Here you can define the Skeleton asset for your character that will use the Motion Matching node. |
| Mirror Data Table | Here you can set a Mirror Data Table asset to provide mirrored animation sequences for the Motion Matching node to use when making animation selections. |
| Data Preprocessor | Set the type of operation performed to the full pose features dataset. You can select from the following options:
|
| Sample Rate | Set the update rate at which the animation data is sampled in the database. The higher the Sample Rate the more refined animation pose searches will be, but will increase the memory cost of the system. |
| Channels | Here you can add and set Channels for the Motion Matching system to use when Querying, Searching, and Matching animation poses at runtime. Channels itemize the cost breakdown of the Motion Database Config asset into simpler parts such as the position or velocity of samples bones, or phases of limbs. The total cost of a query against an indexed database pose will be the sum of the combined channel costs. You can add a channel using (+) Add and selecting a channel from the drop down menu. Adding additional channels will increase the functionality of the motion matching system but will require more memory and performance cost. It is recommended to use as few channels as necessary to achieve your animations system's goals. |
| Continuing Pose Cost Bias | Here you can set a value that will add a bias to the currently selected pose. This allows you to apply a positive or negative cost bias to the pose to influence how it will be valued when selecting the next pose. This is useful to help the system hold on one animation segment longer, or shorter, depending on the value you have set. Negative values make the animation more likely to be continually selected, or played for a longer duration, while positive values make it less likely to be selected again, resulting in the animations being played for a shorter duration. |
| Looping Cost Bias | Here you can set a value that will be added to all looping animations assets in the database. This allows you to control how likely the system will select a looping animation. Negative values make it more likely that the system will select looping animations, and remain in the looping animations, while positive values make it less likely that looping animations will be selected or played consecutively. |
| Number of Permutations | Set the number of times the animation assets from the associated database will be indexed while making selections. |
| Permutations Time Offset | Set a value that will represent the starting offset of the PermutationTime from the Sampling Time of the first permutation. Subsequent permutations will use the flowing formula to determine the Permutation Time Offset: PermutationTime = SamplingTime + PermutationTimeOffset + PermutationIndex / PermutationSampleRate. |
| Add Data Padding | When enabled, a padding channel will be added to the Motion Database Config asset to make sure the data is aligned 16 bytes and padded to facilitate performance improvements at cost of eventual additional memory. |
| Inject Additional Debug Channels | When enabled, channels will be asked to inject additional channels into this schema. The original intent is to add UPoseSearchFeatureChannel_postions(s) to help with the complexity of the debug drawing (the database will have all the necessary positions to draw lines at the right location and time). |
For more information about the individual channels and their specific properties, see the Channels section.
Channels
Here you can reference a list of the available channels for a Motion Database Config asset.
Crashing Legs
The Crashing Legs channel is used to prevent overlap between a character's legs when in motion by selecting poses that keeps the limbs at set distance apart. This is calculated using the angle between the direction from the LeftThigh position to the RightThigh position, and the direction from theLeftFoot position to the RightFoot position, which is then divided it by PI to have values within the set range of -1.0 to 1.0.
Here you can reference a list of the Crashing Legs Channel's settings and a description of their functionality:
| Property | Description |
|---|---|
| LeftThigh | Set the bone that represents the character's left thigh. |
| Right Thigh | Set the bone that represents the character's right thigh. |
| Left Foot | Set the bone that represents the character's left foot. |
| Right Foot | Set the bone that represents the character's right foot. |
| Weight | Set a weight value to weigh this channel's results against the other active channels in the Motion Database Config asset. |
| Input Query Pose | Here you can set the method used to input the queried pose. You can select from the following methods:
|
| Allowed Tolerance | Set the allowed tolerance when making selections using this channel. |
Group
You can use the Group Channel to group other Motion Database Configs asset channels into groups in order to run operations together. After creating the Group Channel you can create additional channels within its Sub-Channel property using (+) Add.
Heading
You can use the Heading Channel to query your systems heading direction. This can be useful when you want to isolate a specific axis of movement, such as only the Horizontal or Vertical movement of a bone.
Here you can reference a list of the Heading Channel's properties and a description of their function:
| Property | Description |
|---|---|
| Debug Color | Here you can set a debug drawing color that will render in the viewport to assist with debugging your motion matching system. |
| Bone | Here you can assign a bone from your character's skeleton that will be used in the query to make pose selections. You can select a bone from the skeleton's hierarchy using the drop down menu. |
| Weight | Set a weight value that will be used to weigh this channel's influence on the output pose against the other channels in your Motion Database Config asset. |
| Sample Time Offset | Here you can set a value that will be used as an offset for the sample time. |
| Heading Axis | Set the axis (X, Y, or Z) that will be used to query the sampled Bone property's motion. |
| Input Query Pose | Here you can set the method used to input the queried pose. You can select from the following methods:
|
| Component Stripping | Here you can select the specific axis of motion to strip from the queried data. Selecting None performs no component stripping, selecting Strip XY will only observe the X and Y axis of motion, matching along the horizontal plane, and selecting Strip Z will only observe motion on the Z axis, only matching along the height motion of the query. |
Padding
The Padding channel is used to make sure the data is aligned 16 bytes and padded to facilitate performance improvements at cost of eventual additional memory. You can set the number of permutations the channel pads the data using the Padding Size property.
Permutation Time
Using the Permutation Time channel you can weight additional channels in order to set the amount of influence each channel has over the final output pose.
You can set the weight of this channel's influence compared to the other channels using the Weight property.
Phase
Here you can reference the Phase channel's properties and a description of their functionality:
| Property | Description |
|---|---|
| Debug Color | Here you can set a debug drawing color that will render in the viewport to assist with debugging your motion matching system. |
| Bone | Here you can assign a bone from your character's skeleton that will be used in the query to make pose selections. You can select a bone from the skeleton's hierarchy using the drop down menu. |
| Weight | Set a weight value that will be used to weigh this channel's influence on the output pose against the other channels in your Motion Database Config asset. |
| Input Query Pose | Here you can set the method used to input the queried pose. You can select from the following methods:
|
Pose
You can use the Pose channel to calculate the character's position in character space, rather than in global space. This channel is useful when the movement you want to query is local to that character's position, rather than global movement.
Here you can reference the Pose Channel's properties and a description of their functionality:
| Property | Description |
|---|---|
| Weight | Set a weight value that will be used to weigh this channel's influence on the output pose against the other channels in your Motion Database Config asset. |
| Sampled Bones | Here you can define a list of bones the Pose Channel will sample based on the associated Flags, to match poses against the queries system. You can add sampled bone definitions using (+) Add. After adding an index, you can set the following properties:
|
| Input Query Pose | Here you can set the method used to input the queried pose. You can select from the following methods:
|
| Use Character Space Velocities | When enabled, velocities will be calculated from the positions in character space, otherwise they will be calculated using global space positions. |
Position
You can use the Position Channel to query the position of a bone relative to another in your character's skeleton. This can be useful when trying to make pose selections based on a bone's displacement, or position relative to another.
Here you can reference a list of the Position Channel's properties and a description of their functionality:
| Property | Description |
|---|---|
| Debug Color | Here you can set a debug drawing color that will render in the viewport to assist with debugging your motion matching system. |
| Bone | Here you can assign a bone from your character's skeleton that will be used in the query to make pose selections. You can select a bone from the skeleton's hierarchy using the drop down menu. |
| Origin Bone | Here you can assign a bone from the character's skeleton that will be used as a reference point, to calculate the Bone's positional change.You can select a bone from the skeleton's hierarchy using the drop down menu. |
| Weight | Set a weight value that will be used to weigh this channel's influence on the output pose against the other channels in your Motion Database Config asset. |
| Sample Time Offset | Here you can set a value that will be used as an offset for the sample time. |
| Input Query Pose | Here you can set the method used to input the queried pose. You can select from the following methods:
|
| Component Stripping | Here you can select the specific axis of motion to strip from the queried data. Selecting None performs no component stripping, selecting Strip XY will only observe the X and Y axis of motion, matching along the horizontal plane, and selecting Strip Z will only observe motion on the Z axis, only matching along the height motion of the query. |
| Permutation Time Offset | Set a value that will represent the starting offset of the PermutationTime from the Sampling Time of the first permutation. Subsequent permutations will use the flowing formula to determine the Permutation Time Offset: PermutationTime = SamplingTime + PermutationTimeOffset + PermutationIndex / PermutationSampleRate. |
Sampling Time
Trajectory
The Trajectory Channel is used for sampling a character's movement trajectory and is designed to be used in conjunction with the Character Trajectory blueprint component. Using the Weight property you can set the amount of influence the Trajectory Channel has over the final output pose. With the Samples property you can add samples from points in time on the Character Trajectory component in which to sample the characters movement model.
Here you can reference a list of the Samples' properties and a description of their functionality:
| Property | Description |
|---|---|
| Debug Color | Here you can set a debug drawing color that will render in the viewport to assist with debugging your motion matching system. |
| Offset | Here you can set when the character's movement sample should be taken from the Character Trajectory component. Positive values look forward in time, while negative values look backwards in time. |
| Flags | Here you can toggle which values from the character's movement should be taken at the location along the Character Trajectory component, specified by the Offset property. You can toggle any number of values from the drop down list. |
| Weight | Set a value that will be used to weight the Samples' influence over the final output pose selection. This value is only used to weight against other Samples in the index, and not against other channels. |
Velocity
You can use the Velocity Channel to query poses based on the character's velocity either in Character Space or in Global Space.
Here you can reference a list of the Velocity Channel's properties and a description of their functionality:
| Property | Description |
|---|---|
| Debug Color | Here you can set a debug drawing color that will render in the viewport to assist with debugging your motion matching system. |
| Bone | Here you can assign a bone from your character's skeleton that will be used in the query to make pose selections. You can select a bone from the skeleton's hierarchy using the drop down menu. |
| Weight | Set a weight value that will be used to weigh this channel's influence on the output pose against the other channels in your Motion Database Config asset. |
| Sample Time Offset | Here you can set a value that will be used as an offset for the sample time. |
| Input Query Pose | Here you can set the method used to input the queried pose. You can select from the following methods:
|
| Use Character Space Velocities | When enabled the velocity of the specified Bone will be calculated in character space rather than globally. This is helpful when you are querying a localized movement, rather than the movement of the character in world space. |
| Normalize | When enabled the velocity values will be normalized to a maximum value of 1. This property can be helpful when trying to query when a bone is in motion, rather than the severity of motion. |
| Component Stripping | Here you can select the specific axis of motion to strip from the queried data. Selecting None performs no component stripping, selecting Strip XY will only observe the X and Y axis of motion, matching along the horizontal plane, and selecting Strip Z will only observe motion on the Z axis, only matching along the height motion of the query. |
Create a Motion Database Asset
A Motion Database asset is used to store your animations for the Motion Matching node to reference. To create a Motion Database asset, navigate in the Content Browser to (+) Add and select Animation > Motion Matching > Motion Database.

Open the Motion Database asset, by double-clicking it in the Content Browser. Set the Motion Database Config asset using the Config property in the Database Details panel.

Now you can add your locomotion animation sequences to the Motion Database asset, using Add (+) in the Asset Tree panel and setting an animation sequence asset in the Selection Details panel.

You can also add animation sequences by dragging and dropping the assets directly into the Asset Tree panel.

You can also add Blend Spaces to the Motion Database asset, to take advantage of the increased sampling fidelity. You can add Blend Spaces in the same fashion as Animation Sequences, using Add (+) or by dragging and dropping.

We also support adding Blendspaces to the database which you can then sample at a custom rate for more data coverage.
After adding a set of Animation Sequences, you can select multiple assets in the Asset Tree to view their simultaneous playback in the Viewport.

Create a Motion Matching Node
In your character's Animation Blueprint, create a motion matching node, by right-clicking in the graph and selecting Motion Matching under the Pose Search category.

Select your Database asset using the Motion Matching node's Searchable pin drop-down menu in the graph.

Select the Motion Matching node in the AnimGraph to expand its properties in the Details panel. Define your character's Motion Trajectory component using the Trajectory property's drop down menu and selecting Character Trajectory > Trajectory. This is possible through Property Access, by accessing the reference variable you have set up within the Animation Blueprint's EventGraph logic. You can also supply the reference to the query system using a pin in the graph or an Animation Node function.

Expand the Settings property, and set the Max Active Blends property to 5, and the Pose Reselect History property to 1.

Finally, connect the Motion Matching node's output pose to the Output Pose node, then save and compile the graph.

Your character is now using Motion Matching to select a locomotion animation pose at runtime.

Motion Matching Node
Here you can reference a list of the Motion Matching node's settings and a description of their functionality:

| Property | Description |
|---|---|
| Database | Here you can set your Database asset, that will be used to make selections from. |
| Trajectory | Here you can set the system you are using to query, such as the Motion Trajectory Component. |
| Trajectory Speed Multiplier | Here you can set a multiplier that will be applied to the character trajectory's speed value. |
| Blend Time | Set a value that will be used to determine how long the blend will be when selecting a new animation sequence segment. Motion Matching has a built-in Blend Tree that allows us to have more options for Blend types, quality of Blends, and Blend Profiles. You can do things like Blend the upper body longer than the lower body for example, if you wanted to. This will be expanded out with even more options in the future. |
| Max Active Blends | Here you can set a value that will set how many blends can be queued in the blend tree. This property can be helpful for preventing too many blends being active and muddling the pose to nothing. It is recommended to use a value between 4 and 5 to achieve this result. |
| Blend Profile | Here you can set one of your character's Blend Profiles to be used with Motion Matching. |
| Blend Option | Here you can set how the Blend is applied in Motion Matching such as Linear, Ease In and Out. |
| Pose Jump Threshold Time | Here you can set a timeframe, in seconds. where the system will not jump to poses within this range, on the same asset, unless it's this amount of time away from the current frame. This helps prevent the system from picking sections of animation inside the same clip over and over and helps encourage playing out animations or picking something new. |
| Pose Reselect History | Here you can set a range, in seconds, that prevent the system from jumping to poses that have been selected previously within the amount of seconds set, in the past. |
| Search Throttle Time | Set how often the system searches for new poses. |
| Play Rate | Here you can set the play rate for the animation selections. |
| Reset On Becoming Relevant | When enabled, this property will reset the Motion Matching state if the node has become relevant to the graph after not being ticked on the previous frame or frames. |
| Should Search | When enabled the Motion Matching node will search the connected Database asset for animations to match against the query system. |
Motion Database Config Weights
You can control how much influence each channel has over the selection process using each channel's Weight property within the Motion Database Config asset.

Firstly, the Channel weight for the Pose and the Channel weight for the Trajectory. This tells the system how much pose or trajectory differences should influence the scoring of animation frames in the Database. In the workflow example above, the pose channel weight set to 1.0 and the trajectory channel weight set to 3.0. This means the system will care three times as much about differences in trajectory than it will about differences in the pose.
Individual items inside the Channel's can also be given weight. For example, the history and prediction horizons can also be given weights to bias scoring toward the past or future. This allows you to distribute the importance of how that top level channel weight is scored such as the 3x Trajectory to pose results in a more future weighted selection.
Regardless of what values you give to these various weights, the system will automatically normalize them all unless you set the Data Processor property to None.
For another example, if your movement model is moving at 5 meters a second, but all your data is average around 4 meters a second. This means every time the system queries the request from the movement model, the deltas on the velocity of the trajectory will return high cost deltas at the data side because you don't have data that matches the 5 meter a second request. This can confuse the system because you might have a start animation where the character accelerates to 5 meters for a moment then back down to 4 meters when it evens out and then would blend to the cycle. The Motion Matching system may just pick this section over and over because it's closest to 5 meters per-second velocity and thus gets the lowest score to be picked, in conjunction with the rest of the features you're scoring against as well.
In this case you can devalue the trajectory velocity so that it does not return such high costs on this miss-match. By adjusting the weights you are adjusting how the system is selecting data. This means that if you change it in one place and it makes that area better, it could make another area worse.
This is where other methods, such as using Motion Database Sets can be used.
Motion Matching Notifies
You can also use a set of Motion Matching Notifies to assist in your setup. Here you can reference a list of the available Motion Matching notifies, and a description of their functionality:

| Notify | Description |
|---|---|
| Pose Matching: Block Transition | This allows you to set areas of an animation where the system cannot jump into the tagged area, but it can play into that area from a previous section that is not tagged with this. This is useful when you have sections of an animation you don't want to jump into the middle of. If you have an idle animation that has the character scratching their head in the middle of it, you don't ever want to jump into the middle of the head scratch. If you tag that area you can jump into any sections of the animation not tagged with this. |
| Pose Matching: Exclude From Database | This allows you to completely exclude sections of animation data from their Animation Sequences. Any sections set with this notify will not be built or searched against. |
| Pose Matching: Override Base Cost Bias | This allows you to give a section of the animation sequence a bonus or a penalty for selecting this section of the animation. Negative values give it a bonus, while positive values give it a penalty. This is helpful in situations where the system is leaving your start animation earlier than you want, so you could place this notify over the sections you want it to continue on before leaving ideally and give it a small bonus to try and keep it in that area longer. |
Animation Warping
You can use animation warping nodes in conjunction with Motion Matching to obtain further animation coverage without more hand authored animation.
For more information about animation warping, see the following documentation:
Motion Matching Debugging
The Pose Search Plugin also contains integrated Rewind Debugger support that you can use when debugging Motion Matching systems in Unreal Engine, such as adjusting the pose selection and query system criteria.

In order to utilize these features, ensure the Animation Insights plugin is also installed to your project.
After recording a segment of gameplay, select the Pose Search track in the Rewind Debugger's outliner under the Animation Blueprint object, you can observe the Motion Matching selections in the Rewind Debugger Details panel.

In the Rewind Debugger Details panel, you can observe the currently selected pose under the Active Pose tab. Next is the Continuing Pose, or what frame of animations would be selected next, this is useful when it jumps to a new pose to compare why it didn't stay in the last clip segment. Then the rest of the Pose Data assets will be displayed and organized from lowest cost to highest.

If you select these different poses in the debug list you will get a debug drawing in the viewport showing where the trajectory of the clip segments selected would go.

Additionally you can observe the breakdown of values for things selected, including the breakdown of what is attributing to the overall cost or the cost difference. You can break down the channels inside the cost output by selecting Channel Breakdown to get a full breakdown of what's attributing to the cost of a frame.
