
Adding Code to Projects
C++ Class Wizard
The C++ Class Wizard provides a fast and easy way to add native C++ code classes into your project for you to extend with your own functionality, if you wish. This converts a content-only project into a code project. You can access the C++ Class Wizard and create a new C++ class by following these steps:
Please make sure you are running Visual Studio 2019 or higher for Windows Desktop installed before proceeding. If you are using Mac, make sure to have Xcode 9 or higher installed.
-
In the main editor, select Tools > New C++ Class...

-
The C++ Class Wizard will appear and show Common Classes by default. If you do not see the class you are looking for, you can view the entire Class hierarchy listing by selecting All Classes.
Common Classes All Classes -
Choose the Class you want to add. For the purposes of this demonstration, we will choose to create a new Actor Class. Select the Actor Class, then click Next >.
-
You will then be prompted to enter a Name for your new Class. Do so, then click Create Class. This will create the header (
.h) and source (.cpp) files.Class names can only contain alphanumeric characters and cannot contain spaces. The field will notify you if you enter an invalid name.
-
In Unreal Engine, Live Coding is now enabled by default. A Live Coding window will appear and compile the new class files that were created.
-
The code will immediately open in Visual Studio, ready for editing.

The code will immediately open in Xcode, ready for editing.

Development Environment
Code files can be created through Visual Studio and added to the game project through the Solution Explorer in the usual manner. You can also add code files to the appropriate folders outside of Visual Studio and rebuild the solution and project files automatically. This makes it easy to add lots of files quickly through the operating system UI, and also makes working on teams easier as the solution and project files do not need to be synced between members of the team. Each person can just sync the code files and rebuild the project files locally.
Code files can be created through Xcode and added to the game project through the Project Navigator in the usual manner. You can also add code files to the appropriate folders outside of Xcode and rebuild the project file automatically. This makes it easy to add lots of files quickly through the operating system UI, and also makes working on teams easier as the solution and project files do not need to be synced between members of the team. Each person can just sync the code files and rebuild the project files locally.
Opening Projects in the Development Environment
If your project is already open in the Unreal Editor, you can easily open it in Visual Studio by selecting Open Visual Studio from the Tools menu.

You can also open the project in Visual Studio through Windows Explorer or Visual Studio's File > Open > Project/Solution.
If your project is inside the UE root directory:
* Open the UE5.sln Visual Studio solution located in the UE root directory.
If your project is outside of the UE root directory:
* Open the PROJECT_NAME.sln Visual Studio solution located in the root of the project's directory.
If your project is already open in the editor, you can easily open it in Xcode by selecting Open in Xcode from the File menu.
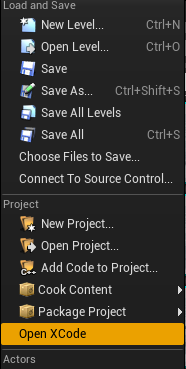
You can also open the project in Xcode through Finder or Xcode's File > Open.
* Open the PROJECT_NAME.xcodeproj Xcode project located in the root of the project's directory.
Generating Project Files
The project files are considered intermediate files - located in PROJECT_DIRECTORY\Intermediate\ProjectFiles. This means if you delete your Intermediate folder, you must regenerate the project files.
.uproject files
1. Navigate to the location of PROJECT_NAME.uproject in Windows Explorer.
1. Ensure that PROJECT_NAME.uproject is highlighted by Left-clicking once. Now, Right-click on the PROJECT_NAME.uproject file and select Generate Visual Studio Files.

1. UnrealBuildTool updates the project files and the solution, including generating Intellisense data.

1. Open the PROJECT_NAME.sln Visual Studio solution located in the root of the project's directory to view the game project in Visual Studio.
1. Navigate to the location of PROJECT_NAME.uproject in Finder.
1. Right-click on the PROJECT_NAME.uproject file and select Generate Xcode Files.
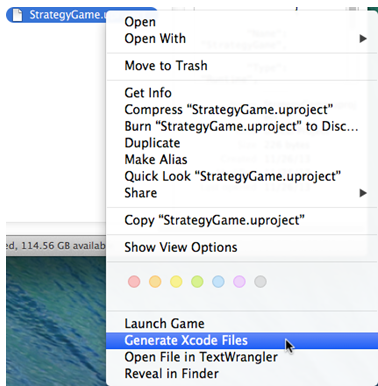
1. UnrealBuildTool updates the project

1. Open the PROJECT_NAME.xcodeproj Xcode project located in the root of the project's directory to view the game project in Xcode.