
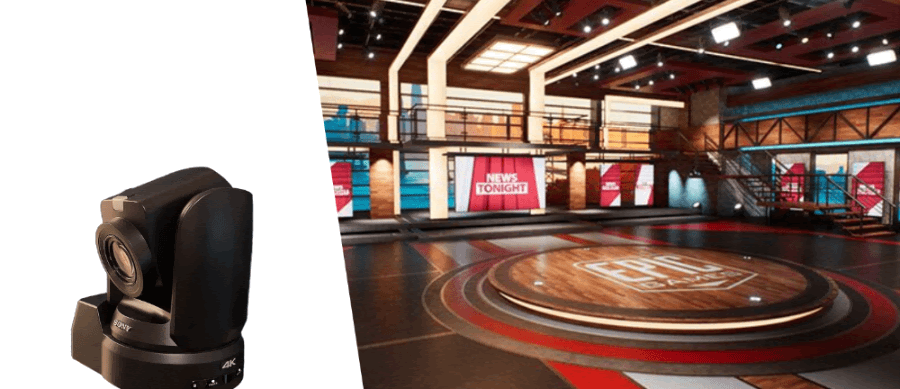
Live Link supports the FreeD data protocol, which is a commonly used protocol for camera tracking with 8 axes of data from the transform position, rotation, and lens. The FreeD protocol is supported by some specific Pan, Tilt, Zoom (PTZ) cameras, such as the Panasonic AW-UE150 and the Sony BRC-X1000, and can be a cost-effective way to add tracking data to your projects.
FreeD is an older protocol and doesn't support many of the new features that some cameras now include. Some features provided by this plugin may not be available depending on your camera model and what data it provides:
-
All cameras that support FreeD should support at least pan, tilt, and rotation.
-
Some may support focus, iris, and zoom (FIZ).
-
Some may support 3D tracked positions in the world.
We recommend referring to your camera manual for details on how it supports FreeD.
Getting Started
Follow these steps to set up camera tracking with Live Link FreeD.
-
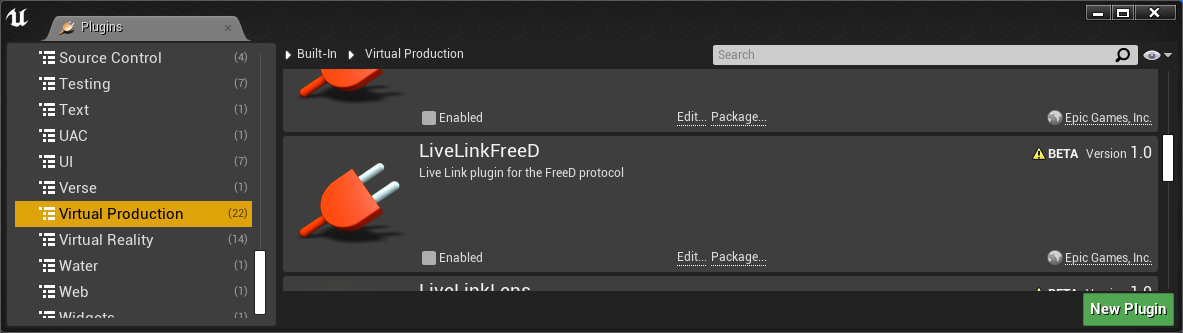
Enable both the Live Link plugin and the Live Link FreeD plugins.
-
Go to Window > Live Link to open the Live Link window.
-
Select Source > LiveLinkFreeD Source and enter the IP Address and Port Number for the camera you're connecting. The default Port Number is 40000.
Not all cameras are set up the same. Refer to your camera's manual for how to connect to it and configure network parameters.
For some cameras, you will need to enable camera data over UDP, which sometimes is referred to as FreeD data. If the camera is set up to send camera data over UDP to the PC, the IP Address must be set to 0.0.0.0 and the appropriate port number.
-
Once the source is added and the camera is connected, the camera will appear as a Subject.
If a Subject doesn't appear, then the camera wasn't set up properly. Check the IP Address, the Port Number, and the settings on the camera for troubleshooting.
The FreeD protocol associates an ID with the camera which can't be modified in UE. Some cameras do have an interface to set their ID, however. Since Live Link requires Subjects to have unique names, it's important to make sure you have unique IDs when you're using multiple cameras with Live Link.
-
Verify the engine is receiving camera data by selecting View Options > Show Frame Data.
-
Add a Cine Camera (or other Camera Actor) to the Level.
-
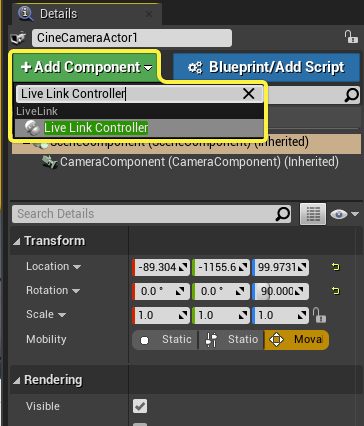
Select your Camera Actor in the World Outliner to open its Details panel.
-
In the Details panel, choose Add Component. Search for and select Live Link Controller.
-
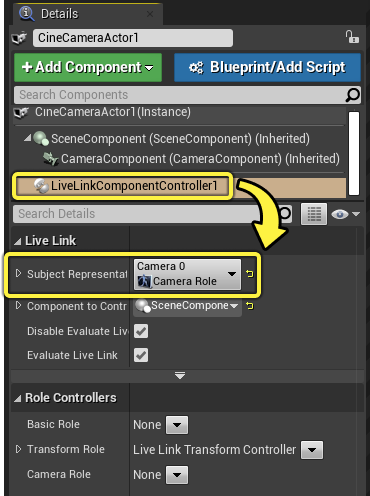
Select the LiveLinkComponentController that you added to your Camera and set its Subject Representation to your Live Link FreeD Subject. In this example, the Subject name is Camera 0.
-
Move the connected physical camera and verify the Camera Actor updates in the Level.
Configuring Camera Data
Most broadcast and cinematic cameras support the FreeD protocol but don't support all of its features. Because each camera provides different data, when you set up your camera with Live Link FreeD, you'll need to customize the settings for your device. You can set the parameters once, however, and save them as a Live Link Preset for future use.
The following sections describe how you can modify your incoming camera data correctly for your device.
Live Link Settings
The incoming data is in binary format so the Plugin handles how to interpret the data into the appropriate focus, iris, and zoom parameters depending on the camera model. You can modify how the Plugin interprets the data.
In the Live Link window, under the Subject section, select FreeD and modify the Source settings. The following table provides further details on the settings.
| Setting | Description |
|---|---|
| Send Extra Meta Data | When enabled, the camera sends additional information per frame. This option can affect performance slightly. |
| Default Config | Customized configurations are provided for some camera brands. The following are the available options:
The Generic option doesn't change any of the settings so you will need to modify them for your camera. |
| Focus Distance Encoder Data | Focus distance data from the camera. See Encoder Data Settings for details on the settings in this section. |
| Focal Length Encoder Data | Focal length data from the camera. See Encoder Data Settings for details on the settings in this section. |
| User Defined Encoder Data | Other data from the camera, typically aperture data. The FreeD spec refers to this as User Defined. See Encoder Data Settings for details on the settings in this section. |
Encoder Data Settings
The following settings apply to the Encoder Data section they're located in. The available Encoder Data include: Focus Distance, Focal Length, and User Defined (typically Aperture data depending on the camera model).
| Setting | Description |
|---|---|
| Is Valid | When enabled, the engine will use this encoder data. |
| Invert Encoder | When enabled, the incoming axis direction is flipped. |
| Use Manual Range | By default, the expected range of values is determined based on dynamic auto-ranging. When using the dynamic auto-ranging, you must calibrate the encoder by forcing the camera to reach its min and max values a few times. You must perform this calibration every time, even if you're using a Live Link Preset, since camera encoders aren't consistent. Enable Use Manual Range to set your own range. If you switch to auto-ranging after setting the range values manually, the auto-ranging will reset those values. |
| Min | The minimum value for the expected range of values, when Use Manual Range is enabled. |
| Max | The maximum value for the expected range, when Use Manual Range is enabled. |
| Mask Bits | Applies a binary mask to the incoming data. The text box expects the mask in decimal format. Some camera manufacturers will encode multiple types of data, so set this field if there are specific bits you want the engine to ignore. |
Physical Camera Settings
In addition to the settings in Live Link, you must modify the settings on the Camera Actor to match your physical camera parameters.
With your Camera Actor selected, go to its Details panel, and under the Current Camera Settings modify the following fields.
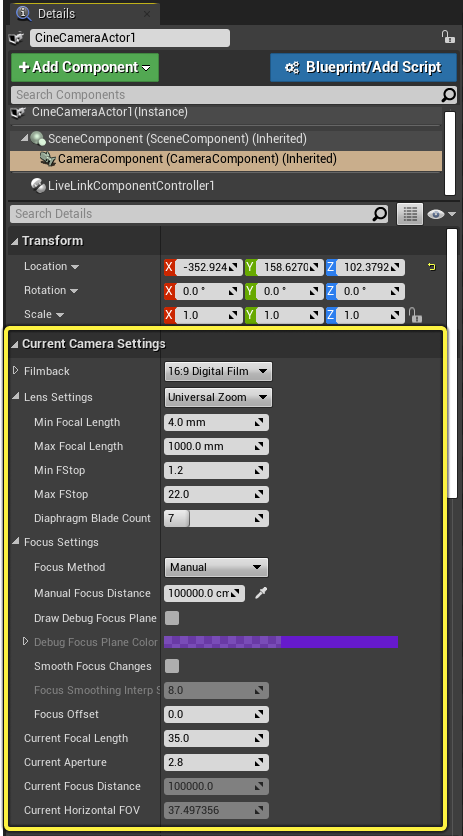
-
Set Lens Settings > Min Focal Length and Lens Settings > Max Focal Length to match the focal length range on your physical camera lens.
-
Set Lens Settings > Min FStop and Lens Settings > Max FStop to match the aperture range on your physical camera lens.
There's no way to set the max focus distance on the Camera. You can set the Focus Settings > Manual Focus Distance on the Camera Actor. This focus distance is a constant in the engine.