
Large World Coordinates are now implemented across Unreal Engine. To understand its implementation in the main engine, reference this Large World Coordinates page. In brief, the data type FVector is now double instead of float.
The Niagara implementation differs from the main engine's. Because calculations need to be done efficiently, whether on the CPU or the GPU, there are limitations that prevent working in doubles. Instead, there is a new way of storing position data in Niagara.
A sufficiently large world will be divided into a grid of tiles. When we conceive of a position in space, it has its own relative position within a tile unit, and also that tile's position in the world. See the following diagram for a conceptual representation of what this might look like.
Click image for full size.
Previously, Niagara positions were interchangeable with vectors, defined as the direction and distance away from the world origin. Now, for the information to be meaningful, additional data is required to locate the emitter relative to the tile it is in.
In UE5, to save not just the position relative to the origin but also the information of which tile the system is in, we need a new data format. This way, we can distinguish between other types of vectors, and positions that carry this additional data.
Position Data in UE4 and UE5
The main difference between UE4 and UE5 is how we store the position data of particles, that is, Particles.Position.
| UE4 | UE5 | |
|---|---|---|
| Particles.Position type | Vector | Position |
| Local space emitter | Particles.Position is relative to the Niagara system's origin in the game |
Particles.Position is relative to the Niagara system's origin in the game (unchanged) |
| World space emitter | Particles.Position is relative to the game's origin (0,0,0) |
Particles.Position is relative to the system's position when it activated. For small coordinates, this is still the game's origin. For larger coordinates, this may be an arbitrary number. |
How to Enable or Disable Large World Coordinates in Niagara
Large World Coordinates in the Project
By default, Large World Coordinates are turned on in new projects. The system will automatically convert your projects when you open them in UE5.
If your project is not large enough to require large world coordinate support, you can turn it off completely in Edit > Project Settings. Under Plugins > Niagara, locate the setting System Support Large World Coordinates, then disable it for your project.
Click image for full size.
Large World Coordinates in a System
You may want to have Large World Coordinates turned on for the project, but disabled for a specific, individual system. In this case, you can edit your Niagara system in the Niagara Editor. In the System Properties, under the Rendering section, you can disable Support Large World Coordinates.
Click image for full size.
How to Test Large World Coordinates in Niagara
When you first update a project file from UE4 to UE5, or as you begin to test your system, you may want to validate that your Niagara systems behave properly in large world coordinates. To test whether a Niagara system works with large world coordinates, you need to move it outside of the first tile. There are several ways to do this, as outlined below.
Move the Effect Very Far Away
You can move your effect very far away from the origin, then play the effect and validate the behavior. This is the only way to test this without making any changes in the engine code itself. For example, you could move the system 3000000 units away from the origin, and this will place it in a tile outside the original tile.
Change the Constant for Tile Size
You can also change the tile size for the large world coordinate tiles in the constant definition. In Engine/Source/Runtime/Core/Private/Misc/LargeWorldRenderPosition.cpp, change UE_LWC_RENDER_TILE_SIZE to something very small, for example 10 units. Now, when you place your effect in the level, so long as it is more than 10 units away from the origin, it will be in a new tile.
Updating Existing Projects
Particles.Position in HLSL
If you wrote custom scripts in HLSL for your project, you need to update these to work with large world coordinates. In previous versions, you may have used HLSL to directly set Particles.Position to a fixed value. This does not work with large world coordinates.
Instead, you can either disable large world coordinate support for that asset or convert the worldspace vector to a position.
Click image for full size.
If you need to know what tile you are in, this is stored in Engine.Owner.LWCTile.
Custom Modules
Using the Niagara Script Editor, or the Scratch Pad, you can create your own custom modules. If you already created custom modules in a previous version, they may not work implicitly when converted to a project using large world coordinates.
The reason for this is the difference between position data, that includes the tile information, and normal vectors, that do not. Core parameters like Particles.Position are automatically converted to the type position, but custom vector inputs connected to them are not.
In the following example, Box Origin uses Particles.Position as a default binding. However, it is not, itself, a position type.
Click image for full size.
To maintain backwards compatibility, the existing connections are kept and the position type is converted to a normal vector type.
Changing the Type of an Existing Vector Input
In a Niagara Script, if you have existing modules you may want to update some parameters to be of type position. To change the type of an existing vector input or output to a position type, do the following:
-
Open the module script in the Niagara Script Editor.
-
In the Parameter tab, right-click the parameter(s) whose type you want to change.
-
Select Change Type > Position from the contextual menu.
Click image for full size.
If you change a parameter to type position, and it is connected to a parameter of a different type, it will create an orphaned pin connection. This way, you can decide what to do next: whether to change the other parameter type as well, or convert the data from one type to another.
You can only change parameters that are owned by this script. If you are inheriting a parameter from outside, you will see that parameter is locked and the type cannot be changed.
Converting Between Vector and Position in a Node Graph
If you connect together a vector and a position in a node graph, the system will add in a convert node, Position -> Vector or Vector -> Position. However, be aware this copies the values without taking into account the large world transformation if it takes place outside the origin tile. This could result in a loss of crucial information.
Click image for full size.
If you want to convert a position type to a worldspace vector, you can use the function Position to Vector. In the reverse, to convert a worldspace vector to a position, you can use Vector to Position.
Click image for full size.
Whenever you convert from a position to a vector or the reverse, there's potentially a loss of data. This can result in a loss of precision, or some unpredictable behaviors when outside of the origin tile. To be safe, from start to end you should use positions without converting. Conversions to world space should ideally only take place in data interfaces or renderers.
Export Particle Data Interface
You can use the Export Particle data interface to send position data to blueprints. If you already used this previously, you will need to update your blueprint for large world coordinates.
Click image for full size.
There is a parameter in the Receive Particle Data event node node called Simulation Position Offset. This stores the offset data for the tile that you are in. You can add this at the end of a script to the simulation position to convert from simulation space back to world space.
Dynamic Material Parameters
Position data carries additional information about the tile offset that cannot be linked directly to a vector that does not carry this information. If your project is set up so that you are exporting position data to a material by using a dynamic input to bind to that material in the renderer, then this will not work with large world coordinates. To fix this, you can convert the position data to a world space vector.
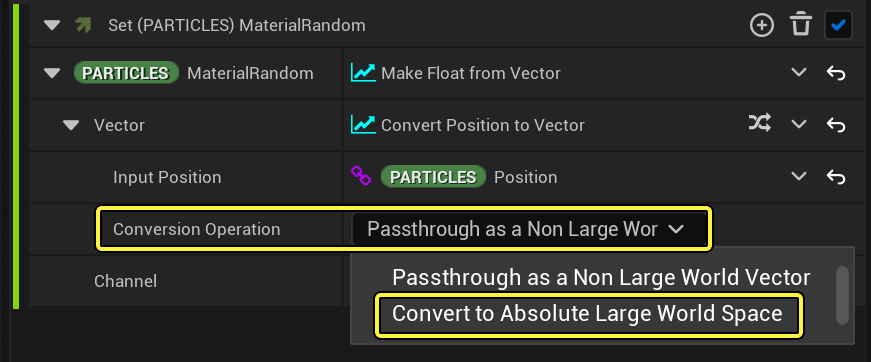
For large coordinates, the additional offset information of which tile you are in is lost, so this can result in an overflow for large coordinates.
If you still have a Material binding to use, you can link it to Engine.Owner.LWCTile to add this offset information back in again.
Click image for full size.
In the Material itself, you can also use the ConvertNiagaraPositionToWorldspace Material function to add the tile offset to the simulation position.
Click image for full size.
Custom Data Interfaces
If you have created any custom data interfaces that contain functions that work with world space positions, then these will need to be updated.
As needed, replace existing functions to use FNiagaraPosition type instead of FVector for their inputs and outputs. You can override UNiagaraDataInterface::UpgradeFunctionCall to upgrade existing function usages.
To transform simulation positions, you can get a helper object from the system instance:
FNiagaraLWCConverter LWCConverter = SystemInstance->GetLWCConverter();
For GPU data interface functions, you can get the system's large world coordinate tile from the FNiagaraDataInterfaceArgs supplied to the shader context. If you need to see an example of this, you can check existing usages like the camera data interface.
Custom Renderers
Any custom renderer reading position data also needs to be updated. Similar to data interfaces, you can get a converter from the system instance. The only difference is that you also need to know if you're rendering a localspace emitter or not:
FNiagaraLWCConverter LwcConverter = SystemInstance->GetLWCConverter(bIsLocalSpaceEmitter);
Any particle position you read can then be transformed into worldspace using the following:
FVector WSPos = LwcConverter.ConvertSimulationPositionToWorld(SimPos);
Please check existing Niagara renderers for examples of how this is already implemented.