Creating accurate, non-linear deformer systems for skinned static and skeletal mesh objects is a complex and computationally-intensive process, especially when calculating these deformation simulations in real-time. Using Unreal Engine's Machine Learning (ML) Deformer Framework, you can approximate complex mesh deformations at runtime, using externally pre-generated mesh deformation simulation data to train a ML Deformer Model in order to mimic high-quality mesh deformations, greatly improving the quality of in-game mesh deformations without the computational cost of real-time deformation generation.
The ML Deformer Framework internally leverages the Neural Network Inference (NNI) system, driven by a deformer model, to process approximate mesh deformation calculations on the GPU, alleviating some processing bandwidth on the CPU.
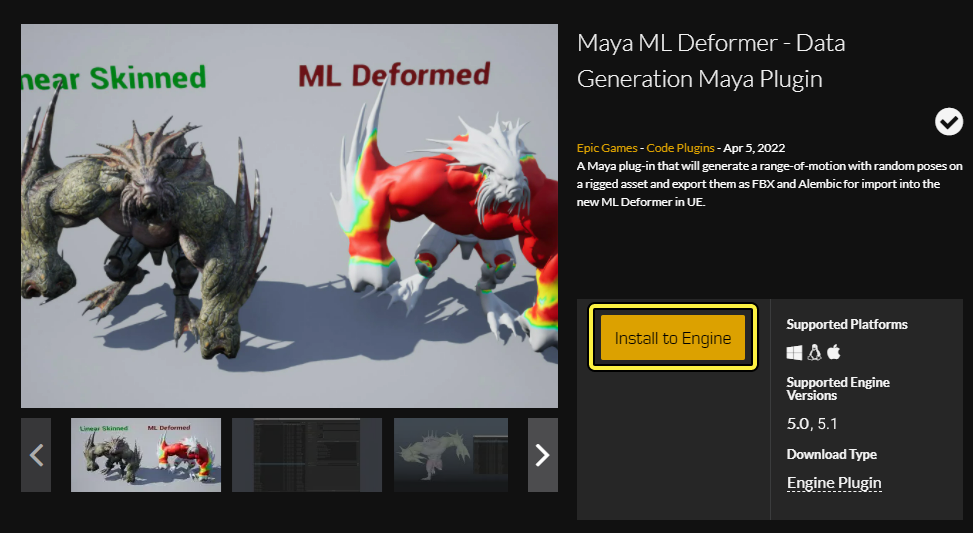
Also available, in the Unreal Engine Marketplace, is a plugin for AutoDesk Maya that you can use to generate the necessary mesh deformation data. After generating mesh deformation data in AutoDesk Maya, the data is then exported as FBX (.fbx) and Alembic (.ab) files that you can import to Unreal Engine and use to train a deformer model.
This document provides an example workflow of generating mesh deformation simulation data in Autodesk Maya, and then using that data in Unreal Engine to train a deformer Model to approximate a character's mesh deformations at runtime.
Prerequisites
-
The ML Deformer Framework is a Plugin and must be enabled prior to use. Navigate in the Unreal Engine menu to Edit > Plugins, locate ML Deformer Framework in the Animation section, and enable it. After enabling the plugin, you will need to restart the editor.

- The ML Deformer workflow requires you to use Autodesk Maya for a portion of the workflow.
- You have a skinned character in both Unreal Engine and Autodesk Maya.
ML Deformer Models
The ML Deformer Framework relies on trained ML Deformer Models to drive skinned mesh deformations.
You can choose to install premade models in the form of Plugins. For this example, a portion of the workflow optionally uses the ML Deformer Neural Morph Model, which you can install, from the Plugins window.
- The ML Deformer Neural Morph Model is a Plugin and must be enabled prior to use. Navigate in the Unreal Engine menu to Edit > Plugins, locate ML Deformer Neural Morph Model in the Animation section, and enable it. After enabling the plugin, you will need to restart the editor.

There are several other prefabricated Models that you can install and use in your project. You can even create your own ML Deformer models within the C++ package of the plugin or customize an existing model.
Autodesk Maya Plugin Setup
You will need to download and install the ML Deformer Data Generation Maya Plugin. To do this, first navigate to the Marketplace page and download the plugin.
When the plugin is installed, it will be located in the Plugins folder of your Unreal Engine install directory. By default, it is located under the following path:
…\Engine\Plugins\Marketplace\MayaMLDeformer\Content\MayaMLDeformer.zip
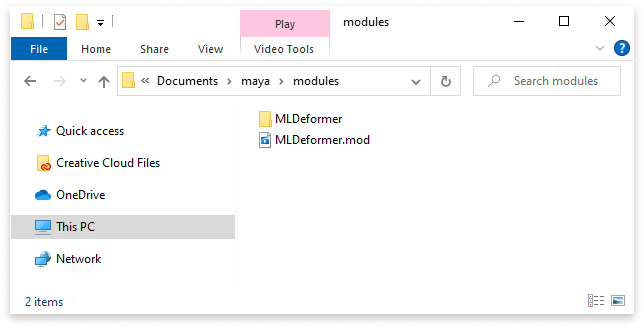
Unzip the contents of MayaMLDeformer.zip to C:\Users\username\Documents\maya\modules. If the modules folder does not exist, you can create it.
For Mac users, the plugin is installed to /Users/Shared/Autodesk/modules/maya.
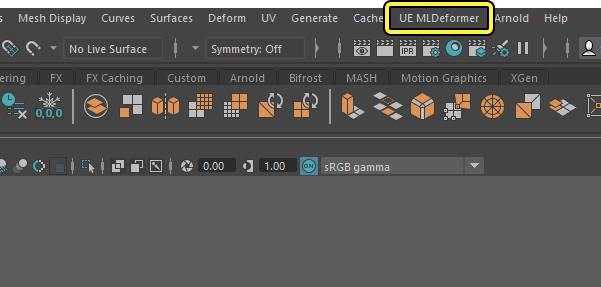
Now when you open Autodesk Maya, you should see UE MLDeformer in the main menu bar.
Training Data Generation in Maya
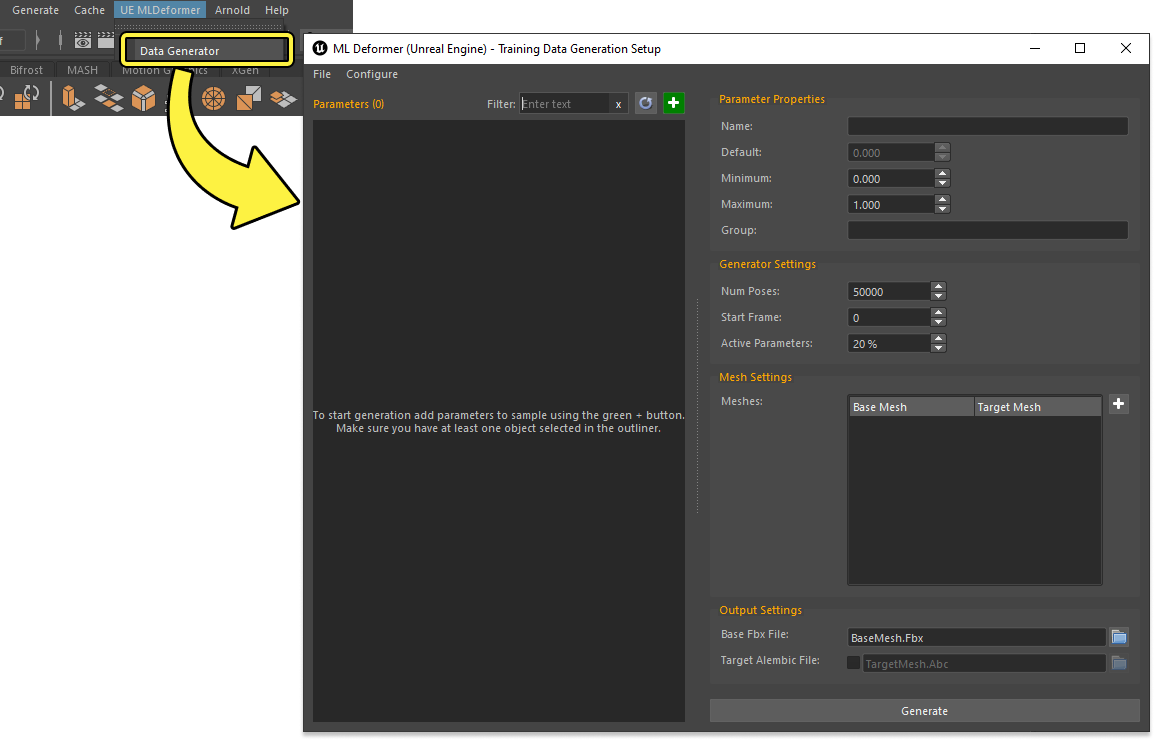
The ML Deformer plugin creates training data for characters by setting procedural keyframes on bones that produce a useful data set for machine learning algorithms. To start the training data generation process, you must first open the tool.
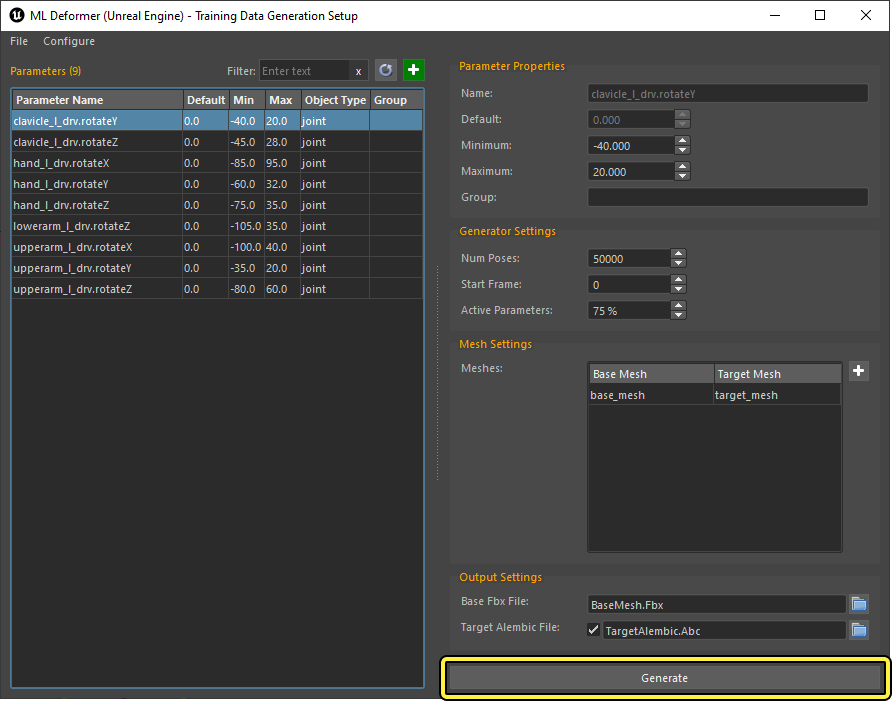
In Maya's main menu bar, click UE ML Deformer > Data Generator, which will open the Training Data Generation Setup window.
Also import or open your skinned character in the Maya scene. For this example workflow, a MetaHuman is used.
Adding Bone Parameters
In order to train your joints, you must add a list of nodes and attributes to modify, along with the range of values that these attributes can adopt.
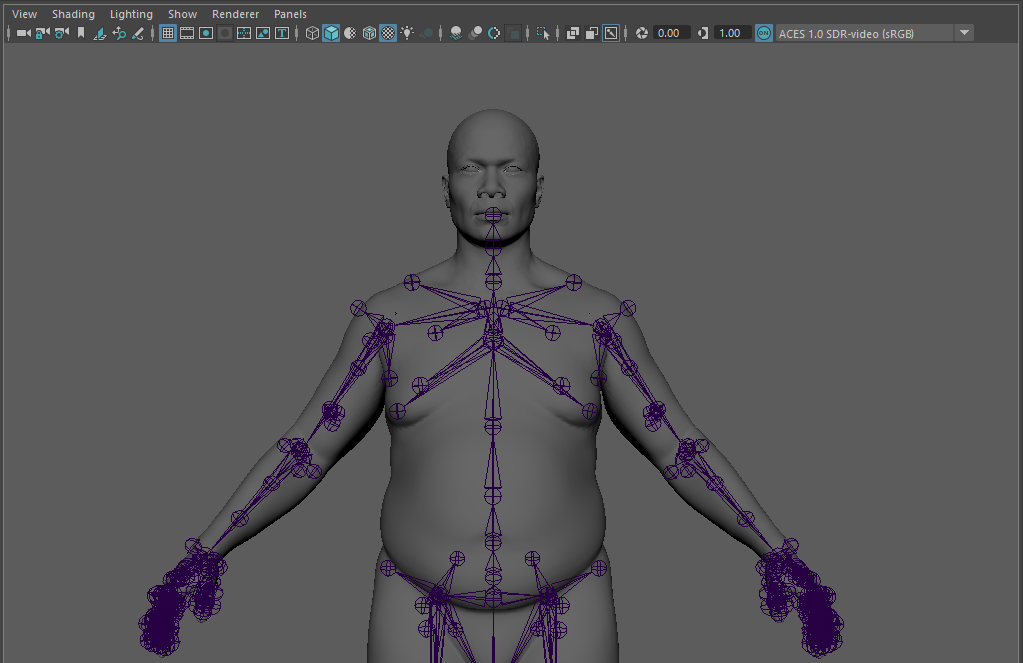
Select the joints in Maya you want to add, and then click Add (+) in the Parameters section of the Training Data Generation Setup window.
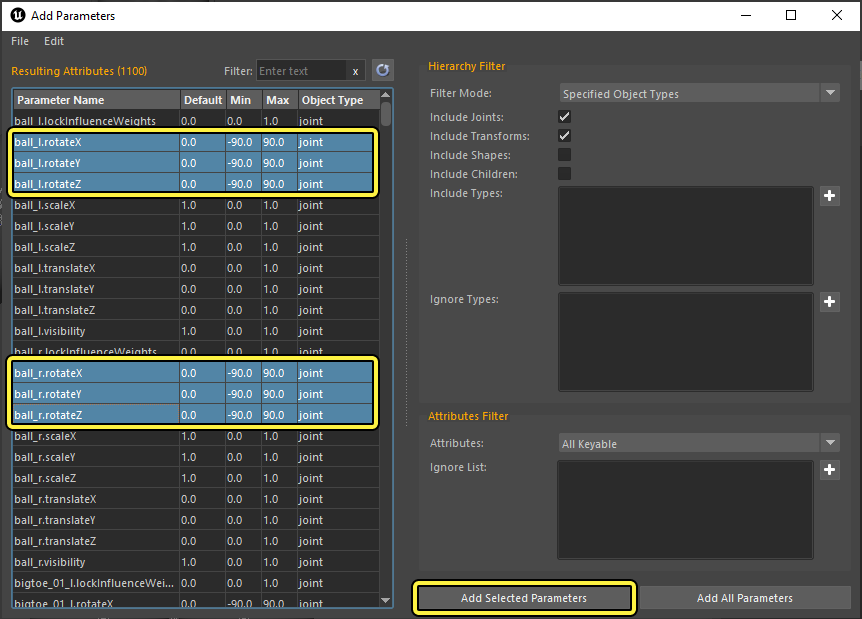
This will open the Add Parameters window, where you can further refine which joint attributes you want to use in the training. You can also click Refresh to refresh the parameter list with your current selection.
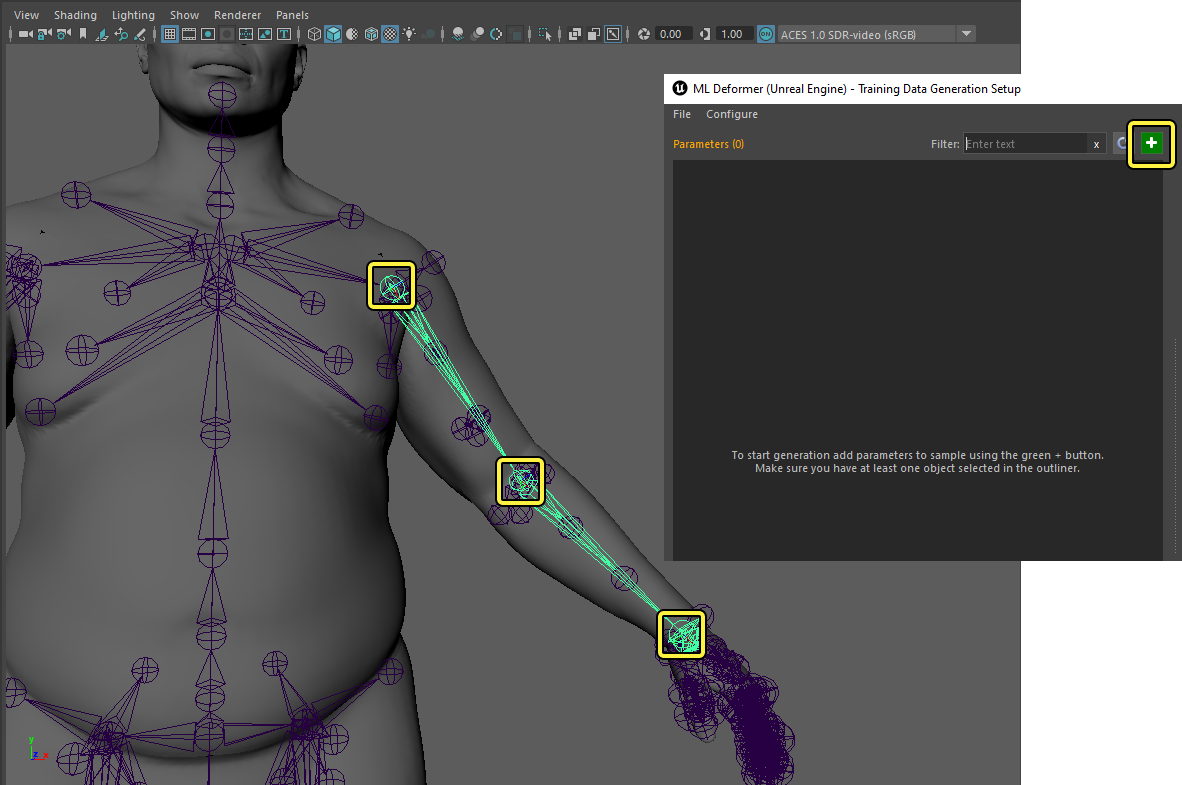
Select the joint attributes you want to add as parameters, then click Add Selected Parameters to add them to the Training Data Generation Setup. In most cases, only the rotation attributes are necessary from joints.
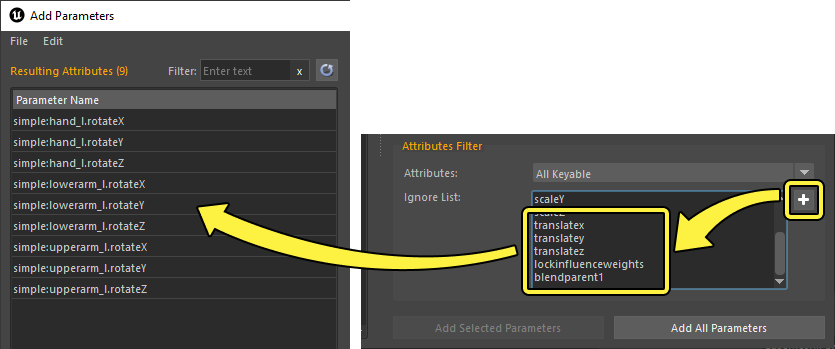
You can use the Attributes Filter section to automatically refine and exclude attributes. Click Add (+) to add a new entry and name it according to the attributes you want to exclude. In this example, all the translation and other minor attributes are being excluded so that the resulting attributes only show rotation.
Configure Bone Parameters
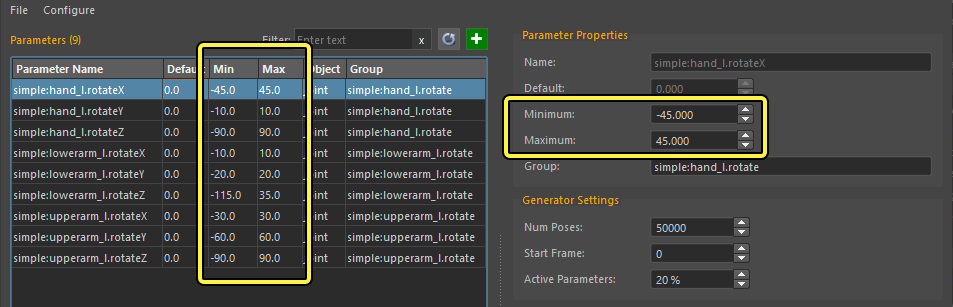
With the attributes added, you will now need to configure the range of motion for each axis. This is done by selecting each attribute and specifying the Minimum and Maximum range of movement for that axis in the Parameter Properties. These values should be as realistic as possible, depending on the complexity and type of character. Defining this data is necessary for the accuracy and quality of the ML Deformer training process. The plugin will automatically initialize the values to the joint limits that are configured in Maya, if they are set up for that joint. You can also provide defaults for given parameter types.
Correctly configuring these parameters can be time consuming, so we recommend you save your progress as a .json file by clicking File > Save Config.
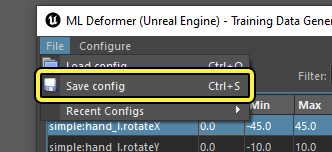
You can restore a saved configuration by selecting File > Load Config. Configuration files are based on node and attribute names, and can be used in any Maya scene with matching names.
Configure Mesh
To finalize the training data, you must specify a Base Mesh, and optionally a Target Mesh.
The Base Mesh is the mesh bound to the skeleton, and is the same mesh used in Unreal Engine.
The Target Mesh is a separate mesh that contains the same vertices and topology as the Base Mesh, but is used for deformation. For example, the Target Mesh might use volume preservation techniques and muscle simulation to create realistic deformation. The target mesh can exist inside Maya, or it can be created in an external program such as Houdini. The Target Mesh is exported as an alembic cache .abc.
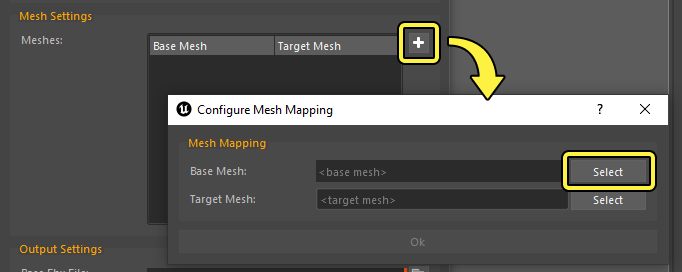
To specify your Base and Target Meshes, click Add (+) in the Mesh Settings area. A window will appear where you can click the Select button and specify each mesh, with the Target Mesh being optional unless you have it in your scene.
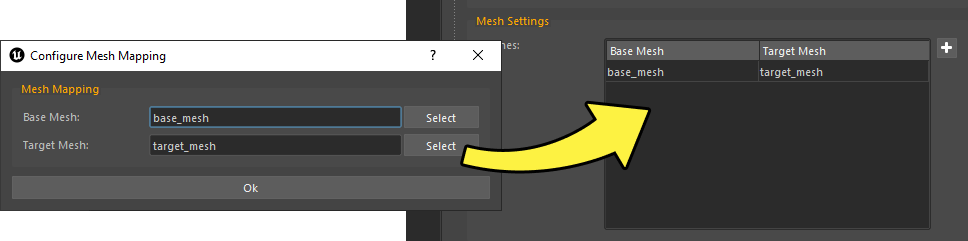
Select your meshes and click OK to add them to the Mesh Settings list.
If your Skeletal Mesh is composed of multiple meshes, you should add each individual mesh to the Mesh Settings list. Typically you would only need to do this if you are using modular characters.
Start Pose Generation
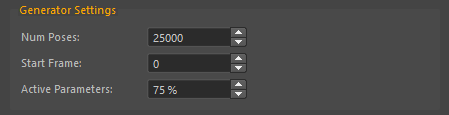
Lastly, you must specify Generator Settings to determine the training length and configuration. A keyframe will be created for every attribute in the parameter list, for each Num Poses.
| Name | Description |
|---|---|
| Num Poses | The number of random poses to create, which creates animation for those frames. The recommended range is 5,000 - 50,000, however in typical cases you can set this to 25,000. Training requires a large amount of data to give good results. Approximately 25,000 frames of animation data is expected to correspond with the default training settings in Unreal. Although it is possible to train with smaller data sets, the results are likely to be worse. The higher the Num Poses value, the slower the training will be. |
| Start Frame | The frame number where the randomly generated poses will start. You can combine existing animation data with the generated frames by setting a value greater than 0. |
| Active Parameters | The amount of randomness of the pose between each frame. In most cases, you should set this to around 75%, with higher values resulting in better quality. Setting this to 100% can cause simulation issues, however. |
Click Generate to start the training data generation process in Maya. If you are using a Target Mesh and Target Alembic File, then this process can take a very long time. Depending on the complexity of your mesh it can take anywhere from a few minutes to several hours. Make sure you also have enough free disk space, as the Alembic file can become very large (around 50 to 100 gigabytes), depending on the vertex count and Num Poses setting.
Once the training data is finished generating, you should now have an exported .fbx and .abc file if you specified a Target Alembic File.
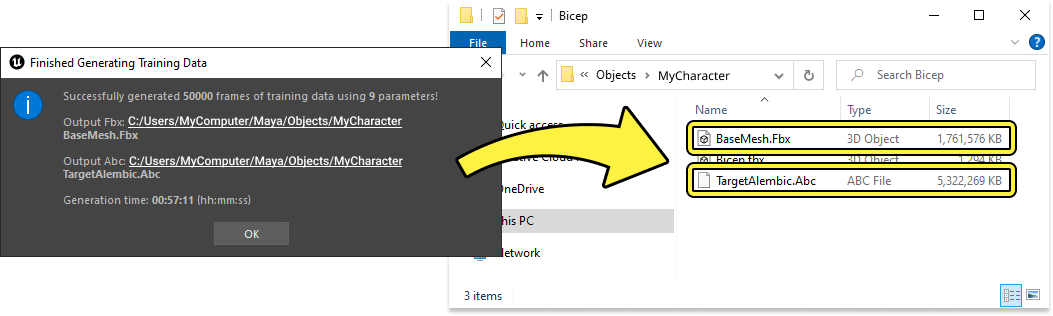
Your FBX and Alembic files must contain the same number of frames, and each frame must correspond to the same skeletal pose.
Deformer Training in Unreal Engine
You can now bring your completed training files into Unreal Engine.
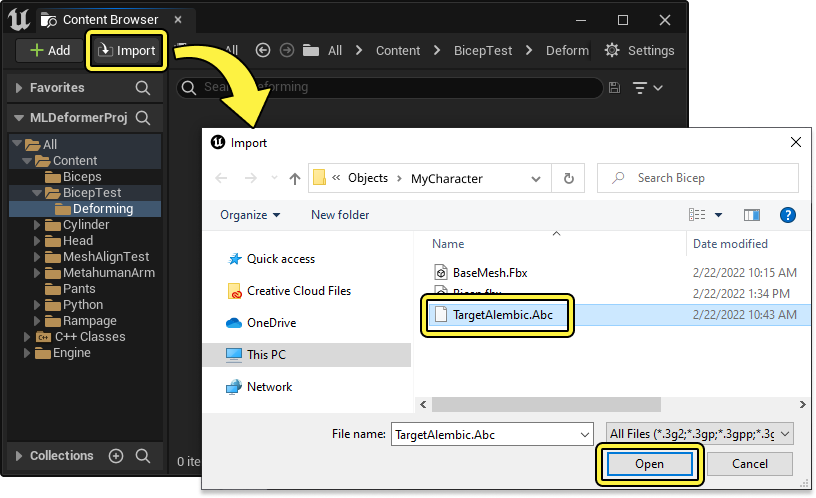
Import Alembic File
Start by importing the .abc file that you either created in the training process, or in a different external deformer tool. In the Content Browser, click Import, then select your .abc file and click Open.
In the import settings dialog window, set the following parameters for the import:
- Set Import Type to Geometry Cache.
- Disable Flatten Tracks. This is required in order to match FBX meshes with the Alembic Geometry Cache tracks. If you have just a single mesh, you can keep Flatten Tracks enabled, but are not required to do so. It is important that your Alembic Track names start with the same name as the name you see in the outliner in Maya.
- Set Compressed Position Precision to 0.001 to ensure greater accuracy. If you keep the default, the ML Deformer may learn errors introduced by compression.
- Enable Store Imported Vertex Numbers. This is required in order to match vertices between the Skeletal Mesh and the Geometry Cache. If you forget to do this the ML Deformer editor will show you a warning, and you will have to re-import the Geometry Cache again.

Once these parameters are set, click Import to import the geometry cache. This process can take a very long time due to the size of the alembic file. Depending on the complexity and size it can take anywhere from a few minutes to several hours.
Import Trained FBX
Next, you will need to import the FBX file that was created from the Maya training data. In the FBX Import Options dialog window, set the following parameters for the import:
- If you have already imported your character into Unreal Engine, set the Skeleton field to use the skeleton of the character.
- Enable Import Animations.
- Set Animation Length to Exported Time.
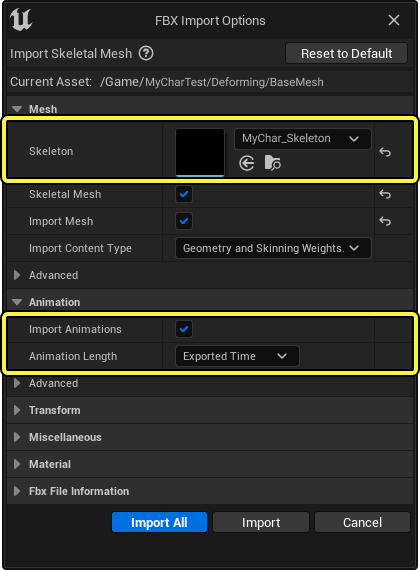
Once these parameters are set, click Import to import the FBX. This process can take a very long time due to the size of the FBX file.
Create ML Deformer Asset
Next, you must create the ML Deformer Asset in order to contain and correlate both the Alembic and FBX sequences. In the Content Browser, click Add (+), then select Animation > ML Deformer. Open the asset after you create it.

In the Details panel of the ML Deformer Editor, assign both the Skeletal Mesh of your character and the imported trained FBX Animation Sequence to their respective properties. This will cause the mesh to appear under the Training Base viewport label.
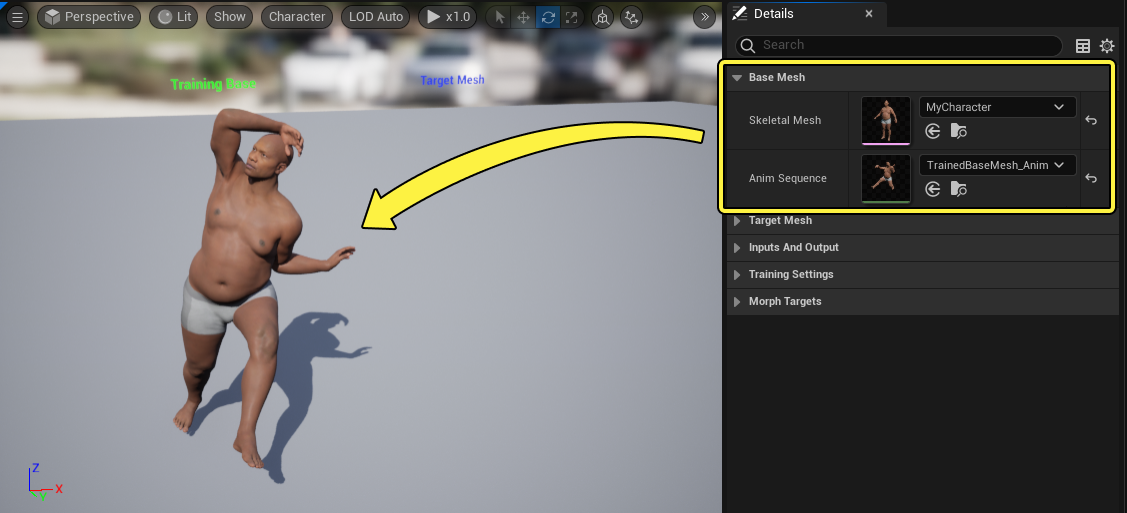
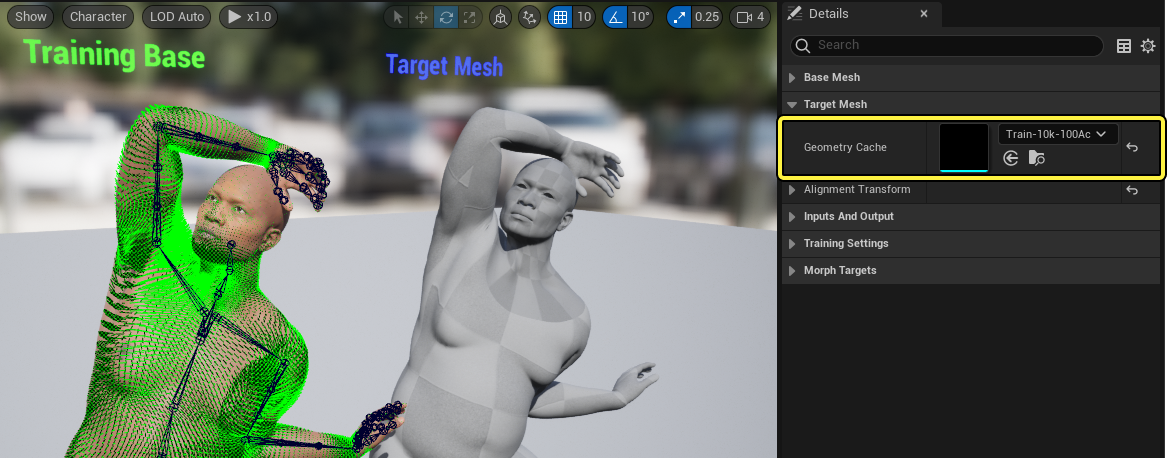
Also assign the imported Alembic file to the Geometry Cache property. This will cause the Alembic mesh to also appear in the viewport under the Training Target label.
You should see green lines appear, being rendered on top of the Training Base model. These represent the deltas, or differences, between the base and target mesh. Make sure they look correct, as the deformer model will learn these during training. If your target mesh is somehow rotated differently compared to your training base, you can use the Alignment Transform to align them. They do not need to overlap, only the rotation needs to match.
Dragging on the timeline playhead will scrub both sequences together, so that you can verify their animations are matching. Make sure the green lines (deltas) look correct every frame.
If the deltas look incorrect on some frames, you can try reimporting the Geometry Cache with the option Constant Topology Optimization enabled.
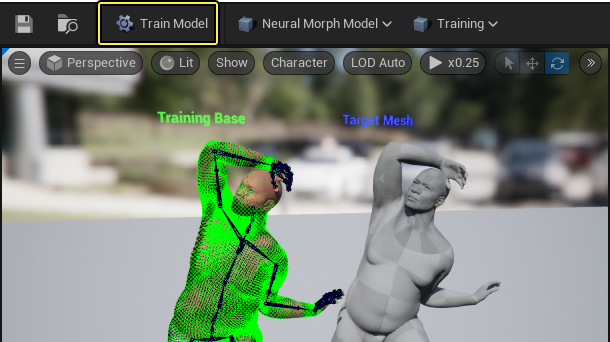
Click Train Model in the ML Deformer Editor toolbar to start training. This process can take a long time.
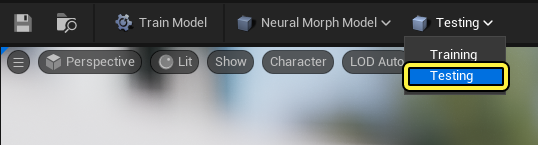
After the training process is complete you can view the results in the ML Deformer Testing mode.
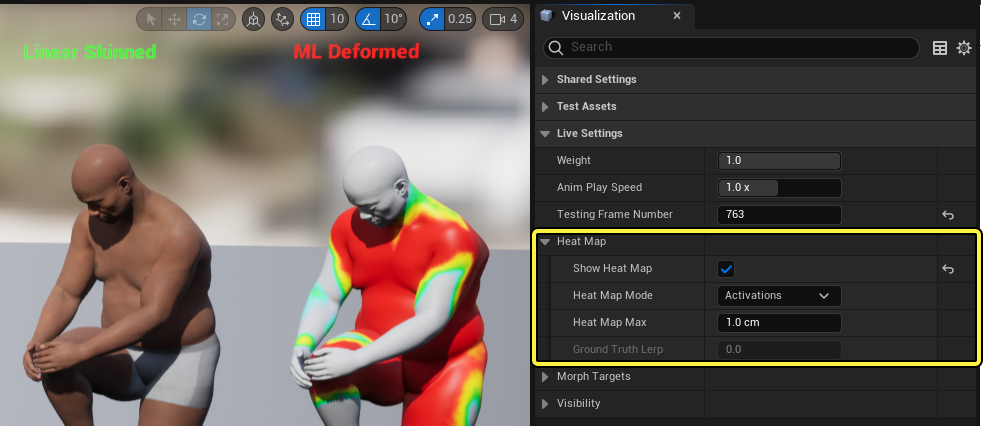
You can adjust the Weight property in the Visualization panel to observe the effect of the ML Deformer mesh (right) compared to the linear skinned mesh (left).
Enable the Show Heat Map property and adjust the Heat Map options in the Visualization panel to see a visual representation of the areas of the mesh being deformed by the ML Deformer.
Deformer Blueprint Setup
In order to start using the ML Deformer on a character in a level, you will need to set up the character using the ML Deformer Component in Blueprints.
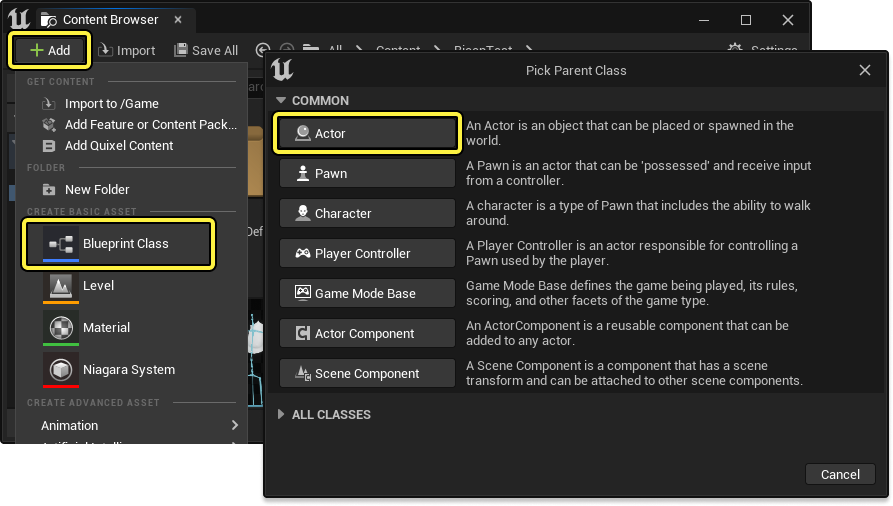
Start by creating an Actor Blueprint. In the Content Browser, click Add (+) > Blueprint Class, then select Actor. Open the Blueprint after it is created.
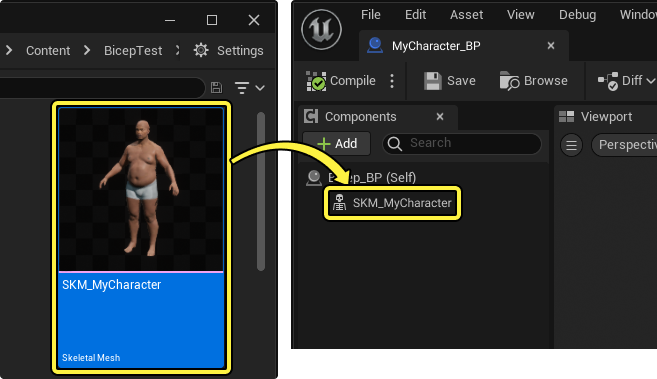
Add your Skeletal Mesh to the Blueprint by dragging it from the Content Browser into the Components panel.
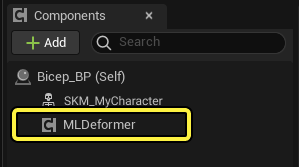
Next, add the MLDeformer Component by clicking Add (+) in the Components panel and selecting MLDeformer.
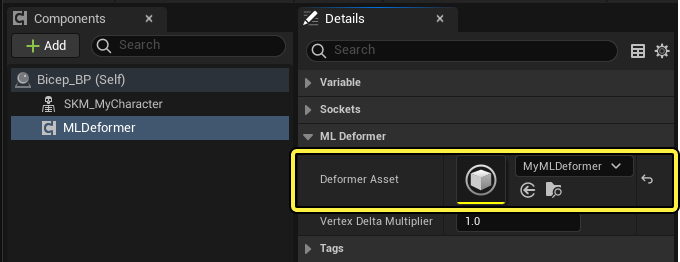
Select the MLDeformer Component and specify your ML Deformer Asset in the Details panel.
Lastly, select the Skeletal Mesh Component and specify a Deformer Graph in the Mesh Deformer property.
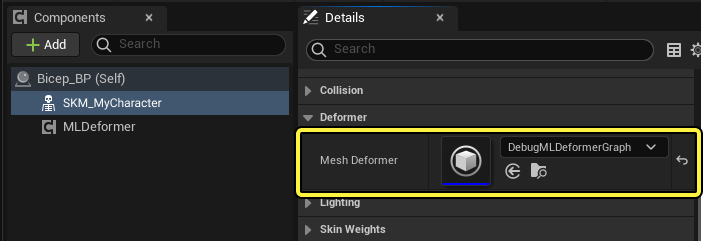
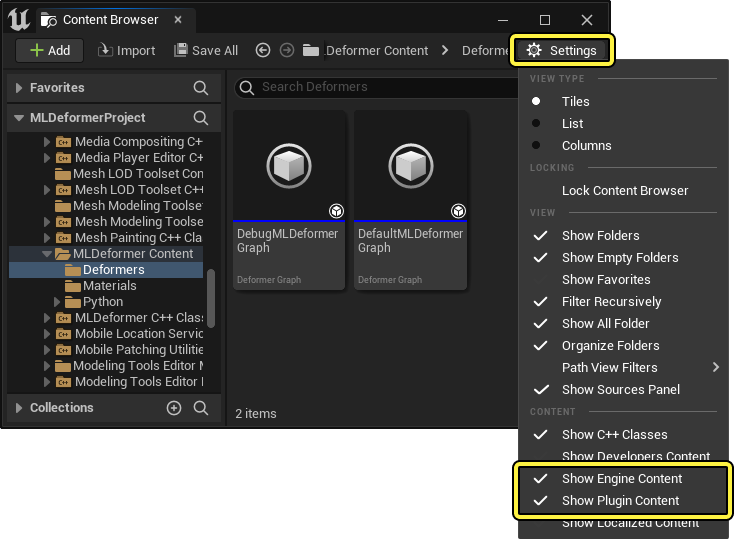
If you do not have a Deformer Graph, you can use the example DefaultMLDeformerGraph located in the Engine > Plugins > MLDeformer Content > Deformers content folder. To access this folder, click on Settings in the Content Browser and enable both Show Engine Content and Show Plugin Content.