
DumpGPU is a platform-agnostic console command that dumps the intermediary rendering resource binaries of a captured frame to disk. The dump is stored with .json and .bin files that can then be browsed using a lightweight webpage viewer.

This command serves several purposes:
- It is available for all builds without the need to install a third party GPU debugging tool or restart the editor.
- Dumps can come from any supported platforms:
- Windows D3D11, D3D12, Vulkan
- Linux Vulkan
- Mac Metal, AGX
- PlayStation 4 and PlayStation 5
- XboxOne, Xbox Series X/S
- Nintendo Switch
- iOS and Android
- The interface is browsable from any platform that supports Chrome and a WebGL 2.0-capable GPU.
- Simple and platform-agnostic, which enables anyone to produce a GPU dump when encountering an artifact.
- Ideal for artists that run into unexpected and hard-to-reproduce problems while working in the editor.
- Minimizes frictions of browsing a resources binary.
- Platform GPU captures often require the correct SDK, and a dev kit to be able to analyze the resource. The GPUDump viewer enables developers to better triage bugs, but also to look at resources from any platforms with the required context of an issue.
- For graphics programmers writing new renderer functionality, this tool provides a faster iterative workflow for analyzing what may be happening.
Dumping Process
To initiate the process of creating a GPU dump of the frame, enter the command DumpGPU into the console window, or use the keyboard shortcut CTRL + Shift + /.
Once the command is initiated, it needs to copy the intermediary rendering resources to disk. To handle this, capture speed is traded for memory to limit out of memory failures from occurring. This ensures that the dump can reliably gather data of artifacts that are rare or difficult to reproduce without crashing a process that was able to reproduce it.
The amount of persistent memory needed for a dump to know whether a resource has been already dumped or not is negligible.
If the amount of memory required to dump a resource is larger than the available memory in the system, the resource will not be dumped. Instead, a warning is placed in the log.
The DumpGPU command is available on Debug, DebugGame, Development, and Test builds, but it can be enabled on Shipping builds with the Project.Target.cs.
GlobalDefinitions.Add("ALLOW_CONSOLE_IN_SHIPPING=1");
GlobalDefinitions.Add("ALLOW_DUMPGPU_IN_SHIPPING=1");
These should be used for debugging testing purposes shipping only rendering problems and should not be enabled when actually shipping the project.
Save Location of GPU Dumps
When a GPU dump is performed, it is stored in the project's root directory under the Saved/GPUDumps by default. On Desktop platforms, the file explorer will open a window to this dump location automatically on completion.
For Staged builds, they are saved in the Stage's Saved directory, with the path format: [Staged Directory] / [Platform Name] / [Project Name] / Saved / GPUDumps.
All dumps are uncompressed raw resources, which means they can take up a lot of disk space. However, it is highly compressible as a Zip file. For example, the Matrix: Awakens technical demo produced dumps that were approximately 8Gb uncompressed, and 2.2Gb once zipped.
Zipping dumps can be useful when sharing data with others.
Mobile Platform Dump Save Location
For Mobile platforms, the GPU dumps are saved in the following locations:
| Mobile Platform | Save Location File Path |
|---|---|
| iOS | [Path to App Container]/Documents/[ProjectName]/Saved/GPUDumps/ |
| Android |
Stencil buffer will be empty on Android OpenGL. |
Dump Settings
The GPU dumps created can be tailored to your needs with the following commands:
| Console Variable | Description |
|---|---|
r.DumpGPU.Root |
Selects a subset of Render Dependency Graph (RDG) passes to dump based on their draw events and the parent scopes they belong to. Enabling this can significantly speed up the dumping process by only dumping the passes you need when iterating on isolated rendering functionality. For example, to only dump post processing passes, enter r.DumpGPU.Root="PostProcessing". |
r.DumpGPU.Viewer.Visualize |
Automatically opens a specific resource based on its name in the viewer. For example you would enter `r.DumpGPU.Viewer.Visualize " |
r.DumpGPU.Directory |
GPU dumps can take up large amounts of disk space. You can specify the directory to save all GPU dumps in a single location using this command in your ConsoleVariables.ini configuration file. You would specify the location like so, `r.DumpGPU.Directory="[X:/File/Path/Name]". |
How the DumpGPU Command Copies the GPUDumpViewer
The GPUDumpViewer source code is available with the engine source and can be found in /Engine/Extras/GPUDumpViewer.
On non-Shipping builds, the GPUDumpViewer is automatically copied into the staging directory. Then, when the DumpGPU command is called to dump the frame, the files are copied from the staged directory to the dumping directory.
If you have a Shipping staged build, the GPUDumpViewer's HTML source may not be copied into the dumping directory because it is missing in the staged directory. In this case, you can copy your repository's //Engine/Extras/GPUDumpViewer application into your dumping directory to open the dump.
The GPU Dump Viewer
The GPU Dump Viewer is an HTML web-based application. From this viewer, you can access information about how the Unreal Engine renderer works.
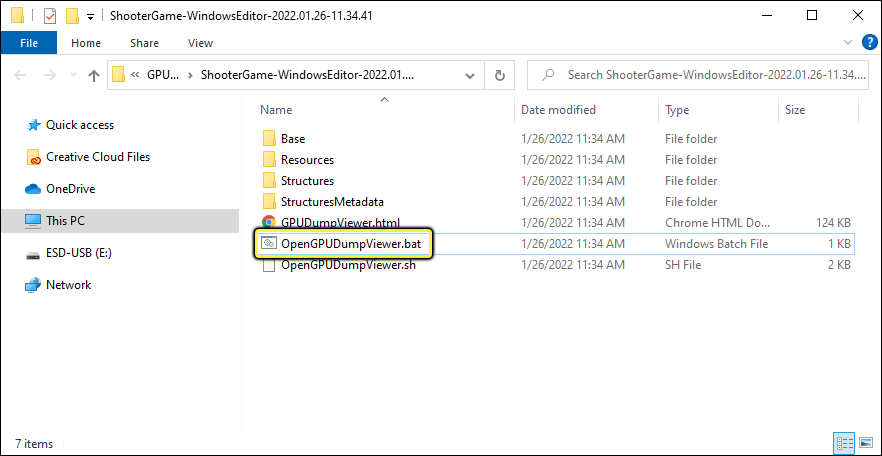
To get started, once a GPU dump has occurred, the operating system will open the folder location of the saved dump. The viewer can be opened in Chrome by double-clicking the OpenGPUDumpViewer.bat file.
Once initiated, a new Chrome window will open with the GPUDumpViewer running.
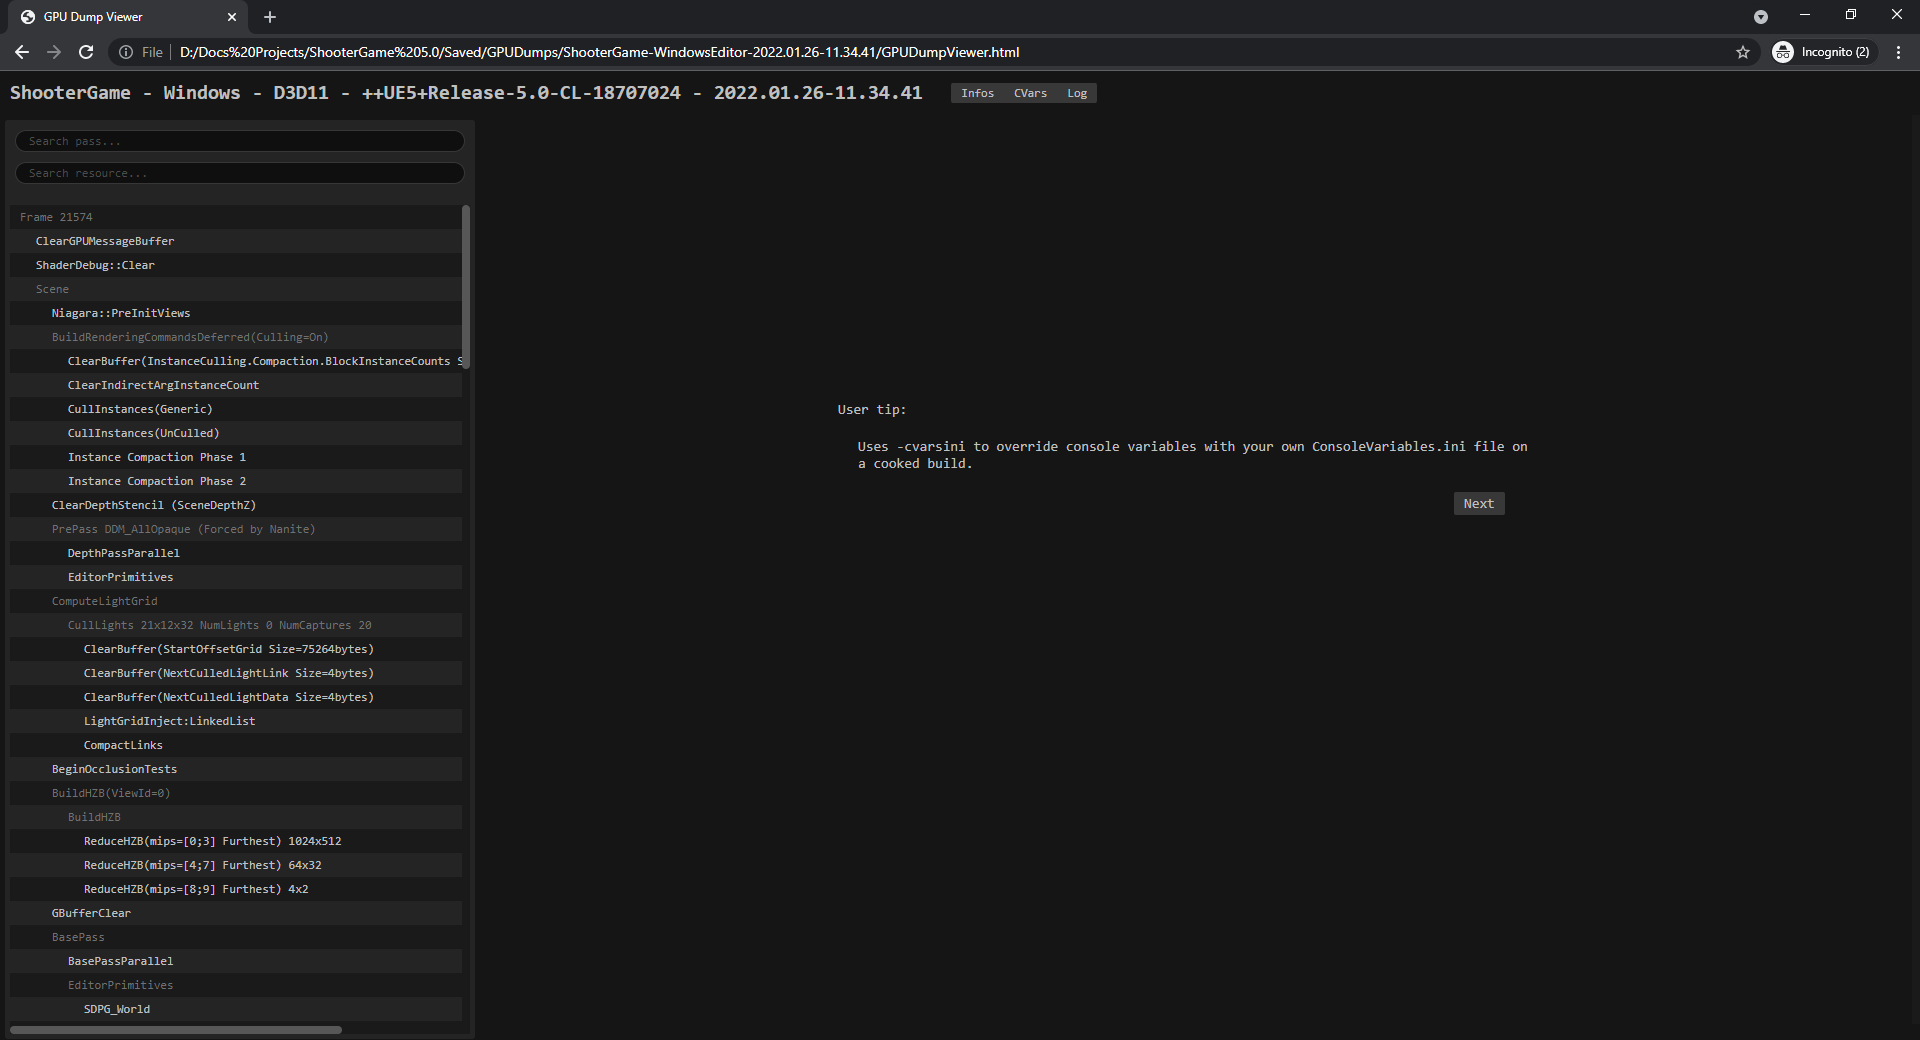
GPUDumpViewer web application opens in a new Chrome Incognito window.
The GPUDumpViewer is a web application and functions similarly to any browser-based page or application. The following are some quick tips about working in the GPUDumpViewer:
- Any link is clickable and can be opened in its own tab for quick access.
- Navigation with the forward and back buttons will move between any previously viewed pages.
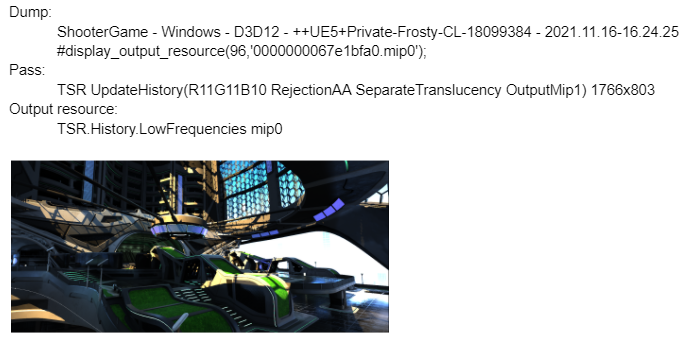
- If sharing a capture with someone, you can share the link after the # part to link them directly to a panel and part of the dump. For example,
#display_output_resource(96,'0000000067e1bfa0.mip0');
When you open GPUDumpViewer, you can cycle through a bunch of tips and tricks in the main viewing area.
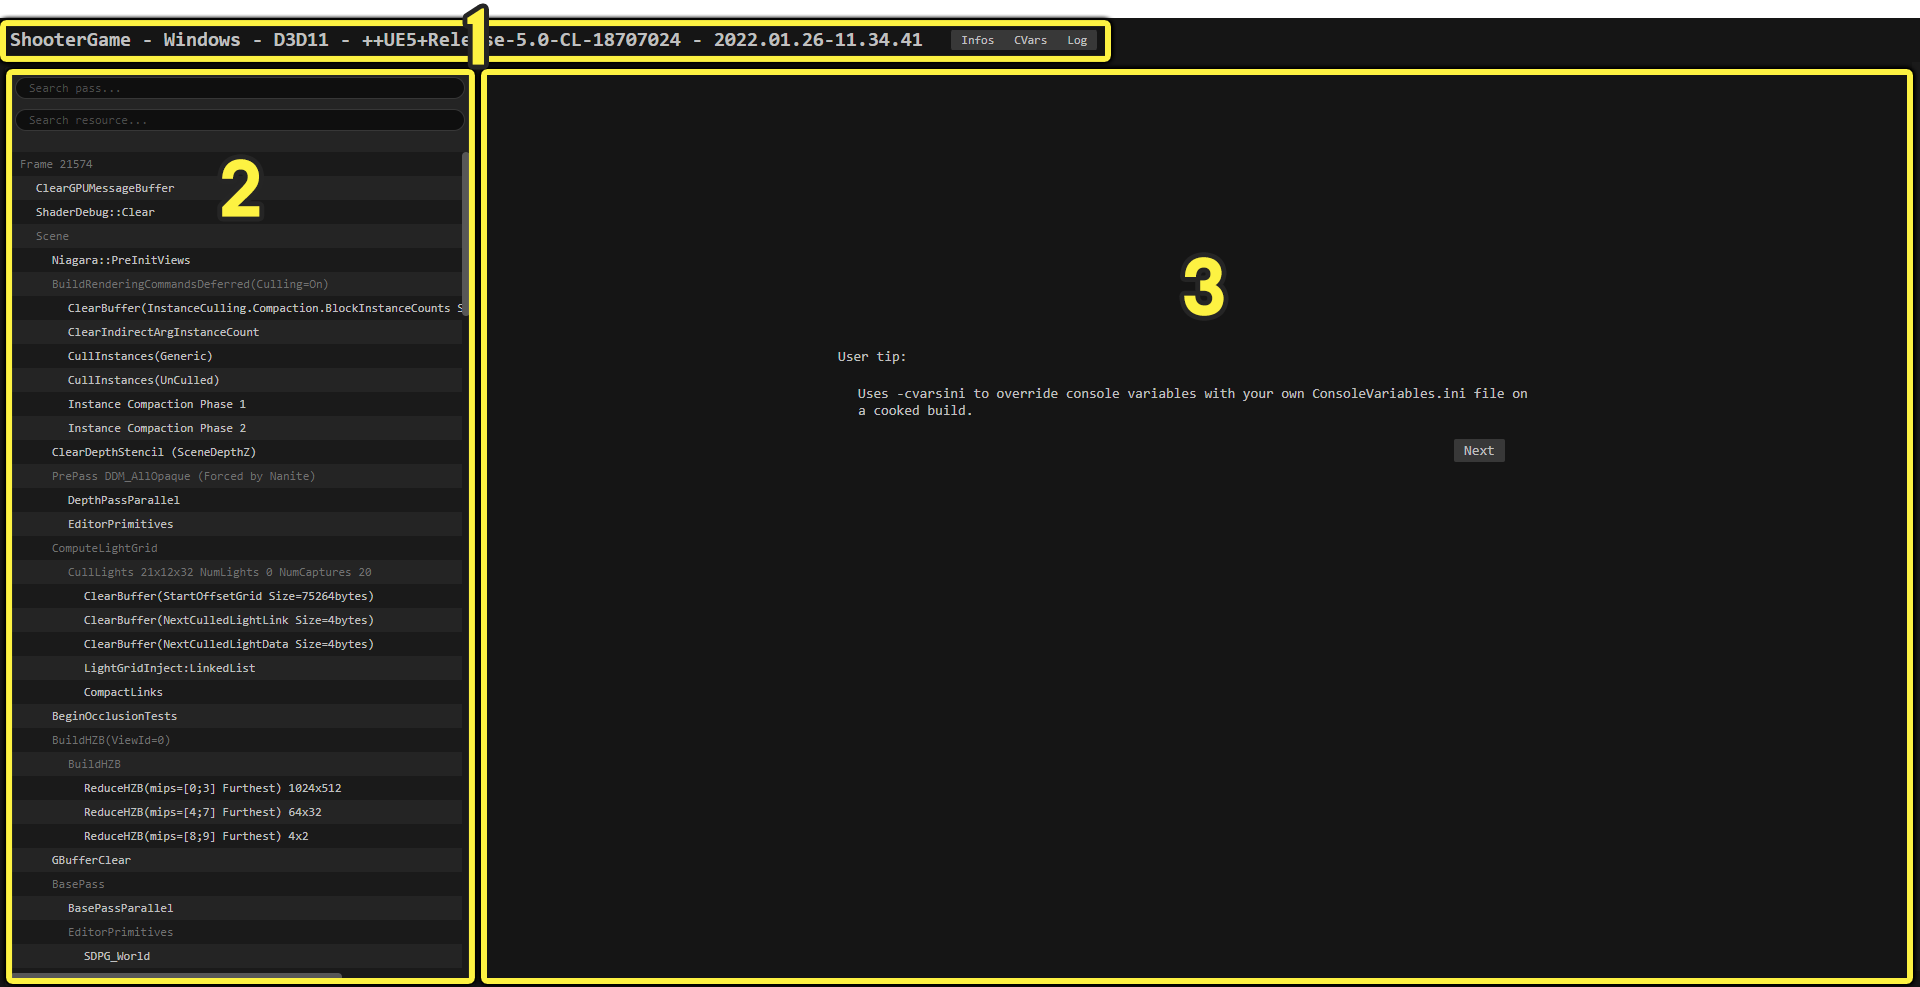
- Title Bar and Panels
- Pass and Resource Tree
- Viewer
Title Bar and Panels
The main title bar provides quick reference information about the name of the project, operating system, RHI, and build that was used when the dump was created. It also includes clickable information panels for general information about the project, console variables used, and a copy of the project's log.

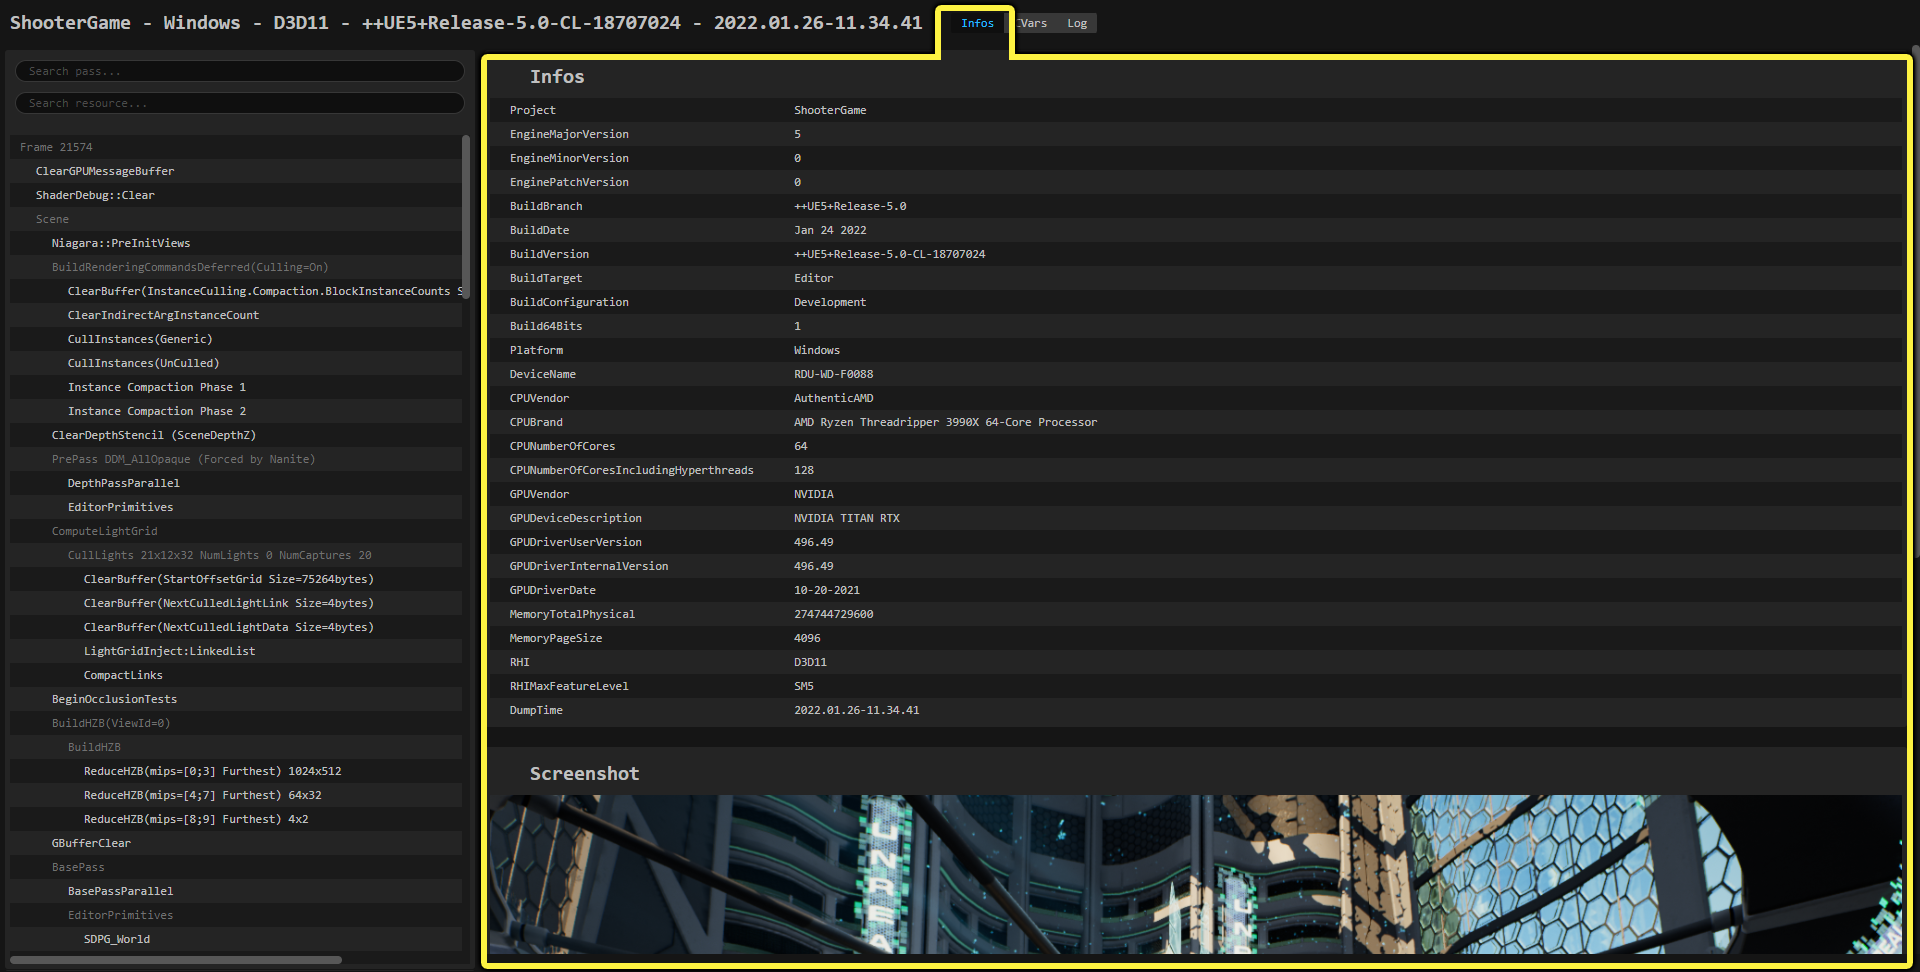
Infos Panel
The Infos panel contains a summary of the GPU Dump. You'll find useful information about the system, drivers, and engine build, along with a screenshot of the final image from the back buffer.
CVars Panel
The CVars panel includes a searchable list of any rendering console variables — ones that begin with .r.* or .sg.*, or contain the RHI keyword — that were run before the dump occured.
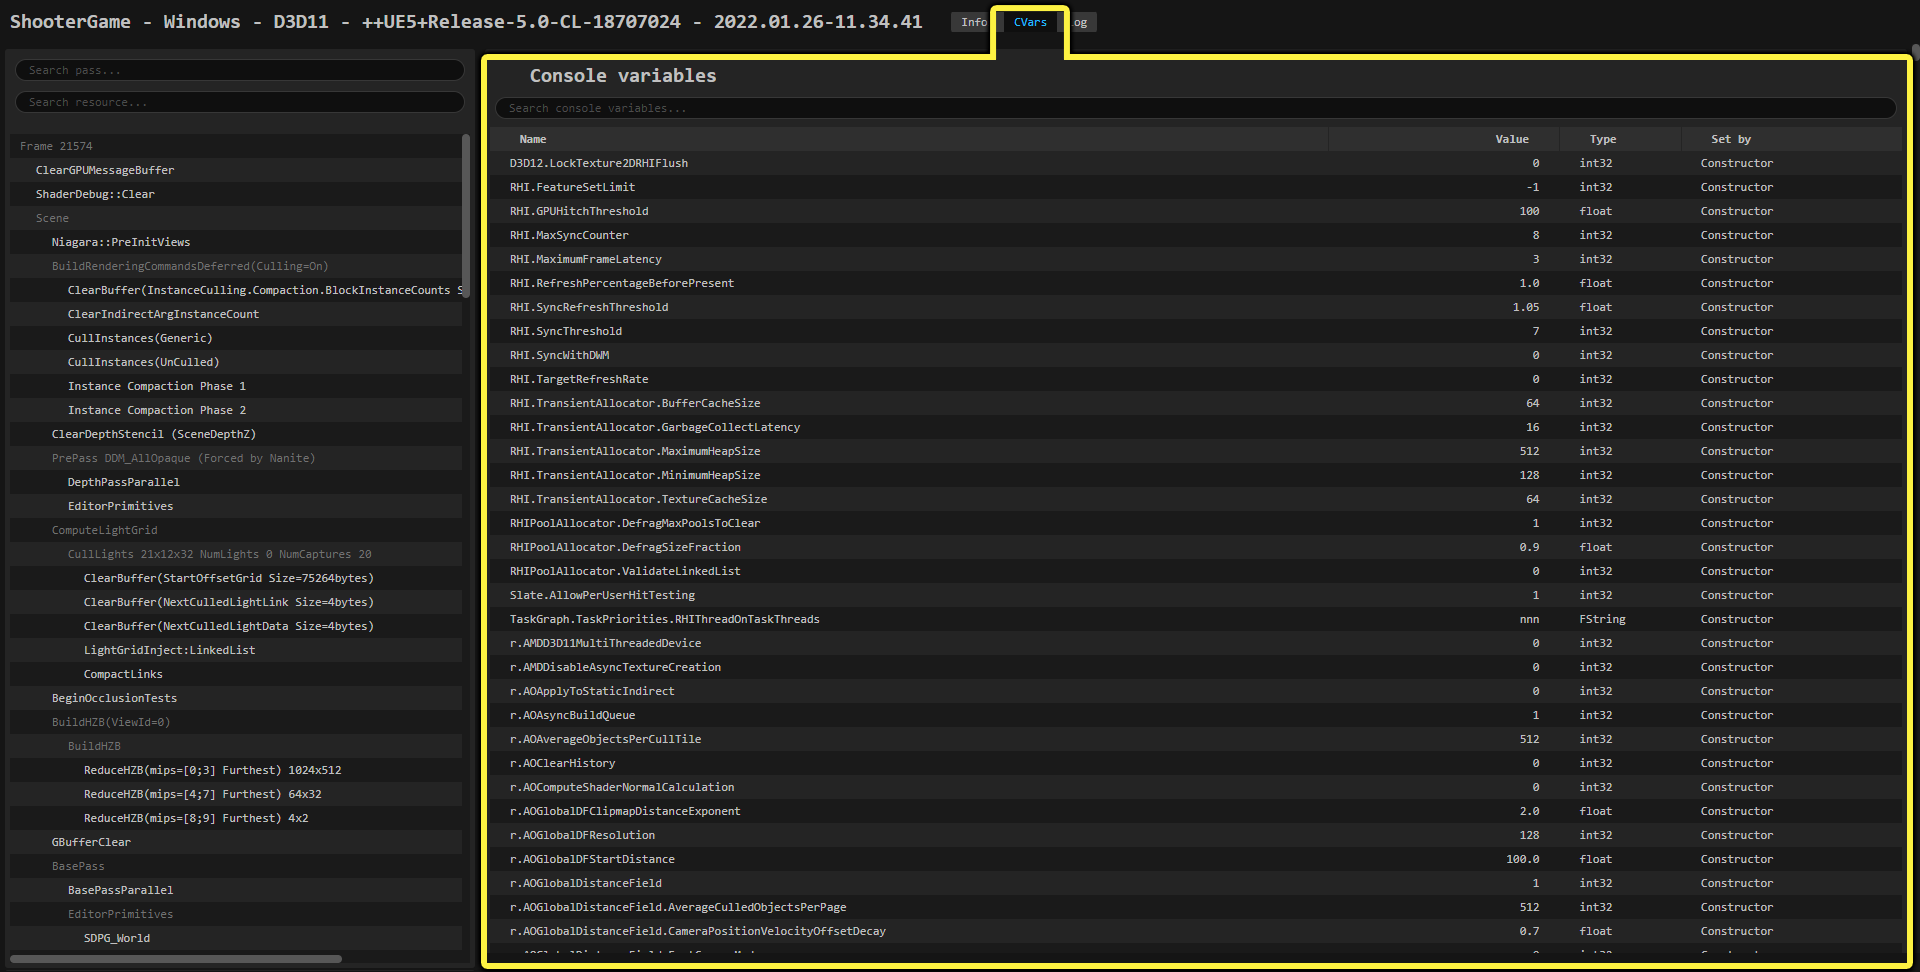
Console variables are captured at the beginning of the frame. Therefore, some might be subject to changes if gameplay toggles cvars at runtime.
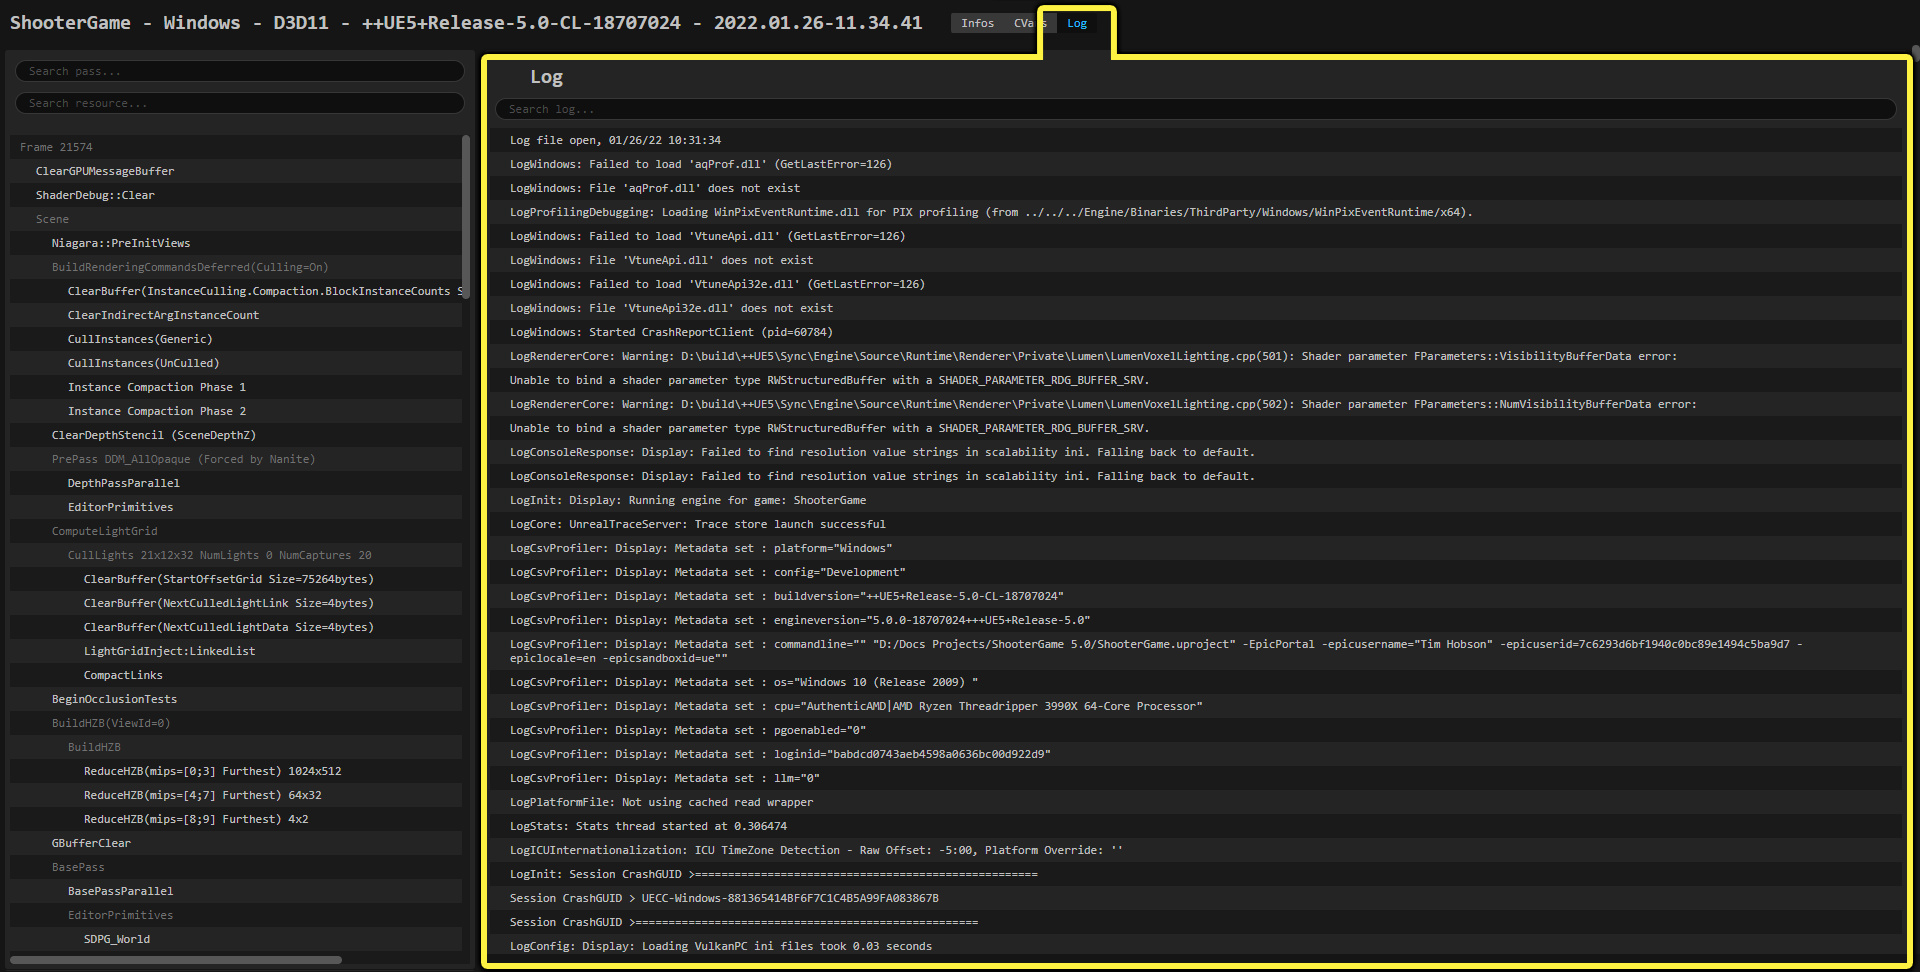
Log Panel
The Log panel provides a copy of the project's log, which gets saved along with the dump once the dump is completed. This is where you can also inspect whether there has been any warning issued in the dumping process.
Viewers
The viewing area displays information about the different Passes, Textures, and Buffers when selected.
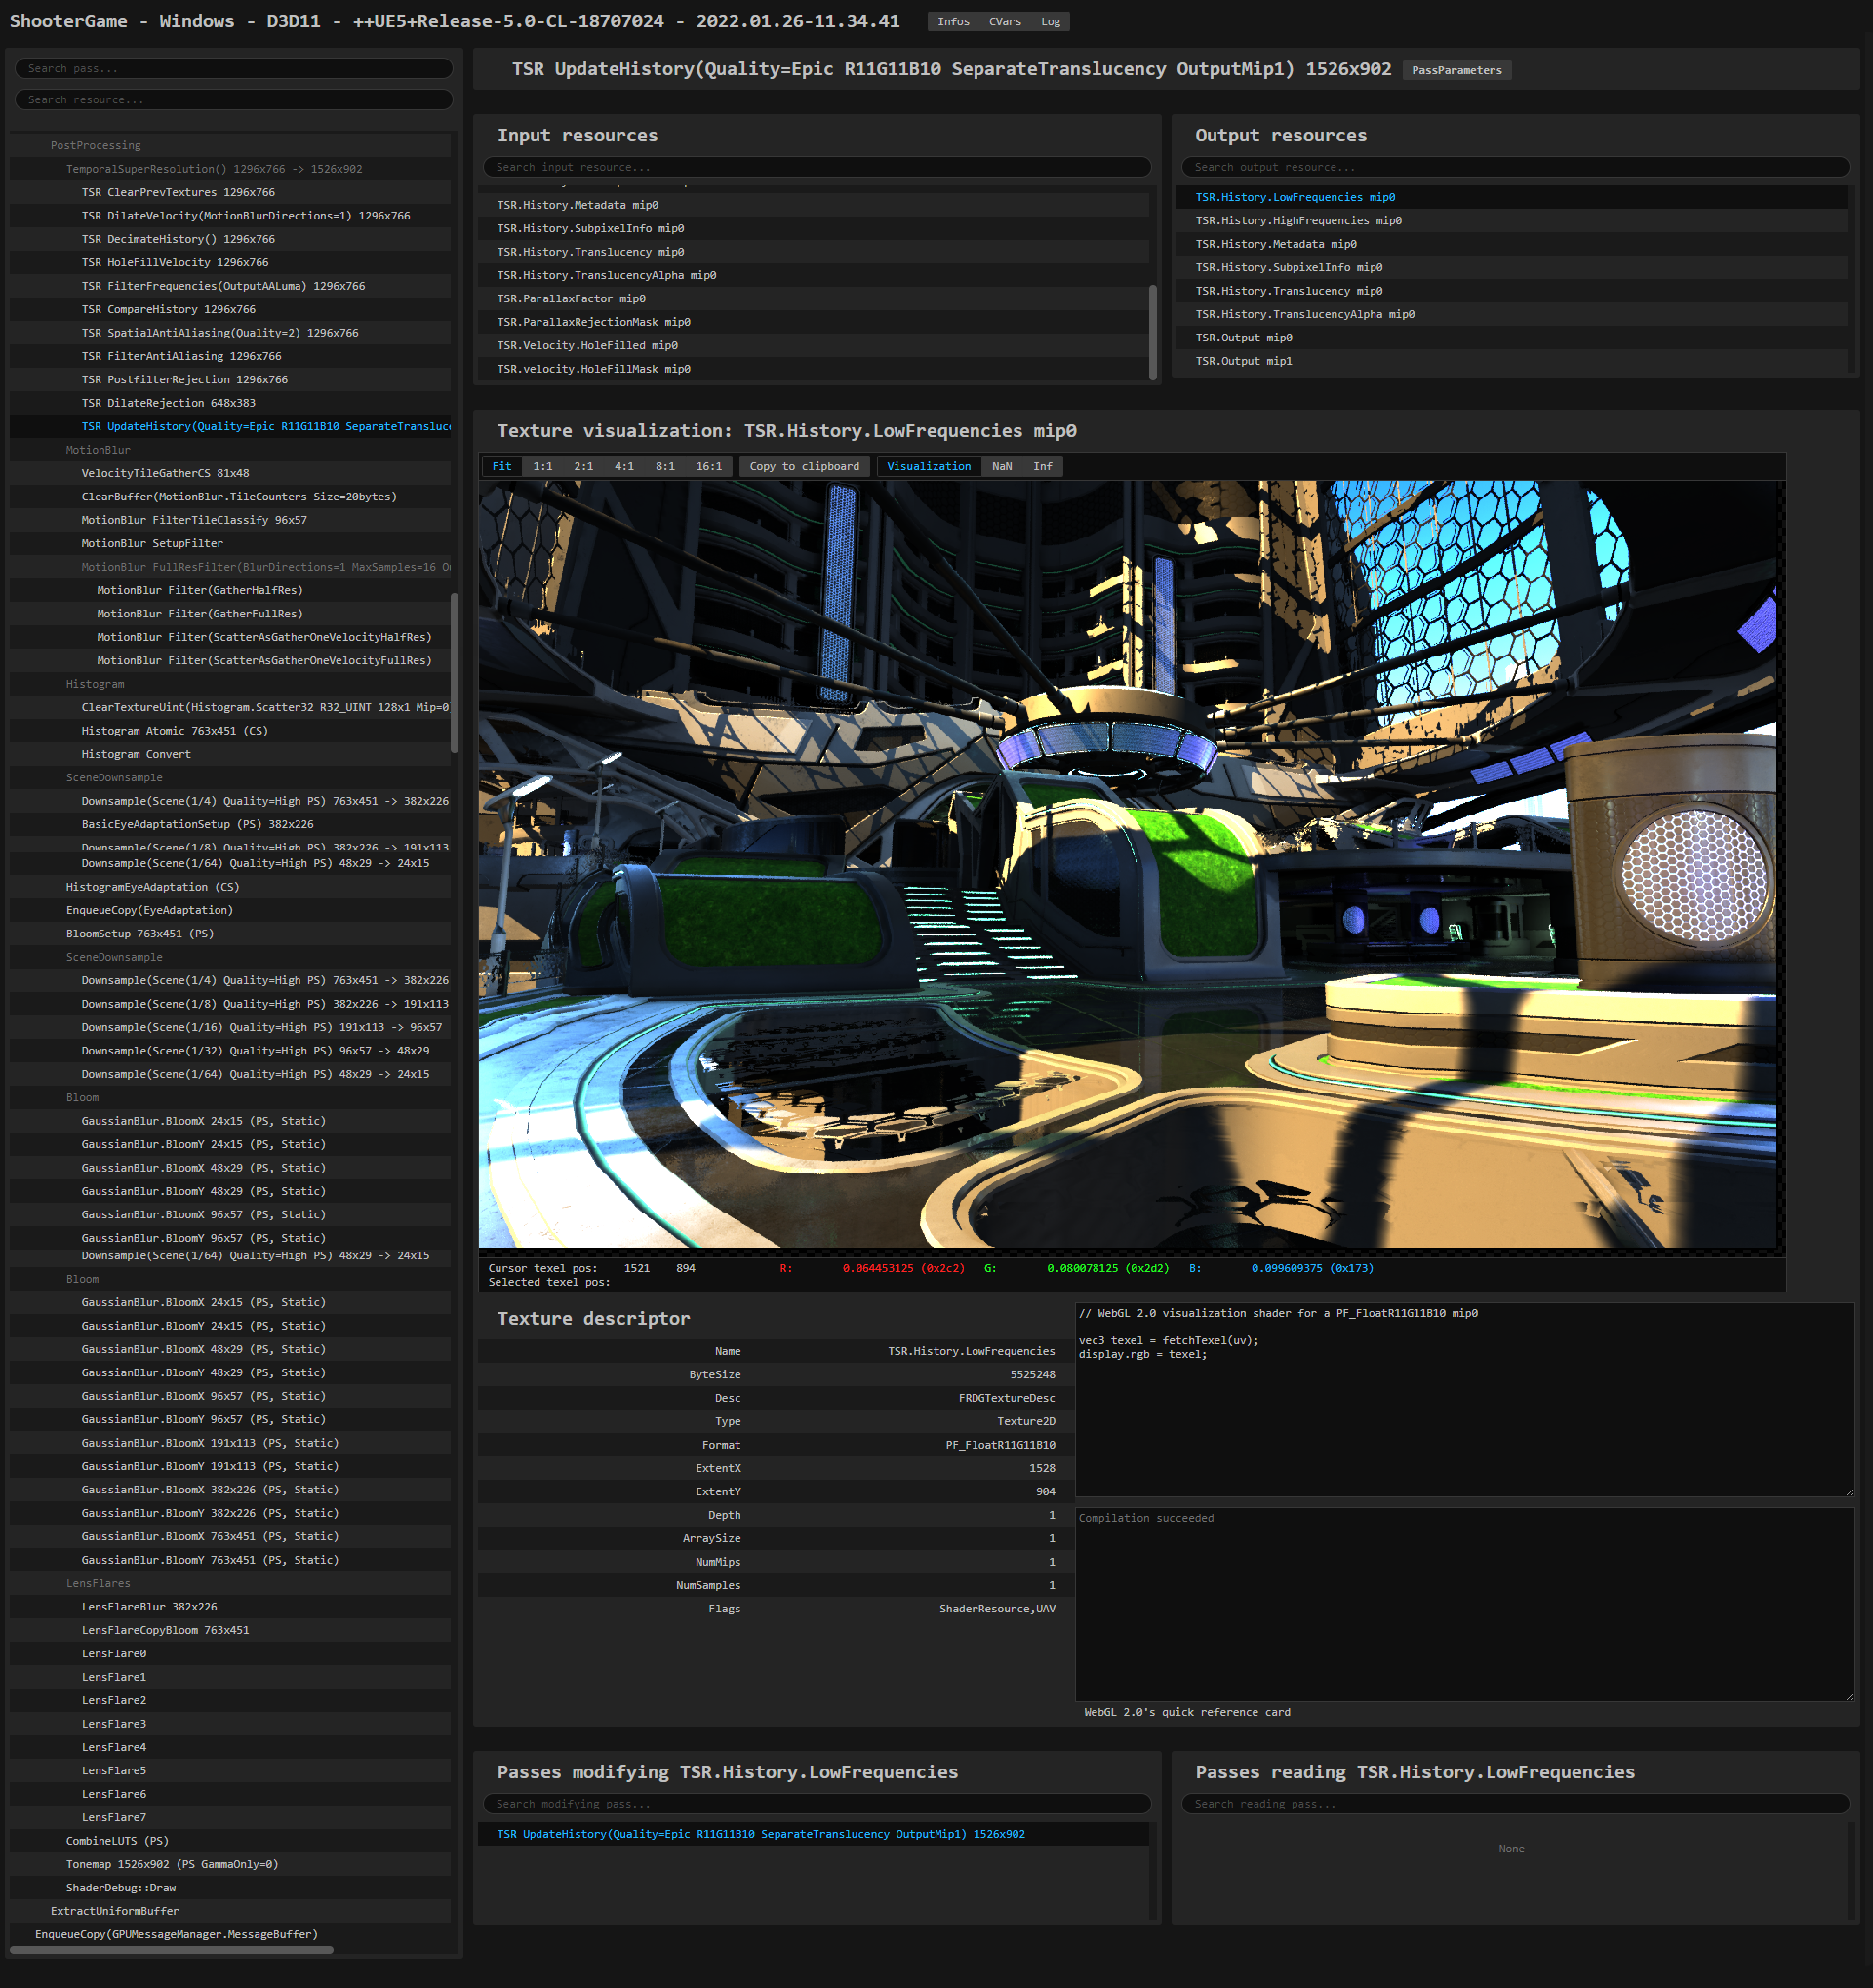
Pass Viewer
When clicking on a Pass in the draw event hierarchy, only the resources that the pass reads and modifies will be shown. It automatically opens up the first output resource, whether it's a texture or the buffer.
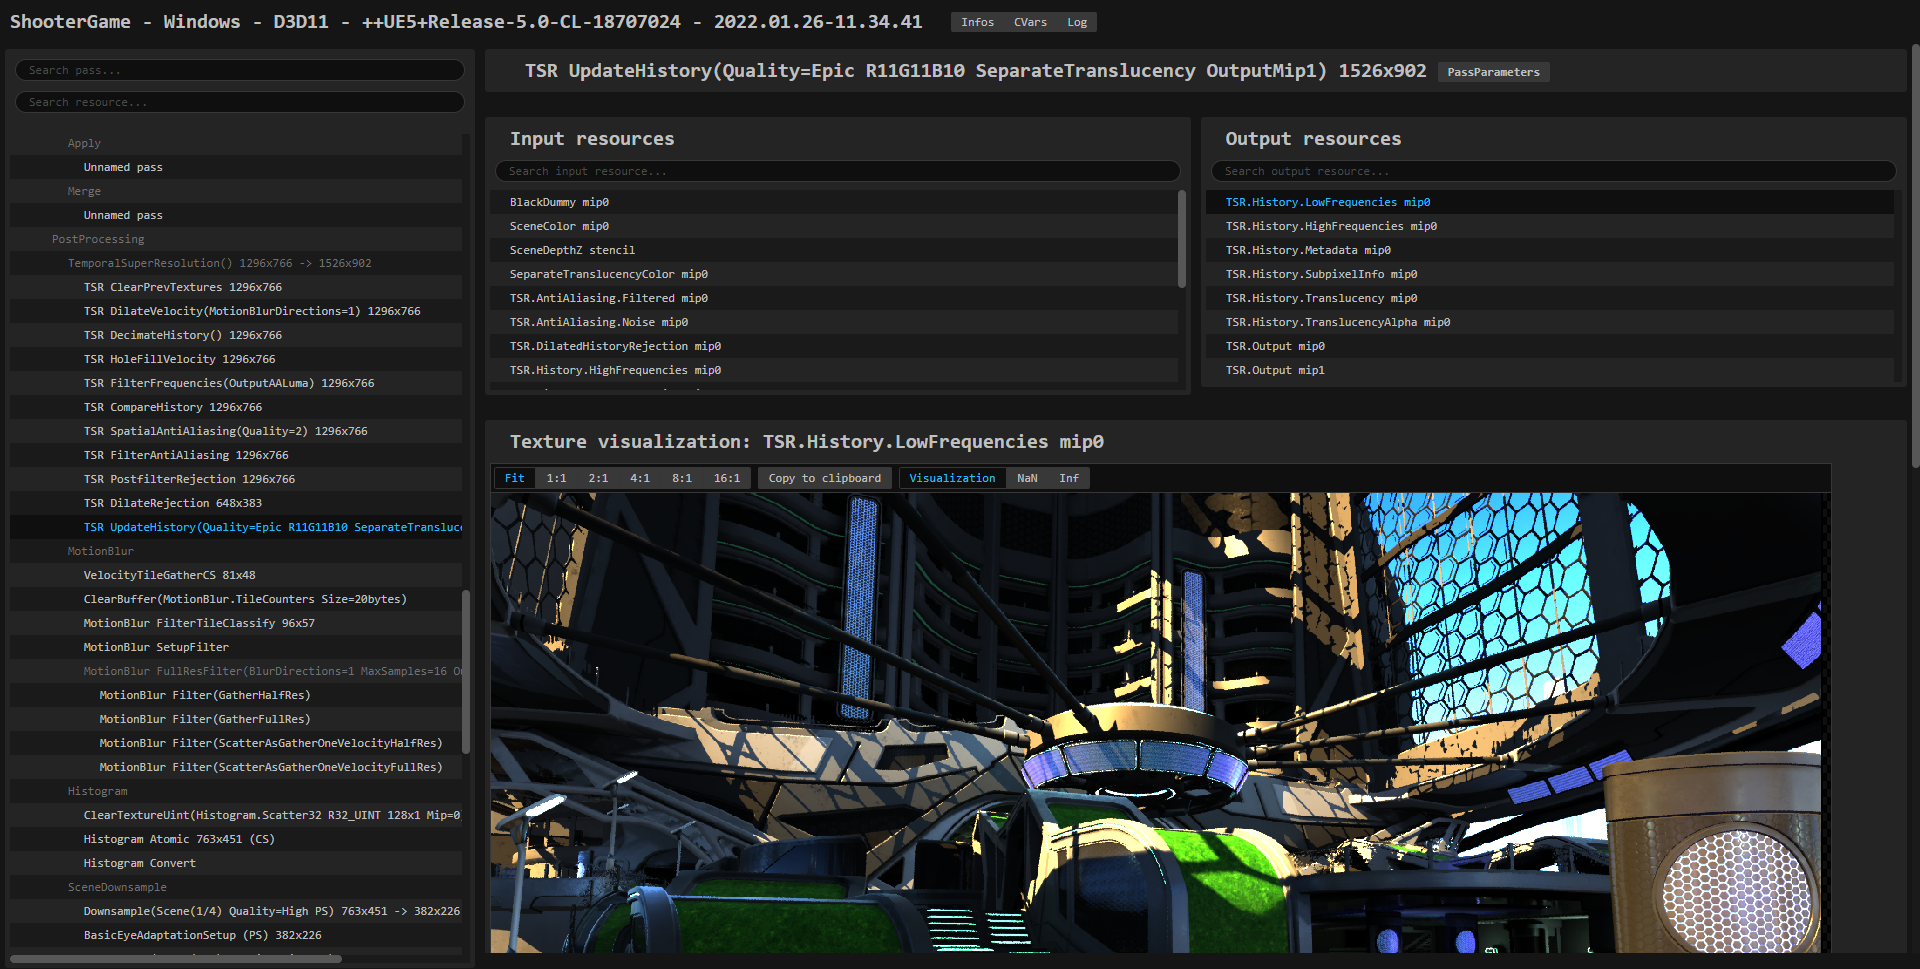
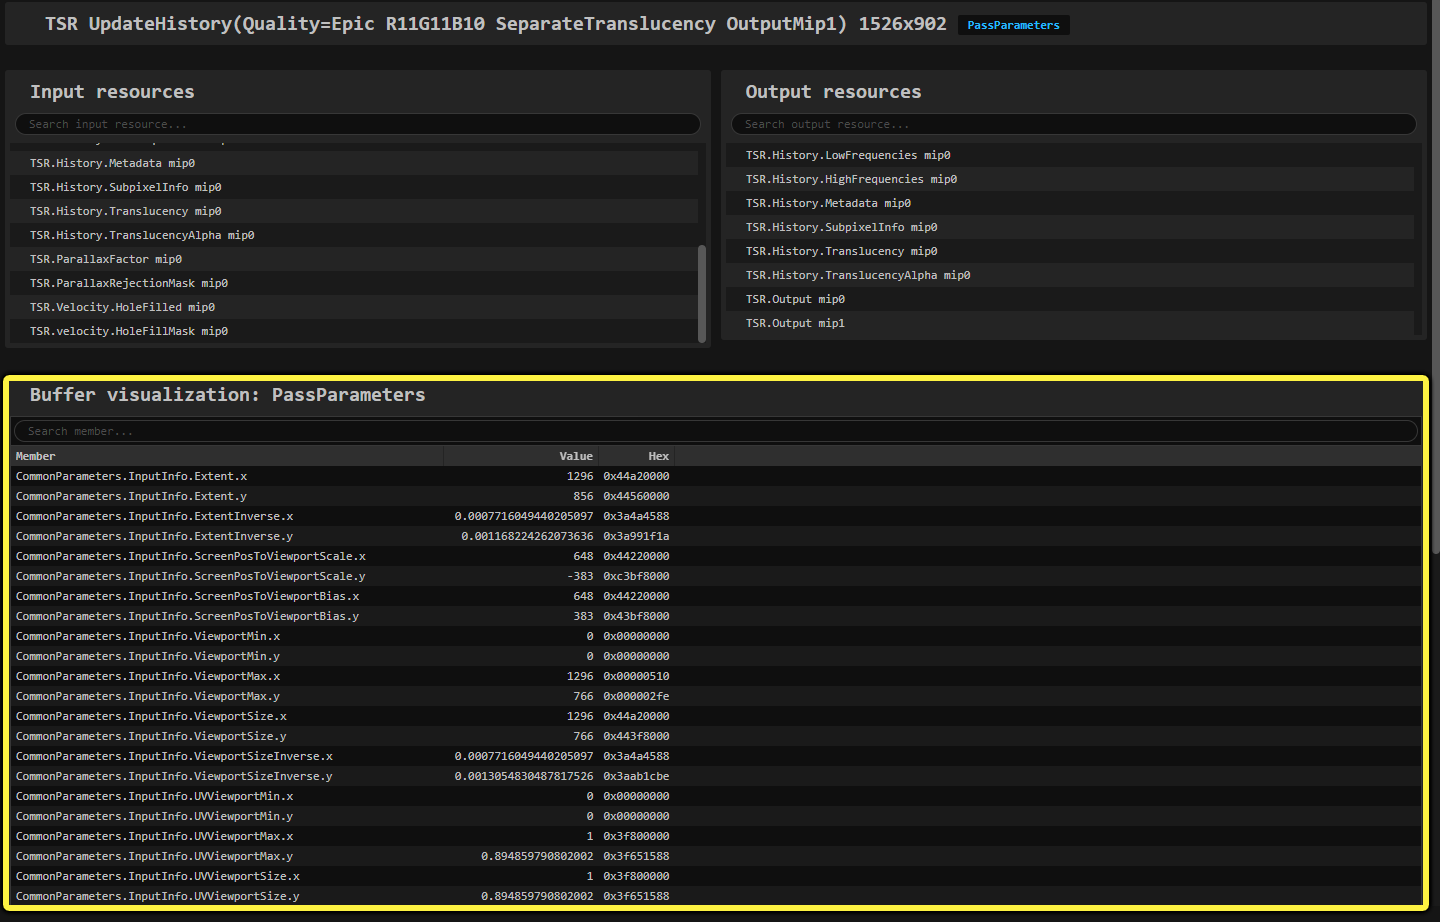
Next to the pass name (at the top of the viewer), you will find the Pass Parameters button.

Clicking this will display the raw pass parameters. More often than not, the pass parameters are shader parameters. For example, when FComputerShaderUtils::AddPass() or FPixelShaderUtils::AddPass() are used.
Pass Parameters enable you to verify that no instances of NaN from the CPU affects your shader through the shader parameters.
Texture Viewer
When a Texture is selected in the Pass view's Input Resources or Output Resources list, you can visualize its pixels in the viewer.
WebGL 2.0's canvas makes it possible to view textures by loading the raw resource binary (the RHI has copied into the dump's directory), and displaying it using a simpler WebGL pixel shader. For formats not supported by WebGL, such as 32 bit UINT textures, additional work behind the scenes is done to accurately simulate the pixel format.
The Texture Viewer includes several buttons along the top of the displayed texture:

- Set the size of the texture being displayed in the viewer or simply fit it to the window.
-
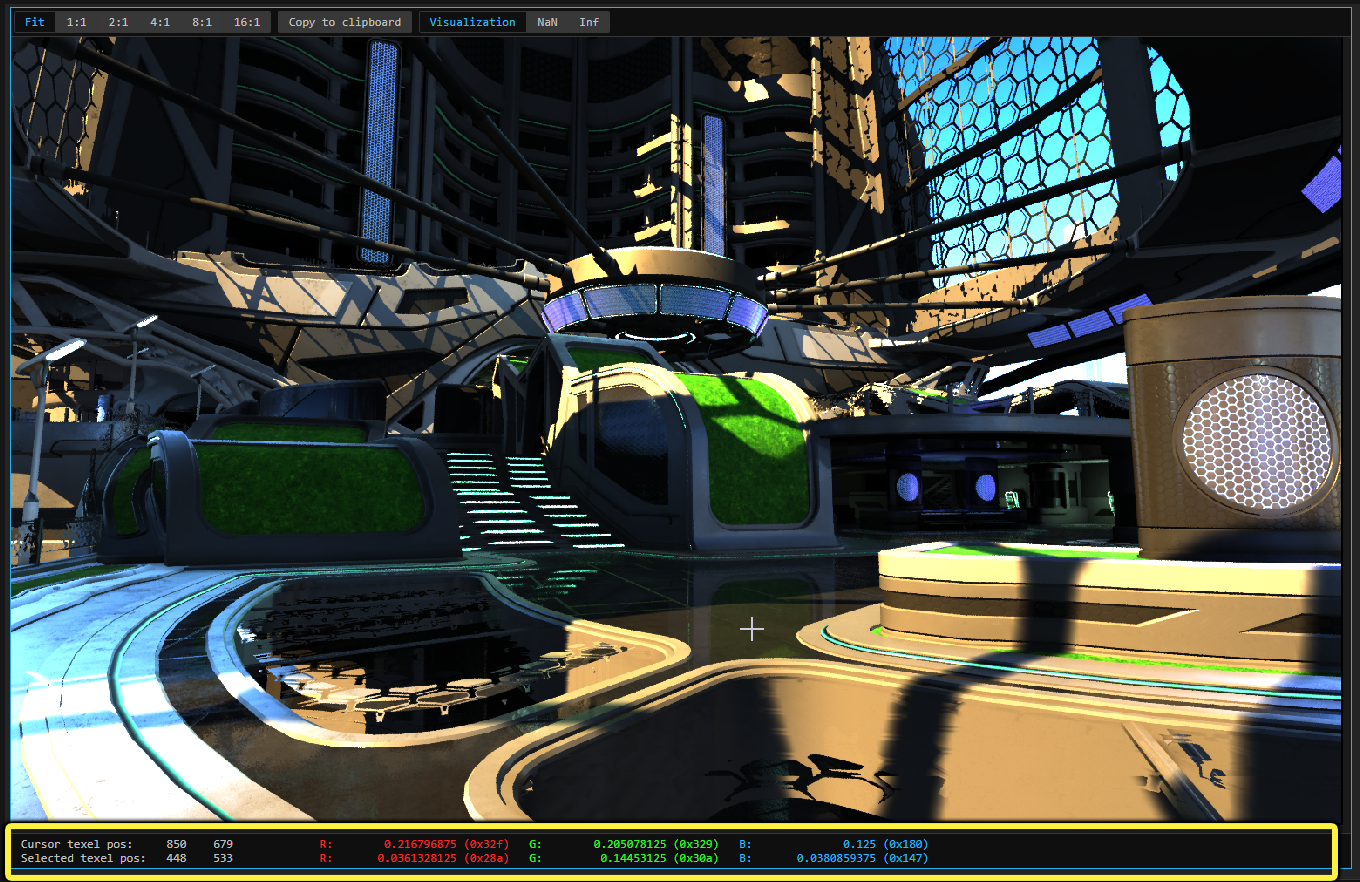
Use Copy to clipboard to copy the currently displayed texture and relevant resource information to your clipboard. When you paste it into a text editor, or email, you should see something like this:
- There are three buttons to change the texture view mode: Visualization for standard texture view mode, or NaN (not a number) and Inf (infinity) viewing modes for identifying those types of pixel errors.
Hovering the mouse over the texture returns the current RGBA values of the cursor texel position. Left-clicking the mouse will capture and hold the texel RGBA position value.
The value displayed for the Cursor Texel Pos and Selected Texel Pos includes many more digits than the precision allowed by the pixel format encoding. This is because the webpage decodes the texel in javascript using double precision floating point format.
For parts of the texture you want to examine more closely, you can use the mouse wheel to zoom in and out of the texture. When zoomed in, you can right-click and drag to move around the texture.
The area below the displayed texture provides key information about the texture and how it is being rendered.
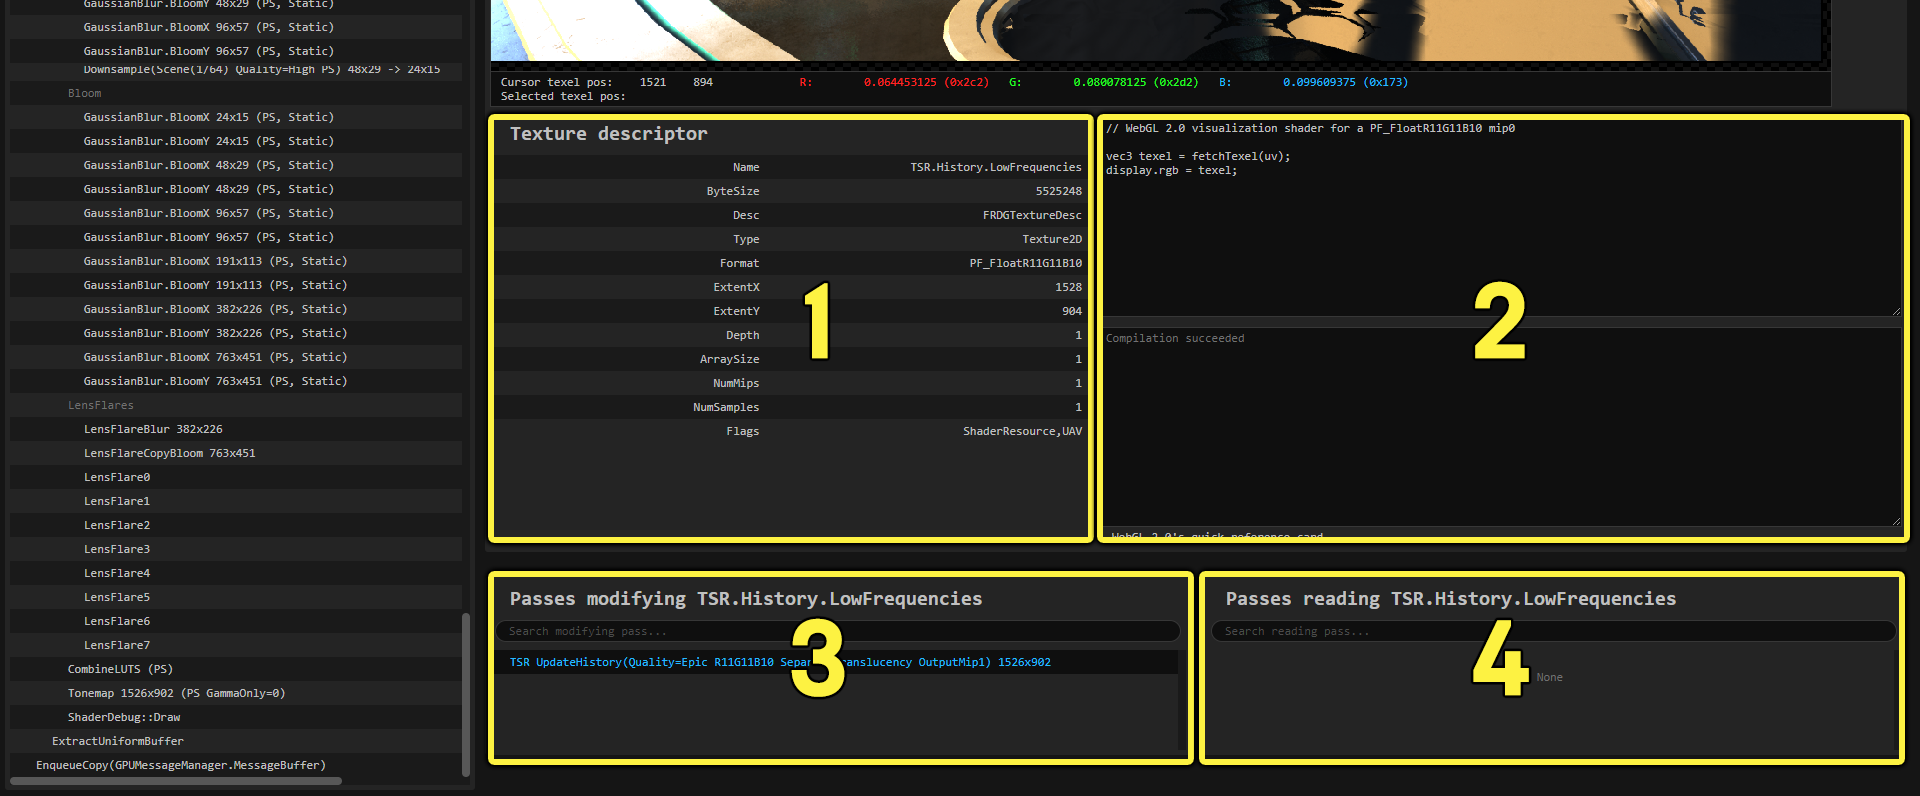
- Texture Descriptor
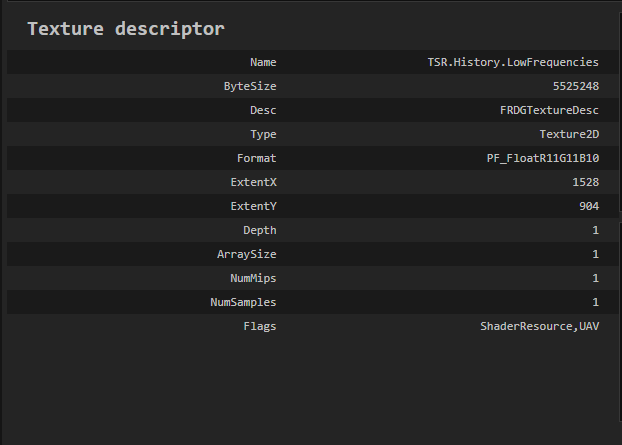
- WebGL 2.0 visualization shader to customize
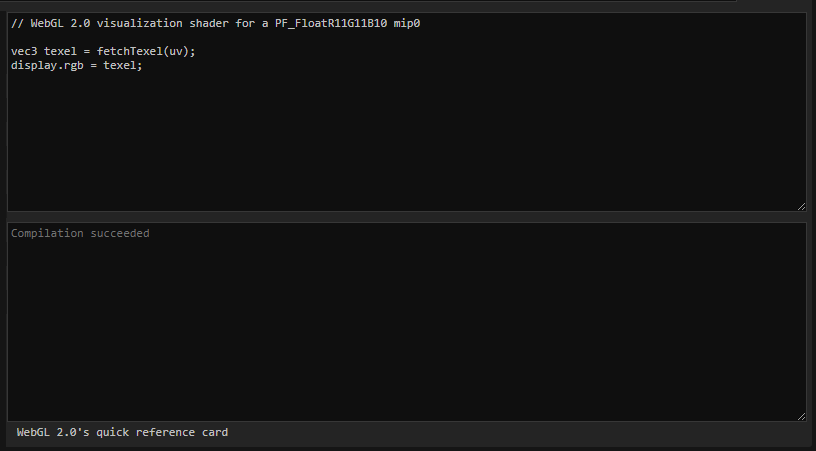
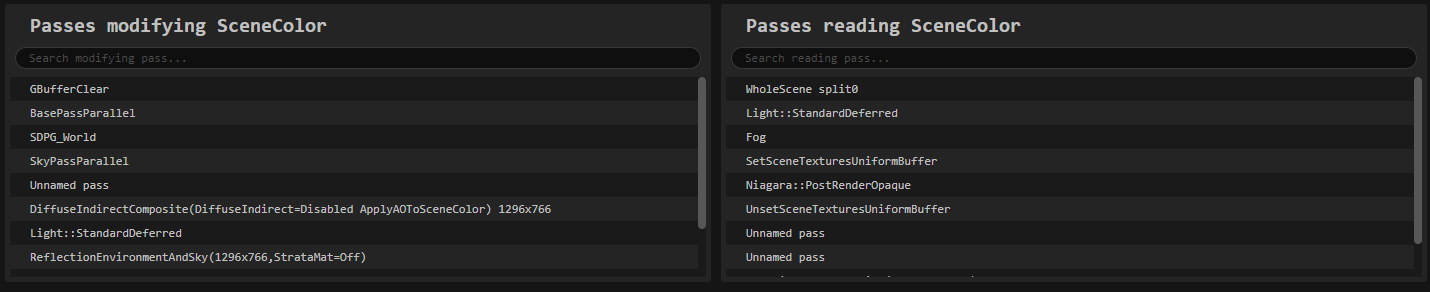
- Passes that modify the resource
- Passes that read the resource
Texture Descriptor
The Texture Descriptor displays information about the currently displayed texture. This is the one set up on FRDGBuilder::CreateTexture().
At this time, the DumpGPU command only dumps FRDGTexture and only supports non-MSAA Texture2D. This includes depth, stencil, and mip levels. Texture2DArray, Texture2DMS, Texture3D, TextureCube, TextureCubeArray are metadata like HTILE, CMask & cie are not supported yet
WebGL 2.0 Visualization Shader
The WebGL 2.0 Visualization Shader displays the code fragment that gets compiled to display the texture in the top window. Below it, the compilation log window displays any compilation errors that may occur.
The WebGL 2.0 canvas window is an editable text box that can be used to write any WebGL 2.0 GLSL. It can be customized to visualize and decode the texture, like when your image is compressing multiple bits of information per channel, or using a different color space. Any code typed in this field will automatically recompile and display any errors.
The syntax for WebGL 2.0 shaders differs from those that Unreal Engine uses with its Unreal Shader Format (.usf) and Unreal Shader Header (.ush) files used to write internal rendering code with HLSL. A link to the WebGL 2.0 quick reference card for GLSL syntax is linked at the bottom of the compilation window.
The fetchTexel(uv) is not standard GLSL. Instead, it is a custom function that automatically handles pixel formats that are not normally supported by WebGL2.0.
Passes being Modified and Read
At the very bottom are two windows, one for the Passes that are modifying the selected resource and Passes that are reading from the selected resource. In either Passes list, click on any Pass to display them in the viewer.
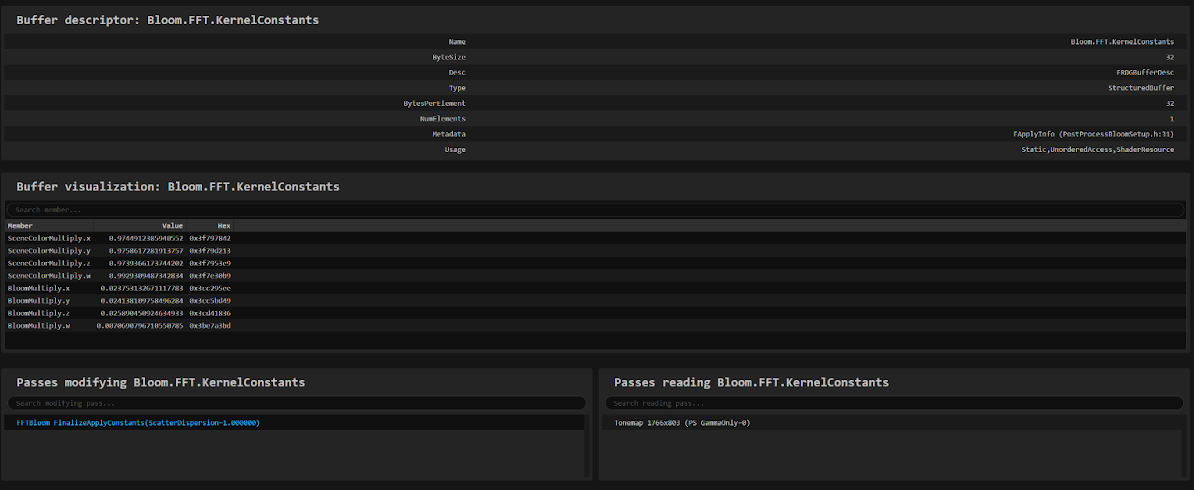
Buffer Viewer
Once a texture is selected for viewing in the Pass Input Resources or Output Resources lists, the Buffer view will list its descriptor and visualization contents.
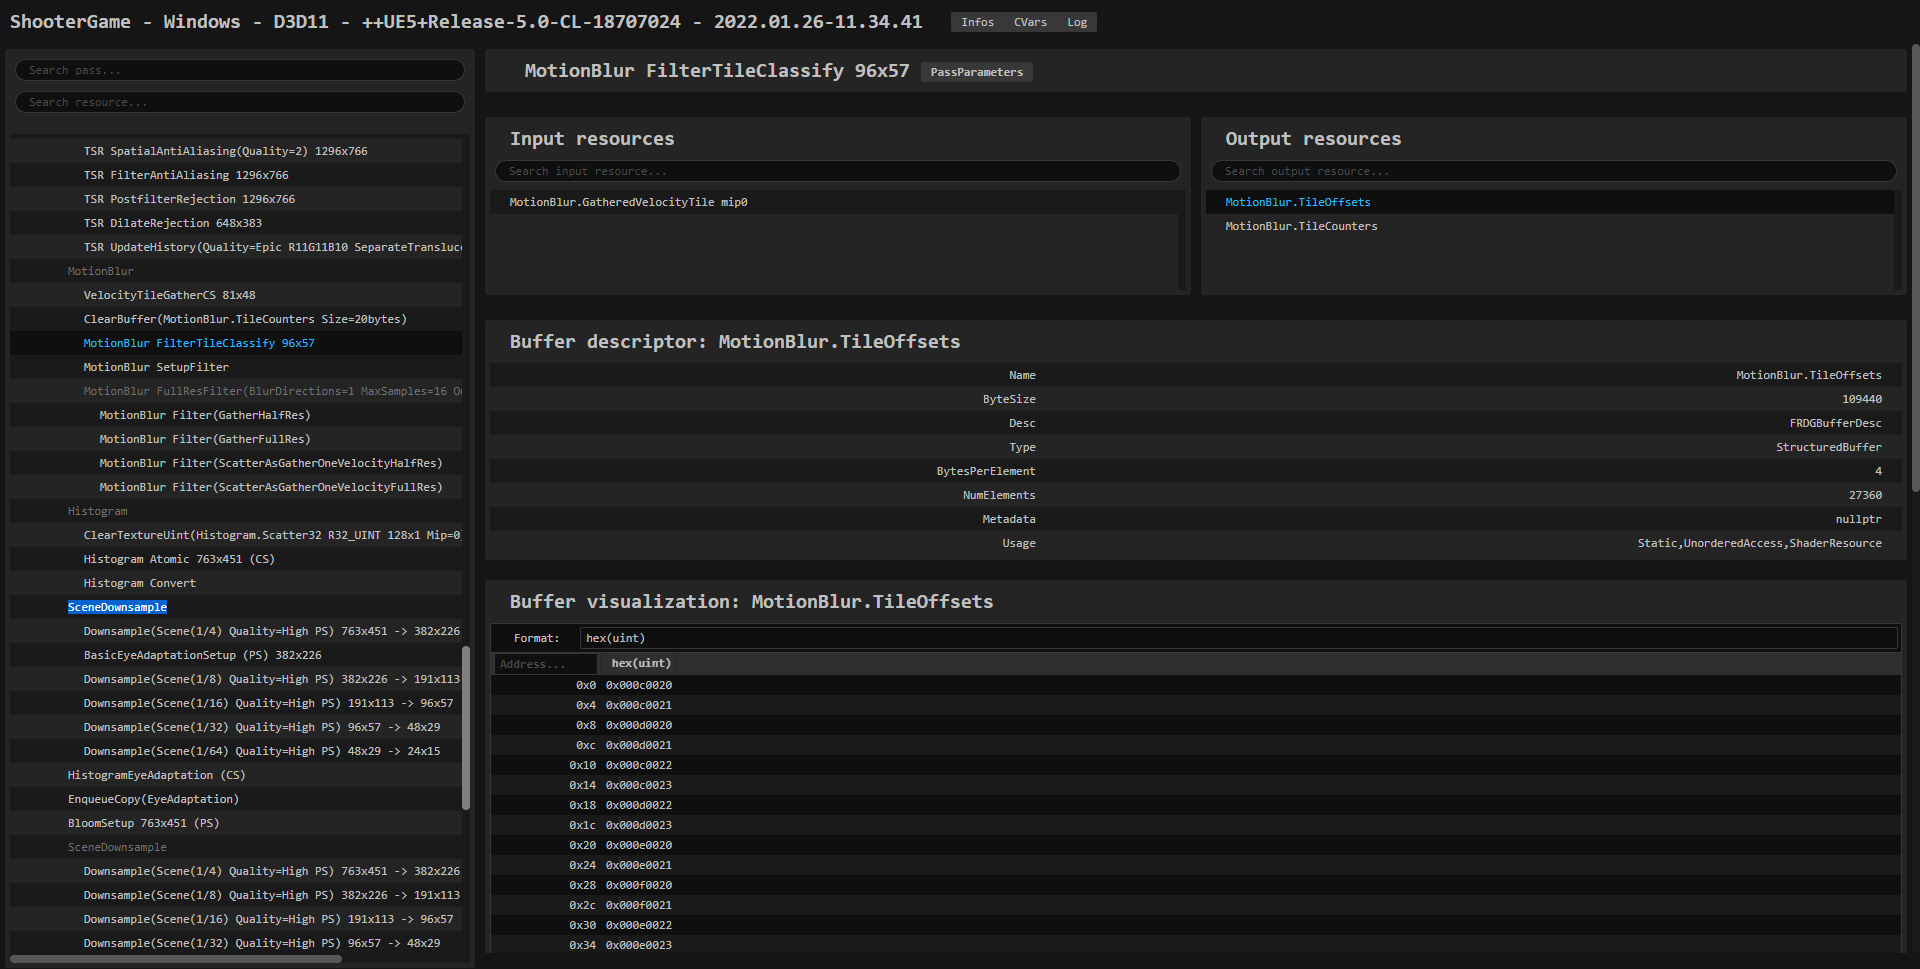
The Buffer Descriptor lists general information about the selected resource, such as its name, size, description, usage, and more.

The Buffer Visualization lists addresses in the buffer with decimal or 0x prefix hexadecimal values.

Use the Address text field to jump to a specific address that is either decimal or with a 0x prefix.

The format of the list can be customized and supports the following:
- Float, Half
- Int, short, char
- Uint, ushort, char
- Hex(), or bin(), which displays any of the above formats in hexadecimal or binary.
Because the GPUDumpViewer doesn't know how the data should be interpreted, the buffer defaults to data visualization using the hex(uint) format unless it has the DrawIndirect usage flag, in which case the Uint format is used.
The templated FRDGBufferDesc::Create*() function can be used to create your FRDGBuffer with a shader parameter structure, making it more convienent to browse the buffer's content.

The buffer automatically switches to displaying members per-column instead of per-row when the descriptor NumElements is greater than 1.