
Custom node attributes can be imported in your FBX Animation Sequences for creating varied animation data-driven setups. Unlike other animation data, such as Curves, attributes are stored per-sequence and support various property types.
This document provides an overview of how to import and reference animation attributes in Unreal Engine.
Prerequisites
- You are familiar with creating custom attributes on nodes in Autodesk Maya.
- Your project contains a Skeletal Mesh.
- You are familiar with importing Animation Sequences.
Importing Attributes
To start importing animation attributes in your Animation Sequence, you must ensure that a Bone contains an attribute with animation. Typically, this is done in DCC software, such as Autodesk Maya. In this example, the root Bone has a custom float attribute.

The currently supported attribute data types for importing are Floats, Integers, Strings, and Transforms.
Project Settings Setup
In order for attributes to import correctly, you will need to ensure they are defined in your Project Settings. From the main menu in Unreal Engine, go to Edit > Project Settings, navigate to the Engine > Animation section, and locate the Custom Attributes settings. The following settings are available:

| Name | Description |
|---|---|
| Bone Timecode Custom Attribute Name Settings | A list of timecode-related properties and their default mappings to custom attributes. You can change these settings to map to different timecode attributes if your project is using different attribute names.

These will be included in the list of attribute names to import and will act as if they were added to the Bone Custom Attributes Names array. |
| Bone Custom Attributes Names | An array where you define your custom attribute names to search for when importing animation. Defining an attribute name on this list will search all Bones in your skeleton for the attribute. Click Add (+) to add an attribute to the list, then fill in the following properties:
 |
| Bone Names with Custom Attributes | An array where you can define a list of Bones to filter for custom attributes when importing animation. Defining a Bone on this list will cause all custom attributes to import from that Bone when importing animation. Click Add (+) to add an item to the list, then define a Bone name.  |
| Attribute Blend Modes | An array where you define how certain attributes behave during blends. This overwrites the global Default Attribute Blend Mode per attribute. Click Add (+) to add an item to the list, define an attribute name, then set the blend mode:
 |
| Default Attribute Blend Mode | The default blend mode to use for all custom attributes. Similar to Attribute Blend Modes, you can select from Override or Blend. |
| Transform Attribute Names | The transform node name to search for when importing transform attributes. |
Depending on how you want to import custom attributes, you may want to set values on either Bone Custom Attribute Names or Bone Names with Custom Attributes. For example, if you wanted to import two custom attributes created on the root Bone, you could either:
-
Create two array entries under Bone Custom Attributes Names, and match the names to your attributes.

-
Create an entry under Bone Names with Custom Attributes, and name it root.

After you set up your custom attribute project settings, you can import your Animation Sequence containing the custom attributes. When importing the FBX, ensure that Import Custom Attribute is enabled.

Animation Sequence
After you import your Animation Sequence containing the custom attributes, you can view the attributes in the Animation Sequence Editor. Attributes are located as tracks within the timeline under the convention Attributes > Bone > Attribute Name.

Hovering your cursor over an attribute will provide you with details about the attribute, including its type and number of keyframes.

Transform Attributes
You can also import custom transform attributes, which require a different workflow for importing. Transform attributes are useful for providing auxiliary transform information within an Animation Sequence without adding extra Sockets or Bones.

FBX Setup
Since Bones already contain base transform attributes, you must instead create a child node of the Bone that you want to apply a custom attribute to. This can be a locator or an empty node.
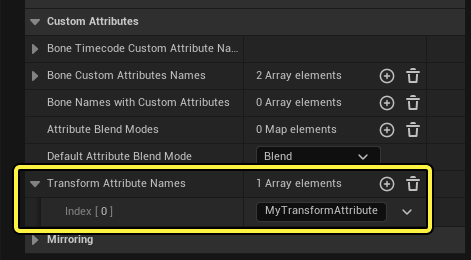
In this example, a locator named "MyTransformAttribute" is parented to a hand Bone. Like any other node or attribute, this can be keyframed in any arbitrary way.

Settings and Import
Next, you need to define the name of the transform attribute in the Custom Attributes Project Settings. Locate Transform Attribute Names, click Add (+) to create an item, and then add the name of the transform attribute node.
You can now import your Animation Sequence containing the custom transform attributes. Once imported, the transform attribute will be visible as a track within the timeline under the convention Attributes > Bone > Attribute Name.

You can visualize custom transform attributes in the Animation Sequence Viewport by clicking Character > Bones, then enabling Attributes in the Viewport menu.

Referencing Attributes
Attributes can be referenced and read in Blueprints by using Get Attribute functions targeting a Skeletal Mesh Component. You can use the following functions:
- Get Float Attribute
- Get String Attribute
- Get Integer Attribute
- Get Transform Attribute

These functions contain the following common pin information:
| Name | Description |
|---|---|
| Target | The Skeletal Mesh Component to target. |
| Bone Name | The name of the Bone containing the custom attribute. |
| Attribute Name | The name of the custom attribute to look for. |
| Default Value | If the attribute cannot be found, then this value will be sent to Out Value. |
| Lookup Type | Determines how the attribute is to be found on the Skeleton. You can select from the following:
|
| Out Value | Passes the value of the attribute, or Default Value if the attribute is not found. |
| Return Value | Outputs true if the attribute is found when executing this function, otherwise will output false. |
Get Attribute Ref
You can also use Get Attribute Ref functions. These functions require a Variable connected to Out Value, where it will write the value to the Variable you linked to the pin. Unlike the Get Attribute functions, Get Attribute Ref will maintain the last value of the attribute if it fails to find it.
