
Decals are a material type that can make local modifications to a scene by projecting the characteristics of the material, such as its base color, roughness, and normals, onto geometry in the level. This includes being able to project directly onto static and skeletal meshes using the Decal Actor or a decal mesh.
Decals are most commonly used to break up repetition and to add grime and damage to an underlying surface. The example below shows decals placed to add damage to a tileable wall texture.

A stone wall without any decals and with decals.
Unreal Engine uses two methods to project decals onto meshes.
- Accumulate all decals in the DBuffer, which stores the base color, normal, and roughness information before the BasePass. Then sample the DBuffer in BasePass materials.
- Blend decals directly to the GBuffer after the BasePass but before lighting.
DBuffer Decals are enabled by default in the Project Settings for all Unreal Engine 5 projects and are considered the default method of decal application. Unreal Engine automatically infers whether to use the DBuffer or GBuffer pass depending on the platform being rendered on. Materials using the the Deferred Decal Material Domain is rendered in whichever decal pass is appropriate for the project and platform.
Substrate and the DBuffer Material Expressions require DBuffer Decals to be enabled to render correctly. For more information and context, see DBuffer Decal Platform and Feature Support.
Using Decals
Decals are made up of two elements: a material and a method to display that material, such as a Decal Actor or a mesh. You can place decals using one of the following methods:
- Hand-placing Decal Actors in the level.
- Creating a Blueprint that contains a Decal Actor component.
- Applying a decal material to a static or skeletal mesh.
Decal Material
Decal Materials are defined by setting their:

- Material Domain: Deferred Decal
- Blend Mode: Translucent or Alpha Composite
The Modulate blend mode is not supported with DBuffer Decals but does not cause compilation errors either. If Modulate is selected, the material compiles successfully, but the Blend Mode silently falls back to a Translucent blend mode.
If your material requires additional blending options, see the DBuffer Material Expressions section of this page.
Decal Actors
You can create a Decal Actor from the Create menu under Visual Effects >Decal Actor. Alternatively, you can drag a Decal Actor into the level from the Place Actors panel from the Visual Effects category.

Decal Actors are a direction-dependent wireframe box that dictates the bounds of the projected decal material. Its arrow indicates the direction the decal is projected.

To use a Decal Actor:
- Place a Decal Actor in the level and direct it towards a surface to project onto.
- In the Details panel, assign a Dbuffer Decal material to the Decal Material assignment slot.
Decal Actors can project straight on towards a surface or at an angle. When the bounding box reaches its extents, the decal projection fades, blending between it and the underlying material, like the example below.

Decal Actors have the following properties:
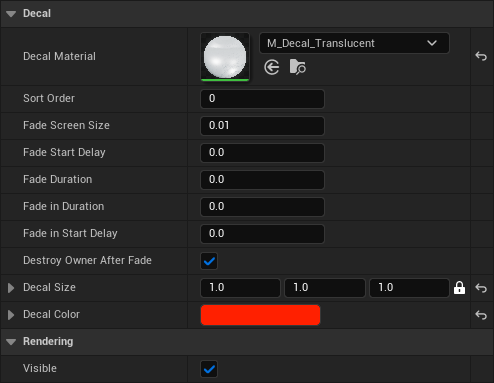
| Property | Definition |
|---|---|
| Decal Material | Specifies the material asset used by the decal. |
| Sort Order | Controls the order in which decal elements are rendered. Higher numbers render later (on top), and lower numbers render on bottom. |
| Fade Screen Size | The size on screen under which the decal will fade out. |
| Fade Start Delay | Time in seconds to wait before fading out the decal. |
| Fade Duration | Time in seconds for the decal to fade out. Set the Fade Duration and Start Delay to 0 to make the decal persistent. |
| Fade In Duration | Time in seconds for the decal to fade in. |
| Fade in Start Delay | Time in seconds to wait before fading in the decal. |
| Destroy Owner After Fade | When enabled, the owning actor is automatically destroyed after fading out. |
| Decal Size | The decal size in local space. |
| Decal Color | A way to set the BaseColor of a decal. You can access this color in a Material graph using the Decal Color node. |
Mesh Decals
Decal materials can be applied directly to static and skeletal meshes to act as a custom decal. These are ideal when you have custom shapes and projections you want to achieve, such as applying a mesh to a surface or adding detail over an existing mesh in a specific way not achievable with a Decal Actor.
The example below shows a decal mesh with a custom piece of geometry that closely resembles the shape of the decal. This approach.

Left, decal mesh geometry; Right, decal displayed in-game.
Decal Property Usage
Actor Receives Decals
Static and skeletal meshes have a Receives Decals property to set whether they should accept decals projected onto their surface or not. Because Decals Actors are volumes that project a decal material in a direction, this means that anything intersecting the volume is affected. It can be useful to disable the receives decals property for any actor you don't want to be affected by decals. For example, this is useful to disable on characters moving through the world as to not have the decal projected on them as they move through the volume.

The example below shows a tight cluster of actors intersecting a decal actor. Only the wall is affected by the projected decal material. The two other objects have Receives Decals disabled so that they are not affected by the decal actor's volume.

Decal Response
The final appearance of a decal in-game is dependent on its attributes and on the material that receives the decal projection. For instance, if you want a decal material to blend with the material it's projecting onto, you'd want to have that data passed from the receiving material to the decal material in order for them to blend together appropriately.
This example shows a decal material projected onto a surface of a material that doesn't have a decal response set (left) compared with one that has its decal response set to color, normal, and roughness (right). When the receiving surface has an appropriately set decal response, the projected decal and the receiving material can blend accordingly.

The Decal Response property of the receiving material determines which attributes of the decal projection are displayed on the receiving surface. You can set this in the material Details panel under Material > Advanced.
All materials default response are set to Color Normal Roughness.

| Decal Response | Definition |
|---|---|
| None | Material does not receive decals. Can still read DBuffer channels from the Material graph for customized decal application, which can free up interpolators. |
| Color Normal Roughness | Receives Decals, applies to all DBuffer channels. |
| Color | Receives Decals, applies color DBuffer channel. |
| Color Normal | Receives Decals, applies color and normal Dbuffer channels. |
| Color Roughness | Receives Decals, applies color, roughness, specular, and metallic DBuffer channels. |
| Normal | Receives Decals, applies normal DBuffer channel. |
| Normal Roughness | Receives Decals, applies normal, roughness, specular, and metallic DBuffer channels. |
| Roughness | Receives Decals, applies roughness, specular, and metallic DBuffer channels. |
Sort Order
In cases where you have multiple overlapping decals, you can use the Sort Order property to specify the order in which they should appear. Higher values will appear on top of lower values. This property is located on the Decal Actor.

In the example below, there are three decals that overlap each other. Blue is set to 3, red to 2, and green to 1 which translates to blue on top of all decals, then red, then green.

DBuffer Material Expressions
For proper results, use these material expressions in the graph of the material that receives the decal and not the decal material itself that is applied to a Decal Actor.
Materials using the DBuffer Decal material domain only support Translucent and Alpha Composite blend modes. This can be limiting for the types of decal materials you want to create. The DBuffer Material Expressions allow for custom blending logic when added to the receiving material's logic.
These DBuffer material expression provide access to each of the three DBuffer textures that can make up a decal response — BaseColor, WorldNormal, and Roughness. These nodes read texture data from the DBuffer directly into the material graph, providing customizable flexibility for your decal materials, such as recreating an approximation of legacy stain decal behavior in Unreal Engine 4 (UE4).

To specify which DBuffer texture the material expression reads from, select the node in the graph and use the DBuffer Texture property dropdown selection in the Details panel to choose between BaseColor, WorldNormal, and Roughness.

In addition to the DBuffer material expressions, there is the ApplyDBuffer material function that is useful for applying DBuffer material expressions directly to Material Attributes. It replicates the logic automatically applied by the DBuffer Decal Response property.

You can prevent double application of the decal when using the ApplyDBuffer node in your logic by setting the Decal Response setting to None.
Recreating Legacy Behavior
With DBuffer material expressions, it's possible to create approximations of legacy decal blend modes from Unreal Engine 4.
Below is an example of the Stain decal blend mode in Unreal Engine 4 (left) compared with one recreated in Unreal Engine 5 using the DBuffer material expressions (right).
Visual differences between these two is due in part to lighting differences between Unreal Engine 4 and Unreal Engine 5. Both of these examples are dynamically lit by a directional light and skylight.

Left, stain decal in Unreal Engine 4; Right, approximation of stain decal in Unreal Engine 5.
The graph below shows a starting point for recreating the legacy look of the Stain decal blend mode.

Any material using a DBuffer material expression should set its Decal Response to None to prevent double application, which can cause the decal to look incorrect.

The primary limitation of this method is that DBuffer decals must be sorted, and only one can be displayed on the surface at any given time. Overlapping DBuffer decals do not blend together. This becomes more apparent when decals overlap.

Left, overlapping Stain DBuffer decals in Unreal Engine 4; Right, overlapping DBuffer material expression decals in Unreal Engine 5.
Performance Implications
Screen coverage and material complexity are the biggest factors in the cost of rendering decals, just like any other material being rendered. Keeping both of these in check means you can render many decals at once without a larger hit to performance.
A big factor in using DBuffer decals as part of the raster render path is that they require depth prepass to be active in the scene. In practice, for higher end platforms this isn't much of an issue because systems like Virtual Textures, Nanite, and Lumen all use the depth prepass. If any of these are being used in your project, there's no penalty to using DBuffer decals.
When it comes to optimizing performance of DBuffer decals, it's best to only enable the DBuffer decal response for materials which actually need to receive decals, which includes enabling the channels in the receiving material that are actually being used (see Decal Response). Each material which utilizes the DBuffer has additional code to do so which in turn adds to the complexity of the material.
There can also be some cost associated with reprojecting the previous frame's normals, but only for the sampling and reprojection of the pixels touched by any decals.
Mesh decals present a significant cost when rendered with the Path Tracer because of the expense of maintaining and tracing another acceleration structure (or TLAS) for the decals, as well as the additional cost of sorting the decal projection prior to tracing the TLAS. As a general rule, the cost of decals increases with their coverage on screen.
For example, the ICVFX Production Test sample project called "The Origin" makes extensive use of mesh decals and costs ~30% more to render a frame than a more constrained scenario that could be much lower. You can toggle decals on and off from the Show options in the viewport in conjunction with the stat gpu command to see their costs.
| Decals off (~32ms/sample) | Decals on (~44ms/sample) |
Additional Information and Limitations
DBuffer Decal Platform and Feature Support
DBuffer decals are enabled by default in Unreal Engine 5 projects but can still be forced off on some platforms where they are not supported, such as mobile. This can affect materials that have been authored using the Dbuffer Material Expressions.This can also be problematic for features that require DBufer decals to be enabled, such as Substrate.
If your project will support multiple platforms, you'll want to author materials with this in mind. One way to do this is to use the Feature Level Switch material node to simplify material graphs for lower-end rendering paths without having to have separate materials for these paths.
Mobile Compatibility with DBuffer Decals
Mobile platforms do not support DBuffer decal rendering. Mobile forward shading (OpenGL ES 3.2, Metal, Vulkan, and Nintento Switch) does not support GBuffer decal rendering either, and instead approximates decals by applying the BaseColor and Emissive to the lit scene color. When Mobile deferred shading is used, GBuffer decals are used, with the exception that ambient occlusion is not supported.
For more information about decal support on mobile render paths, see Mobile Rendering Features.
Mobile Compatibility with Substrate Decals
If you're using Substrate in your project, mobile deferred shading, the GBuffer is not used and only rendering of DBuffer decals are supported.
Visual Inconsistencies with UE4 Legacy Decals
If your project is using baked lighting, there may be visual inconsistencies between the look of the legacy GBuffer decals in UE4 and the DBuffer decals in UE5. This is because GBuffer decals are applied after baked lighting and sky lighting, and they aren't directly affected by lighting in the same way DBuffer decals are. This causes their color to appear washed out.
DBuffer decals are applied earlier (mostly in the BasePass materials, except for emissive and ambient occlusion), meaning they are correctly sampled when calculating baked indirect lighting. The example below shows differences between a GBuffer mesh decal (left) and DBuffer mesh decal (right) with baked indirect lighting.

Normal Reprojection
DBuffer decals must reproject normals from the previous frame to overcome limitations of the shader. This is because normals can only be written to or read from in a given frame, not both. In cases where reprojection errors occur, DBuffer decals may exhibit facetting artifacts due to missed normals. This happens because the DBuffer is sampled too early to sample anything but the prepass depth.
By default, previous frame normal preprojection is disabled. If you're seeing these types of artifacts, you can enable previous frame normal reprojection with the console variable r.Decal.NormalProjectionEnabled.
When enabled, normal reprojection from the previous frame is allowed in SceneTexture nodes on DBuffer decals. Normal reprojection is taken from the previous frame if motion is provided in the depth prepass (r.VelocityOutputPass 0 (default)). Otherwise, normal reprojection fallback extracts the normal from the depth buffer.
Normal reprojection is primarily used when applying a decal based on the facing direction of a surface, such as snow or grass on upward facing surfaces of objects.
Stain Blend Mode
As mentioned with the example in the Recreating Legacy Behavior, it's possible to recreate the look and application of the Stain decal blend mode in Unreal Engine 4 when using DBuffer Material Expressions but not entirely because there is no accounting for overlapping decals. .
However, if you're migrating a project from Unreal Engine 4 to Unreal Engine 5, DBuffer decals do not support the Stain blend mode. Instead, they fallback to the default blend mode. DBuffer decals lerp between color values such that (OutputColor = SourceAlpha + Dest(1-Alpha)). Whereas the Stain blend mode was a multiplication operation that looked like (OutColor = SourceAlpha + Dest).
Decal Emissive and Ambient Occlusion Inputs
Emissive and Ambient Occlusion are treated as special cases in decal materials. Their input pins on the main material node never use the DBuffer system but are implemented by additional draw calls that do deferred blending to either SceneColor or screen space ambient occlusion.