
To improve your cinematic animation productivity, several shortcuts have been built into the Sequencer Editor. This document provides tips for common workflows, overcoming problems, and other helpful features of Sequencer.
Playback
Spacebar Playback Toggle
By default, using the Space Bar as a hotkey to toggle playback of your sequence only works if your window focus is on Sequencer. If your focus is on the Viewport, then pressing the Space Bar will instead cycle between transform manipulation modes.
You can make the Space Bar toggle playback of Sequencer regardless of window focus by following these steps:
-
Open the Editor Preferences window and locate Cycle Between Translate, Rotate, and Scale under General > Keyboard Shortcuts. Unbind this shortcut by clicking Remove this binding (X).

You will still be able to use hotkeys to switch between these transform modes by pressing Q, W, E, and R to enable Select, Translate, Rotate, and Scale, respectively.
-
From the Viewport's Perspective menu, enable Cinematic Viewport.

-
Now you can press the Space Bar while your focus is on either the Sequencer or the Cinematic Viewport, and the playback will toggle correctly.

Inclusive and Exclusive Frames
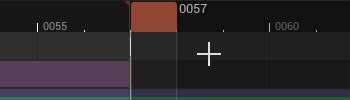
Animation within Unreal Engine uses the concepts of "inclusive" and "exclusive" frames, which determine if a full frame is being included or evaluated fully. Typically this matters when defining start and end frames in your sequence, such as for animations, shots, or overall Sequencer playback times.
For Sequencer, the start frame is inclusive and the end frame is exclusive, which causes all frame data up to the end frame to be evaluated. In this example, where the start time is set to 0, and the end time is set to 10, this means that the actual elapsed time is 9.999 (repeating) frames. In other words, it evaluates up to, but not completely to, the end time. This mimics behavior seen in most non-linear editing software such as Adobe Premiere.

Because of this functionality, you can expect the following behavior:
-
If Keep Cursor in Playback Range While Scrubbing is enabled, then it should be impossible to scrub or view the exact end frame in a sequence. While data can exist on that frame, Sequencer will never reach it. In this example, the end time is 0346 frames, but playback only reaches 0345* .

-
If the Playhead is at the same point where two sections touch, such as shots, then the data from the next shot will be shown instead of the previous shot.

-
When rendering image sequences with Movie Render Queue, the end frame will be excluded. This means that if your sequence contains frames 0 - 50, the image sequence will output frames 0 - 49.

Sequencer's treatment of inclusive and exclusive frames differs from Animation Sequences, which includes both start and end frames. When an animation FBX is imported, Unreal Engine will include a small amount of data beyond the final frame, which causes the final frame to be fully included. This can be observed in Sequencer if you zoom in far enough on the end of an unedited Animation Section.
However, trimming, and other section editing operations on the animation will restore Sequencer's end frame exclusive behavior.
Workflow Shortcuts
Middle-Mouse Scrubbing
Similar to Autodesk Maya, you can change your current time without causing updates or evaluations to occur by clicking and dragging the middle mouse button in the timeline. This can be useful when you want to set additional bracketing keyframes at the same value but at different times. When manipulating the playhead in this way, it will change its color to yellow to indicate the sequence is not evaluating.

Adding Actors to Sequencer
When dragging new Actors into your Level from the Content Browser or by placing Actors, pressing certain keys will also add them to Sequencer. Depending on the pressed key, it will add the Actor as either a spawnable or possessable.
- Holding Ctrl will add the new actor to Sequencer as a possessable.
- Holding Shift will add the new actor to Sequencer as a spawnable.

Default Tracks
When adding certain Actors to Sequencer, you may notice that tracks are automatically created with them. For example:
-
Static Mesh Actors will automatically create a Transform Track.

-
Skeletal Mesh Actors will automatically create a Transform Track and an Animation Track.

-
Cine Camera Actors will automatically create a Transform Track and a Camera Component with Aperture, Focal Length, and Focus Distance property tracks.

-
Light Actors will automatically create a Light Component with Intensity and Light Color property tracks.

This occurs because of the Tracks Settings located in the Sequencer Plugins Project Settings. You can locate these settings by opening the Project Settings window, and locating Level Sequencer in the Plugins category.

The Track Settings array is populated by default with settings for the previously mentioned tracks. You can click the Add (+) button to add a new array item, and each array has the following categories:

| Name | Description |
|---|---|
| Matching Actor Class | This is where you specify the Actor class to automatically create tracks for when adding it to Sequencer.  |
| Default Tracks | This array is where you specify the tracks that are added when the Matching Actor Class is added to Sequencer. Click the Add (+) button and click the dropdown menu to browse Sequencer's track types.  |
| Exclude Default Tracks | This array is where you specify tracks you don't want added for this Actor class. You may want to use this if you are specifying different tracks to add, such as when your class is inheriting from a parent class which also has its default tracks specified here. |
| Default Property Tracks | This array is where you specify the property tracks that are added when the Actor is added to Sequencer. Click the Add (+) button to add a new property item to the array. 
|
| Exclude Default Property Tracks | This array is where you specify property tracks you don't want added for this Actor class. You may want to use this if you are specifying different tracks to add, such as when your class is inheriting from a parent class which also has its default property tracks specified here. |
Auto Size Shots
When adjusting start and end times of shots internally, you can automatically match the parent shot section to these edits using the Auto Size command. To do this, right-click the shot and select Edit > Auto Size. This can be useful if you are retiming your shot and want the shot section to match, without needing to re-trim manually.

Shift Snapping and Alignment
When dragging section assets onto Sequencer tracks, such as audio, subsequence, or animation tracks, holding Shift will snap the dropped section to the Playhead location.

If Snap to the Pressed Key is disabled, you can still align the Playhead to keyframes by holding Shift and clicking the keyframe. This makes it easy to perform subsequent actions, such as changing the value of this keyframe, or aligning other keys to it.

Warm-Up Rendering
When creating pre-rendered sequences with Movie Render Queue (MRQ), it may be necessary to "warm up" each shot in order for various aspects of your scene to render correctly. For example, some common problems can be:
- Particles and other effects activating at the start of the shot, instead of already being active.
- Cloth and other physics-driven entities exhibit a noticeable "settle" at the start of the shot.
- The first rendered frame of a shot can exhibit noticeable aliasing or other temporal artifacts (sparkles).
You can use various warm-up properties within Movie Render Queue's Anti-Aliasing Render Settings to resolve these scenarios. Depending on the scenario, there may also be different considerations to take into account that will determine which settings are best to use.
Particles
In some cases, you may want particles and other effects to be active for a certain duration of time before a shot begins. While real-time previewing might show the correct behavior, rendering with MRQ may cause your particle system to activate at the start of the shot, which is undesirable.
 |
 |
| Particle with no warm-up | Particle with warm-up |
For this particle scenario, you can resolve it in either of the following ways:
-
Create the particle's Activate keyframe at the start time of your shot, then set a frame value on Engine Warm Up Count. This value can be arbitrary depending on how many frames are needed for your particle to warm up.

-
Or, you can create or move the particle's Activate keyframe to the pre-start region of the sequence, along with the Camera Cut section. Then, enable Use Camera Cut for Warm Up. This will cause the warm-up time to be defined by the pre-start area that the Camera Cut track section occupies.

If your particle is GPU-based, then you will also need to enable Render Warm Up Frames.

Cloth and Physics
For cloth and other physics objects, a common problem when rendering is that they can exhibit a noticeable settle at the start of a shot. This is due to the game simulation not starting until the rendering begins, therefore physics needs time to settle to its true simulated state.
 |
 |
| Cloth settles at start (no warm-up) | No cloth settling (with warm-up) |
No Starting Motion
For shots where the character or physics object is not initially moving, such as being in an idle pose, you can fix this by setting a frame value on Engine Warm Up Count. This value can be arbitrary depending on how many frames are needed for your physics to settle. Typically, a value greater than 30 should be used.

Starting Motion
In scenarios where shots start with the physics object in motion, such as running or jumping, then Engine Warm Up Count will not produce an accurate result. This is because it only "warms up" the starting frame and does not take into account motion that may be occurring beforehand. Here you can observe the cloth in the left example starting at an unnatural rest position, then correcting as the simulation reacts to the motion.
 |
 |
| Cloth starts at rest (incorrect warm-up settings) | Cloth starts correctly behind (using correct warm-up settings) |
In order to resolve this, you must do the following:
-
Make sure that your physics character or object contains animation data in the pre-start region of Sequencer, including the Camera Cuts section. This may require you to alter your animation and transform track keyframes in order to extend it into the pre-start region.

If you are previewing your shot in context, then you may want to enable Evaluate Sub Sequences In Isolation from Sequencer's Playback Options menu. Otherwise, scrubbing into the negative timeline region will preview the previous shot and not the pre-start region of your current shot.
-
In the Anti-Aliasing image settings, enable Use Camera Cut for Warm Up. This will cause the warm-up time to be defined by the pre-start area that the Camera Cut track section occupies. This will result in the sequence accumulating the pre-start motion so that the physics state at the start of the shot is accurate. Unlike Engine Warm Up Count, which evaluates and holds on the first frame, Use Camera Cut for Warm Up will evaluate the sequence leading up to the starting frame.

This technique can be used to also build a movement history for other things, such as trail particles.
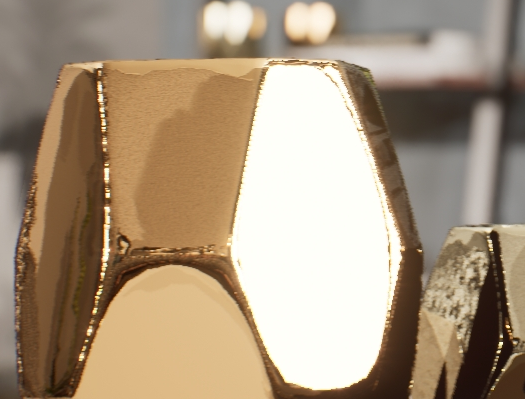
Temporal Artifacts
Aliasing and other artifacts caused by rendering features that have a temporal component, such as Temporal Anti Aliasing (TAA), Temporal Super Resolution (TSR), or raytracing denoisers, can also occur on the first few frames of your shots. Typically, this issue appears as noticeable hard edges or grainy sparkling on reflective surfaces. This is due to the lack of temporal history being accumulated at the start of a render.
 |
 |
| Sparkling and jagged edges (no warm-up) | Smooth edges and highlights (with warm-up) |
To resolve this issue, you can do either of the following:
-
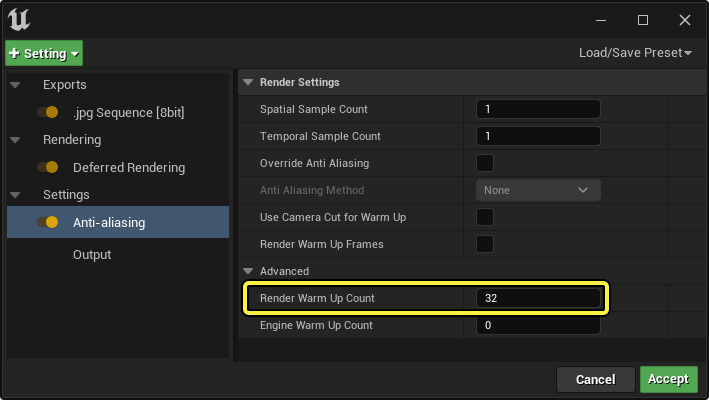
Set a frame value for Render Warm Up Count. This value will be the number of frames to render beforehand to build a temporal history for the first frame.
-
If increasing Render Warm Up Count does not resolve the issue, then you can instead increase the Engine Warm Up Count value and enable Render Warm Up Frames. This will evaluate the first frame of the sequence and then continually tick the engine and renderer until the Engine Warm Up Count frames have passed.
