
When creating animation systems for large crowds of characters, you can use the Animation Sharing Plugin to significantly reduce your projects performance cost. Rather than performing individual evaluations of an Animation Blueprint for each character in your level, you can share animations from a single evaluation across many characters, resulting in a system where the difference between 100 characters and 1000 characters results in a minimum increase in performance cost.
Utalizing the Leader Pose Component system, Animation Sharing utilizes a set of animation state buckets for which animation instances are evaluated. The resulting poses are then transferred to all child components that are part of the bucket. You can then implement blending and playback position randomization techniques to give your crowd a more diverse animation playback.

The following diagram provides a high-level breakdown of how the system works with a numbered key explaining the included components:

-
Individual Crowd Actors (AActor)
-
UAnimationStateProcessorinstance that is part of the Animation Sharing Setup -
Runtime manager that is initialized using the Animation Sharing Setup
-
States (enum named), which the user has set up
-
Runtime representation of the state that takes the form of a Skeletal Mesh Component
-
Master Pose Component system used to share the animation with the child Skeletal Mesh Components
Prerequisite
- Enable the Animation Sharing Plugin. Navigate in the Menu Bar to Edit > Plugins and locate the Animation Sharing plugin, listed under the Animation section, or by using the Search Bar. Enable the Plugin and restart the editor.

-
A crowd Skeletal Mesh character.
-
A set of animations to play on the character.
Set-Up Animation Sharing
After installing the Animation Sharing plugin, create an Animation Sharing Setup asset. To create a new asset, use (+) Add in the Content Browser and navigate to Animation > Advanced > Animation Sharing Setup.

The Animation Sharing Setup asset contains all the information that will be shared across the specified Actors.

Open the Animation Sharing Setup asset to access its properties in the Detail panel.
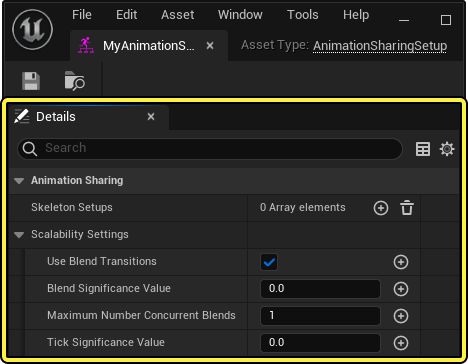
Skeleton Setups
Using the animation Sharing Setup asset's Skeletal Setups property, you can assign multiple Skeletons along with their corresponding properties to define the meshes that will share animation systems. This is useful when you have multiple Skeletons and Skeletal Meshes that will be driven by animations during animation sharing. You can add an array using (+) Add in the Skeleton Setups property.

Here you can reference a list of the available properties you can access after adding a Skeleton Setups array to the asset, and a description of their functionalities:
| Property | Description |
|---|---|
| Skeleton | The Skeleton asset to be replicated. The Animation Sharing Setup is specific to the specified Skeleton. |
| Skeletal Mesh | The Skeletal Mesh to be replicated. This is used for debugging poses only. |
| Animation Blueprint for Blending | The Animation Blueprint that is a child of AnimSharingTransitionInstance. You must create and set up one of these to handle blending between states. Additionally, every time a blend is required, one of these is generated and ran to handle the transition which adds a cost. |
| Animation Blueprint for Additive Animation | The Animation Blueprint that is a child of AnimSharingAdditiveInstance used for additive animations. Inside your Animation Sharing Setup asset, you will also need to set Animation State to On Demand and enable the Additive option. |
| State Processor Class | Interface class used when determining which state an Actor is in. This needs to be set in order to add the Animation States. |
| Animation States | This is an array that holds all the states the Actor can be in. Each state is its own bucket. |
Define the skeleton and skeletal mesh assets you wish to share animations across using the respective Skeleton and Skeletal Mesh properties.

Animation State Enumeration
In order to select poses for the crowd character, you will need to create an Enumeration asset that will select Animation States in the Animation Sharing Setup asset. Create an Enumeration asset by navigating in the Content Browser to (+) Add, and selecting Blueprints > Enumeration.

Name and open the Enumeration asset.

Then assign Enums for each of your crowds animation states using the (+) Add Enumerator button and typing the definitions in the Display Name properties. In this workflow two Enums are created for an Idle and Run animation.

Animation Sharing Character Blueprint
Create a character blueprint that will represent your crowd-character. Navigate in the content browser to (+) Add and select Blueprint Class > Character.

Name and open your Crowd Character Blueprint.
Assign the Character's Mesh using the drop-down in the Skeletal Mesh Asset Property.

In the Character Blueprint's Event Graph, you can build the logic that will set the Enumeration Asset's state based on a variable or gameplay state. In the workflow example a key press function, Keyboard Event 5, is used to change the Enum state.

Then in the Event Begin Play node's logic, create a Get Animation Sharing Manager node. Next create a Register Actor and connect the Sharing Manager's Return Value pin to the Register Actor node's Target pin. Create a Self reference variable and connect it to the In Actor pin. Finally, set the character's skeleton as the Sharing Skeleton.

Animation Sharing State Processor
The AnimationSharingStateProcessor class is a specialized Blueprint class that you can use to set the Animation Sharing Setup assets Animation State to control what animation should be played using your Enumeration asset.
To create a new AnimationSharingStateProcessor blueprint, navigate in the Content Browser, use (+) Add and select Blueprint Class.

Use the Search Bar to locate and select the AnimationSharingStateProcessor class, and then the Select button.

Name the blueprint and open it in the Blueprint Editor.

The Animation Sharing State Processor Blueprint should only be used for prototyping. Runtime performance will be greatly improved by using the native implementation as opposed to the Blueprint implementation.
In the Blueprint's Class Defaults panel, select the Animation State Enum drop down menu, and select your Enumeration asset.

After adding your Enumeration asset, you can use the Animation Sharing State Processor blueprint's two Override Functions to reference and drive the animation selection across your crowd of characters.

- You can use the Process Actor State function to reference your Sharing Animation Character's blueprint and reference your Enum asset state.

- Using the Get Animation State Enum, to interface with a native implementation of the Animation Sharing State Processor, in order to return the Enum class.
After creating your Animation Sharing State Processor blueprint, you can assign it In the Animation Sharing Setup asset's State Processor Class property.

Animation States
Once you assign an Animation Sharing State Processor blueprint to your Animation Sharing Setup asset, you can create an animation state array using (+) Add in the Animation States property and selecting your Enum values from the State properties drop-down menu.

For each Animation State array, add an Animation Setups array using (+) Add, in order to define the animation sequence to play.

Here you can reference a list of the Animation State array properties and a description of their functionality:
| Property | Description |
|---|---|
| State | Define which Enumeration State will activate the Animation State array using the drop-down menu. The available options are inherited based on the assigned Animation State Processor's Animation State Enum property. |
| Animation Setups | Here you can set the Animation States properties, such as the animation sequence to play, and the randomization applied. The following properties are available for each Animation Setups array added to your Animation States property:
|
| On Demand | When enabled, this state is classified as on-demand, which means you can kick off a unique animation when needed. This spins up a unique instance per on-demand animation. When reaching the maximum value, it will snap to the nearest animation. |
| Additive | When enabled, the state is an additive animation state. On-demand must also be enabled and you will need an Additive Animation Blueprint to handle blending. |
| Blend Time | Here you can set the duration of blending when blending to the state. |
| Maximum Number Of Concurrent Instances | The number of instances that will be created for the state (platform-specific). |
| Requires Curves | When enabled, this animation state requires curves or morph targets to function correctly for follower components. |
Scalability Settings
You can use the Scalability Setting section of properties in the Animation Sharing Setup asset to define how the animation sharing works across a large number of actors.

Here you can reference a list of the Scalability Settings properties and a description of their functionality:
| Property | Description |
|---|---|
| Use Blend Transitions | When enabled, the animation will play a blend to transition from one state to another. |
| Blend Significance Value | Here you can set a significance value tied to whether or not a transition should be blended. A value of 0 will result in no significance considered, a value of 1 will consider the significance first. |
| Maximum Number Concurrent Blends | Here you can set the number of blends that can be running at the same time. Each animation that is over this limit will snap to the nearest one. |
| Tick Significance Value | Here you can set a value that will be used with the Significance Manager. Anything over the specified value will not be ticked. |
Animation Blueprint Setup
You will need to set up an Animation Blueprint to handle the blending between the Animation States by referencing the current active pose, From Component and the pose being fed to the Animation Sharing system, To Component. This requires a special class of Animation Blueprint called an Anim Sharing Transition Instance. To create an Animation Blueprint, navigate in the Content Browser, select Animation > Animation Blueprint.

Select the Character's Skeleton, define the AnimSharingTransitionInstance as the animation blueprint's class, and then select Create.

Name and open the asset.

In the Sharing Transition Animation Blueprint's AnimGraph, right-click and search for a From Component transition variable. Then create and connect its output to a Copy Pose From Mesh node. Create and connect the Copy Pose From Mesh node's output to a Blend Poses by bool node's True Pose input pin.

Right-click in the graph and search for a To Component transition variable. Then create and connect its output to a Copy Pose From Mesh node. Connect the Copy Pose From Mesh node's output to the Blend Poses by bool node's False Pose input pin.

Right-click in the graph and search for a Blend Bool transition variable and connect it to the Blend Poses by Bool node's Active Value input pin. Then, right-click in the graph to search for and create a Blend Time variable to reference the Blend Time property in the Animation Sharing Setup asset, and connect it to the True and False Blend Time pins. Then connect the Blend Poses by Bool node's output to the Output Pose node.

Now add the Sharing Transition State Animation Blueprint to the Animation Sharing Setup asset.

You can now transition animation playback when sharing animations across multiple characters.
Anim Sharing Additive Instance
When using additive animations, you will need to set up an Animation Blueprint to handle the shared Additive Animations. This requires a special class of Animation Blueprint called an AnimSharingAdditiveInstance class.
In order to mark your animations as additive, you will need to enable the On Demand and Additive properties in your Animation Sharing Setup asset on each additive animation's Animation State array.

To create an Additive Animation Sharing Animation Blueprint, navigate in the Content Browser, select Animation > Animation Blueprint.

Select the Character's Skeleton, define the AnimSharingAdditiveInstance as the animation blueprint's class and then select Create.

Name and open the asset.

In the Addictive Animation Blueprint's AnimGraph, right-click and create a Base Component additive variable. From the Base Component variable, create and connect a Copy Pose From Mesh node, and connect its output to an Apply Space Additive node.

Right-click in the AnimGraph and create a Sequence Player node. Select the Sequence Player node and expose its Sequence property as a pin in the graph, by navigating in the Details panel and selecting Expose Pin in the Sequence property.

Right-click in the AnimGraph and create an Additive Animation additive variable, and connect it to the Sequence Player node's Sequence pin. Then connect the Sequence Player node's output to the Apply Mesh Space Additive node's Additive pin. Finally, connect the Apply Mesh Space Additive node's output to the Output Pose node.

You can now add The Additive Animation Blueprint to the Animation Sharing Setup asset.

You can now blend the shared animation as an additive animation.
Anim Sharing State Instance
You can use the Anim Sharing State Instance Animation Blueprint class to run shared animations across your characters. With the Anim Sharing State Animation Blueprint you can add AnimBP behavior to expose two properties by default:
-
Animation to Play
-
Permutation Time Offset.
To create an Anim Sharing Animation Blueprint, create a new Animation Blueprint asset using (+) Add in the Content Browser, and select Animation > Animation Blueprint.

Select your skeleton asset, select the AnimSharingStateInstance class from the drop-down menu and then select Create.

Name and open the animation blueprint.

In the AnimGraph, right-click to create a Sequence Player node. In the Sequence Player node's Details panel, expose the Sequence and Start Position properties as pins to the graph, by selecting Expose as Pin in the pin type drop-down menu. Right-click in the graph to create and connect an Animation to Play animation sharing variable to the sequence player node's Sequence pin.

Right-click in the graph to create a Permutation Time Offset animation sharing variable, and connect it to the Sequence Player node's Start Position pin. Finally, connect the Sequence Player node's output to the Output Pose node.

The Animation Sharing Instance Graph's native implementation, exposes GetInstancedActors which returns all AActor(s) that are currently being driven by this state. This ensures all present Notifies are handled correctly and propagated to the unique instances.
This is achieved by overriding HandleNotify and handling it accordingly.
In the Animation Sharing Setup assets, in each Animation State you wish to randomize an animation playback offset, assign the Animation Sharing Animation Blueprint in the Blueprint property. Then set a value in the Num Randomized Instances property.

Animation Sharing Manager
In order for Animation Sharing to be executed at runtime, you must create an Animation Sharing Manager node that points to your Animation Sharing Setup asset within the Character or Level blueprint. After creating the Animation Sharing Manager node, define your Animation Sharing Setup asset using the drop-down menu in the graph. In this workflow example, the Create Animation Sharing Manager node is added to the Level blueprint.

Here you can reference additional functions you can call that target the Animation Sharing Manager node and a description of their functionality:
| Function | Description |
|---|---|
| Animation Sharing Enabled | Returns whether or not Animation Sharing is enabled. |
| Get Animation Sharing Manager | Returns the Animation Sharing Manager (or null if none has been set up). |
| Register Actor | Registers an Actor with the Animation Sharing Manager, according to the specified Sharing Skeleton. |
You can now add the crowd character to the level and observe its animation playback as animation states are changed.
Animation Sharing Debugging
During Play in Editor (PIE) simulation, you can enable some helpful viewport debug rendering to illustrate how the Animation Sharing plugin works and how it is selecting animations.

Here you can reference a list of console commands you can use to debug your Animation Sharing system in Unreal Engine:
| Command | Description |
|---|---|
a.Sharing.ToggleVisibility |
Toggles the visibility of the Leader Pose Components. The Debug render will be located at the level's origin point (0, 0, 0). Characters sharing animations will be rendered in green when they are using an active pose, and blue when they are blending. Red poses are inactive poses. The magenta line will point to the active pose the character is sharing. |
a.Sharing.ScalibilityPlatform |
Controls which platform should be used when retrieving per-platform scalability settings. |
a.Sharing.Enabled |
Toggles whether or not the Animation Sharing system is activated. 0 will disable the system, 1 will enable the system. |
a.Sharing.DebugStates |
Toggle the number of Animation States visible in the debug render. Value added to the command will set that number of debug states to render. |