
How to set up Epic Online Services (EOS)
- A few callouts
- Registering for the Developer Portal
- Accessing product settings
- Creating a Client and Client Policy
A few callouts
Before we begin, here are a few callouts to keep in mind throughout the series:- I'll focus on creating a Windows Presentation Foundation (WPF) application using C# in Visual Studio 2019. There are SDKs for C, Android, and iOS available which you can translate the same concepts to. We also have plugins available for Unity and for Unreal Engine (included in Unreal Engine 4.27).
- The sample application will cover the happy path for the most important API calls of each service. Hardening, integrating into a game, and implementing additional functionality will be left up to you.
- Logging will primarily be done through debug output, but a more persistent mechanism is strongly recommended in an actual implementation.
- Throughout the articles and sample, I'll focus on using Epic Games as the authentication provider, but will call out where you can find information to support other providers.
- Lastly, while I will go over the details of SDK concepts as we use them, be sure to check out the What is Epic Online Services (EOS) documentation page for an overview of important concepts and considerations of the SDK.
Now that we have that out the way, let's begin by setting up an account.
Registering for the Developer Portal
The first thing you'll need is an Epic Account to manage your organization(s) and product(s) in the Epic Games Developer Portal. When you navigate to https://dev.epicgames.com/portal/ for the first time, you'll be asked to either sign in or sign up for an Epic Account. You can create an Epic Account using a number of authentication providers, such as an existing email address, Facebook, Google, Steam, etc. After signing up, you will have to enable Two-Factor Authentication to access the Developer Portal.The first time you log in to the Developer Portal, you'll be asked if you'd like to start on your own or as an organization. For now, we'll choose "On your own", which will automatically create an organization for you, with you as a member. As outlined on the Developer Portal docs, data is organized in a tiered system. An organization can have multiple products, that each have one or more sandboxes (distribution environments), with one or more deployments (distributions) under each sandbox.

Epic Games Developer Portal default organization and product
The SDK is initialized with a full hierarchy of product > sandbox > deployment, which means product session data is accessible at the deployment level. Having selected "On your own" earlier also provided us with a default product that has a default "Live" sandbox, which in turn has a "Release" deployment. We'll use this default product in our sample, but note that you can create new products, sandboxes, and deployments where needed.
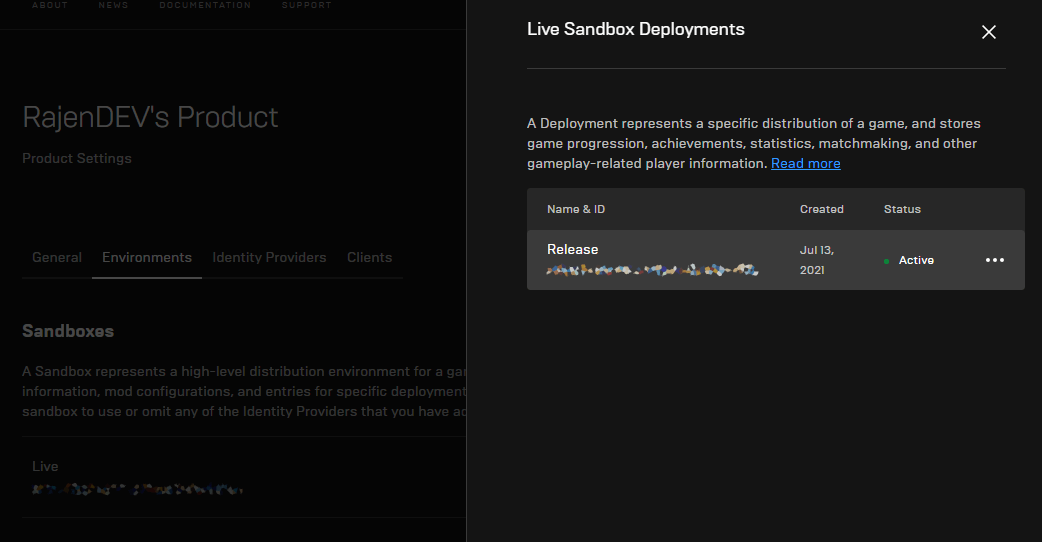 Default Sandbox and Deployment
Accessing product settings
When you click on a product, a link to Product Settings will be shown in the left menu. This is where you can change your product name and cover image, but more importantly access all the credentials that the SDK will require, as well as set up environments, identity providers, and clients that will access this product. We'll dive deeper into all of these as we progress through the series, but for now it's good to know where to find this information. As you can see on the General tab, there are no Clients or Applications set up by default, so let's do that next.

Creating a Client and Client Policy
To connect to EOS using our sample app, we need to create a Client with an attached Client Policy to set permissions of what our app can and cannot do. It’s important to consider where your client will be used. Will it be in a trusted environment (for example on a server you control) or an untrusted environment (for example by a player in your game)? Make sure you only assign the minimal amount of actions based on these factors, to mitigate the risk of unwanted usage of Epic Online Services.- Start by navigating to your product and clicking on the Clients tab under Product Settings. Review and accept the terms if you agree.
- Once you're back on the Clients tab, you'll see a space for Clients and a space for Client Policies. Click on the Add New Client button to create a new Client.
- In the flyout menu, provide a Client Name (e.g. EOS Sample) and click on the Add New Client Policy button to add a new policy.
- In the Client Policy flyout, provide a Client Policy Name (e.g. EOS Sample Game Client Policy) and choose a Client Policy type. There are a number of predefined policies to choose from, but for now we'll click on Custom.
- Here you can select the Conditions and Features of the client policy. Start by checking the User required condition, because our sample app will perform all its functionality after logging in.
- Under Features, you can select the services that this client (our sample app) will have access to. You can also determine individual actions per feature, once you enable it. As we build out our sample, we'll enable these features, so for now we can leave them all disabled.
- Click on Save & Exit for both flyouts to complete the set up for our Client and Client Policy.

Client and Client Policy added
That's where we'll end things for now. Next up, we'll set up our Visual Studio 2019 environment and the structure of our WPF sample application. You can reference the series reference on the previous article for all articles in this series. Let us know what you think on the Epic Online Services Community Support forums.