
A common animation workflow is to bind rigid geometry to a skeletal character or prop. Using geometry scripting and action utilities in Unreal Engine, you can create a workflow to optimize this process for artists.
For this workflow, you will run a tool from the right-click context menu to create a new skeletal mesh asset from a given static and skeletal mesh actor. Your new asset contains the geometry from the selected static mesh and skeletal data from the chosen skeletal mesh for binding.
This guide shows you how to:
-
Use Geometry Scripting to copy over mesh data and create a new asset.
-
Convert a static and skeletal mesh to a dynamic mesh.
-
Copy the bones of a mesh to another mesh.
-
Bind a static mesh to a skeletal mesh.
Prerequisites
To understand and use the content on this page, you must:
-
Enable the Geometry Script plugin. To learn more, see Working with Plugins.
-
Have a skeletal mesh in your project, or download the Tutorial Assets file to follow along.
-
Have a fundamental understanding of Blueprints, action utilities, and Geometry Scripting.
-
Understand the use of a skeletal mesh and the animation editors.
For a base guide on using Geometry Scripting with actor actions, see Create Action Utilities With Geometry Scripting.
Blueprint and Function Setup
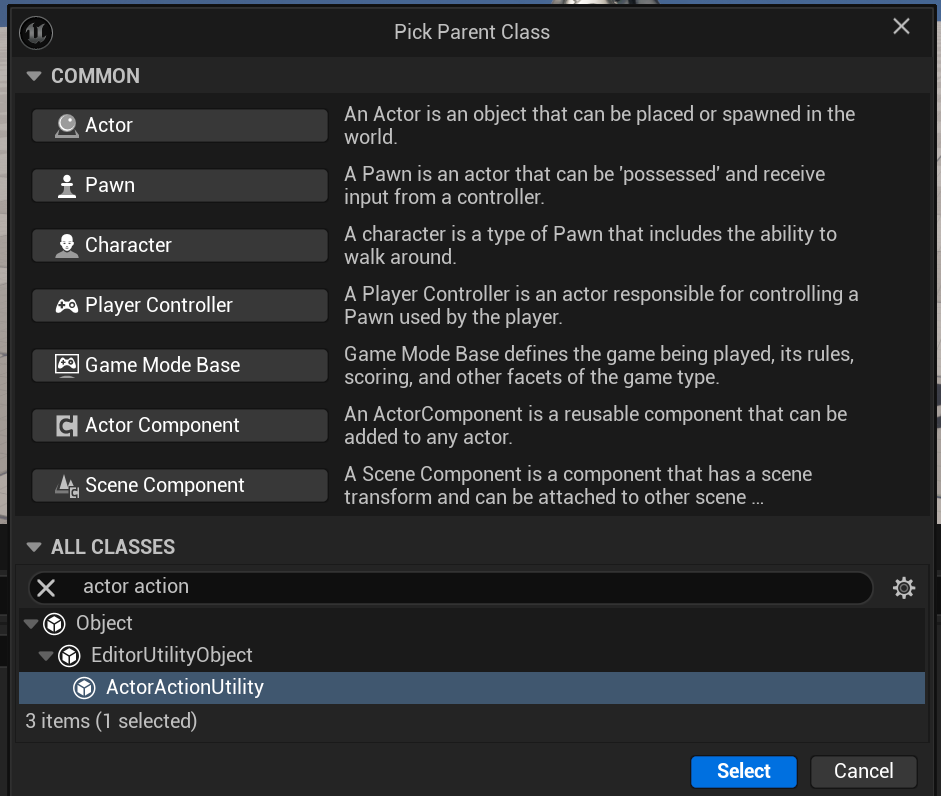
To start, you must have the correct Blueprint class. Since the goal is a workflow to create a new skeletal mesh asset from a given static and skeletal mesh through a right-click menu option, use the ActorActionEditorUtility class. You will use this to create a function that appears in the context menu.
To create the utility class and function, follow these steps:
-
Right-click inside the Content Drawer then select Blueprint Class from the context menu.
-
Search for and select ActorActionEditorUtility.
-
Name the Blueprint
BP_StaticMeshtoSkeletalMesh_ActorAction, then double-click the asset to open it. -
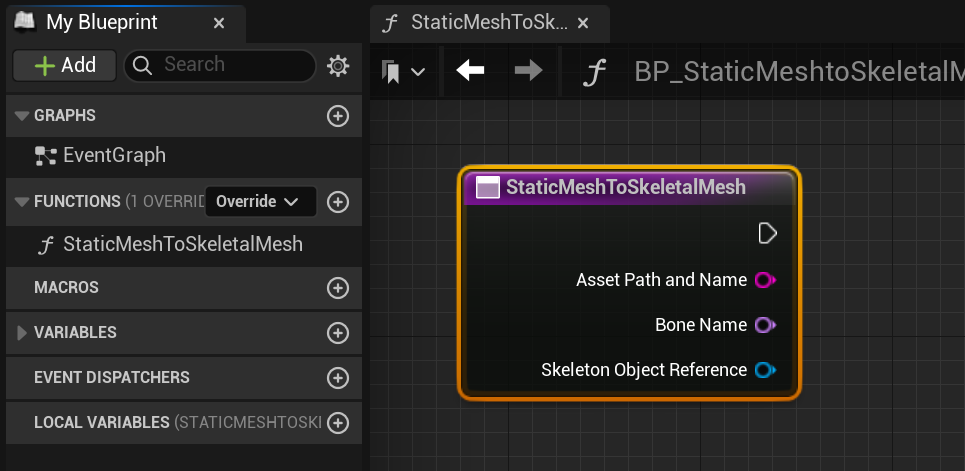
In the My Blueprint panel, create a function by clicking the plus icon next to Functions.
-
Name the function StaticMeshToSkeletalMesh. This name is what will appear in the context menu.
-
To constrain the action to only show when a static or skeletal mesh actor is selected, click Class Defaults.
- In the Details panel, click the plus icon under the Assets category, then search for and add the two actor types.
-
Compile (Ctrl + Alt) and save (Ctrl + S).
Dynamic Mesh Conversion
The purpose of the first part of the script is to get the selection of a skeletal and static mesh and convert them to dynamic meshes. The dynamic mesh acts as a temporary mesh you can perform your operations on before applying them to your static mesh.
This process consists of two similar node networks. You then apply the transforms of the actors to capture any transformations the user applies.
To view the available Geometry Scripting functions, see Blueprint API Reference.
Skeletal Mesh
To convert a skeletal mesh actor to a dynamic mesh, follow these steps:
-
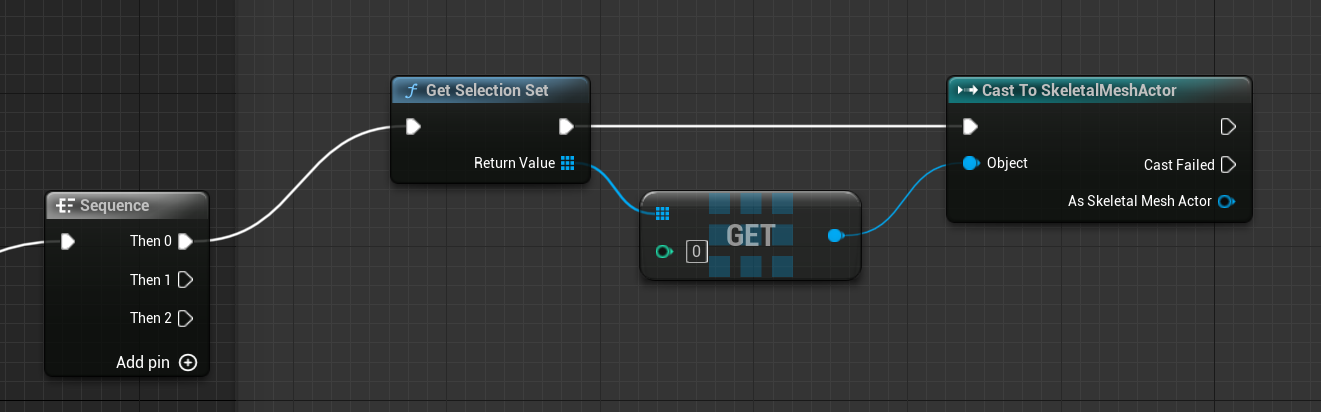
In the StaticMeshToSkeletalMesh function, drag off the execution pin, then search for and select Sequence. The Sequence node will step through the two conversion processes for a static and skeletal mesh.
-
Drag off the Sequence node's Then 0 execution pin, then search for and select Get Selection Set.
-
Drag off the Return Value pin, then search for and select Get (a copy). Select the first index to choose the first item in the selection set.
-
Drag off the output pin, then search for and select Cast to SkeletalMeshActor. Connect the input execution pin to Get Selection Set.
-
To create the dynamic mesh, you must access the actor's asset. Drag off the As Skeletal Mesh Actor pin, then search for and select Get Skeletal Mesh Component.
-
Drag off the Skeletal Mesh Component pin, then search for and select Get Skeletal Mesh Asset.
-
From the Cast to SkeletalMeshActor, drag off the execution pin, then search for and select Construct Object from Class.
- From the Class dropdown, search for and select Dynamic Mesh (UDynamicMesh).
-
Drag off the Return Value pin, then search for and select Copy Mesh from Skeletal Mesh. Connect the execution pins.
-
Connect the Skeletal Mesh Asset output pin to the From Skeletal Mesh Asset input.
Static Mesh
To convert the static mesh actor to a dynamic mesh, follow these steps:
-
Repeat the skeleton mesh conversion steps described previously starting from the Then 1 execution pin.
-
Replace the following nodes and make sure you change the selection index to 1 to indicate you want the second element in the selection set.
-
Cast to SkeletalMeshActor with Cast to StaticMeshActor.
-
Copy Mesh from Skeletal Mesh with Copy Mesh from Static Mesh with Section Materials.
-
Skeletal Mesh Component with Static Mesh Component and Get Skeletal Mesh Asset with Get Static Mesh.
-

Apply Relative Transform Mesh
Next, apply the transform of the actors to the target mesh. The transformation of a skeletal mesh's bones is relative to the root of the skeleton. This relativity means the static mesh actor's transforms must align to the skeleton root. Since you won't know where users place their actors, or other transforms they may apply, you must capture the relative transform and apply it to the dynamic mesh.
As constructed, the Then 0 sequence runs first, followed by the Then 1 sequence. You are going to add the transform logic to the second branch since you have both the skeletal and static meshes at this point.
To apply the relative transform to the dynamic mesh, follow these steps:
-
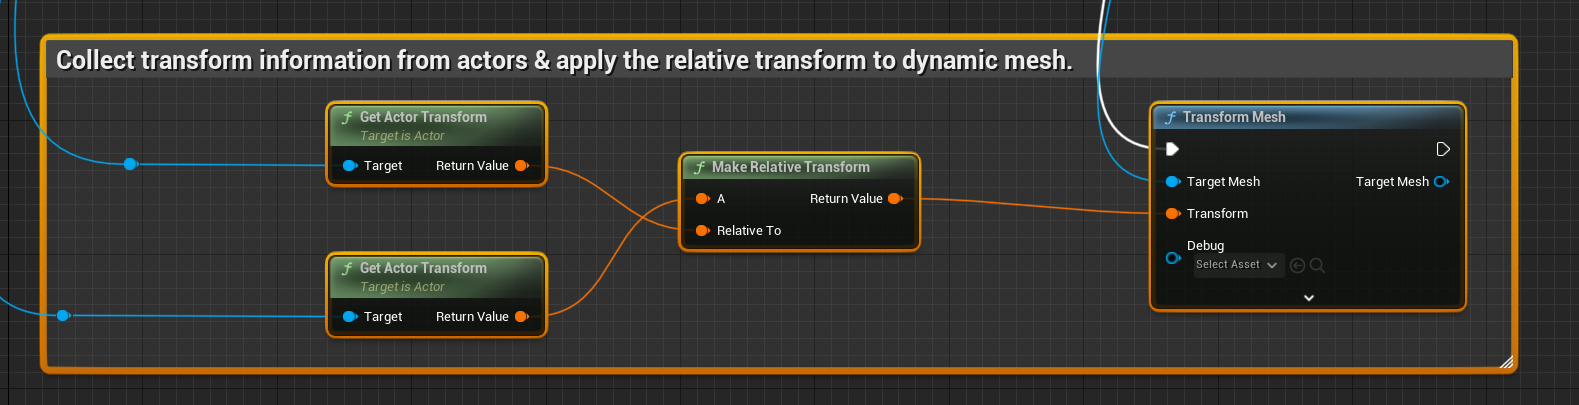
From the Copy Mesh from Static Mesh with Section Materials node, drag off the Success execution pin, then search for and select Transform Mesh. The Transform Mesh node applies the provided transform values to the vertices of the dynamic mesh.
-
Connect the Dynamic Mesh output to the Target Mesh input.
-
From the Cast to SkeletalMeshActor node, drag off the As Skeletal Mesh Actor pin, then search for and select Get Actor Transform.
-
From the Cast to StaticMeshActor node, drag off the As Static Mesh Actor pin, then search for and select Get Actor Transform.
-
Drag off the Return Value pin, then search for and select Make Relative Transform. This node outputs the relative transform value of the static mesh compared to the skeletal mesh.
-
Connect the Return Value output of the skeletal mesh actor transform to the Relative To input.
-
Connect the Return Value pin to the Transform input of the Transform Mesh node.
-
Compile (Ctrl + Alt) and save (Ctrl + S).
Copy Skeletal Data and Add Bone Weights
Static meshes have no skeletal data or bone weights (skin weights). This means the dynamic mesh you convert to won't have that data either.
To add the skeletal data, you first copy over the bone names and hierarchy information from the skeletal mesh. You can then create a bone weight attribute which you populate with the skinning data. With the bone data, you can convert the static mesh to a skeletal mesh asset, and then bind it to the source skeletal mesh.
The next process shows you how to bind the target skeletal mesh to a single bone, that is, to transfer skeletal information and populate the skinning data in such a way that all vertices are bound exclusively to the bone you select. You can modify this procedure to bind vertices to different combinations of bones, using the collection of bone weight geometry script nodes.
To copy the skeletal data and populate bone weights, follow these steps:
-
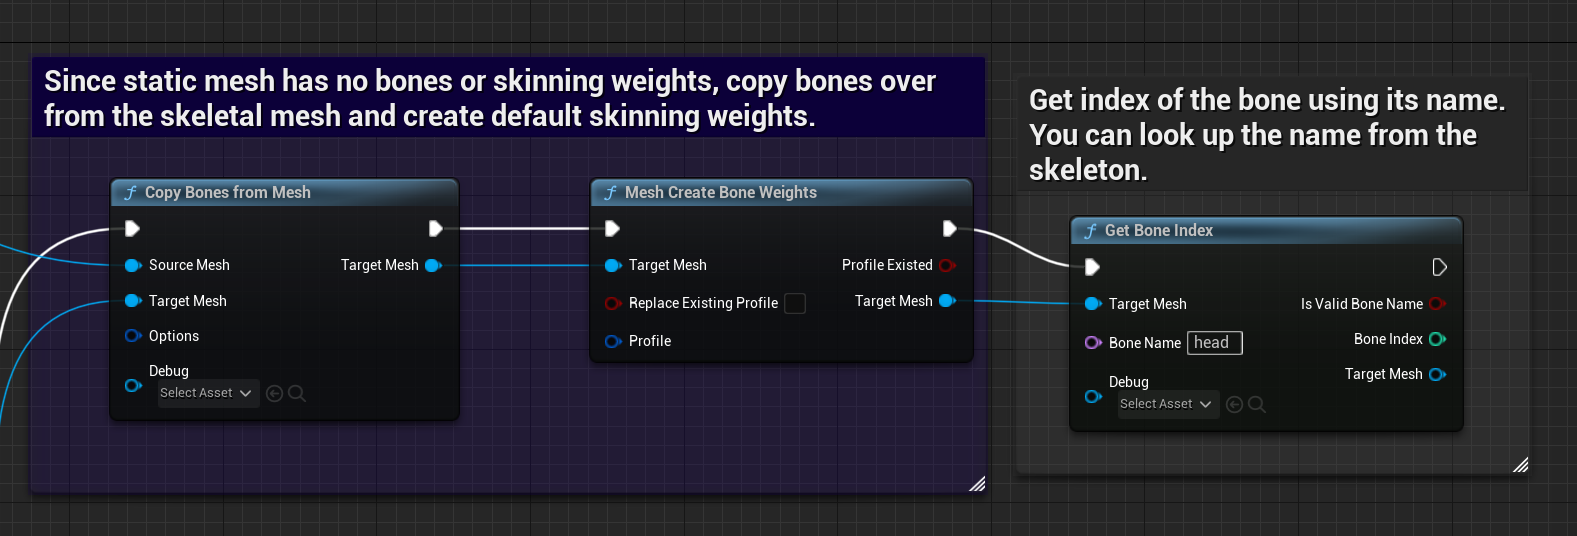
From the Transform Mesh node, drag off the execution pin, then search for and select Copy Bones from Mesh. This node copies the skeletal data (bone names and hierarchy information) to the target dynamic mesh.
-
Connect the Target Mesh output to the Target Mesh input.
-
From the Copy Mesh from Skeletal Mesh, connect the Dynamic Mesh output to the Source Mesh input.
-
From the Copy Bones from Mesh node, drag off the execution pin, then search for and select Mesh Create Bone Weights. This node creates a bone weight attribute to the target mesh.
-
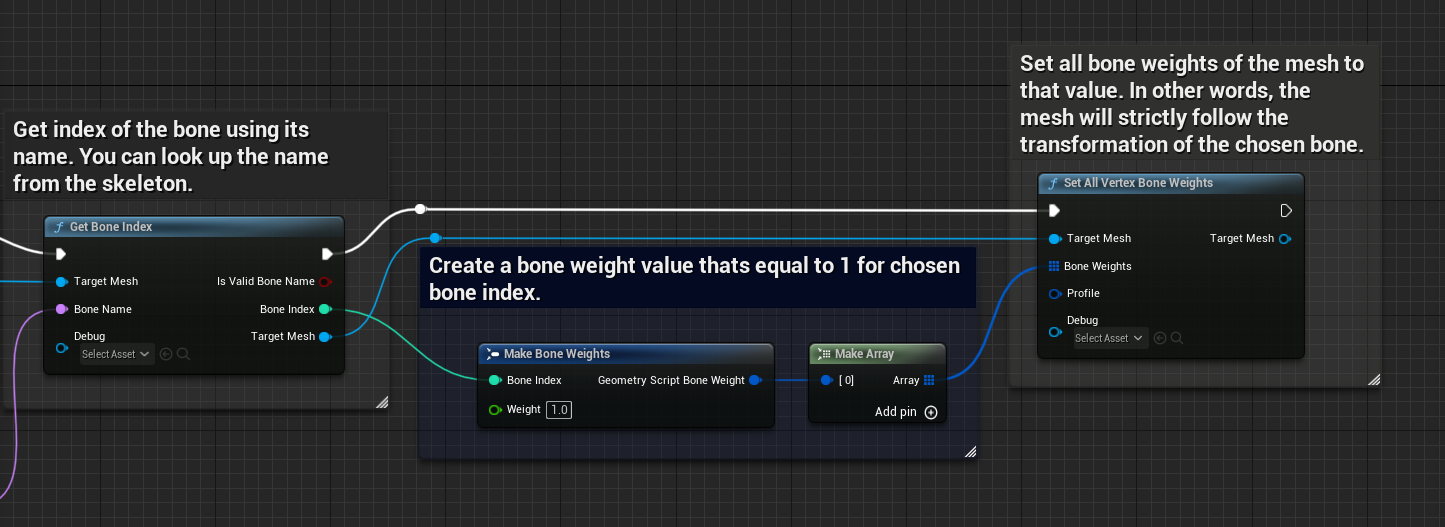
Get the index of the bone the target mesh binds to using its name. From the Mesh Create Bone Weights node, drag off the execution pin, then search for and select Get Bone Index.
-
In the Bone Name field, type "head" to bind the hat to the head bone. You can look up the names of the bones using the Skeletal Mesh Editor.
-
Drag off the Bone Index output pin, then search for and select the Make Bone Weights struct. Set the Weight field to 1.
-
Drag off the output pin, then search for and select Make Array.
-
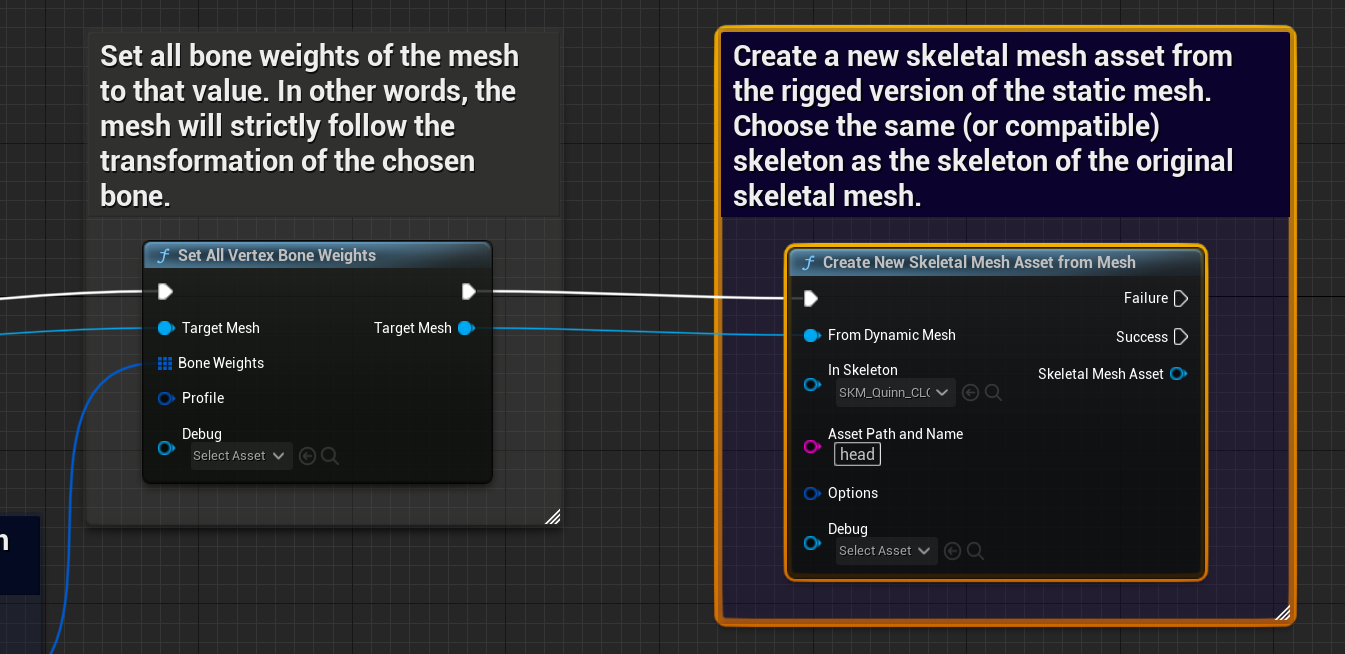
Set all vertices of the target mesh to the corresponding bone weight value. From the Array pin, search for and select Set All Vertex Bone Weights. This node rigidly binds the mesh to the selected bone, in this case the head joint. The binding means that the new skeletal mesh only follows the transformation of the head joint.
-
Between the Bone Index and Set All Vertex Bone Weights nodes, connect the execution and Target Mesh pins.
Save the Dynamic Mesh as a New Skeletal Mesh Asset
Using the target mesh containing the geometry of the source static mesh and skeleton data from the source skeletal mesh, you can convert the dynamic mesh to a new skeletal mesh asset.
-
From Set All Vertex Bone Weights node, drag off the execution pin, then search for and select Create New Skeletal Mesh Asset from Mesh. This node saves the dynamic mesh containing the skeletal data and bone weights as a new skeletal mesh asset.
-
In the In Skeleton field, choose the skeleton from which you copied the bone data.
-
Connect the From Dynamic Mesh input to the Target Mesh output.
-
In the Asset Path and Name field, set the location to save the mesh and add the new name to the end. To copy a path, right-click the desired location and choose Copy Path.
-
Compile (Ctrl + Alt) and save (Ctrl + S).
For a better user experience, convert the Bone Name, In Skeleton, and Asset Path and Name fields into public variables for artists to adjust. This feature prevents artists from needing to open the Blueprint to change the variables.
Set the default value of Asset Path and Name to /Game/NewAsset to ensure a folder is set and to help users understand the path syntax.
Your action utility is complete and ready to run. Below is the snippet of the utility function.

Run the Action Utility
To run the action utility, follow these steps:
-
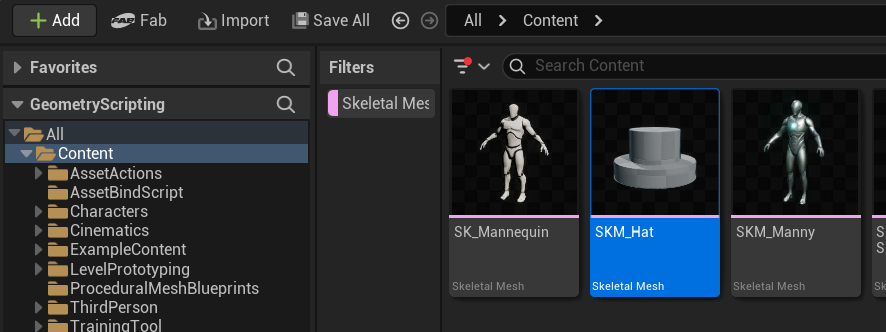
Place the skeletal mesh and the sample SM_Hat mesh (or any other static mesh) in the viewport.
-
Position the hat on the head of the skeletal mesh body.
The sample hat mesh was created with in-engine modeling tools, to learn more see Modeling Mode Overview.
-
Click the skeletal mesh first, and then Shift + click the static mesh, to select both.
-
Right-click the actors and choose Scripted Actor Actions > StaticMeshToSkeletalMesh (the name you use for the function).
-
Fill out the prompt.

The utility converts a static mesh to a skeletal mesh asset with bones related to the source skeletal mesh. The asset should appear in the folder you have chosen.
After conversion, you can tweak the geometry and skeletal data of the new mesh using the Editing Tools inside the Skeletal Mesh Editor. You can also test binding using the Skeleton Editor.
Next Step
Expand the actor action utility with a function to transfer skin weights to dynamic assets like clothing. In addition, learn how to apply the materials from the static mesh to the target mesh.