控制绑定中的Python脚本功能能让你将工作流程自动化,并创建可用于绑定流程的工具。你还可以使用 控制绑定Python日志(Control Rig Python Log) 对命令进行逆向工程,复制脚本以便共享到其他项目。
本文介绍了控制绑定的Python脚本功能、控制绑定Python Log功能,以及一些脚本示例。
先决条件
-
你已经打开了控制绑定资产。
-
你有一些在虚幻引擎中编写Python脚本的经验。
脚本编写概述
Python主要用于在控制绑定中与绑定图表(Rig Graph)进行交互,绑定图表包含多个模块:
| 模块名称 | 说明 |
|---|---|
| ControlRig | 包含绑定运行时。 |
| ControlRigDeveloper | 包含更改绑定的所有功能。 |
| ControlRigEditor | 包含前端和用户界面逻辑。 |
控制绑定图表使用 模型(Model) - 视图(View) - 控制器(Controller) 设计模式实现。模型层就是图表本身,其中使用了以下术语:
| 控制绑定Python术语 | 说明 |
|---|---|
| RigUnit | 为绑定定义函数的C++结构体(示例:FRigUnit_GetBoneTransform)。 |
| 引脚(Pin) | 函数的单个输入或输出。 |
| 链接(Link) | 两个引脚之间的连接。 |
| 节点(Node) | RigUnit的视觉效果表示。 |
| 图表(Graph) | 定向图表,包含绑定中所有节点和链接。 |
| PinPath | 描述图表中引脚地址的字符串(示例:NodeA.Translation.X)。 |
| 控制器(Controller) | 用于在图表中做出更改的对象。 |
| RigElementKey | 从骨骼(Bone)、控制点(Control)、空(Null)或曲线(Curve)中选择。 |
| 骨骼(Bone) | 骨架中用于变形的绑定元素。 |
| 控制点(Control) | 用于交互的绑定元素。 |
| 空(Null) | 用于中间变换的绑定元素。 |
| 曲线(Curve) | 用于存储浮点通道的绑定元素。 |
| 形状(Shape) | 视口中控制点的视觉效果表示。 |
| 层级(Hierarchy) | 用于存储绑定中所有骨骼、控制点、空和曲线的容器。 |
| HierarchyController | 与控制器类似,HierarchyController用于更改层级。 |
| 编译器(Compiler) | 将控制绑定图表转换为高性能运行时的对象。 |
| VM | 用于执行绑定的虚拟机运行时。 |
| 常量(Constant) | 运行时不会更改的值。 |
| 参数(Parameter) | 可以用作绑定输入或输出的值 |
| 变量(Variable) | 可以在运行时更改并在绑定执行后保留的值。 |
| ControlRigBlueprint | 包含图表(Graph)、控制器(Controller)、编译器(Compiler)和VM的资产。 |
| 工厂(Factory) | 负责创建和导入新对象的对象。在整个虚幻编辑器中用于创建资产。 |
Python通过 Python编辑器脚本插件(Python Editor Script Plugin) 启用,它本身在虚幻引擎中默认启用。当启用 控制绑定插件(Control Rig Plugin) 时,该插件也会自动启用,因为它是依赖项。
访问控制绑定
编写脚本的第一步是访问你将与之交互的主要对象,此处为 ControlRigBlueprint 对象。你有几种访问方法,但是你的第一个命令通常是加载ControlRigDeveloper模块,以便更改控制绑定。
unreal.load_module('ControlRigDeveloper')
要访问现有绑定,请使用以下示例命令加载资产:
rig = unreal.load_object(name = '/Game/ControlRig/Samples/Mannequin_ControlRig', outer = None)
你还可以使用以下内容加载当前打开的控制绑定资产:
rigs = unreal.ControlRigBlueprint.get_currently_open_rig_blueprints()
使用以下内容新建控制绑定资产:
factory = unreal.ControlRigBlueprintFactory()
rig = factory.create_new_control_rig_asset(desired_package_path = '/Game/TestRig')
最后,你可以使用以下示例代码基于骨架或骨骼网格体创建控制绑定资产:
# load a skeletal mesh
mesh = unreal.load_object(name = '/Game/Mannequin/Character/Mesh/SK_Mannequin.SK_Mannequin', outer = None)
# create a control rig for the mesh
factory = unreal.ControlRigBlueprintFactory
rig = factory.create_control_rig_from_skeletal_mesh_or_skeleton(selected_object = mesh)
Python日志
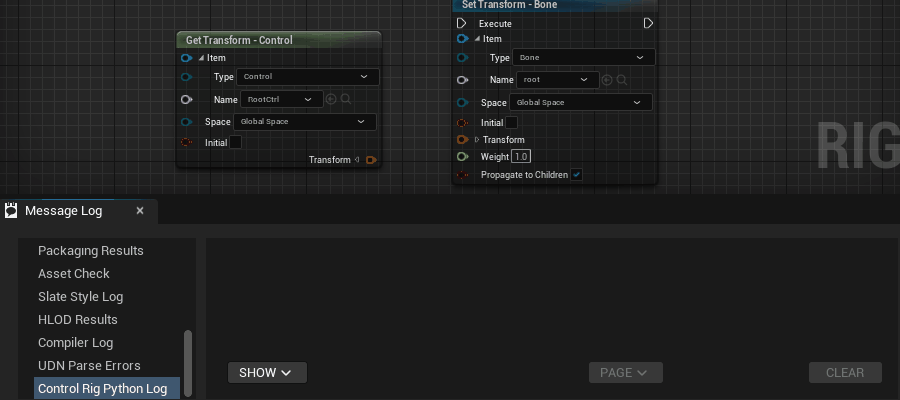
Python日志(Python Log) 提供了你在控制绑定编辑器中执行的所有操作的文本日志。其中包括视口、层级和图表中的操作。你可以使用它引用要在Python脚本中使用的命令。
要访问日志,请从控制绑定主菜单中,点击 窗口(Window)>消息日志(Message Log),然后从消息日志(Message Log)侧边栏中选择 控制绑定Python日志(Control Rig Python Log)。
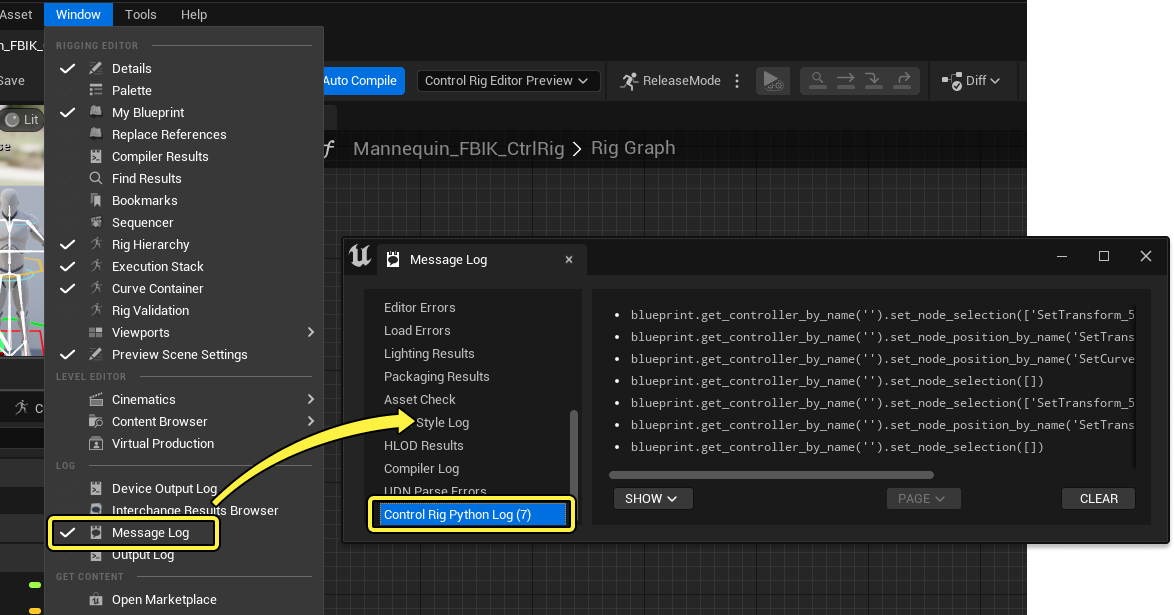
你现在可以在绑定图表中执行操作并查看日志中记录的操作。
如果你要保存命令以便在其他地方共享或使用,你可以从日志中选择任意行,并按 Ctrl + C 复制,然后粘贴到文本编辑器中。你还可以按住 Shift 选择多行。
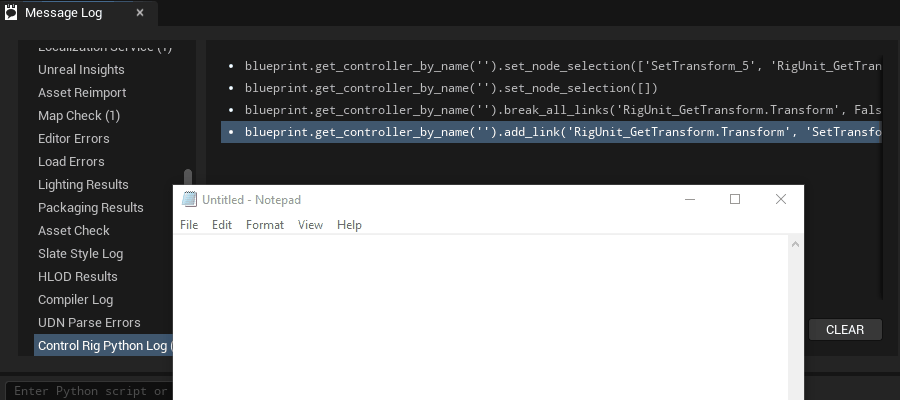
将命令粘贴到 输出日志(Output Log) 中并执行即可测试命令,确保将日志类型设置为Python。在此示例中,创建了新控制点。
Python上下文
Python上下文用于设置在运行Python命令时应该影响哪个控制绑定资产的上下文。默认情况下,查看控制绑定时不设置上下文。在 类设置(Class Settings) 细节(面板中,点击 运行Python上下文(Run Python Context),你可以设置当前控制绑定的上下文。
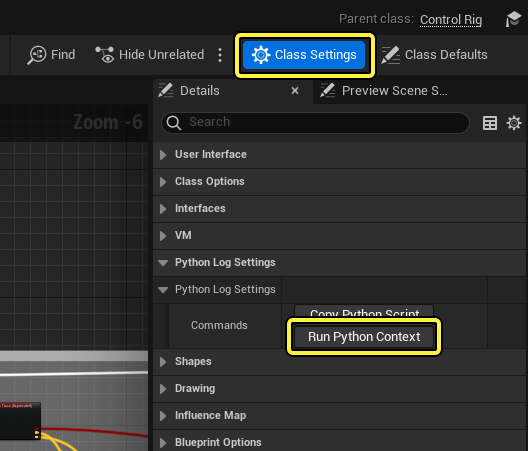
这将执行一系列将当前控制绑定资产绑定到Python上下文的命令。这允许在此控制绑定资产中粘贴和执行从Python日志复制的命令。
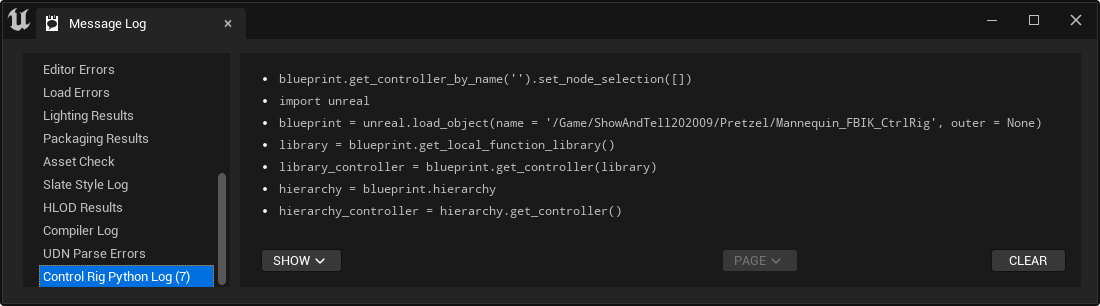
blueprint.get_controller_by_name('').set_node_selection([])
import unreal
blueprint = unreal.load_object(name = '/Game/ShowAndTell202009/Pretzel/Mannequin_FBIK_CtrlRig', outer = None)
library = blueprint.get_local_function_library()
library_controller = blueprint.get_controller(library)
hierarchy = blueprint.hierarchy
hierarchy_controller = hierarchy.get_controller()
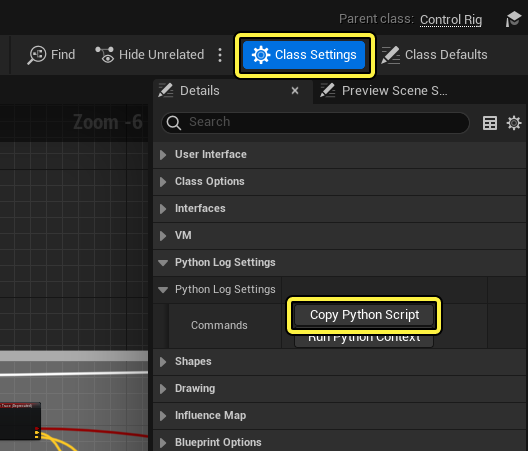
复制Python脚本
你还可以将控制绑定的节点、绑定元素和属性全部复制到剪贴板。然后,你可以将其粘贴到外部脚本编辑器中,或粘贴回输出日志,以便在另一个控制绑定上执行。复制Python脚本对于共享、调试和比较不同绑定之间的逻辑很有用。与复制单个命令类似,复制整个绑定对于从控制绑定对Python命令进行逆向工程也很有用。
要复制控制绑定,请点击 类设置(Class Settings) 细节面板中的 复制Python脚本(Copy Python Script)。
Python脚本示例
添加节点
由于节点是 RigUnit 结构体的视觉效果表示,因此你需要访问该单元才能将节点添加到图表中。
unreal.load_module('ControlRigDeveloper')
# get an array of all available units
units = unreal.ControlRigBlueprint.get_available_rig_units()
# print details about the units
for unit in units:
print(unit.get_path_name())
print(unreal.EditorAssetLibrary.get_metadata_tag(unit, 'Keywords'))
然后,你需要访问控制器。控制器是用于对图表做出更改的中心对象。
controller = rig.get_controller()
要将节点添加到图表中,你可以使用 add_struct_node、add_comment_node、add_parameter_node 或 add_variable_node 函数。下面的示例重点关注结构体节点,这是最常见的类型。结构体节点是RigUnit的视觉效果表示,因此图表中的大多数节点都是结构体节点。
# get the unit - you might also get this by path or similar
unit = unreal.RigUnit_MathFloatAdd.static_struct()
# add the node to the graph provided the unit struct, the method (is always Execute) and 2D position in the graph
node = controller.add_unit_node(script_struct = unit, method_name = "Execute", position = unreal.Vector2D(0, 0))
编辑层级
除了编辑图表,你还可以使用Python代码编辑层级。控制绑定层级中的每个绑定元素都使用 RigElementKey 标识,其中包含元素的名称和类型。当你创建层级中的元素或与之交互时,你将需要使用此键。
控制绑定元素是结构体,这意味着复制它们时使用的是其总值。因此,如果你更改了元素,你可能必须在层级中重新设置。
层级 可用于查询元素、获取或设置全局/局部变换,以及将元素重置回初始值。
HierarchyController 可以用于添加、删除和编辑元素。如有必要,你还可以使用它来重命名和重新确定父元素。
要检查当前层级,可以使用以下Python代码:
# access the hierarchy object
hierarchy = rig.hierarchy
# get all element keys and print them
elements = hierarchy.get_all_keys()
for element in elements:
print(element)
要创建绑定元素,例如骨骼,你可以使用以下代码:
# access the hierarchy controller object
hierarchy_ctrlr = rig.get_hierarchy_controller()
# add a new bone
new_bone_key = hierarchy_ctrlr.add_bone(name = "MyBone", parent = unreal.RigElementKey(), transform = unreal.Transform())
# add a new child bone to a parent that is 10 units away on Z
child_transform = unreal.Transform(location = [0, 0, 10])
new_child_bone_key = hierarchy_ctrlr.add_bone(name = "ChildBone", parent = new_bone_key, transform = child_transform)
变量和资产操作
要使用getter和setter节点创建控制绑定变量,你可以使用以下代码:
rig.add_member_variable("MyVariable", "Transform", is_public = True, is_read_only = False, default_value ="")
# Create variable getter node
controller.add_variable_node_from_object_path(MyVariable, 'FTransform', '/Script/CoreUObject.Transform', is_getter = True, default_value = '', position = unreal.Vector2D(), node_name = 'MyVariable_Getter')
# Create variable setter node
controller.add_variable_node_from_object_path(MyVariable, 'FTransform', '/Script/CoreUObject.Transform', is_getter = False, default_value = '', position = unreal.Vector2D(), node_name = 'MyVariable_Setter')
预览网格体也可以使用以下代码更改:
# load a skeletal mesh
mesh = unreal.load_object(name = '/Game/Mannequin/Character/Mesh/SK_Mannequin.SK_Mannequin', outer = None)
# create a new (empty) asset
factory = unreal.ControlRigBlueprintFactory()
rig = factory.create_new_control_rig_asset(desired_package_path = '/Game/TestRig')
# set the preview mesh
rig.set_preview_mesh(preview_mesh = mesh)
你可以使用以下代码编译控制绑定,具体取决于你的上下文:
# force a recompile of the VM
rig.recompile_vm()
# compile the VM if there are pending changes
rig.recompile_vm_if_required()
# request a compilation if auto compile is enabled and the editor is open
rig.request_auto_vm_recompilation()
# request the control rig to run an init pass (initialize all units)
rig.request_control_rig_init()
# request the control rig to run a full blueprint compile
unreal.BlueprintEditorLibrary.compile_blueprint(rig)
编辑器启动
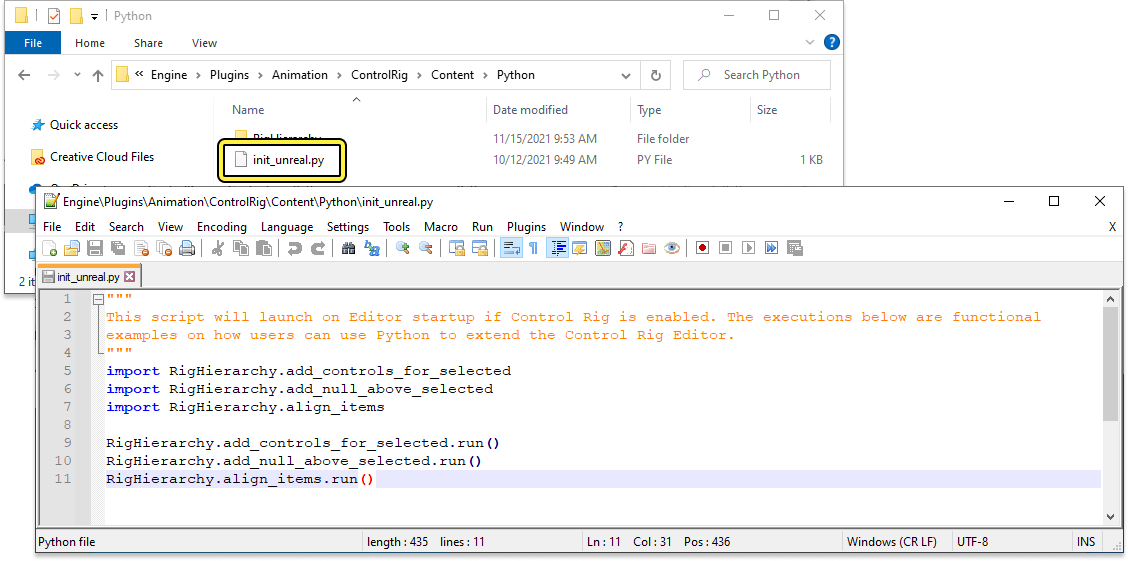
Python脚本可以在编辑器启动时加载,这对于加载自定义工具和内置Python函数很有用。你可以从以下文件夹路径的项目目录中找到此脚本和示例脚本函数:
Engine\Plugins\Animation\ControlRig\Content\Python
此文件夹中是init_unreal.py脚本,其中包含以下代码:
import RigHierarchy.add_controls_for_selected
import RigHierarchy.add_null_above_selected
import RigHierarchy.align_items
RigHierarchy.add_controls_for_selected.run()
RigHierarchy.add_null_above_selected.run()
RigHierarchy.align_items.run()
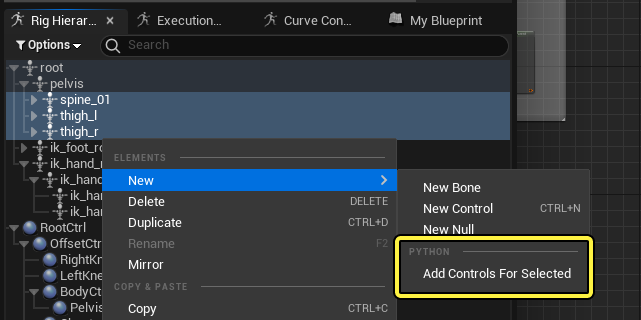
此代码将加载启用了额外功能的示例脚本。
例如,add_controls_for_selected 将启用使用附加规则在选定骨骼上创建控制点的功能。这些规则由自定义Python脚本确定,脚本位于Engine\Plugins\Animation\ControlRig\Content\Python\RigHierarchy\add_controls_for_selected.py中。