
Gameplay Debugger Tool (GDT) は、リアルタイム データをランタイムに見るのに便利です。レプリケーションを使用するネットワーク ゲームのクライアントに対しても使用可能です。Play In Editor (PIE)、 Simulate In Editor (SIE) (エディタでシミュレートする)、およびスタンドアロンのゲーム セッションで機能します。すべてのデータはゲームのビューポートにオーバーレイとして表示されます。このシステムには、ゲーム固有のデータのデバッグを有効にするために拡張可能なフレームワークがあります。
Unreal Engine では以下を表示することが可能です。
- ポーンからの基本データ
- AIController からの基本データ
- Behavior Tree とブラックボード データに関する情報
- 実行した EQS に関する情報
- 知覚システムからの情報
- プレイヤー周囲の Navmesh またはリンクやエリアなどのあらゆる詳細を含む選択したポーン
通常、多くのデータがあるため、GDT ではカテゴリを使ってオンスクリーンの情報量を制限しています。有効にしたカテゴリのデータのみをレプリケートします。これにより、レプリケーション チャンネルの帯域幅を節約します。5 つのデフォルト カテゴリとプロジェクトによって使用される 5 つのカテゴリがあります。

- Navmesh
- Basic
- Behavior Tree
- EQS
- Perception
- およびプロジェクトによって使用される 5 つのカテゴリ
既存のカテゴリを拡張して、ゲーム固有のデータをさらに表示することもできます。
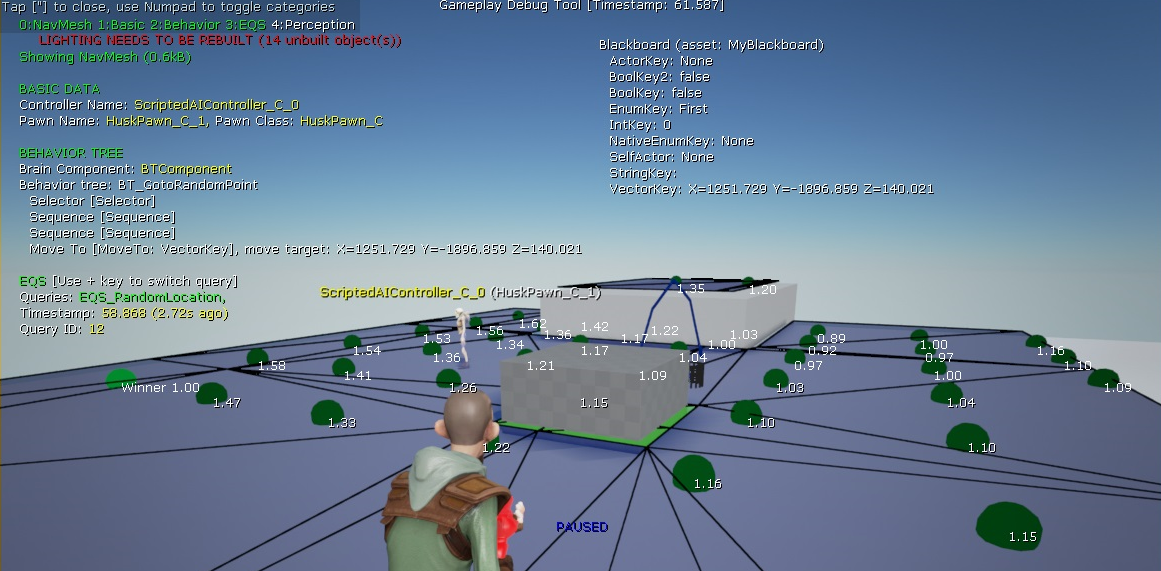
以下は Basic、EQS、NavMesh、Behavior Tree のカテゴリを有効にした状態でクライアント側でキャプチャしたスクリーン ショットです。
Gameplay Debugger は、デフォルトで ' (アポストロフィ) キーまたは EnableGDT チートを使ってアクティベートすることができます。キー バインドはファイルで設定し、簡単に変更することができます。デバッグする敵を選択するには、オンスクリーンでその敵をポイントしながら ' キーを押します。表示カテゴリの切り替えには数字キーボードを使います。アクティベートし、使用可能な状態にするには、GameplayDebugger モジュールをプロジェクトの依存関係のあるモジュールに追加しなければなりません。
Gameplay Debugger を使用する
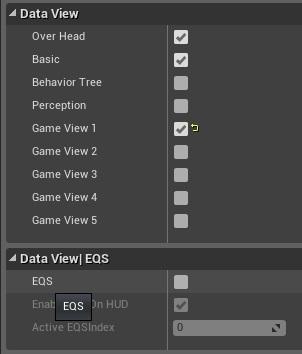
エディタで作業中に、GDT を PIE またはシミュレーションで使用することができます。バインドされたキーまたは EnableGDTチートを使って PIE で GDT をアクティベートすることができます。シミュレート モードは PIE とほとんど変わりません。つまり、このデバッグ ツールをアクティベートするには、Debug AI 表示フラグを有効にする必要があります。シミュレートで可視カテゴリを変更するオプションもあります。GameplayDebuggingReplicator アクタを使います。このアクタはシーン アウトライナーにあります。アクタのプロパティを使って GDT を制御します。
Debug Camera Controller
DebugCameraController には以下の機能もあります。
- Orbit 機能は、選択したアクタの選択した位置またはそのアクタの中心をユーザーが周回できるようになり、アセットをより詳細に確認できます。
- Buffer visualization (バッファ ビジュアリゼーション) には、全画面表示用のバッファを選択するオプションがあります。グラフィックカード バッファのコンテンツを調べることができます。
- View mode cycling を使って、処理中の様々な種類のシーン データを調べることができます。
Play-In-Editor(PIE) で Debug Camera Controller (デバッグ カメラ コントローラー) を使用している場合、この新しい機能によってゲーム内デバッグの機能が強化されます。ビューモードとグラフィック バッファを調べる機能は、ゲーム内で想定外のシーンの結果を診断するのに便利です。
PIE でデバッグ カメラ コントローラーを開くには、コンソール コマンドラインで「ToggleDebugCamera」と入力するか、セミコロン ホットキー「;」 を使用します。
基本的な拡張子
Gameplay Debugger は C++ コードでのみ拡張することができます。ブループリントのプロジェクトの場合は、そのままの状態でのみ使用して基本的なデバッグ状態を表示することができます。ゲーム固有のデータを集めて表示するために、Gameplay Debugger を簡単に拡張できます。その手順は、まず UGameplayDebuggingComponent クラスと AGameplayDebuggingHUDComponent クラスから継承するカスタム クラスが必要です。最初のクラスはデータを集めて徐々にレプリケートするために使用し、二つ目のクラスは収集したすべてのデータを画面上に表示するために使用します。
以下はゲーム固有のデータを集める単純なクラスです。
GDTComponent.h
// Copyright Epic Games, Inc. All Rights Reserved.
#pragma once
#include "GameplayDebuggingComponent.h"
#include "GDTComponent.generated.h"
UCLASS()
class UGDTComponent : public UGameplayDebuggingComponent
{
public:
GENERATED_UCLASS_BODY()
virtual void CollectBasicData() override;
UPROPERTY(Replicated)
float TestData; //custom data replicated to clients (クライアントにレプリケートされたカスタム データ)
};
GDTComponent.cpp
// Copyright Epic Games, Inc. All Rights Reserved.
#include "MyGameProject.h"
#include "GameplayDebuggingComponent.h"
#include "GDTComponent.h"
UGDTComponent::UGDTComponent(const class FPostConstructInitializeProperties& PCIP) :Super(PCIP) { }
void UGDTComponent::GetLifetimeReplicatedProps(TArray<FLifetimeProperty> &OutLifetimeProps) const
{
Super::GetLifetimeReplicatedProps( OutLifetimeProps );
#if !(UE_BUILD_SHIPPING || UE_BUILD_TEST)
DOREPLIFETIME( UGDTComponent, TestData);
#endif
}
void UGDTComponent::CollectBasicData()
{
Super::CollectBasicData();
#if !(UE_BUILD_SHIPPING || UE_BUILD_TEST)
TestData= FMath::RandRange(2.75, 8.25); //collect data and store it (データを集めてそれを保存)
#endif
}
次のクラスは、新しいデータを画面上に表示するために使用します。
GDTHUDComponent.h
// Copyright Epic Games, Inc. All Rights Reserved.
#pragma once
#include "GameplayDebuggingHUDComponent.h"
#include "GDTHUDComponent.generated.h"
UCLASS(notplaceable)
class AGDTHUDComponent: public AGameplayDebuggingHUDComponent
{
GENERATED_UCLASS_BODY()
protected:
virtual void DrawBasicData(APlayerController* PC, class UGameplayDebuggingComponent *DebugComponent) override;
};
GDTHUDComponent.cpp
// Copyright Epic Games, Inc. All Rights Reserved.
#include "MyGameProject.h"
#include "GDTComponent.h"
#include "GDTHUDComponent.h"
AGDTHUDComponent::AGDTHUDComponent(const class FPostConstructInitializeProperties& PCIP)
: Super(PCIP)
{
}
void AGDTHUDComponent::DrawBasicData(APlayerController* PC, class UGameplayDebuggingComponent *DebugComponent)
{
Super::DrawBasicData(PC, DebugComponent);
#if !(UE_BUILD_SHIPPING || UE_BUILD_TEST)
const UGDTComponent* MyComp = Cast<UGDTComponent>(DebugComponent);
if (MyComp)
{
PrintString(DefaultContext, FString::Printf(TEXT("{white}Test data: {red}%f\n"), MyComp->TestData));
}
#endif
}
Gameplay Debugger は新しいクラスについて認識する必要があり、その情報は「DefaultEngine.ini」 コンフィギュレーション ファイルで設定することができます。
DefaultEngine.ini
[/Script/GameplayDebugger.GameplayDebuggingReplicator]
DebugComponentClassName="/Script/MyGameProject.GDTComponent"
DebugComponentHUDClassName="/Script/MyGameProject.GDTHUDComponent" |
カスタム カテゴリ
プロジェクト固有のカテゴリを Gameplay Debugger に追加するにはさらにステップが必要です。
GDTComponent クラスを拡張しましょう。
GDTComponent.h
// Copyright Epic Games, Inc. All Rights Reserved.
#pragma once
#include "GameplayDebuggingComponent.h"
#include "GDTComponent.generated.h"
UCLASS()
class UGDTComponent : public UGameplayDebuggingComponent
{
public:
GENERATED_UCLASS_BODY()
protected:
virtual void CollectDataToReplicate(bool bCollectExtendedData) override;
void CollectCustomData();
public:
UPROPERTY(Replicated)
float TestData; //custom data replicated to clients
};
GDTComponent.cpp
// Copyright Epic Games, Inc. All Rights Reserved.
#include "MyGameProject.h"
#include "GameplayDebuggingComponent.h"
#include "GDTComponent.h"
UGDTComponent::UGDTComponent(const class FPostConstructInitializeProperties& PCIP) :Super(PCIP) { }
void UGDTComponent::GetLifetimeReplicatedProps(TArray<FLifetimeProperty> &OutLifetimeProps) const
{
Super::GetLifetimeReplicatedProps( OutLifetimeProps );
#if !(UE_BUILD_SHIPPING || UE_BUILD_TEST)
DOREPLIFETIME( UGDTComponent, TestData);
#endif
}
void UGDTComponent::CollectCustomData()
{
Super::CollectBasicData();
#if !(UE_BUILD_SHIPPING || UE_BUILD_TEST)
TestData= FMath::RandRange(2.75, 8.25); //collect data and store it
#endif
}
void UGDTComponent::CollectDataToReplicate(bool bCollectExtendedData)
{
Super::CollectDataToReplicate(bCollectExtendedData);
#if !(UE_BUILD_SHIPPING || UE_BUILD_TEST)
if (ShouldReplicateData(EAIDebugDrawDataView::GameView1))
{
CollectCustomData();
if (bCollectExtendedData)
{
// collect additional data for selected Pawn/AIController
}
}
#endif
}
ここで HUD componentを展開して新規ビューにデータを表示します。
GDTHUDComponent.h
// Copyright Epic Games, Inc. All Rights Reserved.
#pragma once
#include "GameplayDebuggingHUDComponent.h"
#include "GDTHUDComponent.generated.h"
UCLASS(notplaceable)
class AGDTHUDComponent: public AGameplayDebuggingHUDComponent
{
GENERATED_UCLASS_BODY()
protected:
virtual void DrawGameSpecificView(APlayerController* PC, class UGameplayDebuggingComponent *DebugComponent) override;
virtual void GetKeyboardDesc(TArray<FDebugCategoryView>& Categories) override;
void DrawCustomData(APlayerController* PC, class UGameplayDebuggingComponent *DebugComponent);
};
GDTHUDComponent.cpp
// Copyright Epic Games, Inc. All Rights Reserved.
#include "MyGameProject.h"
#include "GDTComponent.h"
#include "GDTHUDComponent.h"
AGDTHUDComponent::AGDTHUDComponent(const class FPostConstructInitializeProperties& PCIP)
:Super(PCIP)
{
}
void AGDTHUDComponent::DrawCustomData(APlayerController* PC, class UGameplayDebuggingComponent *DebugComponent)
{
#if !(UE_BUILD_SHIPPING || UE_BUILD_TEST)
const UGDTComponent* MyComp = Cast<UGDTComponent>(DebugComponent);
if (MyComp)
{
PrintString(DefaultContext, FString::Printf(TEXT("{white}Test data: {red}%f\n"), MyComp->TestData));
}
#endif
}
void AGDTHUDComponent::GetKeyboardDesc(TArray<FDebugCategoryView>& Categories)
{
Super::GetKeyboardDesc(Categories);
#if !(UE_BUILD_SHIPPING || UE_BUILD_TEST)
Categories.Add(FDebugCategoryView(EAIDebugDrawDataView::GameView1, TEXT("MyData")));
#endif
}
void AGDTHUDComponent::DrawGameSpecificView(APlayerController* PC, class UGameplayDebuggingComponent *InDebugComponent)
{
Super::DrawGameSpecificView(PC, InDebugComponent);
#if !(UE_BUILD_SHIPPING || UE_BUILD_TEST)
if (InDebugComponent && GameplayDebuggerSettings(GetDebuggingReplicator()).CheckFlag(EAIDebugDrawDataView::GameView1))
{
PrintString(DefaultContext, FColor::Green, TEXT("\nMY GAME DATA\n"));
DrawCustomData(PC, InDebugComponent);
}
#endif
}
これで、新しいカテゴリの準備が整い、プロジェクト固有のデータをデバッグできるようになりました。
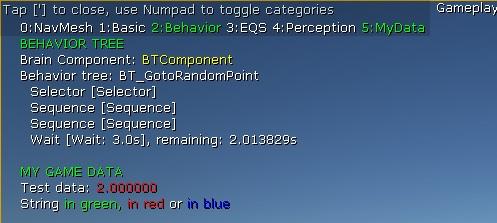
デバッグ情報を色分けして描画するために、 PrintString 関数で文字列でタグを使ってアクティブ カラーを変更します。これにより、異なる色で文字列を描画できます。
void PrintString(FPrintContext& Context, const FString& InString );
void PrintString(FPrintContext& Context, const FColor& InColor, const FString& InString );
PrintString(DefaultContext, FColor::Green, TEXT("Whole text in green"));
PrintString(DefaultContext, TEXT("String {green}in green, {red}in red {white}or {R=0,G=0,B=255,A=255}in blue"));
最後の PrintString 関数は 4 種類の色で文字列を生成します。
