
スプリング アームとカメラをポーンに取り付けると、カメラがワールドのポーンにどのように追従するかを調整できます。
1. カメラをポーンにアタッチする
-
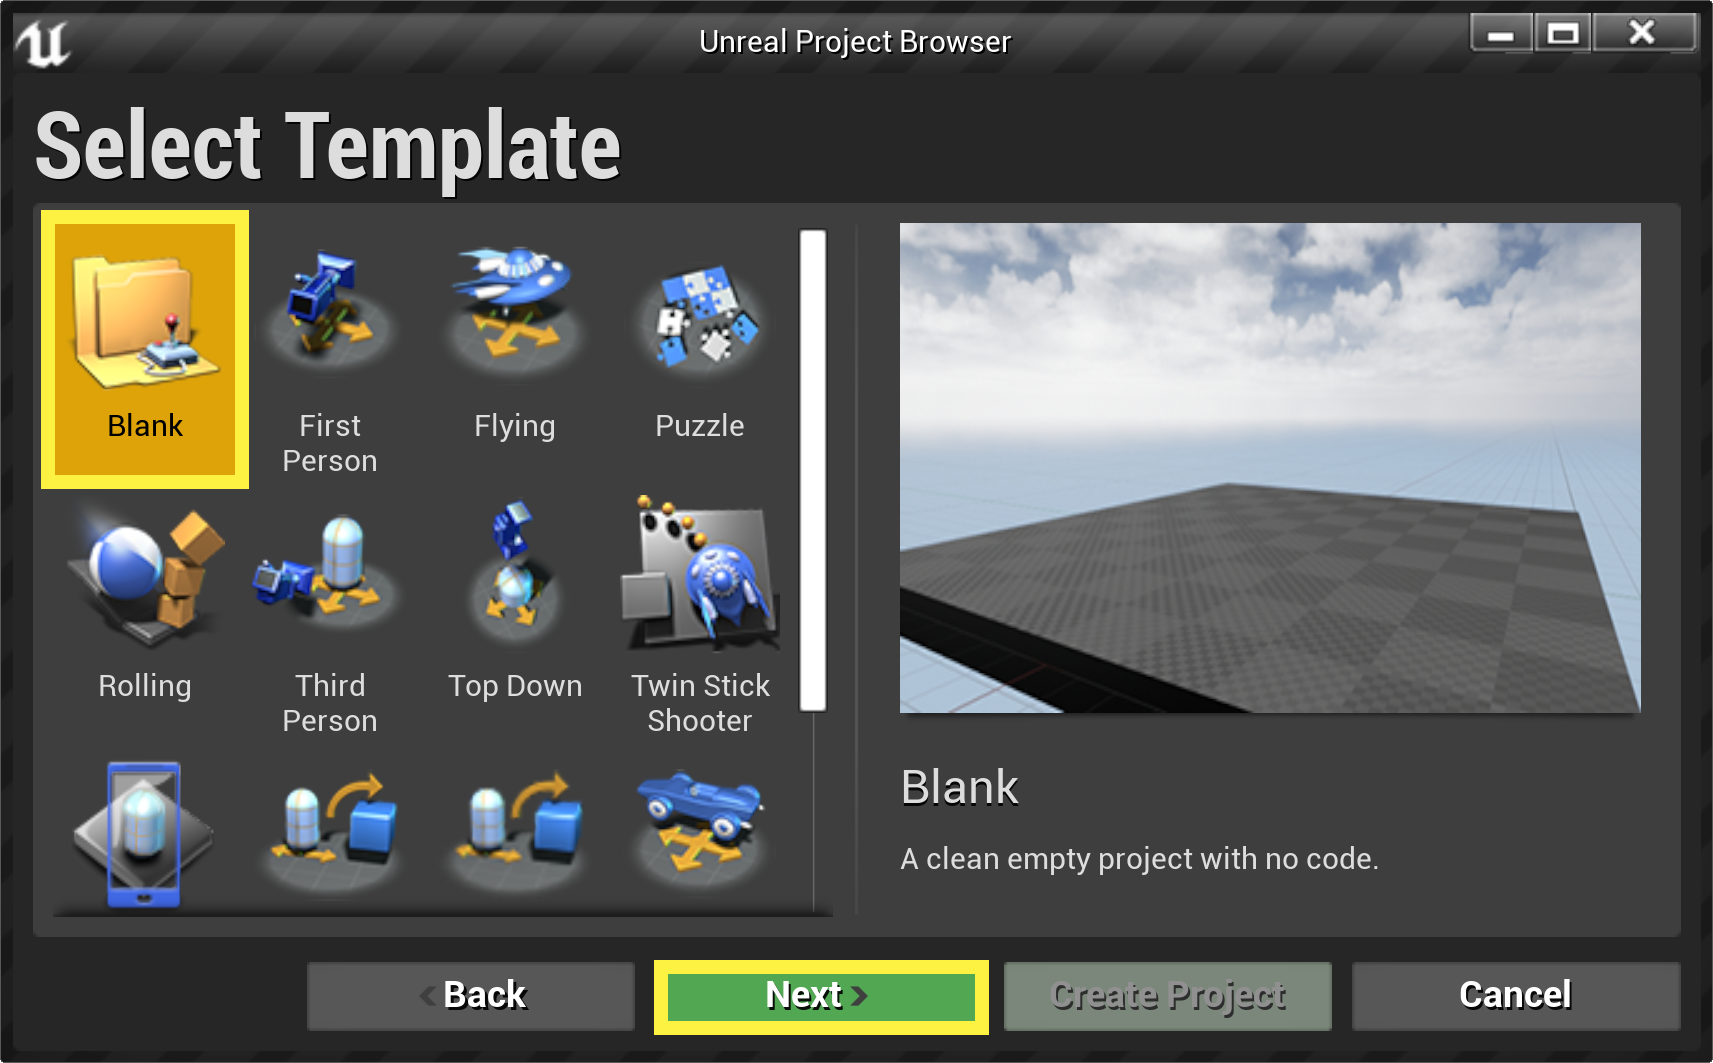
まず、Unreal Engine を起動してブランクのテンプレートを新規作成します。
-
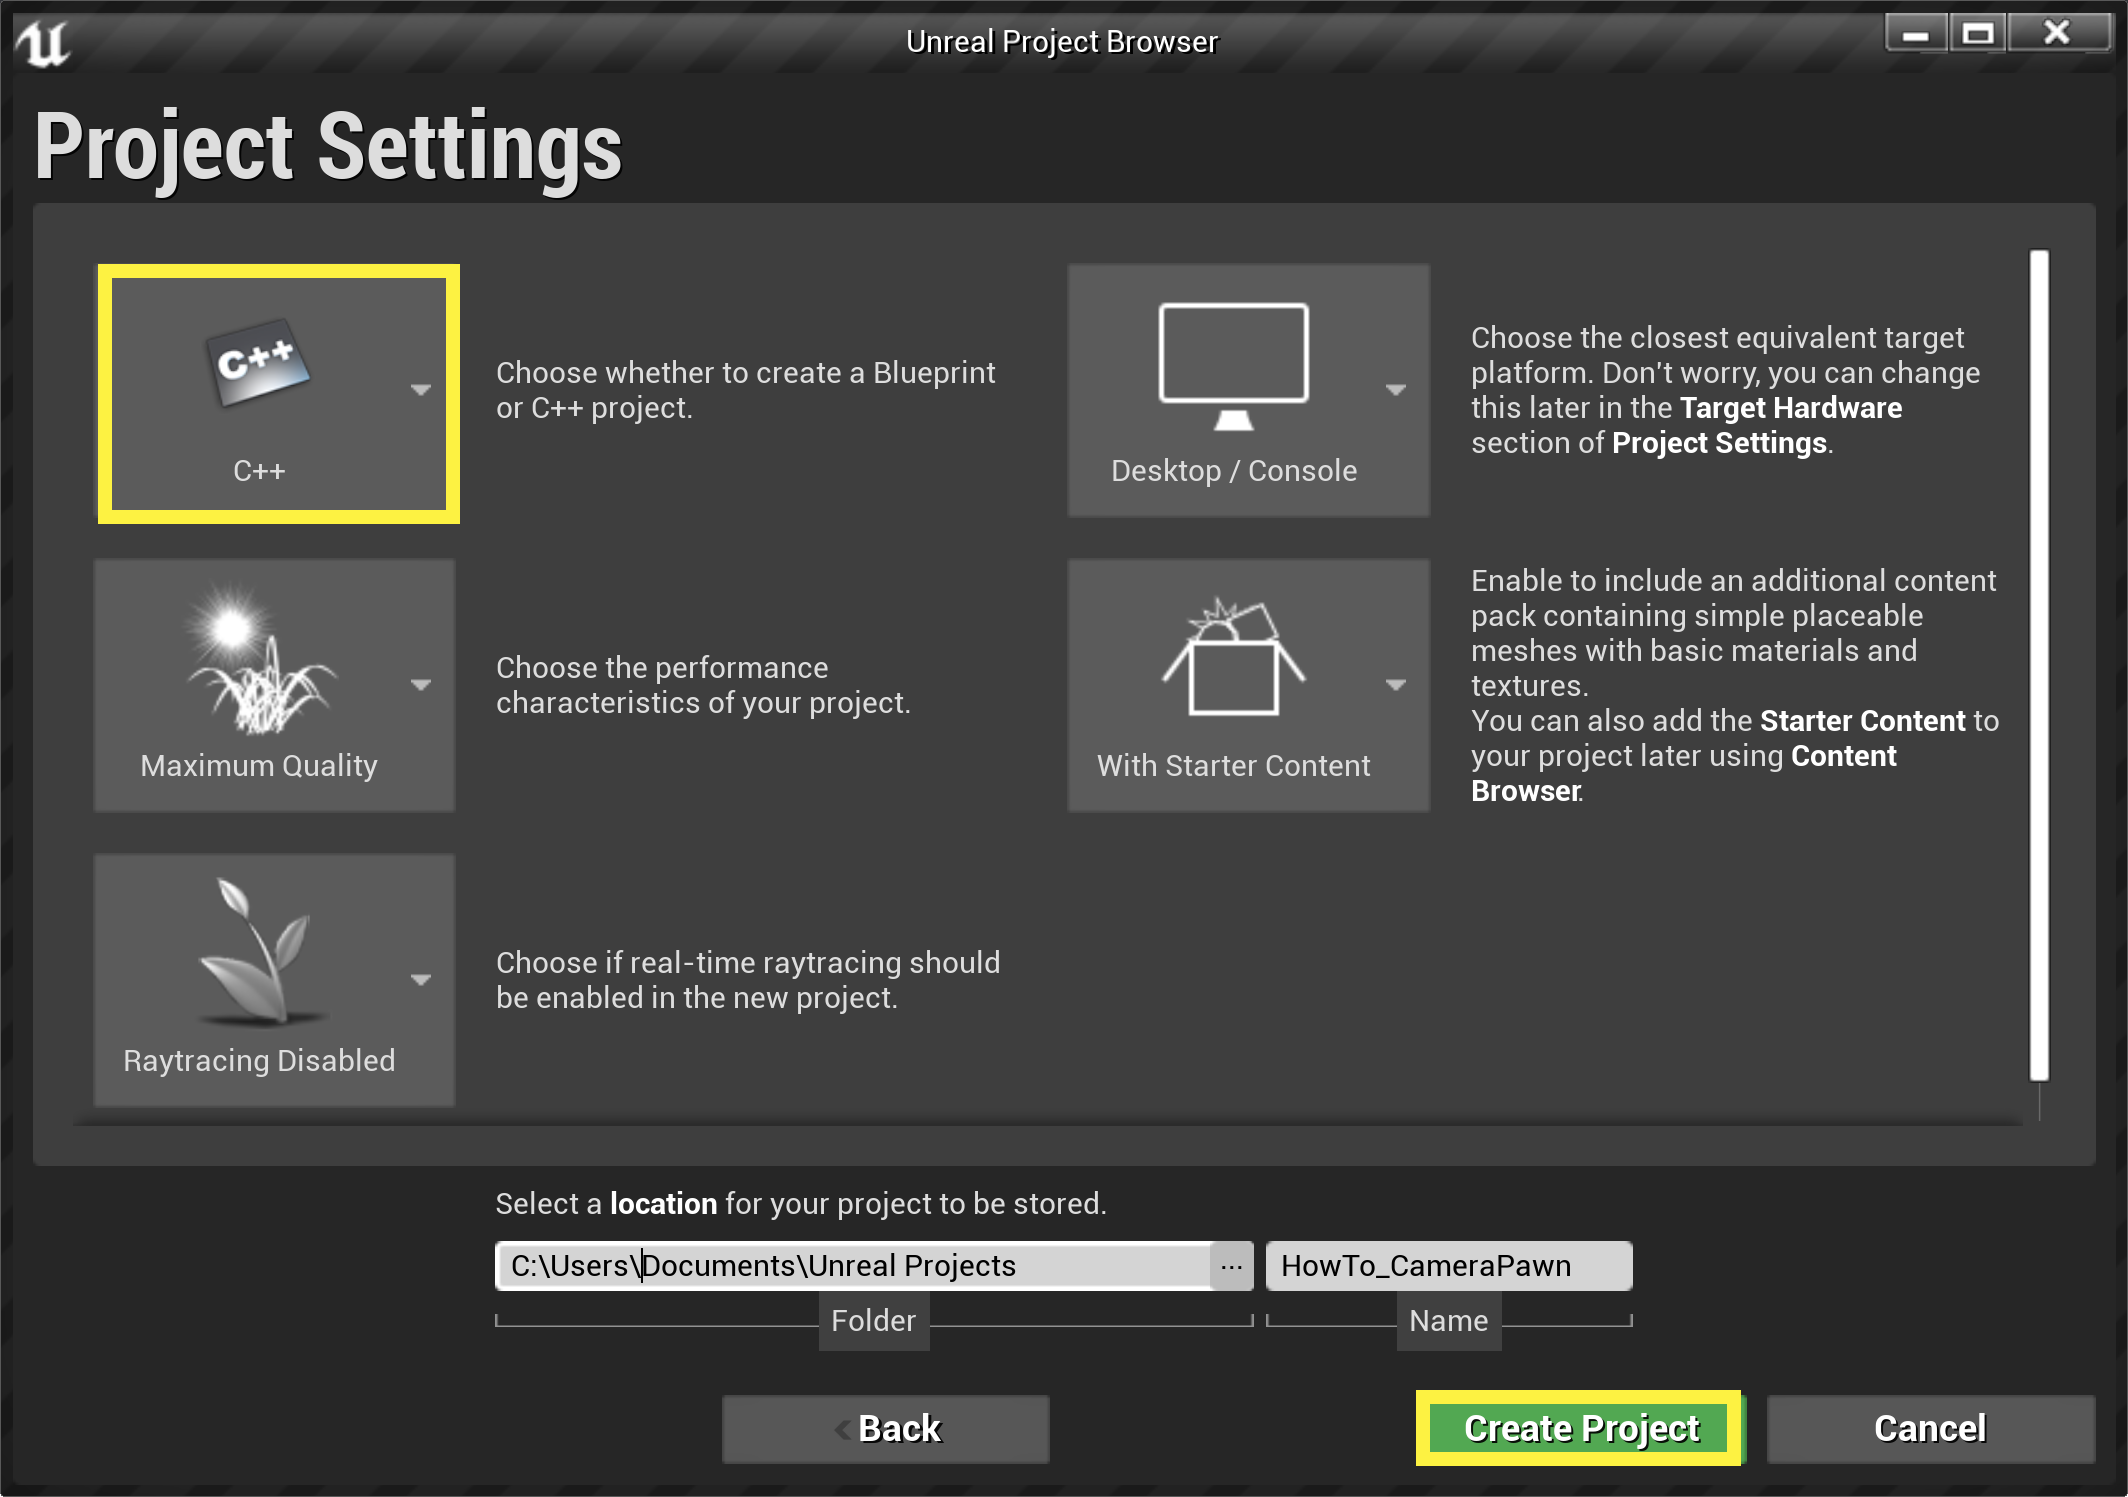
新しい Game Project を選択します。[Project Settings (プロジェクト設定)] ウィンドウで、デフォルト コードを Blueprint から C++ に変更し、スターター コンテンツ有りにします。Unreal プロジェクトの保存先とするディレクトリを選択し、プロジェクト名を「HowTo_PlayerCamera」として、[Create Project (プロジェクトを作成)] をクリックします。
-
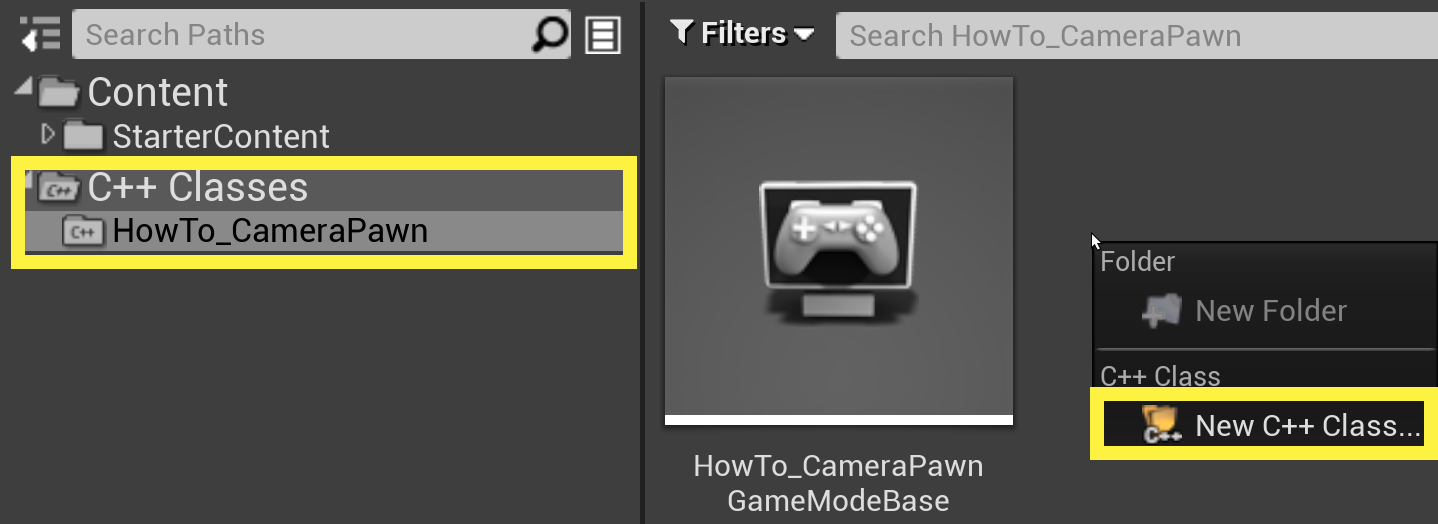
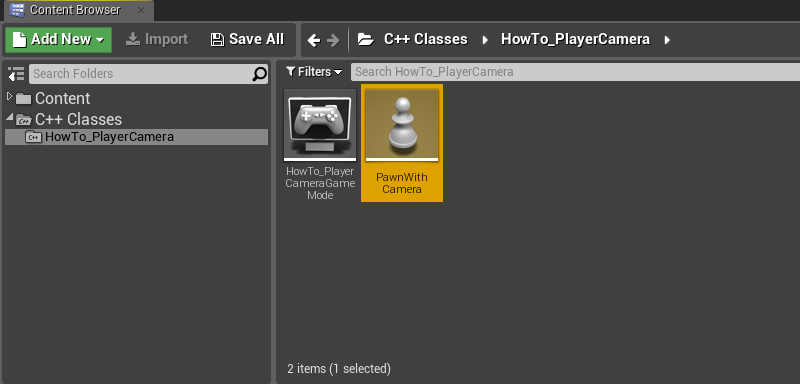
ソース パネルから「C++ Classes」フォルダへ移動します。単一クラスに Game モードの基本クラスが含まれていることがわかります。隣接するグレー スペースを右クリックし、ドロップダウン ウィンドウから [New C++ class (新規 C++ クラス)] を選択します。
-
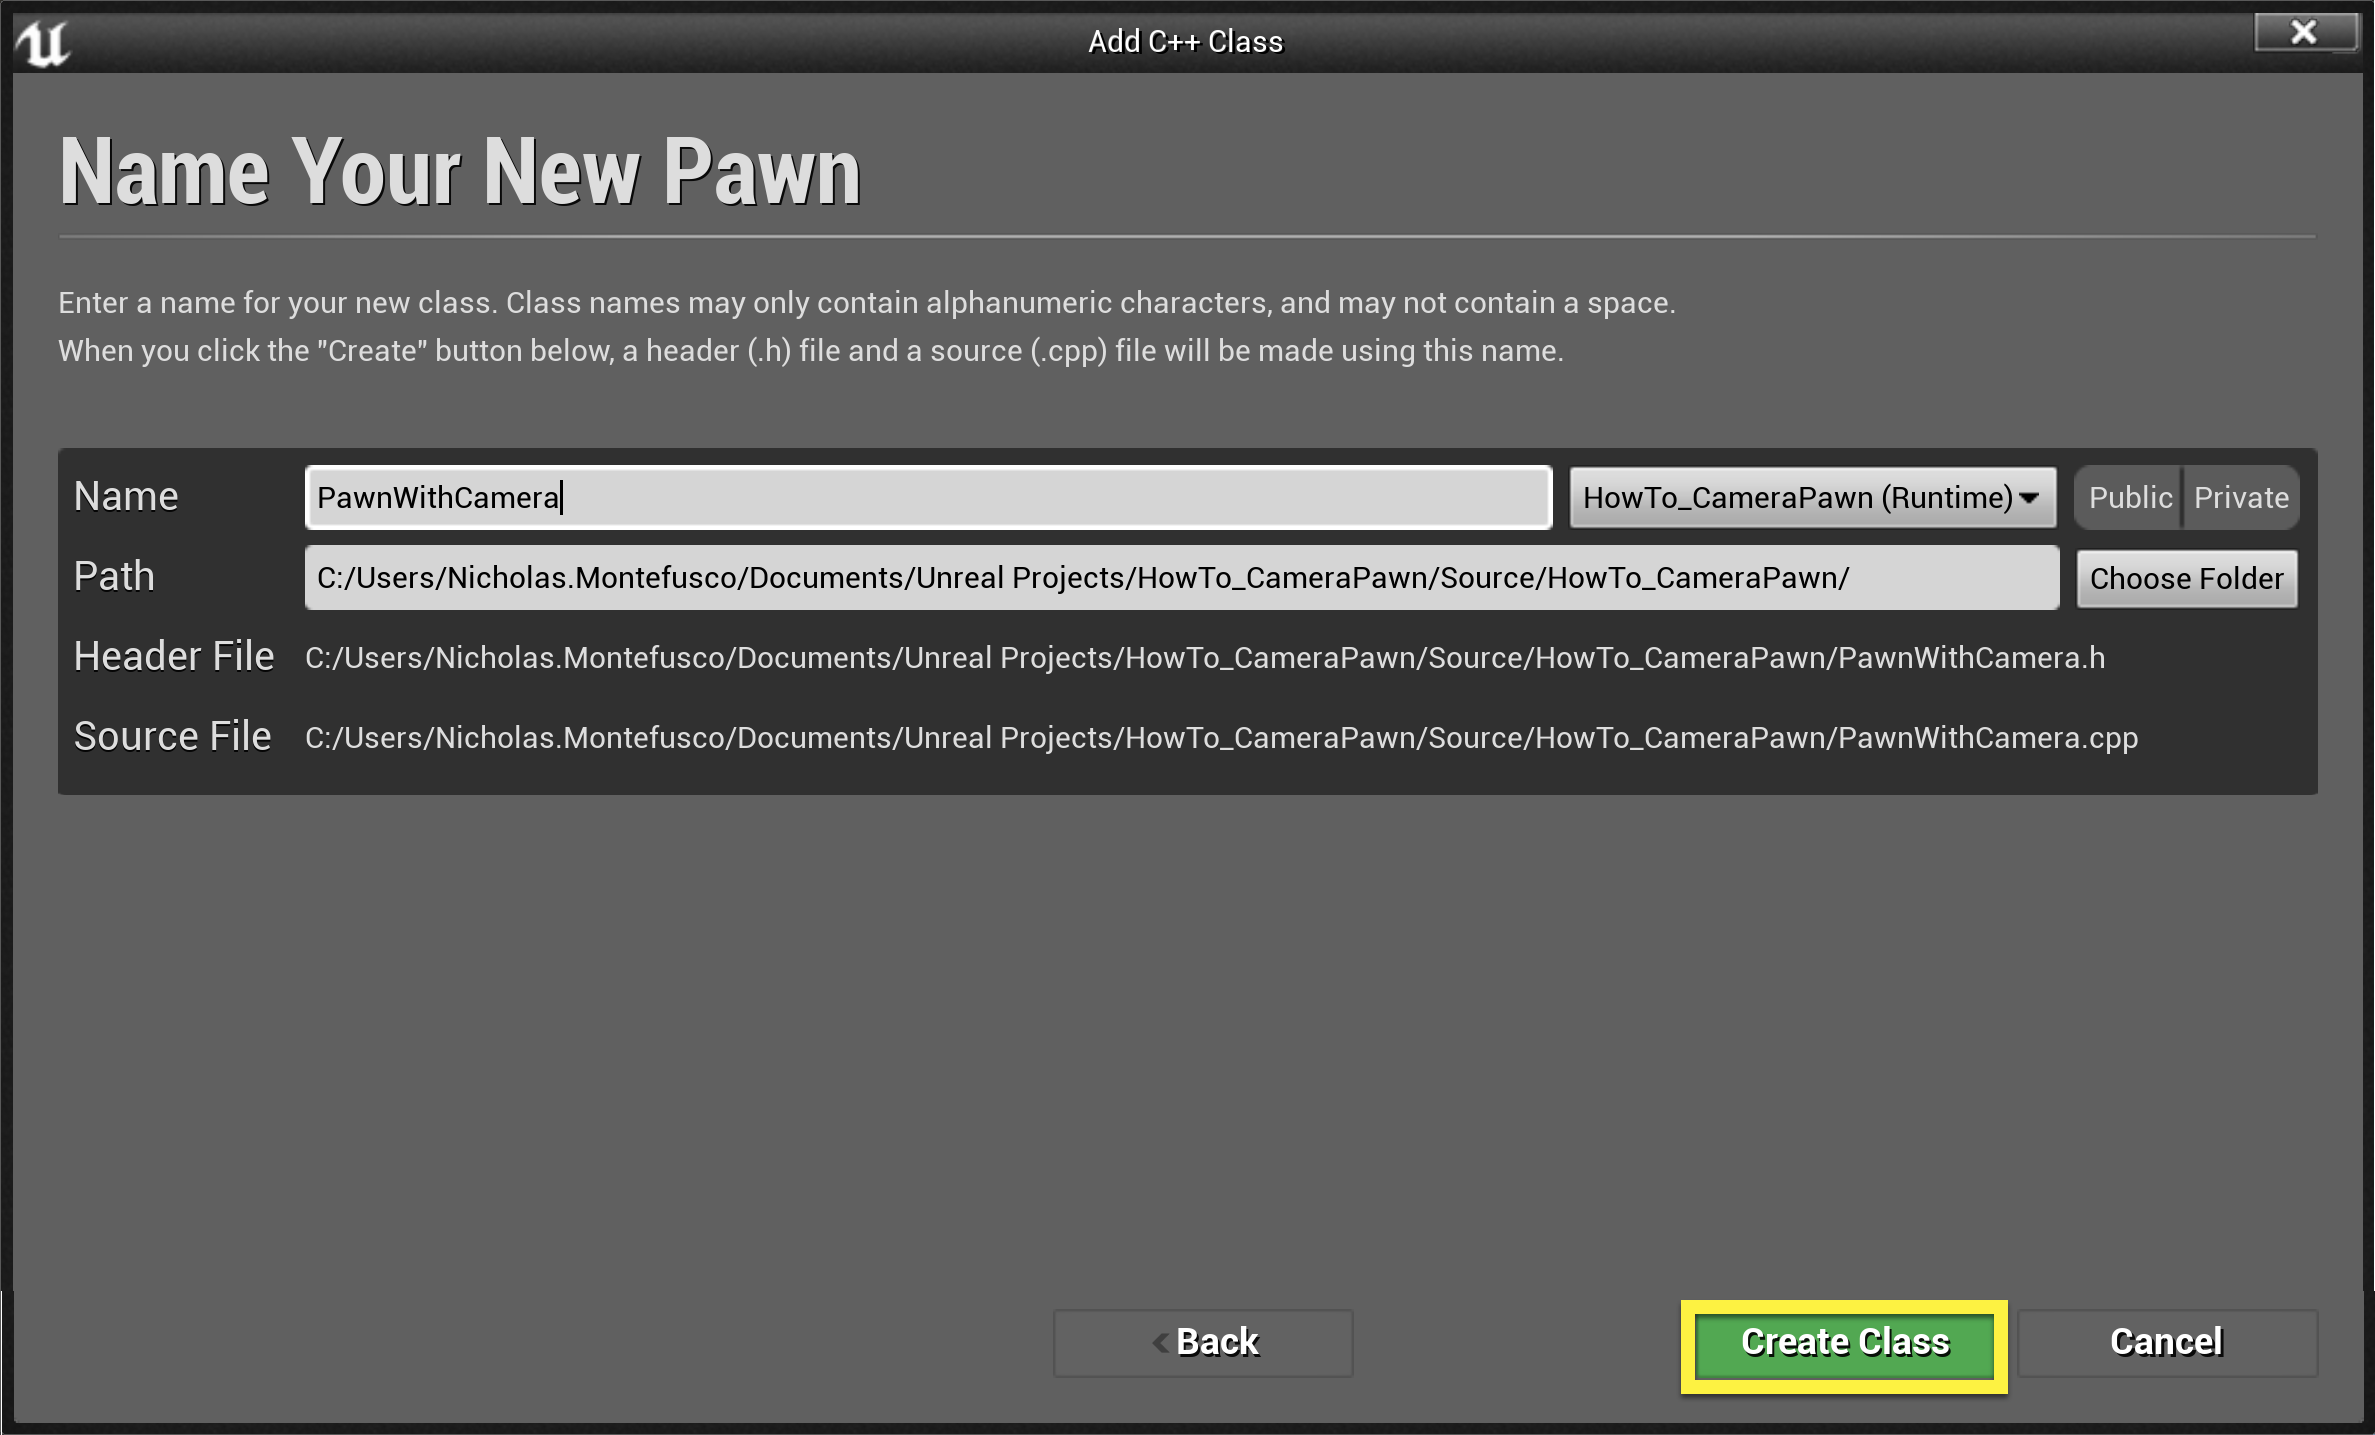
ポーンを親クラスとして選択し、[Next] をクリックします。新しいポーンに「PawnWithCamera」と名前を付けます。
-
Visual Studio で
PawnWithCamera.hファイルに移動し、クラス定義の保護された名前空間に以下のコードを追加します。protected: UPROPERTY(EditAnywhere) class USpringArmComponent* SpringArmComp; UPROPERTY(EditAnywhere) class UCameraComponent* CameraComp; UPROPERTY(EditAnywhere) UStaticMeshComponent* StaticMeshComp;
こうした変数を使って、端に CameraComponent をアタッチした SpringArmComponent を作成します。スプリング アームを使用すると、カメラ (または他のコンポーネント) を簡単にアタッチできるため、動きが滑らかになり、観察対象のオブジェクトに合わせて流れるように動きます。
-
PawnWithCamera.cppに移動し、次のように宣言します。#include "GameFramework/SpringArmComponent.h" #include "Camera/Component.h" -
次に、スタティックメッシュ、スプリング アーム、カメラ コンポーネントを作成する必要があります。クラス コンストラクタ APawnWithCamera::APawnWithCamera: 内から以下のコードを PawnWithCamera.cpp に宣言します。以下のコードを追加します。
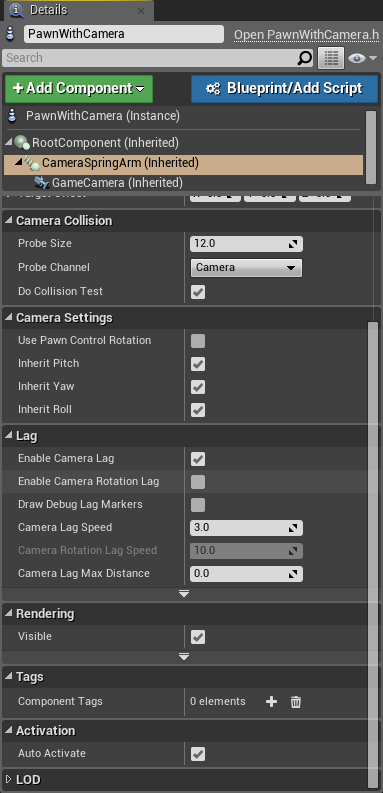
//コンポーネントを作成します RootComponent = CreateDefaultSubobject<USceneComponent>(TEXT("RootSceneComponent")); StaticMeshComp = CreateDefaultSubobject <UStaticMeshComponent>(TEXT("StaticMeshComponent")); SpringArmComp = CreateDefaultSubobject<USpringArmComponent>(TEXT("SpringArmComponent")); CameraComp = CreateDefaultSubobject<UCameraComponent>(TEXT("CameraComponent")); //コンポーネントをアタッチします StaticMeshComp->SetupAttachment(RootComponent); SpringArmComp->SetupAttachment(StaticMeshComp); CameraComp->SetupAttachment(SpringArmComp,USpringArmComponent::SocketName); //SpringArm クラス変数を割り当てます。 SpringArmComp->SetRelativeLocationAndRotation(FVector(0.0f, 0.0f, 50.0f), FRotator(-60.0f, 0.0f, 0.0f)); SpringArmComp->TargetArmLength = 400.f; SpringArmComp->bEnableCameraLag = true; SpringArmComp->CameraLagSpeed = 3.0f;
これにより、SceneComponent がコンポーネント リスト階層のルートとして作成されます。次に、StaticMeshComponent を作成してアタッチします。その後、SpringArmComponent と Camera Component の両方が作成され、CameraComponent が SpringArmComponent のソケット長の端に接続されます。スプリング アームは、デフォルトのピッチ -60 度、ルートから 50 ユニット上の位置に設定されています。また、SpringArmComponent クラスに固有のいくつかの値を設定して、長さと動きの滑らかさを決定します。
-
最後に、コンストラクタからのポーンを所有するように、デフォルトのプレイヤー コントローラーを設定します。
//デフォルト プレイヤーの制御 AutoPossessPlayer = EAutoReceiveInput::Player0;
これで、カメラを快適に制御できるシンプルなポーンができました。次に Unreal Engine エディタで入力を設定し、それに反応するコードを作成します。
作成中のコード
PawnWithCamera.h
// Copyright 1998-2021 Epic Games, Inc. All Rights Reserved.
#pragma once
#include "CoreMinimal.h"
#include "GameFramework/Pawn.h"
#include "PawnWithCamera.generated.h"
UCLASS()
class HOWTO_PLAYERCAMERA_API APawnWithCamera : public APawn
{
GENERATED_BODY()
public:
// このポーンのプロパティのデフォルト値を設定します
APawnWithCamera();
protected:
// ゲームの開始時またはスポーン時に呼び出されます
virtual void BeginPlay() override;
public:
// フレームごとに呼び出されます
virtual void Tick( float DeltaSeconds ) override;
// Input に機能をバインドする際に呼び出されます
virtual void SetupPlayerInputComponent(class UInputComponent* InputComponent) override;
protected:
UPROPERTY(EditAnywhere)
class USpringArmComponent* SpringArmComp;
UPROPERTY(EditAnywhere)
class UCameraComponent* CameraComp;
UPROPERTY(EditAnywhere)
UStaticMeshComponent* StaticMeshComp;
};
PawnWithCamera.cpp
// Copyright 1998-2021 Epic Games, Inc. All Rights Reserved.
#include "HowTo_PlayerCamera.h"
#include "PawnWithCamera.h"
#include "GameFramework/SpringArmComponent.h"
#include "Camera/CameraComponent.h"
// デフォルト値を設定します
APawnWithCamera::APawnWithCamera()
{
// 各フレームでこのポーンが Tick() を呼び出すよう設定します。必要ない場合は、パフォーマンス向上のためにこれをオフにすることができます。
PrimaryActorTick.bCanEverTick = true;
//コンポーネントを作成します
RootComponent = CreateDefaultSubobject<USceneComponent>(TEXT("RootSceneComponent"));
StaticMeshComp = CreateDefaultSubobject <UStaticMeshComponent>(TEXT("StaticMeshComponent"));
SpringArmComp = CreateDefaultSubobject<USpringArmComponent>(TEXT("SpringArmComponent"));
CameraComp = CreateDefaultSubobject<UCameraComponent>(TEXT("CameraComponent"));
//コンポーネントをアタッチします
StaticMeshComp->SetupAttachment(RootComponent);
SpringArmComp->SetupAttachment(StaticMeshComp);
CameraComp->SetupAttachment(SpringArmComp,USpringArmComponent::SocketName);
//SpringArm クラス変数を割り当てます。
SpringArmComp->SetRelativeLocationAndRotation(FVector(0.0f, 0.0f, 50.0f), FRotator(-60.0f, 0.0f, 0.0f));
SpringArmComp->TargetArmLength = 400.f;
SpringArmComp->bEnableCameraLag = true;
SpringArmComp->CameraLagSpeed = 3.0f;
//デフォルト プレイヤーの制御
AutoPossessPlayer = EAutoReceiveInput::Player0;
}
// ゲームの開始時またはスポーン時に呼び出されます
void APawnWithCamera::BeginPlay()
{
Super::BeginPlay();
}
// フレームごとに呼び出されます
void APawnWithCamera::Tick( float DeltaTime )
{
Super::Tick( DeltaTime );
}
// Input に機能をバインドする際に呼び出されます
void APawnWithCamera::SetupPlayerInputComponent(class UInputComponent* InputComponent)
{
Super::SetupPlayerInputComponent(InputComponent);
}
2. カメラを制御する入力の設定
カメラとポーンを制御する入力キーを決定し、それに応じて入力を設定する必要があります。このプロジェクト サンプルでは、マウスの右ボタンを押したままにしたときに、追跡距離を短くし、FOV を拡大できるようにします。
-
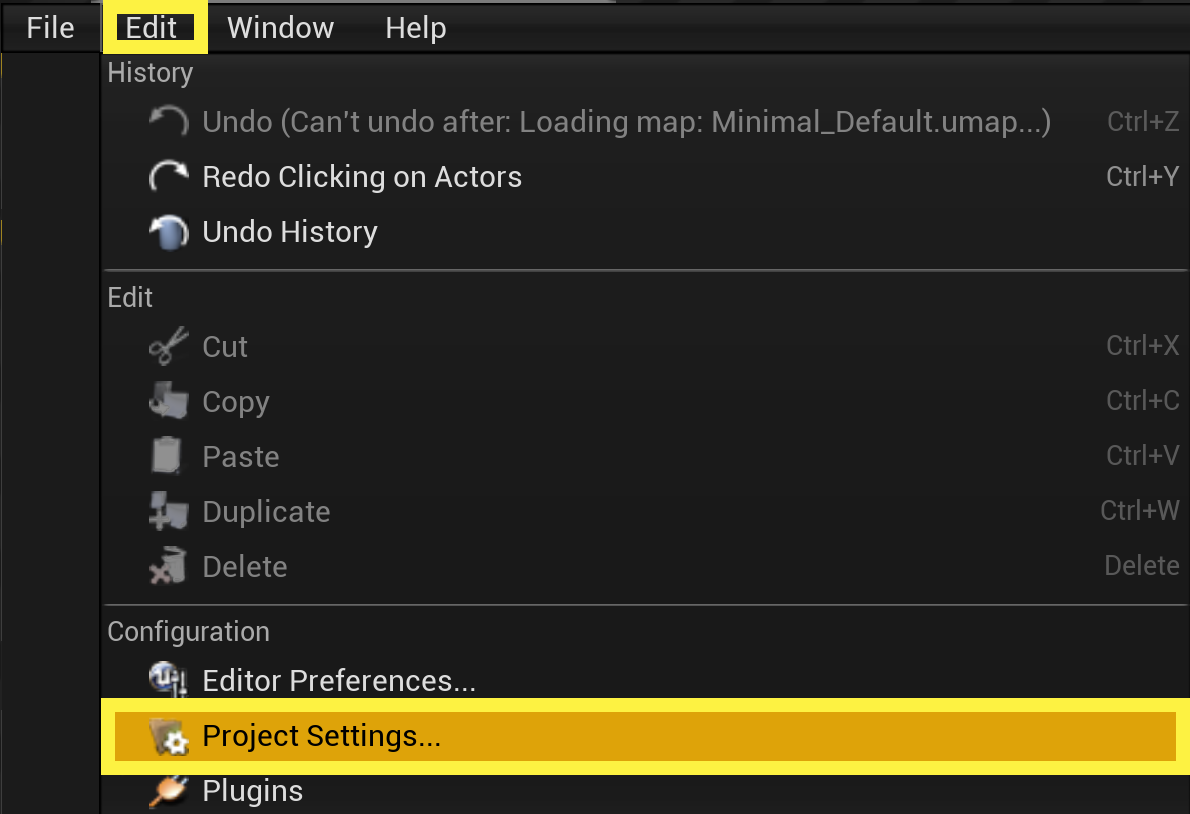
これに加えてマウス操作で視野角を、WASD キー操作で ポーン の動作をコントロールしましょう。設定を行うために、Unreal Engine エディタの [Edit (編集)] ドロップダウンメニューから [Project Settings (プロジェクト設定)] を開きます。
-
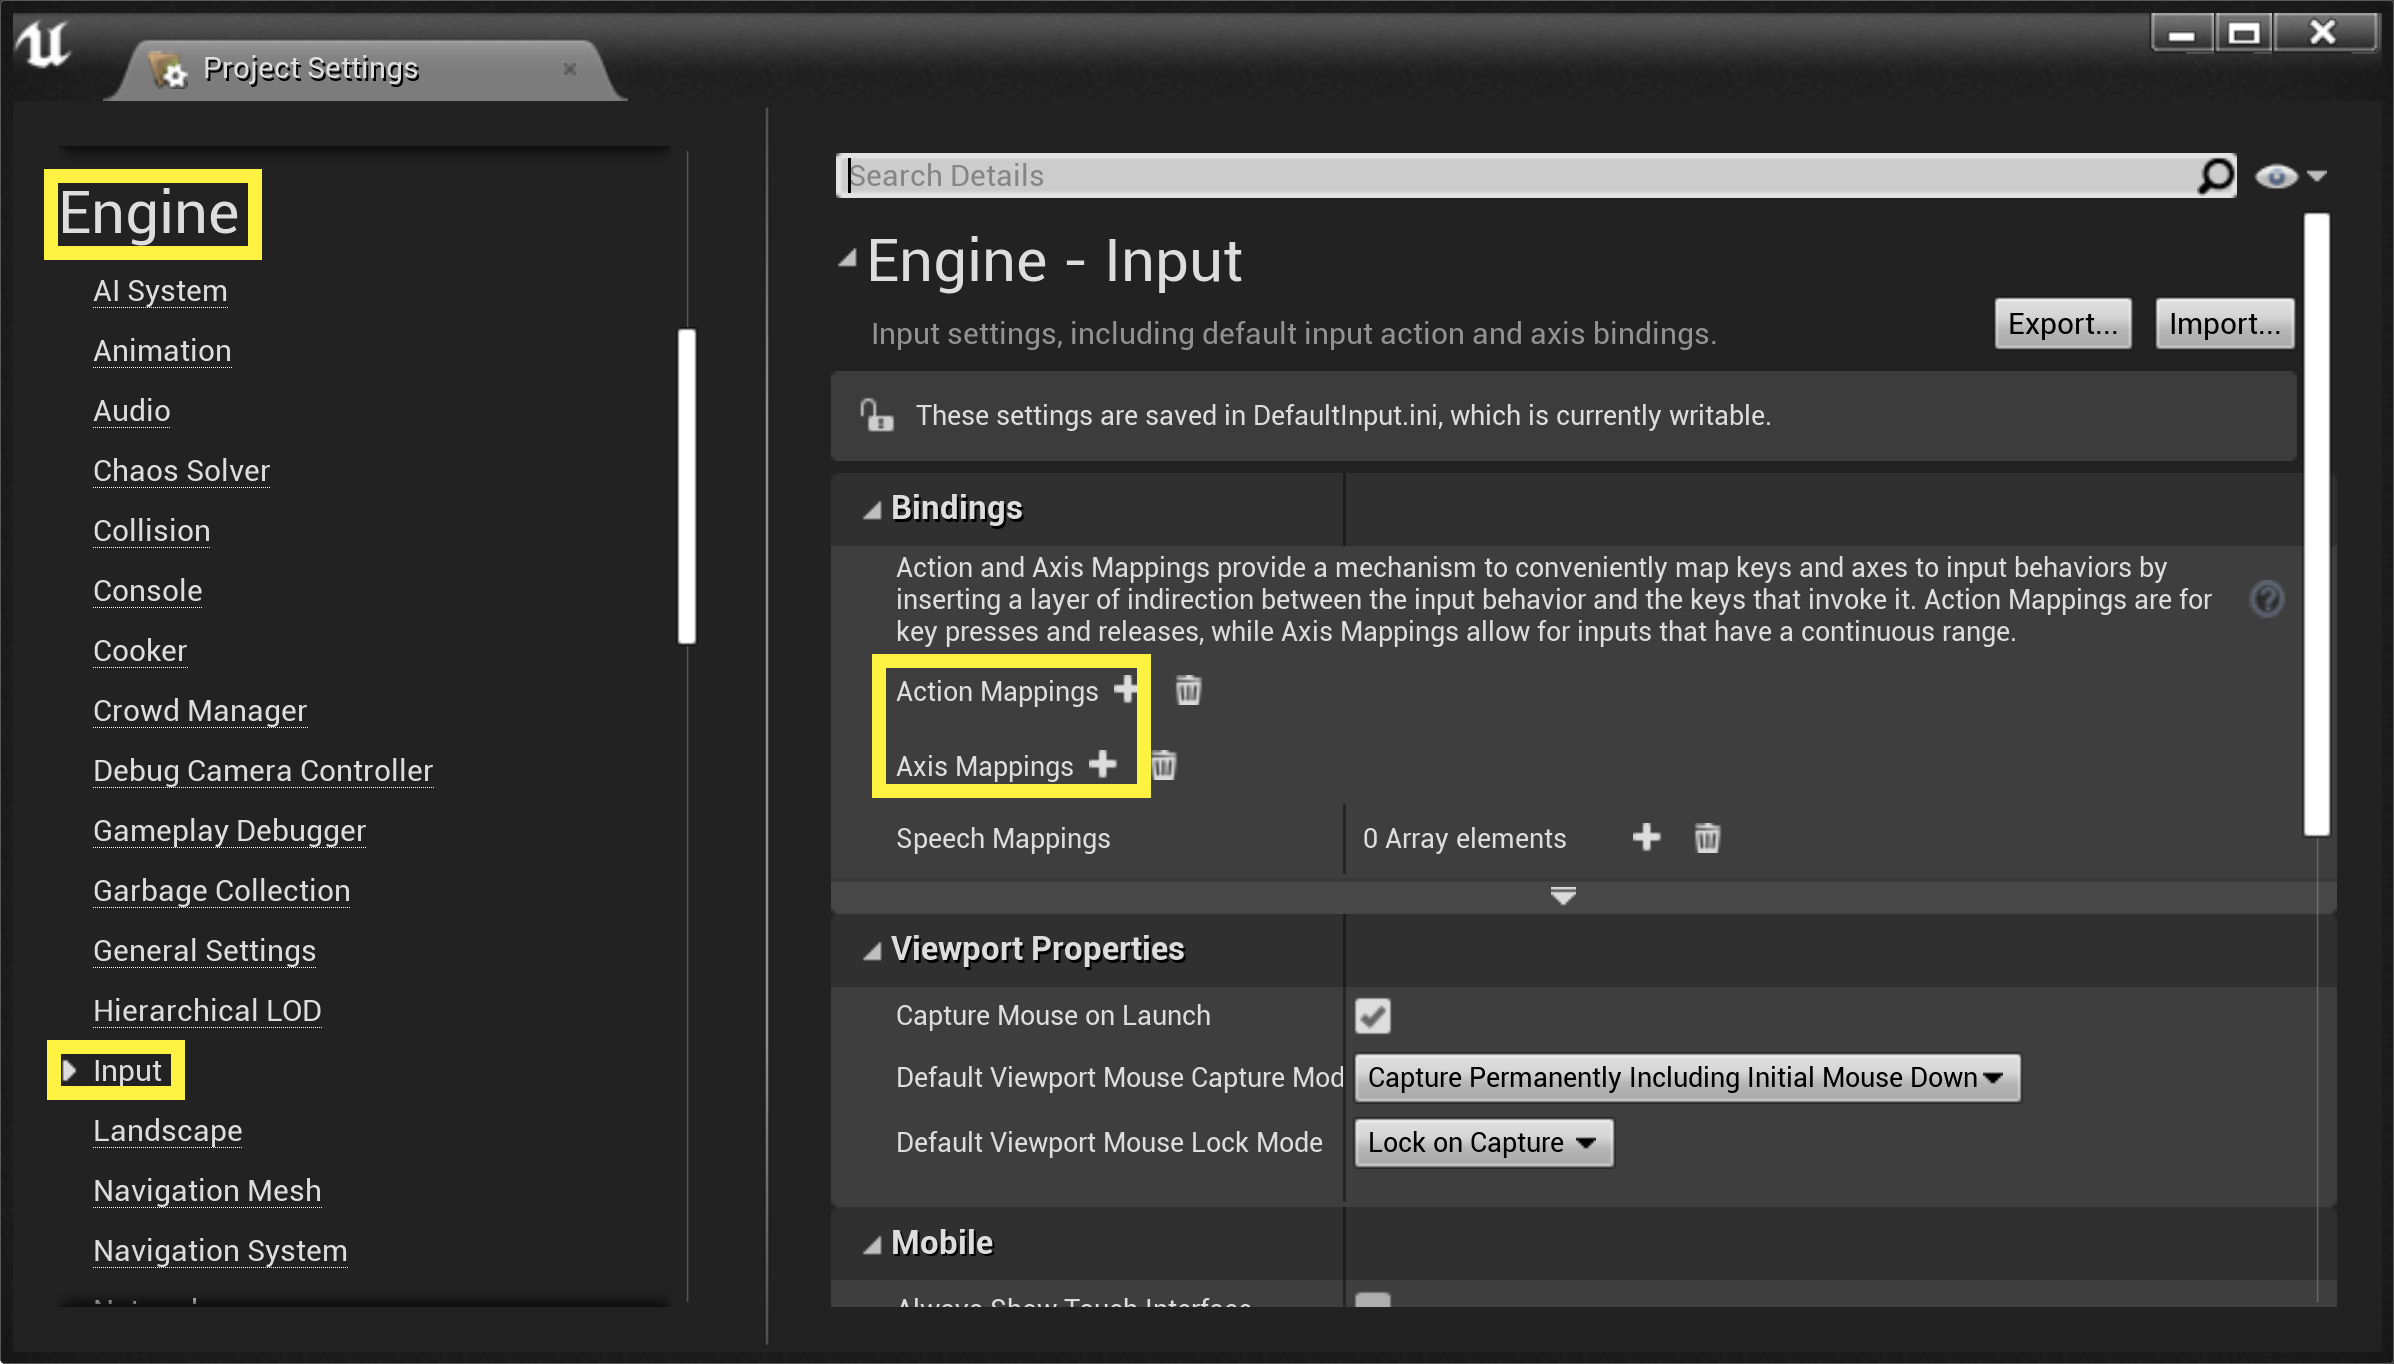
[Project Settings (プロジェクト設定)] ウィンドウで [Engine] > [Input] > [Bindings (バインディング)] を選択します。そこから、Action Mapping と Axis Mapping の横にある + 記号をクリックして、新規キーマップを追加します。
-
以下の入力 Action Mapping と Axis Mapping を定義する必要があります。これらは入力ロジックを制御するために使用されます。
アクション マッピング: ZoomIn マウスの右ボタン 軸マッピング: MoveForward W 1.0 S -1.0 MoveRight A -1.0 D 1.0 CameraPitch MouseY 1.0 CameraYaw MouseX 1.0 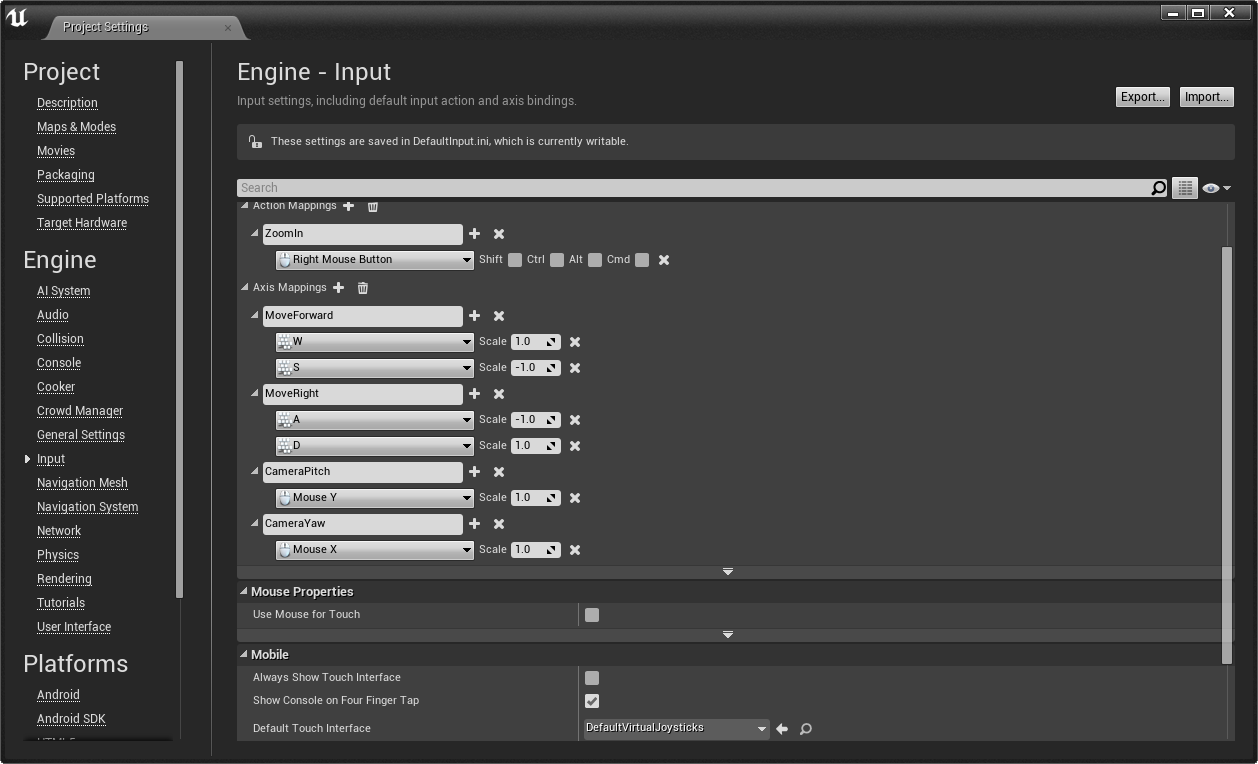
入力マッピングがどのように機能するかについての詳細は、プレイヤー入力と Pawn クラス チュートリアルを参照してください。
入力を定義したら、Visual Studio に戻って次のステップへ進みます。
3. 入力に反応する C++ コードを記述する
受け取る入力データを格納するメンバー変数を設定して、入力マッピングを利用するために必要なコードを記述します。 Event Tick の更新中に、移動とマウスルックの軸の値 (それぞれの 2D ベクター値) が必要です。
ズームインまたはズームアウトのカメラ ビューのどちらへ移動させるべきか、またカメラがこの 2 つのステートから現時点でどれくらい離れているのかについても知る必要があります。
-
PawnWithCamera.h のクラス定義の保護された名前空間に次のコードを追加することから始めます。
//入力変数 FVector2D MovementInput; FVector2D CameraInput; float ZoomFactor; bool bZoomingIn; -
入力を追跡するための関数を作成する必要があります。まず以下のコードを PawnWithCamera.h のクラス定義に追加します。
//入力関数 void MoveForward(float AxisValue); void MoveRight(float AxisValue); void PitchCamera(float AxisValue); void YawCamera(float AxisValue); void ZoomIn(); void ZoomOut(); -
次に、「PawnWithCamera.Cpp」ファイルに移動し、以下のコードを追加して関数ロジックを実装します。
//入力関数 void APawnWithCamera::MoveForward(float AxisValue) { MovementInput.X = FMath::Clamp<float>(AxisValue, -1.0f, 1.0f); } void APawnWithCamera::MoveRight(float AxisValue) { MovementInput.Y = FMath::Clamp<float>(AxisValue, -1.0f, 1.0f); } void APawnWithCamera::PitchCamera(float AxisValue) { CameraInput.Y = AxisValue; } void APawnWithCamera::YawCamera(float AxisValue) { CameraInput.X = AxisValue; } void APawnWithCamera::ZoomIn() { bZoomingIn = true; } void APawnWithCamera::ZoomOut() { bZoomingIn = false; }ZoomFactor を使ってまだ何もしていません。この変数は、値がボタンの状態に基づいて時間とともに常に変化するため、Pawn's Tick 関数の実行中に更新されます。
-
入力データを格納するために必要なコードを作成したので、次はコードをいつ呼び出すかをエンジンに指示します。ポーンの入力イベントに関数をバインドするには、以下のように APawnWithCamera::SetupPlayerInputComponent メソッドにバインディングコードを追加します。
//「ZoomIn」にイベントを接続します InputComponent->BindAction("ZoomIn", IE_Pressed, this, &APawnWithCamera::ZoomIn); InputComponent->BindAction("ZoomIn", IE_Released, this, &APawnWithCamera::ZoomOut); //4 軸の各フレーム処理に接続します InputComponent->BindAxis("MoveForward", this, &APawnWithCamera::MoveForward); InputComponent->BindAxis("MoveRight", this, &APawnWithCamera::MoveRight); InputComponent->BindAxis("CameraPitch", this, &APawnWithCamera::PitchCamera); InputComponent->BindAxis("CameraYaw", this, &APawnWithCamera::YawCamera); -
Tick 関数でこれらの値を使用して、ポーンと カメラ をフレームごとに更新することができます。次のコード ブロックはすべて PawnWithCamera.cpp の APawnWithCamera::Tick に追加する必要があります。
//[ZoomIn (ズームイン)] ボタンが押されていればズームインし、押されていなければズームアウトします { if (bZoomingIn) { ZoomFactor += DeltaTime / 0.5f; //0.5 秒間ズームインします } else { ZoomFactor -= DeltaTime / 0.25f; //0.25 秒間ズームアウトします } ZoomFactor = FMath::Clamp<float>(ZoomFactor, 0.0f, 1.0f); //ZoomFactor に応じて、カメラの FOV と SpringArm の長さをブレンドします CameraComp->FieldOfView = FMath::Lerp<float>(90.0f, 60.0f, ZoomFactor); SpringArmComp->TargetArmLength = FMath::Lerp<float>(400.0f, 300.0f, ZoomFactor); }このコードはハードコードされた値をいくつか使用します。使用する値は、0.5 秒や 0.25 秒のズーム時間、90 度でズームアウト、60 度でズームインする FOV 値、またはカメラ距離の 400 ズームアウト、300 ズームインの値などです。このような値は、通常、UPROPERTY(EditAnywhere) でタグ付けされた変数としてエディタに公開する必要があります。この例では、プログラマーでなくても値を変更できる追加機能を提供する UPROPERTY(EditAnywhere) 指定子タグを使用しました。その結果、プログラマーはコードを再コンパイルすることなく、あるいはエディタ内でゲームをプレイしながら動的に変更することもできます。
//アクタのヨーを回転させます。アタッチされているため、カメラも回転します { FRotator NewRotation = GetActorRotation(); NewRotation.Yaw += CameraInput.X; SetActorRotation(NewRotation); } //カメラのピッチを回転させますが、常に下を向くよう制限します { FRotator NewRotation = OurCameraSpringArm->GetComponentRotation(); NewRotation.Pitch = FMath::Clamp(NewRotation.Pitch + CameraInput.Y, -80.0f, -15.0f); SpringArmComp->SetWorldRotation(NewRotation); }このコードブロックはマウスの X 軸でポーンのヨーを直接回転させますが、カメラシステムのみが、マウスの Y 軸からのピッチ変更に反応します。アクタ やアクタ サブクラスを回転させると、実際はルートレベルの コンポーネント が回転し、それにアタッチされているすべてのものも間接的な影響を受けます。
//「MoveX」軸と「MoveY」軸に応じた動きを扱います { if (!MovementInput.IsZero()) { //移動の入力軸の値を毎秒 100 単位でスケーリングします MovementInput = MovementInput.SafeNormal() * 100.0f; FVector NewLocation = GetActorLocation(); NewLocation += GetActorForwardVector() * MovementInput.X * DeltaTime; NewLocation += GetActorRightVector() * MovementInput.Y * DeltaTime; SetActorLocation(NewLocation); } }GetActorForwardVector と GetActorRightVector を使用すると、アクタが向いている方向と相対的な動きになります。カメラはアクタと同じ方向を向いているため、フォワード キーはプレイヤーが見ているものに対して常に相対的に前方向になります。
-
おつかれさまでした!コーディングが終わりました。コードをコンパイルして、コンテンツ ブラウザ から新規クラスのインスタンスを Unreal Engine Editor の レベル エディタ ウィンドウにドラッグできるようになりました。
スタティックメッシュ やその他のビジュアル コンポーネントを自由に追加したり、または何も追加しないでプレイをお楽しみください。カメラが操作に追随してレベル内で滑らかに加速、減速の動きをするのがわかりますが、回転はぎこちなく瞬間的に起こります。Camera Rotation Lag を追加したり Camera Lag を増減させるなど、SpringArmComponent のプロパティをいくつか変更して、コントロールの操作性の違いを確認してください。
-
提供されたコードによるすべての機能は以下のようになります。
カメラ ピッチ/ヨー
前方/右方向に移動
ズームイン/アウト
完成したコード
PawnWithCamera.h
// Copyright 1998-2021 Epic Games, Inc. All Rights Reserved.
#pragma once
#include "CoreMinimal.h"
#include "GameFramework/Pawn.h"
#include "PawnWithCamera.generated.h"
UCLASS()
class HOWTO_PLAYERCAMERA_API APawnWithCamera : public APawn
{
GENERATED_BODY()
public:
// このポーンのプロパティのデフォルト値を設定します
APawnWithCamera();
protected:
// ゲームの開始時またはスポーン時に呼び出されます
virtual void BeginPlay() override;
public:
// フレームごとに呼び出されます
virtual void Tick( float DeltaSeconds ) override;
// Input に機能をバインドする際に呼び出されます
virtual void SetupPlayerInputComponent(class UInputComponent* InputComponent) override;
protected:
UPROPERTY(EditAnywhere)
class USpringArmComponent* OurCameraSpringArm;
UPROPERTY(EditAnywhere)
class UCameraComponent* OurCamera;
UPROPERTY(EditAnywhere)
UStaticMeshComponent* StaticMeshComp;
//入力変数
FVector2D MovementInput;
FVector2D CameraInput;
float ZoomFactor;
bool bZoomingIn;
//入力関数
void MoveForward(float AxisValue);
void MoveRight(float AxisValue);
void PitchCamera(float AxisValue);
void YawCamera(float AxisValue);
void ZoomIn();
void ZoomOut();
};
PawnWithCamera.cpp
// Copyright 1998-2021 Epic Games, Inc. All Rights Reserved.
#include "PawnWithCamera.h"
#include "GameFramework/SpringArmComponent.h"
#include "Camera/CameraComponent.h"
// デフォルト値を設定します
APawnWithCamera::APawnWithCamera()
{
// 各フレームでこのポーンが Tick() を呼び出すよう設定します。必要ない場合は、パフォーマンス向上のためにこれをオフにすることができます。
PrimaryActorTick.bCanEverTick = true;
//コンポーネントを作成します
RootComponent = CreateDefaultSubobject<USceneComponent>(TEXT("RootComponent"));
StaticMeshComp = CreateDefaultSubobject <UStaticMeshComponent>(TEXT("StaticMeshComponent"));
SpringArmComp = CreateDefaultSubobject<USpringArmComponent>(TEXT("SpringArmComponent"));
CameraComp = CreateDefaultSubobject<UCameraComponent>(TEXT("CameraComponent"));
StaticMeshComp->SetupAttachment(RootComponent);
SpringArmComp->SetupAttachment(StaticMeshComp);
CameraComp->SetupAttachment(SpringArmComp,USpringArmComponent::SocketName);
//SpringArmComponent のデフォルト変数と動作を設定します
SpringArmComp->SetRelativeLocationAndRotation(FVector(0.0f, 0.0f, 50.0f), FRotator(-60.0f, 0.0f, 0.0f));
SpringArmComp->TargetArmLength = 400.f;
SpringArmComp->bEnableCameraLag = true;
SpringArmComp->CameraLagSpeed = 3.0f;
//デフォルト プレイヤーの制御
AutoPossessPlayer = EAutoReceiveInput::Player0;
}
// ゲームの開始時またはスポーン時に呼び出されます
void APawnWithCamera::BeginPlay()
{
Super::BeginPlay();
}
// フレームごとに呼び出されます
void APawnWithCamera::Tick( float DeltaTime )
{
Super::Tick(DeltaTime);
//[ZoomIn (ズームイン)] ボタンが押されていればズームインし、押されていなければズームアウトします
{
if (bZoomingIn)
{
ZoomFactor += DeltaTime / 0.5f; //0.5 秒間ズームインします
}
else
{
ZoomFactor -= DeltaTime / 0.25f; //0.25 秒間ズームアウトします
}
ZoomFactor = FMath::Clamp<float>(ZoomFactor, 0.0f, 1.0f);
//ZoomFactor に応じて、カメラの FOV と SpringArm の長さをブレンドします
CameraComp->FieldOfView = FMath::Lerp<float>(90.0f, 60.0f, ZoomFactor);
SpringArmComp->TargetArmLength = FMath::Lerp<float>(400.0f, 300.0f, ZoomFactor);
}
//アクタのヨーを回転させます。アタッチされているため、カメラも回転します
{
FRotator NewRotation = GetActorRotation();
NewRotation.Yaw += CameraInput.X;
SetActorRotation(NewRotation);
}
//カメラのピッチを回転させますが、常に下を向くよう制限します
{
FRotator NewRotation = SpringArmComp->GetComponentRotation();
NewRotation.Pitch = FMath::Clamp(NewRotation.Pitch + CameraInput.Y, -80.0f, -15.0f);
SpringArmComp->SetWorldRotation(NewRotation);
}
//「MoveX」軸と「MoveY」軸に応じた動きを扱います
{
if (!MovementInput.IsZero())
{
//移動の入力軸の値を毎秒 100 単位でスケーリングします
MovementInput = MovementInput.SafeNormal() * 100.0f;
FVector NewLocation = GetActorLocation();
NewLocation += GetActorForwardVector() * MovementInput.X * DeltaTime;
NewLocation += GetActorRightVector() * MovementInput.Y * DeltaTime;
SetActorLocation(NewLocation);
}
}
}
// Input に機能をバインドする際に呼び出されます
void APawnWithCamera::SetupPlayerInputComponent(class UInputComponent* InputComponent)
{
Super::SetupPlayerInputComponent(InputComponent);
//「ZoomIn」にイベントを接続します
InputComponent->BindAction("ZoomIn", IE_Pressed, this, &APawnWithCamera::ZoomIn);
InputComponent->BindAction("ZoomIn", IE_Released, this, &APawnWithCamera::ZoomOut);
//4 軸の各フレーム処理に接続します
InputComponent->BindAxis("MoveForward", this, &APawnWithCamera::MoveForward);
InputComponent->BindAxis("MoveRight", this, &APawnWithCamera::MoveRight);
InputComponent->BindAxis("CameraPitch", this, &APawnWithCamera::PitchCamera);
InputComponent->BindAxis("CameraYaw", this, &APawnWithCamera::YawCamera);
}
//入力関数
void APawnWithCamera::MoveForward(float AxisValue)
{
MovementInput.X = FMath::Clamp<float>(AxisValue, -1.0f, 1.0f);
}
void APawnWithCamera::MoveRight(float AxisValue)
{
MovementInput.Y = FMath::Clamp<float>(AxisValue, -1.0f, 1.0f);
}
void APawnWithCamera::PitchCamera(float AxisValue)
{
CameraInput.Y = AxisValue;
}
void APawnWithCamera::YawCamera(float AxisValue)
{
CameraInput.X = AxisValue;
}
void APawnWithCamera::ZoomIn()
{
bZoomingIn = true;
}
void APawnWithCamera::ZoomOut()
{
bZoomingIn = false;
}
4. 応用編
ここまでで学んだ知識を活かして、以下を行ってみましょう。
- プレイヤーに、ポーンの 移動速度を上げるランキーを押し続けてもらいます。
- 自動カメラの動きと入力によるカメラの動きを組み合わせてさまざまな方法を試しましょう。これはゲーム開発における非常に奥深い領域であり、探求する余地がたくさんあります。
- スプリング コンポーネント からのラグを増減、あるいは削除することで、ラグがカメラの全体的な感覚にどのような影響を与えるか模索してみましょう。
- 定期的な小さな動きを導入します。ランダム性を少し加えるか、カーブ アセットを使用して、カメラに手持ちの感覚を作り出します。
- カメラ にある程度の自動旋回機能を搭載し、移動するプレイヤー オブジェクトを徐々に追尾して、プレイヤーの進行方向を向かせるようにします。
以下は、このチュートリアルの内容の詳しい情報のリンク先です。