
このチュートリアルでは、コンポーネント の作成、コンポーネントの階層への配置、ゲームプレイ中のコントロール、またソリッドなオブジェクトが存在するワールド内でコンポーネントを使用した ポーン の移動方法をを説明します。
1. コンポーネントを作成およびアタッチする
Unreal Engine にまだ慣れていない場合は、最初に 「プログラミング クイックスタートガイド チュートリアル 」を確認することを推奨します。このチュートリアルの対象者は、プロジェクトを作成、プロジェクトに C++ コードを追加、および Unreal Editor で入力値の設定ができる方を想定しています。
独自の Pawn クラス作成や入力設定にまだ慣れていない場合は、「プレイヤー入力と Pawn クラスのチュートリアル」から始めてください。
-
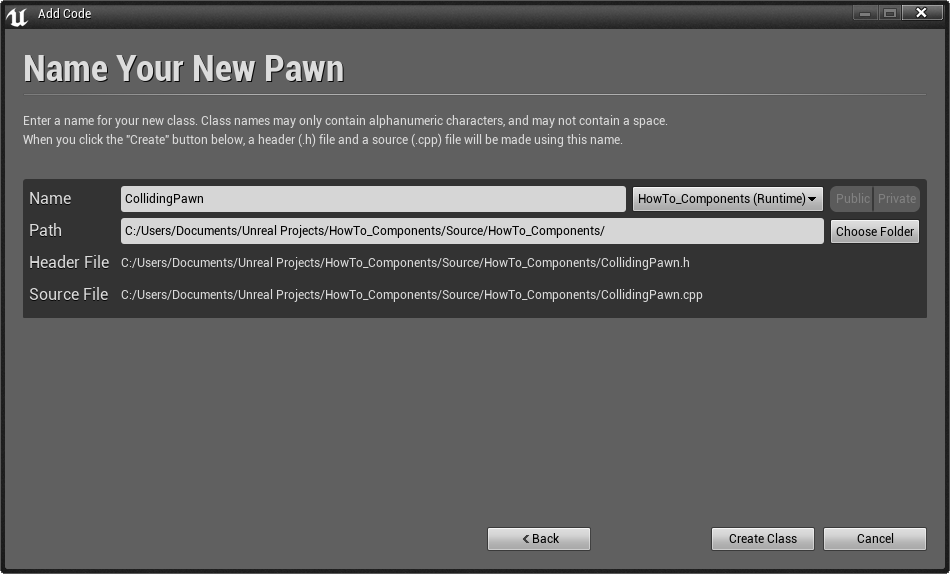
まず「HowTo_Components」という名前のスターター コンテンツを使用して、Basic Code (基本コード) プロジェクトを作成します。まず必要なのは、コンポーネントを保持、レベル内を移動、そしてソリッドなオブジェクトと衝突するカスタマイズしたポーンをプロジェクトに追加することです。このチュートリアルでは「
CollidingPawn」と名前を付けます。
-
コード エディタ (通常 Visual Studio または Xcode) で「
CollidingPawn.h」 ファイルを開いて、以下のコードをクラス定義の下に追加します。UPROPERTY() class UParticleSystemComponent* OurParticleSystem;この変数を使って、後で作成する Particle System Component を追跡します。変数で追跡を行わないコンポーネントも作成できますが、コードでこのコンポーネントを使用する場合は、以下のようにクラスメンバ変数に保存しなくてはいけません。
-
CollidingPawn.cpp を開いて、さまざまな用途に役立つコンポーネントをスポーンし、それらを階層に配置するコードを追加することにより、コンストラクタ関数、ACollidingPawn::ACollidingPawn の編集が可能になります。物理ワールドとインタラクションを行う Sphere コンポーネント、コリジョン形状を視覚的に表現する Static Mesh コンポーネント、意図的にオン/オフに出来る Particle System コンポーネント、またインゲーム パースペクティブをコントロールするために Camera コンポーネント を親子付けして使用できる Spring Arm コンポーネント を作成します。その前に、これらのコンポーネントを使用するためにやがて必要となるヘッダ ファイルをインクルードします。クラスヘッダ ファイルをインクルードする行の下に以下を追加します。
#include "UObject/ConstructorHelpers.h" #include "Particles/ParticleSystemComponent.h" #include "Components/SphereComponent.h" #include "Camera/CameraComponent.h" #include "GameFramework/SpringArmComponent.h" -
最初に階層のルートとなるコンポーネントを決めます。このチュートリアルは、ゲームワールドとのインタラクションや衝突が可能な物理プレゼンスである Sphere コンポーネントをルートに使用します。アクタ は複数の物理が有効なコンポーネントを階層に設定できますが、チュートリアルでは 1 つのみを有効にします。
// ルート コンポーネントは、物理学に反応する球体でです。 USphereComponent* SphereComponent = CreateDefaultSubobject<USphereComponent>(TEXT("RootComponent")); RootComponent = SphereComponent; SphereComponent->InitSphereRadius(40.0f); SphereComponent->SetCollisionProfileName(TEXT("Pawn")); -
次に半径 50 の Static Mesh アセットから目に見えるスフィアを作成してこれを親子付けします。直前に作成した半径 40 の Sphere コンポーネントと完全にそろわないので、80 %に縮小します。さらに、中心を Sphere コンポーネントの中心と並べるために 40 単位移動させなくてはいけません。
// 球体の位置が分かるようにメッシュ コンポーネントを作成して配置します UStaticMeshComponent* SphereVisual = CreateDefaultSubobject<UStaticMeshComponent>(TEXT("VisualRepresentation")); SphereVisual->SetupAttachment(RootComponent); static ConstructorHelpers::FObjectFinder<UStaticMesh> SphereVisualAsset(TEXT("/Game/StarterContent/Shapes/Shape_Sphere.Shape_Sphere")); if (SphereVisualAsset.Succeeded()) { SphereVisual->SetStaticMesh(SphereVisualAsset.Object); SphereVisual->SetRelativeLocation(FVector(0.0f, 0.0f, -40.0f)); SphereVisual->SetWorldScale3D(FVector(0.8f)); }Static Mesh アセットのアセット位置はコードで確認することができますが、アセットのパスのハードコーディングは一般的にアセットのロードに最適な方法とは言えません。クラスでコンポーネントを使用するには、コードにコンポーネント自体を作成して、Unreal Editor でアセットを選択することが一般的に好まれます。一方でコードで直接アセットをロードすることも可能で、プログラマーが行うデバッグ作業や新規機能の作成を高速に処理できます。
-
階層に非アクティブな Particle System コンポーネントの親子付けができるようになりました。このコンポーネントはコードで操作可能で、後にオン/オフを切り替える入力を設定することができます。Particle System コンポーネントはルートにではなく Static Mesh コンポーネントに直接親子付けできることに注目してください。プレイ中の表示をより見やすくするために、メッシュの下部中央から少しだけオフセットしています。
// パーティクル システムを作成し、アクティブにしたり、非アクティブにすることができます。 OurParticleSystem = CreateDefaultSubobject<UParticleSystemComponent>(TEXT("MovementParticles")); OurParticleSystem->SetupAttachment(SphereVisual); OurParticleSystem->bAutoActivate = false; OurParticleSystem->SetRelativeLocation(FVector(-20.0f, 0.0f, 20.0f)); static ConstructorHelpers::FObjectFinder<UParticleSystem> ParticleAsset(TEXT("/Game/StarterContent/Particles/P_Fire.P_Fire")); if (ParticleAsset.Succeeded()) { OurParticleSystem->SetTemplate(ParticleAsset.Object); } -
Spring Arm コンポーネントは、追跡しているポーンよりもゆっくりとカメラを加速したり減速させるため、よりスムーズな固定点を作成します。サードパーソン ゲームでプレイヤーがコーナーへ追いつめられる状況など、カメラがソリッドなオブジェクトを通り抜けてしまうことを防止する内蔵機能も備わっています。必須ではありませんが、ゲーム内のカメラワークにスムースな感覚を作成する迅速かつ簡単な方法です。
// スプリング アームを使い、カメラにスムーズで自然な動きを与えます。 USpringArmComponent* SpringArm = CreateDefaultSubobject<USpringArmComponent>(TEXT("CameraAttachmentArm")); SpringArm->SetupAttachment(RootComponent); SpringArm->SetRelativeRotation(FRotator(-45.f, 0.f, 0.f)); SpringArm->TargetArmLength = 400.0f; SpringArm->bEnableCameraLag = true; SpringArm->CameraLagSpeed = 3.0f; -
実際の Camera コンポーネントは作成が簡単であり、ユースケース用に特別な設定をする必要はありません。Spring Arm Component コンポーネントには、ベース以外に親子付けが出来る特別な内蔵ソケットがあります。
// カメラを作成し、スプリングアームに取り付けます。 UCameraComponent* Camera = CreateDefaultSubobject<UCameraComponent>(TEXT("ActualCamera")); Camera->SetupAttachment(SpringArm, USpringArmComponent::SocketName); -
コンポーネントを作成および親子付けしたので、このポーンをデフォルト プレイヤーがコントロールするように設定します。以下が必要なコードの全てです。
// デフォルトのプレイヤーをコントロールする AutoPossessPlayer = EAutoReceiveInput::Player0;
新規のポーンに便利なコンポーネントのコレクションを親子付けしました。また、ユーザーによるコントロール設定の準備も整いました。ここで Unreal Editor に戻ります。
Work-In-Progress Code
CollidingPawn.h
// Copyright 1998-2018 Epic Games, Inc.All Rights Reserved.
#pragma once
#include "CoreMinimal.h"
#include "GameFramework/Pawn.h"
#include "CollidingPawn.generated.h"
UCLASS()
class HOWTO_COMPONENTS_API ACollidingPawn : public APawn
{
GENERATED_BODY()
public:
// このポーンのプロパティのデフォルト値を設定します
ACollidingPawn();
protected:
// ゲーム開始時またはスポーン時に呼び出されます
virtual void BeginPlay() override;
public:
// フレームごとに呼び出されます
virtual void Tick( float DeltaSeconds ) override;
// 入力に機能をバインドするために呼び出されます
virtual void SetupPlayerInputComponent(class UInputComponent* InInputComponent) override;
UPROPERTY()
class UParticleSystemComponent* OurParticleSystem;
};
CollidingPawn.cpp
// Copyright 1998-2018 Epic Games, Inc.All Rights Reserved.
#include "CollidingPawn.h"
#include "UObject/ConstructorHelpers.h"
#include "Particles/ParticleSystemComponent.h"
#include "Components/SphereComponent.h"
#include "Camera/CameraComponent.h"
#include "GameFramework/SpringArmComponent.h"
// Sets default values
ACollidingPawn::ACollidingPawn()
{
// このポーンが毎フレーム Tick() を呼び出すように設定します。必要がない場合はこれをオフにしてパフォーマンスを向上させることができます。
PrimaryActorTick.bCanEverTick = true;
// ルート コンポーネントは物理学に反応する球体です。
USphereComponent* SphereComponent = CreateDefaultSubobject<USphereComponent>(TEXT("RootComponent"));
RootComponent = SphereComponent;
SphereComponent->InitSphereRadius(40.0f);
SphereComponent->SetCollisionProfileName(TEXT("Pawn"));
// メッシュ コンポーネントを作成し球体の位置を確認できるようにします。
UStaticMeshComponent* SphereVisual = CreateDefaultSubobject<UStaticMeshComponent>(TEXT("VisualRepresentation"));
SphereVisual->SetupAttachment(RootComponent);
static ConstructorHelpers::FObjectFinder<UStaticMesh> SphereVisualAsset(TEXT("/Game/StarterContent/Shapes/Shape_Sphere.Shape_Sphere"));
if (SphereVisualAsset.Succeeded())
{
SphereVisual->SetStaticMesh(SphereVisualAsset.Object);
SphereVisual->SetRelativeLocation(FVector(0.0f, 0.0f, -40.0f));
SphereVisual->SetWorldScale3D(FVector(0.8f));
}
// パーティクル システムを作成し、アクティブにしたり、非アクティブにしたりできます。
OurParticleSystem = CreateDefaultSubobject<UParticleSystemComponent>(TEXT("MovementParticles"));
OurParticleSystem->SetupAttachment(SphereVisual);
OurParticleSystem->bAutoActivate = false;
OurParticleSystem->SetRelativeLocation(FVector(-20.0f, 0.0f, 20.0f));
static ConstructorHelpers::FObjectFinder<UParticleSystem> ParticleAsset(TEXT("/Game/StarterContent/Particles/P_Fire.P_Fire"));
if (ParticleAsset.Succeeded())
{
OurParticleSystem->SetTemplate(ParticleAsset.Object);
}
// スプリング アームを使い、カメラにスムーズで自然な動きを与えます。
USpringArmComponent* SpringArm = CreateDefaultSubobject<USpringArmComponent>(TEXT("CameraAttachmentArm"));
SpringArm->SetupAttachment(RootComponent);
SpringArm->SetRelativeRotation(FRotator(-45.f, 0.f, 0.f));
SpringArm->TargetArmLength = 400.0f;
SpringArm->bEnableCameraLag = true;
SpringArm->CameraLagSpeed = 3.0f;
// カメラを作成し、スプリングアームに取り付けます。
UCameraComponent* Camera = CreateDefaultSubobject<UCameraComponent>(TEXT("ActualCamera"));
Camera->SetupAttachment(SpringArm, USpringArmComponent::SocketName);
// デフォルトのプレイヤーをコントロールします。
AutoPossessPlayer = EAutoReceiveInput::Player0;
}
// ゲーム開始時またはスポーン時に呼び出されます
void ACollidingPawn::BeginPlay()
{
Super::BeginPlay();
}
// フレームごとに呼び出されます
void ACollidingPawn::Tick( float DeltaTime )
{
Super::Tick( DeltaTime );
}
// 入力に機能をバインドするために呼び出されます
void ACollidingPawn::SetupPlayerInputComponent(class UInputComponent* InInputComponent)
{
Super::SetupPlayerInputComponent(InInputComponent);
}
2. 入力設定と Pawn Movement コンポーネントの作成
-
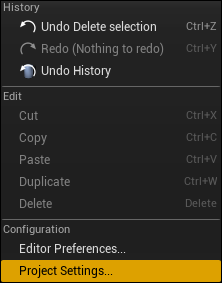
Unreal Editor へ戻って、プロジェクトの入力設定を行います。設定値は [Edit (編集)] ドロップダウン メニューの [Project Settings (プロジェクト設定)] にあります。
設定メニューに移動したら、左パネルの [Engine (エンジン)] セクションから [Input (入力)] を選択します。パーティクル システムの切り替えを設定する Action Mapping (アクションマッピング) 、ポーン を動かす 2 つの Axis Mappings 、そして ポーン を回転するためにもう一つの Axis Mapping を設定しなくてはいけません。
Action Mapping ParticleToggle (パーティクルの切替) スペース バー Axis Mapping MoveForward W 1.0 S -1.0 MoveRight A -1.0 D 1.0 Turn (ターン) Mouse X 1.0 
-
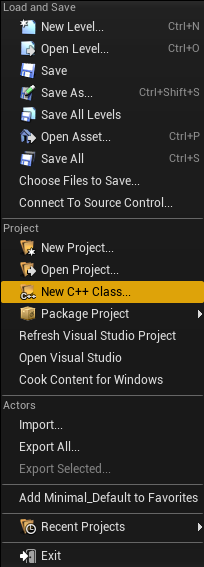
Pawn クラスですべての動きを直接処理する代わりに、動きを管理する Movement コンポーネント を作成します。このチュートリアルでは、 Pawn Movement コンポーネント クラスを拡張します。最初に [File (ファイル)] のドロップダウン メニューから [Add Code to Project (コードをプロジェクトに追加)] コマンドを選択します。
Pawn クラスとは異なり、 Pawn Movement コンポーネントはデフォルトで表示されません。このコマンドを探すには、[Show All Classes (すべてのクラスを表示)] オプションにチェックをいれなくてはいけません。
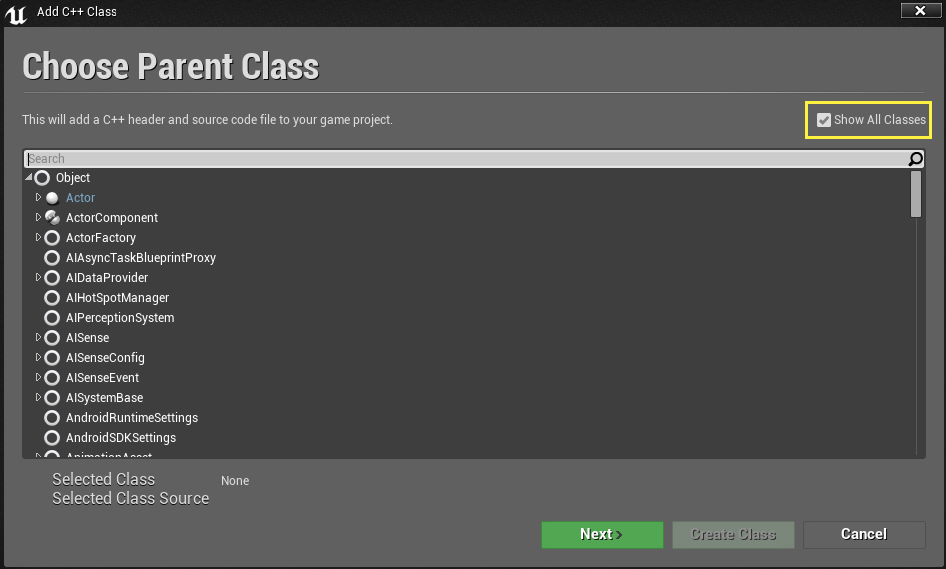
検索バーに「movement」と入力するとリストの検索範囲を絞り込めます。
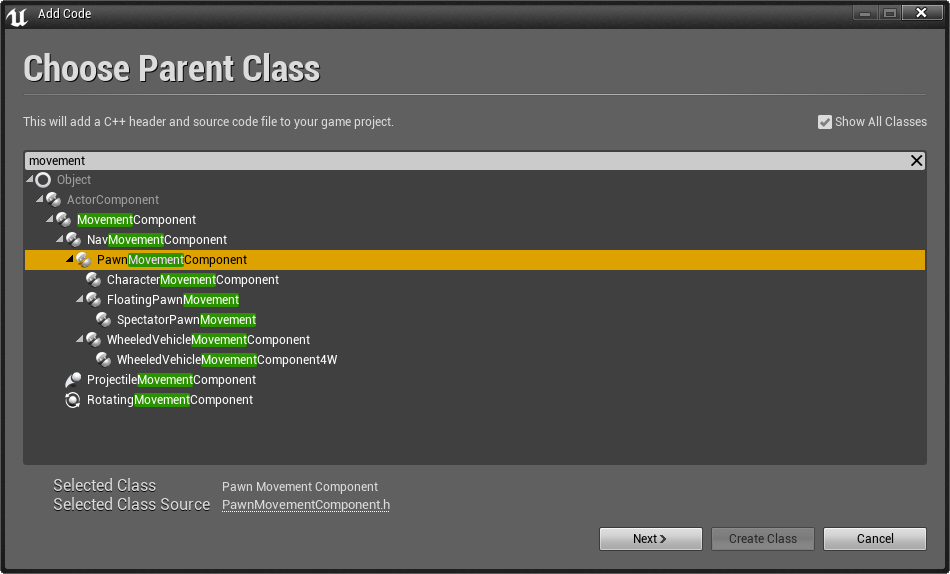
Pawn Movement コンポーネントにはパワフルな内蔵機能がいくつかあり一般的な物理機能に役立ちます。また、多数ある Pawn タイプの間で移動コードを共有する最適な方法です。プロジェクトが大きくなるにつれて乱雑な状態になったり、ポーンがより複雑になることを防ぐために、機能の分割にコンポーネントを使用することはグッドプラクティスです。Pawn クラスを
CollidingPawnと呼ぶため、このクラスをCollidingPawnMovementComponentと呼びます。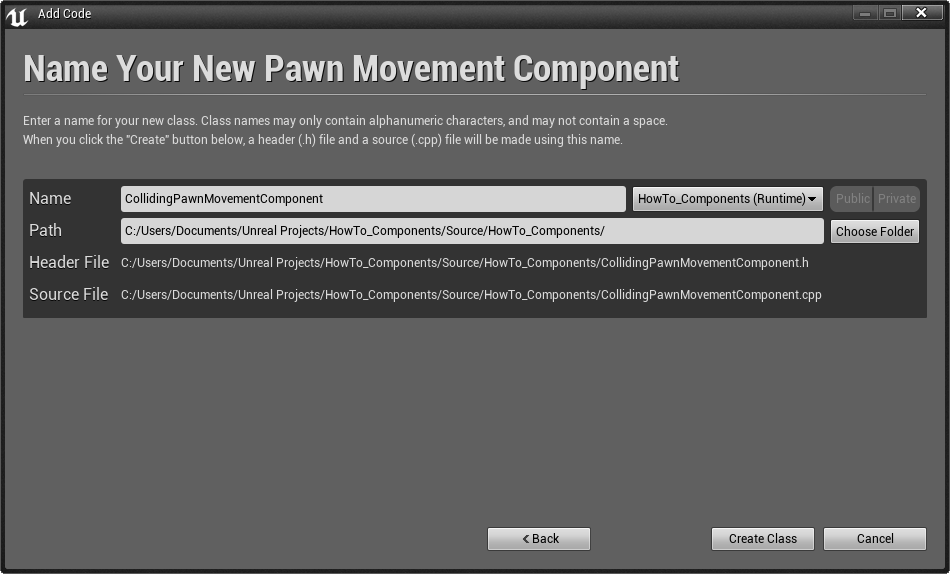
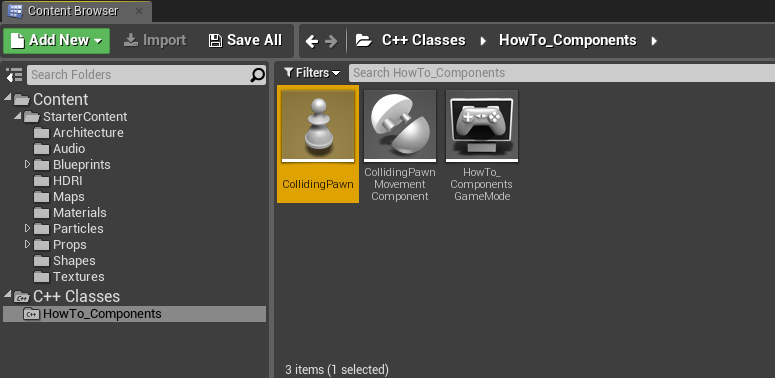
これで入力設定を定義して、カスタムの Pawn Movement コンポーネントを作成しました。コード エディタに戻って、Pawn Movement Component を使用時にポーンを移動するための方法を定義するコードを記述します。
3. Pawn Movement コンポーネントの挙動のコーディング
-
Visual Studio に戻り、カスタマイズした Pawn Movement コンポーネントを記述することができます。実際に記述が必要なのは、各フレームでどのように動くかを示す TickComponent 関数 (アクタの Tick 関数に類似)のみです。CollidingPawnMovementComponent.h で、クラス定義の TickComponent をオーバーライドする必要があります。
public: virtual void TickComponent(float DeltaTime, enum ELevelTick TickType, FActorComponentTickFunction *ThisTickFunction) override;CollidingPawnMovementComponent.cppでこの関数を定義します。void UCollidingPawnMovementComponent::TickComponent(float DeltaTime, enum ELevelTick TickType, FActorComponentTickFunction *ThisTickFunction) { Super::TickComponent(DeltaTime, TickType, ThisTickFunction); // すべてが有効になっていて、移動が許可されていることを確認します。 if (!PawnOwner || !UpdatedComponent || ShouldSkipUpdate(DeltaTime)) { return; } // ACollidingPawn::Tickで設定した移動ベクトルを取得します (クリアします) FVector DesiredMovementThisFrame = ConsumeInputVector().GetClampedToMaxSize(1.0f) * DeltaTime * 150.0f; if (!DesiredMovementThisFrame.IsNearlyZero()) { FHitResult Hit; SafeMoveUpdatedComponent(DesiredMovementThisFrame, UpdatedComponent->GetComponentRotation(), true, Hit); // 何かにぶつかると、それに沿って滑ろうとします。 if (Hit.IsValidBlockingHit()) { SlideAlongSurface(DesiredMovementThisFrame, 1.f - Hit.Time, Hit.Normal, Hit); } } };このコードは、適切な箇所でサーフェスをスライドしながら、ワールド内でポーンをスムーズに動かします。重力はポーンに適用されず、ポーンの最大速度は 1 秒当たり 150 の アンリアル単位 でハードコーディングされています。
この
TickComponent関数はUPawnMovementComponentクラスのパワフルな機能をいくつか利用します。-
ConsumeInputVectorは、移動入力値の保存に使用するビルドイン変数の値をレポートしてクリアします。 -
SafeMoveUpdatedComponentはソリッドなバリアを尊重しながら Pawn Movement コンポーネントの移動に Unreal Engine の物理を使用します。 -
SlideAlongSurfaceは、その場に停止したり壁や斜面にくっつくのではなく、壁や斜面に最終的に衝突した時のコリジョンサーフェスに沿ったスムーズなスライドの計算および物理を処理します。
Pawn Movement コンポーネントは、その他にも検討に値する機能がありますが、このチュートリアルの範囲では必要ありません。Floating Pawn Movement、Spectator Pawn Movement、Character Movement Component などその他のクラスもさらなる使用法やアイデアを与えてくれるかもしれません。
-
Pawn Movement Component の挙動を定義したら、カスタマイズした Pawn クラスにすべてをまとめるコードを記述していきます。
Work-In-Progress Code
CollidingPawn.h
// Copyright 1998-2018 Epic Games, Inc.All Rights Reserved.
#pragma once
#include "CoreMinimal.h"
#include "GameFramework/Pawn.h"
#include "CollidingPawn.generated.h"
UCLASS()
class HOWTO_COMPONENTS_API ACollidingPawn : public APawn
{
GENERATED_BODY()
public:
// Sets default values for this pawn's properties
ACollidingPawn();
protected:
// ゲーム開始時またはスポーン時に呼び出されます
virtual void BeginPlay() override;
public:
// フレームごとに呼び出されます
virtual void Tick( float DeltaSeconds ) override;
// 入力に機能をバインドするために呼び出されます
virtual void SetupPlayerInputComponent(class UInputComponent* InInputComponent) override;
UPROPERTY()
class UParticleSystemComponent* OurParticleSystem;
};
CollidingPawn.cpp
// Copyright 1998-2018 Epic Games, Inc.All Rights Reserved.
#include "CollidingPawn.h"
#include "UObject/ConstructorHelpers.h"
#include "Particles/ParticleSystemComponent.h"
#include "Components/SphereComponent.h"
#include "Camera/CameraComponent.h"
#include "GameFramework/SpringArmComponent.h"
// Sets default values
ACollidingPawn::ACollidingPawn()
{
// このポーンが毎フレーム Tick() を呼び出すように設定します。必要がない場合はこれをオフにしてパフォーマンスを向上させることができます。
PrimaryActorTick.bCanEverTick = true;
// ルート コンポーネントは物理学に反応する球体です。
USphereComponent* SphereComponent = CreateDefaultSubobject<USphereComponent>(TEXT("RootComponent"));
RootComponent = SphereComponent;
SphereComponent->InitSphereRadius(40.0f);
SphereComponent->SetCollisionProfileName(TEXT("Pawn"));
// メッシュ コンポーネントを作成し球体の位置を確認できるようにします。
UStaticMeshComponent* SphereVisual = CreateDefaultSubobject<UStaticMeshComponent>(TEXT("VisualRepresentation"));
SphereVisual->SetupAttachment(RootComponent);
static ConstructorHelpers::FObjectFinder<UStaticMesh> SphereVisualAsset(TEXT("/Game/StarterContent/Shapes/Shape_Sphere.Shape_Sphere"));
if (SphereVisualAsset.Succeeded())
{
SphereVisual->SetStaticMesh(SphereVisualAsset.Object);
SphereVisual->SetRelativeLocation(FVector(0.0f, 0.0f, -40.0f));
SphereVisual->SetWorldScale3D(FVector(0.8f));
}
// パーティクル システムを作成し、アクティブにしたり、非アクティブにしたりできます。
OurParticleSystem = CreateDefaultSubobject<UParticleSystemComponent>(TEXT("MovementParticles"));
OurParticleSystem->SetupAttachment(SphereVisual);
OurParticleSystem->bAutoActivate = false;
OurParticleSystem->SetRelativeLocation(FVector(-20.0f, 0.0f, 20.0f));
static ConstructorHelpers::FObjectFinder<UParticleSystem> ParticleAsset(TEXT("/Game/StarterContent/Particles/P_Fire.P_Fire"));
if (ParticleAsset.Succeeded())
{
OurParticleSystem->SetTemplate(ParticleAsset.Object);
}
// スプリング アームを使い、カメラにスムーズで自然な動きを与えます。
USpringArmComponent* SpringArm = CreateDefaultSubobject<USpringArmComponent>(TEXT("CameraAttachmentArm"));
SpringArm->SetupAttachment(RootComponent);
SpringArm->SetRelativeRotation(FRotator(-45.f, 0.f, 0.f));
SpringArm->TargetArmLength = 400.0f;
SpringArm->bEnableCameraLag = true;
SpringArm->CameraLagSpeed = 3.0f;
// カメラを作成し、スプリングアームに取り付けます。
UCameraComponent* Camera = CreateDefaultSubobject<UCameraComponent>(TEXT("ActualCamera"));
Camera->SetupAttachment(SpringArm, USpringArmComponent::SocketName);
// デフォルトのプレイヤーをコントロールします。
AutoPossessPlayer = EAutoReceiveInput::Player0;
}
// ゲーム開始時またはスポーン時に呼び出されます
void ACollidingPawn::BeginPlay()
{
Super::BeginPlay();
}
// フレームごとに呼び出されます
void ACollidingPawn::Tick( float DeltaTime )
{
Super::Tick( DeltaTime );
}
// 入力に機能をバインドするために呼び出されます
void ACollidingPawn::SetupPlayerInputComponent(class UInputComponent* InInputComponent)
{
Super::SetupPlayerInputComponent(InInputComponent);
}
CollidingPawnMovementComponent.h
// Copyright 1998-2018 Epic Games, Inc.All Rights Reserved.
#pragma once
#include "CoreMinimal.h"
#include "GameFramework/PawnMovementComponent.h"
#include "CollidingPawnMovementComponent.generated.h"
/**
*
*/
UCLASS()
class HOWTO_COMPONENTS_API UCollidingPawnMovementComponent : public UPawnMovementComponent
{
GENERATED_BODY()
public:
virtual void TickComponent(float DeltaTime, enum ELevelTick TickType, FActorComponentTickFunction *ThisTickFunction) override;
};
CollidingPawnMovementComponent.cpp
// Copyright 1998-2018 Epic Games, Inc.All Rights Reserved.
#include "CollidingPawnMovementComponent.h"
void UCollidingPawnMovementComponent::TickComponent(float DeltaTime, enum ELevelTick TickType, FActorComponentTickFunction *ThisTickFunction)
{
Super::TickComponent(DeltaTime, TickType, ThisTickFunction);
// すべてが有効になっていて、移動が許可されていることを確認します。
if (!PawnOwner || !UpdatedComponent || ShouldSkipUpdate(DeltaTime))
{
return;
}
// ACollidingPawn::Tickで設定した移動ベクトルを取得します (クリアします)
FVector DesiredMovementThisFrame = ConsumeInputVector().GetClampedToMaxSize(1.0f) * DeltaTime * 150.0f;
if (!DesiredMovementThisFrame.IsNearlyZero())
{
FHitResult Hit;
SafeMoveUpdatedComponent(DesiredMovementThisFrame, UpdatedComponent->GetComponentRotation(), true, Hit);
// 何かにぶつかると、それに沿って滑ろうとします。
if (Hit.IsValidBlockingHit())
{
SlideAlongSurface(DesiredMovementThisFrame, 1.f - Hit.Time, Hit.Normal, Hit);
}
}
};
4.ポーンとコンポーネントの併用
-
カスタム仕様の Pawn Movement コンポーネントを使用するために、まずコンポーネントを追跡する Pawn クラスを追加します。
OurParticleSystem変数を追加した付近の、CollidingPawn.hのクラス定義下部に以下のコードを追加します。UPROPERTY() class UCollidingPawnMovementComponent* OurMovementComponent; -
追跡する場所を用意したら、新規変数を格納する Colliding Pawn Movement コンポーネント を作成しなくてはいけません。CollidingPawn.cpp を開いて、ファイル上部の
GameFramework/Pawn.h行を含む行の下に以下を追加しして、コードで新規クラスの参照ができるように#include "CollidingPawnMovementComponent.h"インクルードされる最後のヘッダファイルの最後は "generated.h"になるようにしてください。そうしないと、コンパイル エラーが発生します。
Pawn Movement コンポーネントの作成と、このコンポーネントと Pawn の関連付けはシンプルな作業です。
ACollidingPawn::ACollidingPawnの下に以下のコードを追加します。// Create an instance of our movement component, and tell it to update the root. OurMovementComponent = CreateDefaultSubobject<UCollidingPawnMovementComponent>(TEXT("CustomMovementComponent")); OurMovementComponent->UpdatedComponent = RootComponent;これまで見てきたコンポーネントと違って、このコンポーネントを独自の Component 階層に親子付けする必要はありません。理由は、その他のコンポーネントは本質的に物理ロケーションを必要とするあらゆる種類の **Scene コンポーネント** だからです。しかし **Movement Controllers** は Scene コンポーネントではないため物理オブジェクトを表現しません。そのため、物理位置に存在したり、別のコンポーネントに物理的にアタッチするという概念があてはまりません。 -
Pawns には
GetMovementComponentという関数があります。この関数はエンジン内のその他のクラスが、Pawn が現在使用中の Pawn Movement コンポーネントにアクセスできるようにします。カスタムの Pawn Movement コンポーネント を返すようにこの関数をオーバーライドする必要があります。CollidingPawn.hのクラス定義に以下のコードを追加します。virtual UPawnMovementComponent* GetMovementComponent() const override;CollidingPawn.cppにオーバーライドされた関数の定義を以下のように追加します。UPawnMovementComponent* ACollidingPawn::GetMovementComponent() const { return OurMovementComponent; } -
新規 Pawn Movement コンポーネントをセットアップしたので、Pawn が受け取る入力を処理するコードを作成します。
CollidingPawn.hのクラス定義にいくつかの関数を宣言することからスタートします。void MoveForward(float AxisValue); void MoveRight(float AxisValue); void Turn(float AxisValue); void ParticleToggle();CollidingPawn.cppにこれらの関数の定義を以下のように追加します。void ACollidingPawn::MoveForward(float AxisValue) { if (OurMovementComponent && (OurMovementComponent->UpdatedComponent == RootComponent)) { OurMovementComponent->AddInputVector(GetActorForwardVector() * AxisValue); } } void ACollidingPawn::MoveRight(float AxisValue) { if (OurMovementComponent && (OurMovementComponent->UpdatedComponent == RootComponent)) { OurMovementComponent->AddInputVector(GetActorRightVector() * AxisValue); } } void ACollidingPawn::Turn(float AxisValue) { FRotator NewRotation = GetActorRotation(); NewRotation.Yaw += AxisValue; SetActorRotation(NewRotation); } void ACollidingPawn::ParticleToggle() { if (OurParticleSystem && OurParticleSystem->Template) { OurParticleSystem->ToggleActive(); } } -
あとは関数と入力イベントをバインドするのみです。次のコードを
ACollidingPawn::SetupPlayerInputComponentに追加します。InInputComponent->BindAction("ParticleToggle", IE_Pressed, this, &ACollidingPawn::ParticleToggle); InInputComponent->BindAxis("MoveForward", this, &ACollidingPawn::MoveForward); InInputComponent->BindAxis("MoveRight", this, &ACollidingPawn::MoveRight); InInputComponent->BindAxis("Turn", this, &ACollidingPawn::Turn); -
プログラミングは終了です。Unreal Editor に戻って [Compile] ボタンを押して変更をロードします。
プログラミング作業は終了です。これでカスタム ポーンをワールドに配置してあちこちへ移動させることができます。
完成したコード
CollidingPawn.h
// Copyright 1998-2018 Epic Games, Inc.All Rights Reserved.
#pragma once
#include "CoreMinimal.h"
#include "GameFramework/Pawn.h"
#include "CollidingPawn.generated.h"
UCLASS()
class HOWTO_COMPONENTS_API ACollidingPawn : public APawn
{
GENERATED_BODY()
public:
// Sets default values for this pawn's properties
ACollidingPawn();
protected:
// ゲーム開始時またはスポーン時に呼び出されます
virtual void BeginPlay() override;
public:
// フレームごとに呼び出されます
virtual void Tick( float DeltaSeconds ) override;
// 入力に機能をバインドするために呼び出されます
virtual void SetupPlayerInputComponent(class UInputComponent* InInputComponent) override;
UPROPERTY()
class UParticleSystemComponent* OurParticleSystem;
UPROPERTY()
class UCollidingPawnMovementComponent* OurMovementComponent;
virtual UPawnMovementComponent* GetMovementComponent() const override;
void MoveForward(float AxisValue);
void MoveRight(float AxisValue);
void Turn(float AxisValue);
void ParticleToggle();
};
CollidingPawn.cpp
// Copyright 1998-2018 Epic Games, Inc.All Rights Reserved.
#include "CollidingPawn.h"
#include "CollidingPawnMovementComponent.h"
#include "UObject/ConstructorHelpers.h"
#include "Particles/ParticleSystemComponent.h"
#include "Components/SphereComponent.h"
#include "Camera/CameraComponent.h"
#include "GameFramework/SpringArmComponent.h"
// Sets default values
ACollidingPawn::ACollidingPawn()
{
// このポーンが毎フレーム Tick() を呼び出すように設定します。必要がない場合はこれをオフにしてパフォーマンスを向上させることができます。
PrimaryActorTick.bCanEverTick = true;
// ルート コンポーネントは物理学に反応する球体です。
USphereComponent* SphereComponent = CreateDefaultSubobject<USphereComponent>(TEXT("RootComponent"));
RootComponent = SphereComponent;
SphereComponent->InitSphereRadius(40.0f);
SphereComponent->SetCollisionProfileName(TEXT("Pawn"));
// メッシュ コンポーネントを作成し球体の位置を確認できるようにします。
UStaticMeshComponent* SphereVisual = CreateDefaultSubobject<UStaticMeshComponent>(TEXT("VisualRepresentation"));
SphereVisual->SetupAttachment(RootComponent);
static ConstructorHelpers::FObjectFinder<UStaticMesh> SphereVisualAsset(TEXT("/Game/StarterContent/Shapes/Shape_Sphere.Shape_Sphere"));
if (SphereVisualAsset.Succeeded())
{
SphereVisual->SetStaticMesh(SphereVisualAsset.Object);
SphereVisual->SetRelativeLocation(FVector(0.0f, 0.0f, -40.0f));
SphereVisual->SetWorldScale3D(FVector(0.8f));
}
// パーティクル システムを作成し、アクティブにしたり、非アクティブにしたりできます。
OurParticleSystem = CreateDefaultSubobject<UParticleSystemComponent>(TEXT("MovementParticles"));
OurParticleSystem->SetupAttachment(SphereVisual);
OurParticleSystem->bAutoActivate = false;
OurParticleSystem->SetRelativeLocation(FVector(-20.0f, 0.0f, 20.0f));
static ConstructorHelpers::FObjectFinder<UParticleSystem> ParticleAsset(TEXT("/Game/StarterContent/Particles/P_Fire.P_Fire"));
if (ParticleAsset.Succeeded())
{
OurParticleSystem->SetTemplate(ParticleAsset.Object);
}
// スプリング アームを使い、カメラにスムーズで自然な動きを与えます。
USpringArmComponent* SpringArm = CreateDefaultSubobject<USpringArmComponent>(TEXT("CameraAttachmentArm"));
SpringArm->SetupAttachment(RootComponent);
SpringArm->SetRelativeRotation(FRotator(-45.f, 0.f, 0.f));
SpringArm->TargetArmLength = 400.0f;
SpringArm->bEnableCameraLag = true;
SpringArm->CameraLagSpeed = 3.0f;
// カメラを作成し、スプリングアームに取り付けます。
UCameraComponent* Camera = CreateDefaultSubobject<UCameraComponent>(TEXT("ActualCamera"));
Camera->SetupAttachment(SpringArm, USpringArmComponent::SocketName);
// デフォルトのプレイヤーをコントロールします。
AutoPossessPlayer = EAutoReceiveInput::Player0;
// Create an instance of our movement component, and tell it to update our root component.
OurMovementComponent = CreateDefaultSubobject<UCollidingPawnMovementComponent>(TEXT("CustomMovementComponent"));
OurMovementComponent->UpdatedComponent = RootComponent;
}
// ゲーム開始時またはスポーン時に呼び出されます
void ACollidingPawn::BeginPlay()
{
Super::BeginPlay();
}
// フレームごとに呼び出されます
void ACollidingPawn::Tick( float DeltaTime )
{
Super::Tick( DeltaTime );
}
// 入力に機能をバインドするために呼び出されます
void ACollidingPawn::SetupPlayerInputComponent(class UInputComponent* InInputComponent)
{
Super::SetupPlayerInputComponent(InInputComponent);
InInputComponent->BindAction("ParticleToggle", IE_Pressed, this, &ACollidingPawn::ParticleToggle);
InInputComponent->BindAxis("MoveForward", this, &ACollidingPawn::MoveForward);
InInputComponent->BindAxis("MoveRight", this, &ACollidingPawn::MoveRight);
InInputComponent->BindAxis("Turn", this, &ACollidingPawn::Turn);
}
UPawnMovementComponent* ACollidingPawn::GetMovementComponent() const
{
return OurMovementComponent;
}
void ACollidingPawn::MoveForward(float AxisValue)
{
if (OurMovementComponent && (OurMovementComponent->UpdatedComponent == RootComponent))
{
OurMovementComponent->AddInputVector(GetActorForwardVector() * AxisValue);
}
}
void ACollidingPawn::MoveRight(float AxisValue)
{
if (OurMovementComponent && (OurMovementComponent->UpdatedComponent == RootComponent))
{
OurMovementComponent->AddInputVector(GetActorRightVector() * AxisValue);
}
}
void ACollidingPawn::Turn(float AxisValue)
{
FRotator NewRotation = GetActorRotation();
NewRotation.Yaw += AxisValue;
SetActorRotation(NewRotation);
}
void ACollidingPawn::ParticleToggle()
{
if (OurParticleSystem && OurParticleSystem->Template)
{
OurParticleSystem->ToggleActive();
}
}
CollidingPawnMovementComponent.h
// Copyright 1998-2018 Epic Games, Inc.All Rights Reserved.
#pragma once
#include "CoreMinimal.h"
#include "GameFramework/PawnMovementComponent.h"
#include "CollidingPawnMovementComponent.generated.h"
/**
*
*/
UCLASS()
class HOWTO_COMPONENTS_API UCollidingPawnMovementComponent : public UPawnMovementComponent
{
GENERATED_BODY()
public:
virtual void TickComponent(float DeltaTime, enum ELevelTick TickType, FActorComponentTickFunction *ThisTickFunction) override;
};
CollidingPawnMovementComponent.cpp
// Copyright 1998-2018 Epic Games, Inc.All Rights Reserved.
#include "CollidingPawnMovementComponent.h"
void UCollidingPawnMovementComponent::TickComponent(float DeltaTime, enum ELevelTick TickType, FActorComponentTickFunction *ThisTickFunction)
{
Super::TickComponent(DeltaTime, TickType, ThisTickFunction);
// すべてが有効になっていて、移動が許可されていることを確認します。
if (!PawnOwner || !UpdatedComponent || ShouldSkipUpdate(DeltaTime))
{
return;
}
// ACollidingPawn::Tickで設定した移動ベクトルを取得します (クリアします)
FVector DesiredMovementThisFrame = ConsumeInputVector().GetClampedToMaxSize(1.0f) * DeltaTime * 150.0f;
if (!DesiredMovementThisFrame.IsNearlyZero())
{
FHitResult Hit;
SafeMoveUpdatedComponent(DesiredMovementThisFrame, UpdatedComponent->GetComponentRotation(), true, Hit);
// 何かにぶつかると、それに沿って滑ろうとします。
if (Hit.IsValidBlockingHit())
{
SlideAlongSurface(DesiredMovementThisFrame, 1.f - Hit.Time, Hit.Normal, Hit);
}
}
};
5. Playing in Editor (PIE)
-
Unreal Editor で [Compile] ボタンを押して変更したコードをロードします。

-
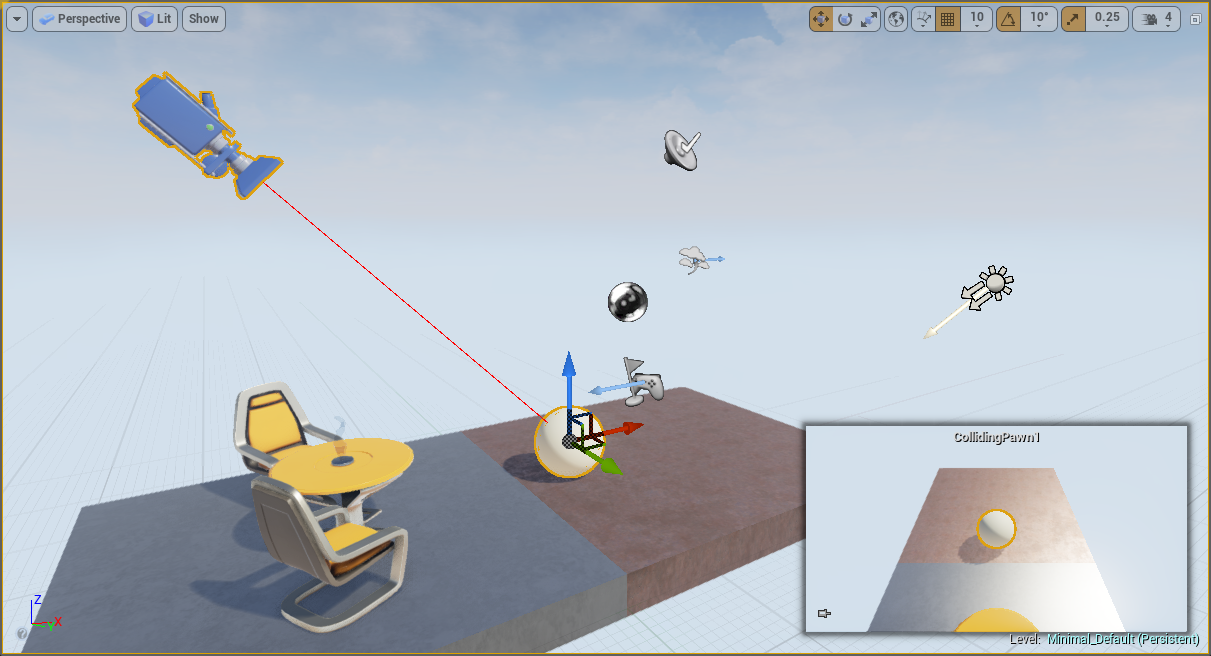
ワールドに CollidingPawn のインスタンスをドロップします。コンテンツ ブラウザ の "C++ Classes/(Our Project Name)/CollidingPawn" の配下にクラスがあります。
-
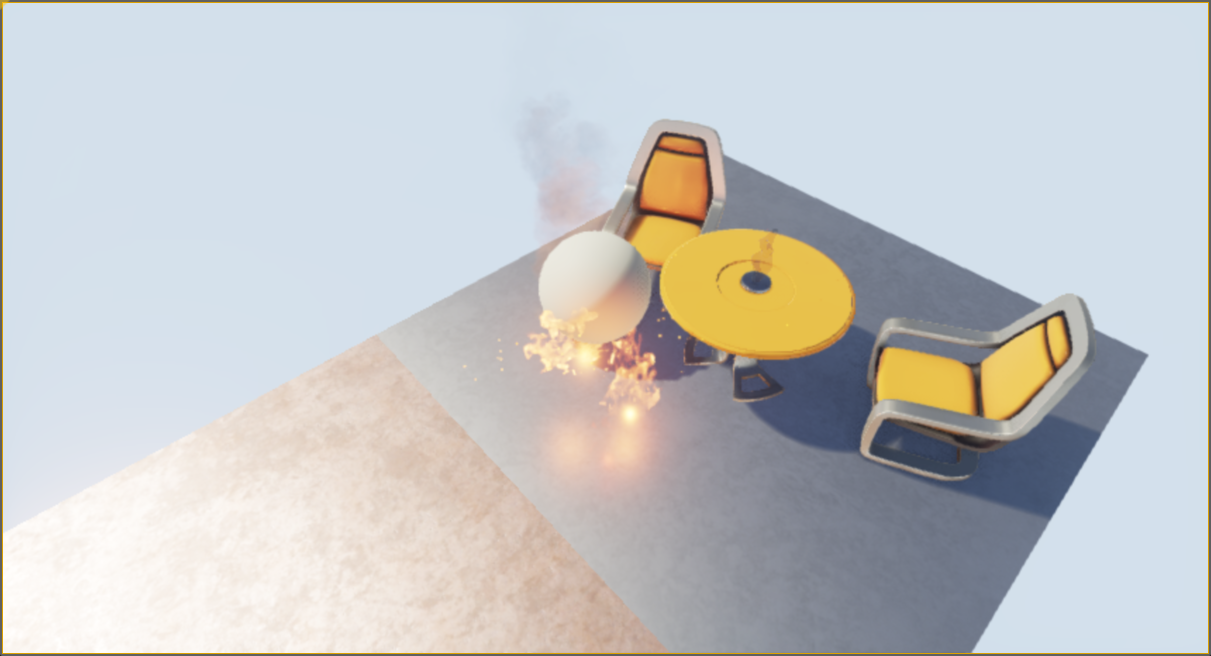
[Play (再生)] を押すと、球体を WASD キーで移動およびマウス操作で回転したり、例で使用しているテーブル、チェア、ワールドに配置するその他の物理オブジェクトなどのワールドオブジェクトと平行に「衝突してスライド」します。スペースバーで球体に火を付ける (または火を消す) こともできます!
Unreal Engine は幅広い用途向けの コンポーネント を提供しています。これまでは一般的なコンポーネントをいくつか紹介しただけですが、その他にもたくさんのコンポーネントがあります。ビルトイン コンポーネントを試してみたり、独自のコンポーネントを記述してみてください!柔軟性に優れたパワフルな機能を提供するだけでなく、プロジェクトコードの管理と再利用に役立ちます。
6. 応用編
ここまでで学んだ知識を活かして、以下を行ってみましょう。
- 親の周りを自動的に回る コンポーネント を作成します。
- 最大 3 個までの子をスポーンするコンポーネントをビルドします。各コンポーネントは設定された時間後に独自にスポーンします。
- コンポーネントを用いて完全な アクタ を別の アクタ へ親子付けする方法を学びます。