
プロジェクトのニーズと使用するデバイスに応じて、Switchboard のデバイス機能に対して追加や拡張を行うことができます。このページでは Python で独自のデバイス プラグインを作成する方法を説明します。C++ のナレッジがあれば、リスナーの拡張により受信するメッセージの種類を増やすことができます (ここでは説明しません)。
次の手順では、たたき台として Switchboard に対応した新しいデバイス プラグインである SampleDevice を作成する方法について説明します。
- このデバイス プラグインが Switchboard の読み込み時に検出されるように、命名規則「
<plugin_name>\plugin_<plugin_name>.py」に従ってフォルダと Python ファイルを「\Engine\Plugins\VirtualProduction\Switchboard\Source\Switchboard\switchboard\devices\」配下に作成します。- SampleDevice プラグインの場合は以下のファイルを作成します。
\Engine\Plugins\VirtualProduction\Switchboard\Source\Switchboard\switchboard\devices\sampledevice\plugin_sampledevice.py。
- SampleDevice プラグインの場合は以下のファイルを作成します。
- 「
\Engine\Plugins\VirtualProduction\Switchboard\Source\Switchboard\switchboard\devices\device_base.py」で定義されたDeviceクラスを拡張して「plugin_sampledevice.py」ファイルとます。- 「
device_base.py」からDeviceをインポートします。 Deviceを継承して、新しいクラスDeviceSampleDeviceを作成します。-
「
switchboard/switchboard_logging.py」からエラー報告に使用するLOGGERをインポートします。from switchboard.devices.device_base import Device from switchboard.switchboard_logging import LOGGER class DeviceSampleDevice(Device):` def __init__(self, name, ip_address, **kwargs): super().__init__(name, ip_address, **kwargs)
このファイルを Switchboard から検出できることを確認します。Switchboard を起動して [Add Device] ドロップダウン メニューを展開します。一覧に SampleDevice が表示されます。

- 「
- SampleDevice を Switchboard に追加するだけでは、ウィジェットがビューに作成されません。「
plugin_sampledevice.py」でDeviceWidgetを拡張して SampleDevice ウィジェットを作成します。- 「
device_widget_base.py」からDeviceWidgetをインポートします。 -
DeviceWidgetを継承して、新しいクラスDeviceWidgetSampleDeviceを作成します。from switchboard.devices.device_base import Device from switchboard.devices.device_widget_base import DeviceWidget from switchboard.switchboard_logging import LOGGER class DeviceSampleDevice(Device): def __init__(self, name, ip_address, **kwargs): super().__init__(name, ip_address, **kwargs) class DeviceWidgetSampleDevice(DeviceWidget): def __init__(self, name, device_hash, ip_address, icons, parent=None): super().__init__(name, device_hash, ip_address, icons, parent=parent)
このウィジェットが Switchboard に表示されることを確認します。Switchboard を起動して SampleDevice を追加します。最小限の SampleDevice ウィジェットがビューに表示されます。

- 「
AddDeviceDialogを継承する新しいクラスを作成し、それをDeviceSampleDeviceクラスのスタティック変数add_device_dialogに割り当てることにより、新しい SampleDevice を追加する時にカスタム ダイアログを作成します。- 「
device_widget_base.py」からAddDeviceDialogをインポートします。 - PySide2 から Qt モジュールをインポートします。
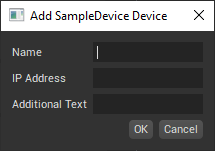
AddDeviceDialogを継承する新しいクラスAddSampleDeviceDialogを作成し、基本クラスのコンストラクタ呼び出しで device_type パラメータに "SampleDevice" を設定します。- この新しいクラスのコンストラクタで、QLineEdit テキスト フィールドをダイアログに追加します。
-
DeviceSampleDeviceのadd_device_dialogスタティック変数を、この新しいクラスでオーバーライドします。from switchboard.devices.device_base import Device from switchboard.devices.device_widget_base import AddDeviceDialog, DeviceWidget from switchboard.switchboard_logging import LOGGER from PySide2 import QtWidgets, QtGui, QtCore class AddSampleDeviceDialog(AddDeviceDialog): def __init__(self, existing_devices, parent=None): super().__init__(device_type="SampleDevice", existing_devices=existing_devices, parent=parent) # Create QTWidgets to add to the form self.additional_text_field = QtWidgets.QLineEdit(self) # Append the new options to the QTWidgets.QFormLayout object defined in the parent class self.form_layout.addRow("Additional Text", self.additional_text_field) class DeviceSampleDevice(Device): # Override the add device dialog object associated with the device plugin add_device_dialog = AddSampleDeviceDialog def __init__(self, name, ip_address, **kwargs): super().__init__(name, ip_address, **kwargs) class DeviceWidgetSampleDevice(DeviceWidget): def __init__(self, name, device_hash, ip_address, icons, parent=None): super().__init__(name, device_hash, ip_address, icons, parent=parent)
この新しいデバイス ダイアログが Switchboard に表示されることを確認します。Switchboard を起動して SampleDevice を追加します。追加のテキスト フィールドがダイアログに表示されます。
- 「
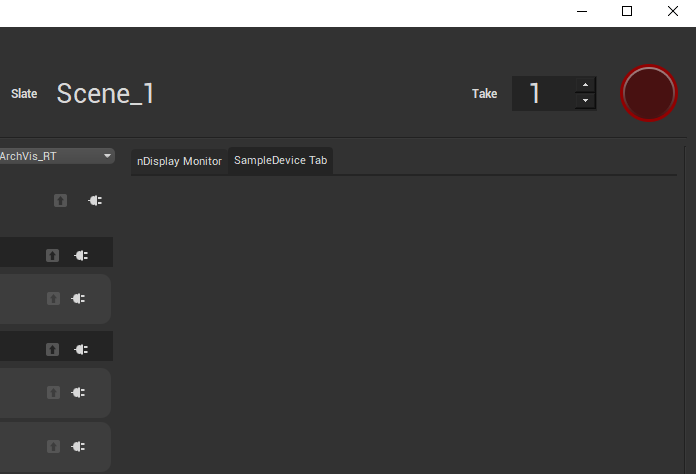
- Switchboard の右側にデバイスのウィジェットを配置し、他の拡張ダイアログにタブを追加して、より多くの情報を共有できます。基本クラス
Deviceのクラス メソッドplug_into_uiをオーバーライドして、このタブを作成します。QtWidgets.QWidgetを継承して、新しいクラスSampleDeviceTabViewを作成します。DeviceSampleDeviceにクラス メンバーtab_viewを作成して、このウィジェットのインスタンスを保持します。-
DeviceSampleDeviceのクラス メソッドplug_into_uiをオーバーライドし、新しいクラスSampleDeviceTabViewでtab_viewを初期化します。from switchboard.devices.device_base import Device from switchboard.devices.device_widget_base import AddDeviceDialog, DeviceWidget from switchboard.switchboard_logging import LOGGER from PySide2 import QtWidgets, QtGui, QtCore class AddSampleDeviceDialog(AddDeviceDialog): def __init__(self, existing_devices, parent=None): super().__init__(device_type="SampleDevice", existing_devices=existing_devices, parent=parent) # Create QTWidgets to add to the form self.additional_text_field = QtWidgets.QLineEdit(self) # Append the new options to the QTWidgets.QFormLayout self.form_layout object defined in the parent class self.form_layout.addRow("Additional Text", self.additional_text_field) class DeviceSampleDevice(Device): add_device_dialog = AddSampleDeviceDialog # Override the default dialog for the plugin tab_view = None def __init__(self, name, ip_address, **kwargs): super().__init__(name, ip_address, **kwargs) @classmethod def plug_into_ui(cls, menubar, tabs): ''' Implementation of base class function that allows plugin to inject UI elements. ''' if not cls.tab_view: cls.tab_view = SampleDeviceTabView(parent=tabs) tabs.addTab(cls.tab_view, 'SampleDevice Tab') class DeviceWidgetSampleDevice(DeviceWidget): def __init__(self, name, device_hash, ip_address, icons, parent=None): super().__init__(name, device_hash, ip_address, icons, parent=parent) class SampleDeviceTabView(QtWidgets.QWidget): def __init__(self, parent): QtWidgets.QWidget.__init__(self, parent)
ここまでの手順で、Switchboard の新しいデバイス プラグインの作成方法を説明しました。より高度なサンプルについては、Switchboard の nDisplay デバイス プラグインを参照してください。