
Introduction
Unreal Engine 5.4 introduces the ability to link a StateTree asset within another StateTree. This enables a more modular approach when building and reusing StateTrees in your project.
You can now create State Trees with specific functionality and reuse them when needed.
This guide will go through the steps of creating a simple State Tree and linking it to the State Tree created in the StateTree Quickstart Guide.
Goals
In this guide you will create a State Tree that rotates a moving target when it is hit. You will add this State Tree as an external asset to another StateTree that handles the movement of the target.
Objectives
- Create a new Hit Reaction StateTree and StateTree Task that rotate the moving target when hit
- Add the Hit Reaction StateTree to the ShootingTarget StateStree as an external asset and configure it
- Modify BP_ShootingTarget and STT_MoveAlongSpline to accommodate this new functionality
1- Prerequisites
This guide will use the StateTree created in the StateTree Quickstart Guide to demonstrate how to use an external StateTree. Please complete the Quickstart Guide to follow along the examples in this document.
Once you complete the Quickstart guide, press Play to verify the behavior.

2 - Create a StateTree Task to rotate the target
In this section you will create a StateTree Task that rotates the moving target.
- Right click in the Content Browser and click Blueprint Class from the Create Basic Asset section.
- In the Pick Parent Class window, expand All Classes and search for StateTree Task Blueprint Base. Select it and click Select.
- Name the asset STT_RotateTarget.


-
Double click STT_RotateTarget to open it. Create a new variable and call it ContextActor.
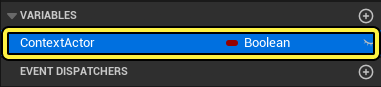
- Go to the Details panel, click the Variable Type dropdown and select Actor Object Reference.
- Click the Category textbox and enter Context. This will automatically bind the variable to the Context Actor in the StateTree.
- Compile and Save the Blueprint.

-
Go to the Functions section and click the Override dropdown. Click EnterState to create the EventEnterState node in the Event Graph. Repeat this process and click on ExitState.


- Drag the Context Actor into the Event Graph and select Get ContextActor.
- Drag from ContextActor and search for then select Add Actor Component By Class.
- Click the Class dropdown and search for then select Rotating Movement Component.

- Right click the Return Value pin of the Add Rotating Movement Component node and click Promote to Variable.
- Name the variable RotatingMovementComp.
- Drag from the RotatingMovementComp pin and search for then select Set Rotation Rate and enter 720 as the Z value.

- Drag RotatingMovementComp to the Event Graph and select Get RotatingMovementComp.
- Drag from RotatingMovementComp and search for then select Is Valid.
- Connect the EventEnterState node to the Is Valid node.
- Connect the Is Not Valid pin of the Is Valid node to the Add Rotating Movement Component node.

- Drag RotatingMovementComp to the Event Graph and select Get RotatingMovementComp.
- Drag from RotatingMovementComp and search for then select Set Component Tick Enabled.
- Check the Enabled pin to set it to True.

- Drag RotatingMovementComp to the Event Graph and select Get RotatingMovementComp.
- Drag from RotatingMovementComp and search for then select Set Component Tick Enabled.
- Make sure the Enabled pin is set to False (unchecked).
- Connect the EventExitState node to the SetComponentTickEnabled node.

-
Verify your Blueprint graph looks like the example below.

Section Results
In this section you created a StateTree Task that adds a Rotating Actor component to the target actor and rotates it.
3 - Create a StateTree to rotate the target
In this section you will create a StateTree that rotates the moving target when it is hit. This StateTree will be linked to the ST_ShootingTarget StateTree from the StateTree Quickstart Guide.
-
Right click in the Content Browser and click Artificial Intelligence > StateTree. Click StateTree Component and name the asset ST_Reaction.


-
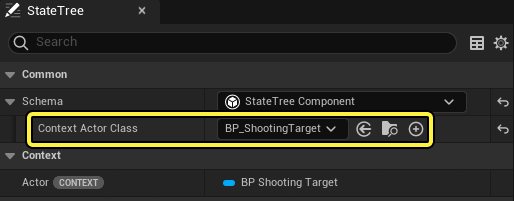
Double click ST_Reaction to open it. Expand the Schema section and click the Context Actor Class dropdown. Search for and select BP_ShootingTarget.
-
Click +Add State to create a new State. Name the State Reaction.

-
Add a Delay Task and enter 0.5 for its Duration. Then add a new Task and select STT Rotate Target from the dropdown.

-
Create a Transition and set the Trigger to On State Completed and Transition To to Tree Succeeded.

-
Compile and Save the StateTree.
Section Results
In this section you created the ST_Reaction StateTree which runs the STT_RotateTarget task. This task rotates the target when the StateTree is executed.
4 - Add the External StateTree
In this section you will add ST_Reaction as an external (linked) StateTree to ST_ShootingTarget.
-
Open ST_ShootingTarget and click +Add State to create a new State. Name the State Hit Reaction.

-
Select the Hit Reaction State and go to the Details panel. Click the Type dropdown and select Linked Asset. Click the Linked Asset dropdown and select ST_Reaction.

- Add an Enter Condition, click the If dropdown and select Integer Compare.
- Click the Operator dropdown and select Less.
- Set the Right value to 5.
- Click the Left dropdown and select Actor > Hit Count.

-
Add a new Transition and set the Trigger to On State Completed. Set Transition To to Idle.

- Select the MoveAlongSpline State and create a new Transition.
- Click the Trigger dropdown and select On Event.
- Click the Event Tag dropdown and select Manage Gameplay Tags.

-
Click the + button to add a new entry called StateTree. Add another entry below it and call it HitReaction, as seen below.

-
Click the Event Tag dropdown and select StateTree > Hit Reaction. Set Transition To to Hit Reaction.

Section Results
In this section you modified ST_ShootingTarget by adding ST_Reaction as an external StateTree in the Hit Reaction State. You also modified the MoveAlongSpline State to transition to Hit Reaction when a gameplay event is called.
5 - Modify BP_ShootingTarget
In this section you will modify the ShootingTarget Blueprint so it sends a Hit Reaction event to the StateTree and causes the target to rotate.
-
In the Content Browser, double click BP_ShootingTarget to open it. Create a new Float variable and name it DistanceTraveled.

- Drag the StateTree component to the Event Graph.
- Drag from the StateTree reference and search for then select Send State Tree Event.
- Connect the ++ node to the Send State Tree Event node.

-
Drag from the Event pin in the Send State Tree Event node and search for then select Make StateTree Event.

-
Click the Tag dropdown and select StateTree > Hit Reaction.

- Drag from the Hit Component pin of the OnComponentHit node and search for then select Get Display Name.
- Drag from the Return Value pin of the Get Display Name node and connect it to the Origin pin of the Make StateTree Event node.

- Compile and Save the Blueprint.
Section Results
In this section you modified the ShootingTarget Blueprint so it sends a StateTree Hit Reaction event when it is hit.
6 - Modify STT_MoveAlongSpline
In this section you will modify STT_MoveAlongSpline to use the DistanceTraveled variable from BP_ShootingTarget instead of a local distance variable to calculate its position along the spline.
-
In the Content Browser, double click STT_MoveAlongSpline to open it. Click the Override dropdown next to Functions and select EnterState to create the Event EnterState node in the Event Graph.

- Drag the Actor variable to the Event Graph and select Get Actor.
- Drag from Actor and search for then select Cast to BP_ShootingTarget.
- Right click the As BP_ShootingTarget pin in the Cast to BP_ShootingTarget node and select Promote to Variable.
- Connect the Event EnterState node to the Cast to BP_ShootingTarget node.

- Drag AsBPShootingTarget to the Event Graph and select Get AsBPShootingTarget.
- Drag from AsBPShootingTarget and search for then select Get Distance Traveled.
- Connect DistanceTraveled to the Distance pin of the Get Location at Distance Along Spline node. This replaces the current connection to Distance.

- Drag AsBPShootingTarget to the Event Graph and select Get AsBPShootingTarget.
- Drag from AsBPShootingTarget and search for then select Get Distance Traveled.
- Connect DistanceTraveled to the Less Than node, replacing the connection with Distance.

- Drag AsBPShootingTarget to the Event Graph and select Get AsBPShootingTarget.
- Drag from AsBPShootingTarget and search for then select Get Distance Traveled.
- Connect DistanceTraveled to the + node, replacing the connection with Distance.
- Drag AsBPShootingTarget to the Event Graph and select Get AsBPShootingTarget. Drag from the node and search for then select Set DistanceTraveled.
- Replace the Set Distance node connected to the True pin of the Branch node.

- Drag AsBPShootingTarget to the Event Graph and select Get AsBPShootingTarget.
- Drag from the node and search for then select Set DistanceTraveled.
- Replace the Set Distance node connected to the True pin of the Branch node.

- Compile and Save the Blueprint.
Section Results
In this section you modified STT_MoveAlongSpline to use the DistanceTraveled variable from BP_ShootingTarget, instead of a local Distance variable.
7 - Test your Results
Press Play and shoot at the target. You should see the target spin when it's hit and resume moving after 0.5 seconds.
