
The DMX Library asset is the main DMX plugin data structure that holds information in regards to:
- Controllers
- Fixture Types
- Fixture Patches
This guide shows you how to create a DMX (Digital Multiplex) Library and add Fixture Patches, which let you send and receive DMX data in Unreal Engine. The DMX Library contains your fixture database, various settings, and patching configuration.
Create a DMX Library
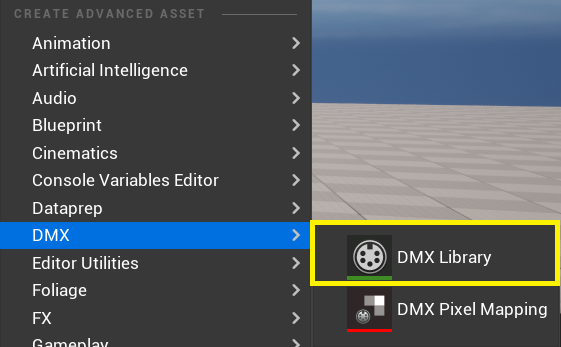
To create a DMX Library, follow these steps:
-
In the Content Drawer, click +Add > DMX > DMX Library.
- Enter a name for the DMX Library.
- Double-click the DMX Library to open it.
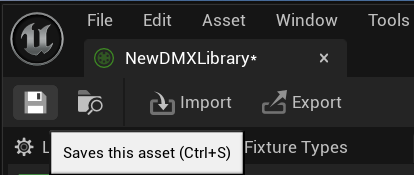
As you make changes to the DMX Library, click the save icon to save your changes:
Fixture Types
DMX fixtures are physical devices that can be controlled by a DMX protocol, such as Art-Net or sACN. Lights are the most common type of DMX fixture, but many stage special effects machines, like lasers and fog machines, are also fixtures.
Each fixture has a set of attributes or channels that are predefined on the hardware level. These attributes are organized into groups called modes. DMX fixtures often have dozens of modes, enabling more and more functionality for every available mode. The more complex the mode, the more memory footprint it requires. This directly impacts the space that fixtures take within a mapped Universe.
To add a fixture type to Unreal Engine, you can either import a fixture type using GDTF, or create a fixture type manually.
Import a Fixture Type Using GDTF
Most of the time, manufacturers have created properly crafted signature files for their fixtures following the GDTF specifications that Unreal Engine also supports. (For example, this is where you will also find Epic Games Lightcard signature file.)
Fixture manufacturers share their GDTF files on https://gdtf-share.com/. You have to create an account to download the GDTF file you want to import.
After you download a GDTF file, you can import and use it in Unreal Engine:
- Drag a GDTF file into the Content Drawer to import it.
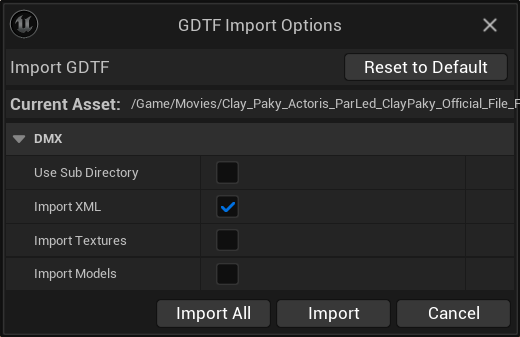
-
In the GDTF Import Options window, click Import.
Options to Import Textures and Import Models are not implemented in this engine version.
- In the Content Drawer, double-click the DMX Library to open it.
- Click the Fixture Types tab.
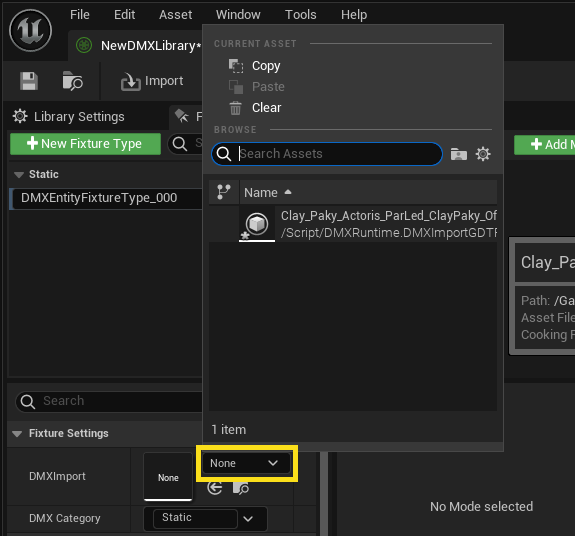
- Click + New Fixture Type.
- To rename the fixture type, right-click the fixture type and click Rename.
- Under Fixture Settings, select the GDTF asset from the DMXImport dropdown.
Create a Fixture Type Manually
For debugging purposes, or whenever GDTF signature files or MVR files are not available (for example, for very old or very new fixtures, or if you would like to drive properties in-engine), you can follow the manufacturer specifications and create the Fixture Type definition yourself in the DMX Library.
To create a fixture manually, follow these steps:
- In the Content Drawer, double-click the DMX Library to open it.
- Click the Fixture Types tab.
- Click + New Fixture Type.
- After the new fixture type is created, click + Add Mode.
After adding a mode, you can add functions to the mode. Functions are specific features of a given DMX fixture. Functions can map to a single or multiple channels, represented by the chosen bit depth (8, 16, or 24 bits).
To add functions to a mode, follow these steps:
- Click + Add Function.
- In the Attribute dropdown, click the predefined attribute that this function will control.
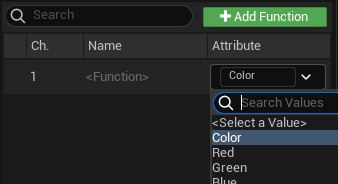
Under Function Settings, you can update the bit depth using the Data Type dropdown.
Add a Fixture Patch
DMX fixtures need to be patched so that they can receive data and execute commands using the DMX Protocol.
To add a Fixture Patch, follow these steps:
- In the Content Drawer, double-click the DMX Library to open it.
- Click the Fixture Patch tab.
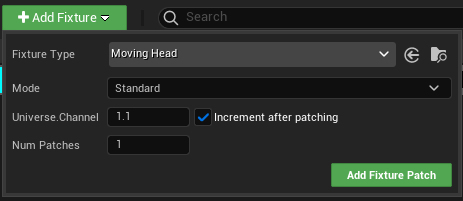
- Click + Add Fixture.
- You change the following settings:
- Fixture Type: The fixture type that is being patched.
- Mode: The mode of the fixture type that is being patched.
- Universe.Channel: The starting universe and channel to patch to, such as “2.1” for Universe 2, Channel 1.
- Increment after patching: Automatically increments the Universe.Channel field after adding the patch.
- Num Patches: The number of patches being created.
- Click Add Fixture Patch.
After a patch is added, it shows in the Fixture List on the left and in the Patcher on the right. You can change the fixture type, mode, and patch.

Receive and Send DMX Using Fixture Patches
You can set up Fixture Patches to send and receive DMX values in any Blueprint.
To receive DMX from Fixture Patches, you can either use the Patches in a DMX component, or use a Patch directly. Using a DMX component is more performant than using a Patch directly in most use cases, since the On Fixture Patch Received event only fires when DMX values change.
You can also send DMX using a Patch.
Receive DMX Using A Patch
You can use the Get Attribute Values and Get Normalized Attribute Values nodes to retrieve the last received DMX values. The attributes correspond to the attribute names of the fixture type that the patch is based on.
To receive DMX using a Patch, follow these steps:
- Create a blueprint of any class or open a blueprint from the Content Drawer.
- In the Blueprint editor, right-click in the Event Graph to bring up the context menu.
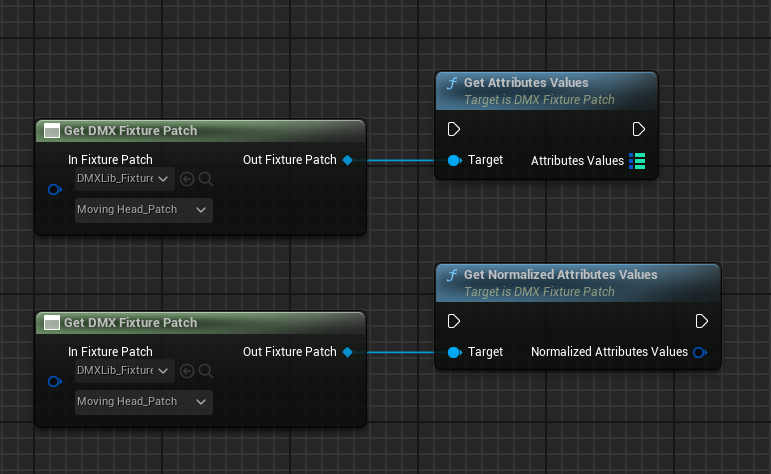
- Enter "Get DMX Fixture Patch" in the search bar and click Get DMX Fixture Patch to create a node.
- Drag off the Out Fixture Patch pin and enter "Get Attributes Values" or "Get Normalized Attributes Values" in the search bar, and click it to create a node.
- Compile (Ctrl + Alt) and Save (Ctrl + S) the script.
Receive DMX Using a DMX Component
To receive DMX using a DMX component, follow these steps:
- Create a blueprint of any class or open a blueprint from the Content Drawer.
- In the Components panel, click Add + > DMX.
- If the Components panel isn't enabled, click Window > Components in the navigation menu.
- Click DMX in the Components panel.
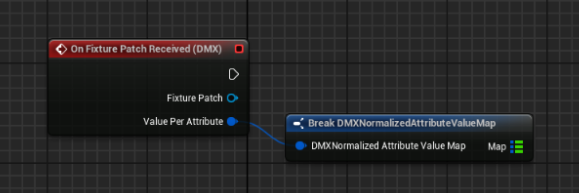
- Right-click on the Event Graph, enter "Add On Fixture Patch Received" in the search bar, and click On Fixture Patch Received to create an event node.
- In the event node, drag off the Value Per Attribute pin and create a Break DMXNormalizedAttributeValueMap node.
- Compile (Ctrl + Alt) and Save (Ctrl + S) the script.
Send DMX Using A Patch
To send DMX using a Patch:
- Create a blueprint of any class or open a blueprint from the Content Drawer.
- In the Blueprint editor, right-click on the Event Graph to bring up the context menu.
- Enter "Get DMX Fixture Patch" in the search bar and click Get DMX Fixture Patch to create a node.
- In the Get DMX Fixture Patch node, drag off the Out Fixture Patch pin and create a Send DMX node.
- In the Send DMX node, drag off Attribute Map, then click Promote to Variable.
- Compile (Ctrl + Alt) the script.
- In the Details panel, under Default Value, click + in the Attribute Map category to add an element to the map.
- In the new element, set the DMXAttribute Name and Value to match an attribute on the fixture that you're patching. For example, if you're creating a patch for a fixture with a single 8-bit Color attribute, you would set DMXAttribute Name to "Color" and Value to a number between 0 and 255.
- Repeat steps 7 and 8 for all the fixture's attributes.
- Compile (Ctrl + Alt) and Save (Ctrl + S) the script.
