
A USD Stage is a complex composition of layers that can have sublayers, references, and layered files. The USD Stage Editor in Unreal Engine enables you to work with and edit USDs.
This guide explores the actions and workflows you can use while working with USD files in Unreal Engine.
For more information on USD stages and terminology, see Pixar's Universal Scene Description Terms and Concepts.
Also, see the USD Stage Editor Quick Start to get started using the USD Stage Editor in Unreal Engine.
Duplicating Prims
The Duplicate rollout lists several options for duplicating a prim. USD is a complex format and it's not obvious in all cases what "duplication" means. Because of this, the USD Stage Editor provides multiple duplication methods that use slightly different approaches, and that can be useful in different situations.
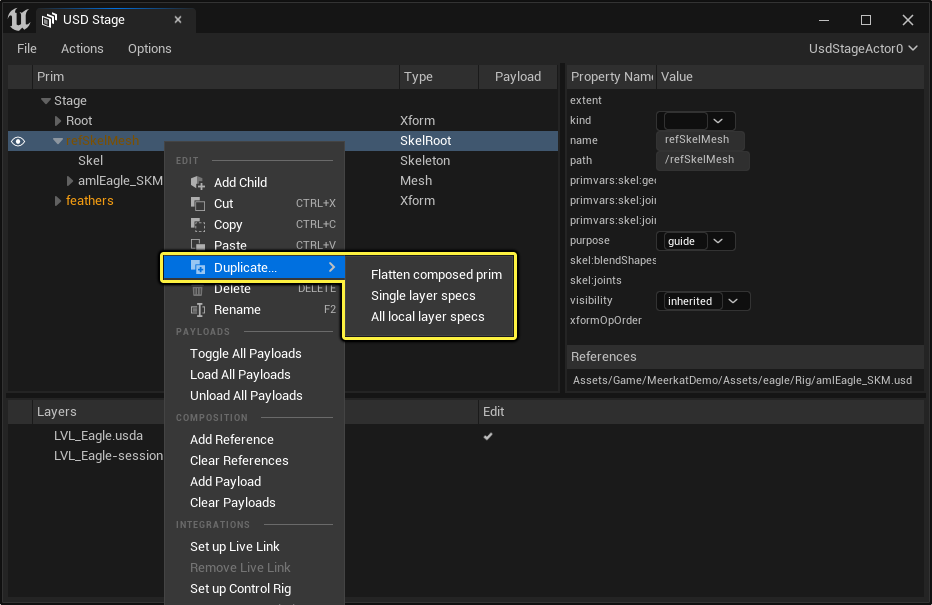
- Flatten Composed Prim combines prim specs and makes a new prim with them, "flattening" everything. If the composed prim has an override on a spec, that override is the only opinion for that spec that will be visible on the duplicated prim.
- Single Layer Specs duplicates the prim's specs on the current Edit Target only. You can use this option to duplicate a prim's specs on a given layer without also duplicating overrides defined on stronger layers. This option is only available when the current edit target has specs for the prim you are duplicating.
- All Local Layer Specs duplicates each of the prim's specs across all local layers of the USD stage.
You can use a text editor to inspect the changes made to your USD file after saving it in the USD Stage Editor.
Cut/Copy/Paste Prims
The Cut and Copy actions always add flattened representations of the prims to the clipboard stage (similar to the Flatten Composed Prim method of duplicating prims). The Paste action always pastes the prims from the clipboard stage as children of the currently selected prim, on the current Edit Target.
The Clipboard Stage is a separate stage the USD Stage Editor keeps behind the scenes, independent of whatever stage is currently opened. Because of this, it is possible to use these actions to cut, copy, and paste prims across different opened USD Stages.
Adding References
You can give any prims on the USD Stage Editor a reference that points to another prim on the currently-loaded USD Stage or another USD file on your machine. Use the Add Reference option from the right-click context menu to open the Add Reference dialog where you can specify how you want the selected prim to reference another.
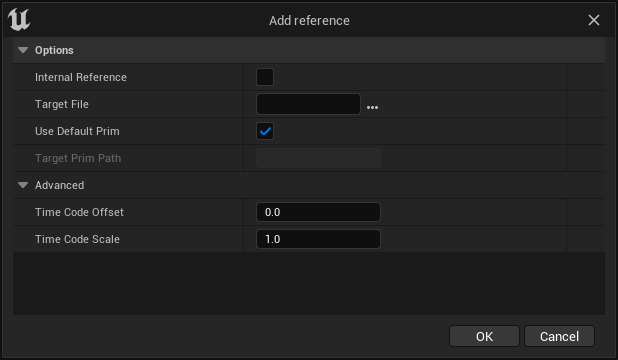
| Property | Description |
|---|---|
| Internal Reference | When enabled, the reference will target a prim on this stage. |
| Target File | Select the USD file to use as a reference. |
| Use Default Prim | Use the default prim of the target layer as the referenced prim. |
| Target Prim Path | When Use Default Prim is disabled, select a specific prim of the target stage as the referenced prim. |
| Advanced | |
| Time Code Offset | Applies an offset to the referenced prim's timeline sampled attributes. For example, setting a value of 10 will delay the start of the referenced animation by 10 time codes. |
| Time Code Scale | The time scaling factor to apply to the referenced prim's timeline sampled attributes. |
To add a reference to a prim on the currently-loaded USD Stage, enable Internal Reference and disable Use Default Prim. This disables the Target File option and enables the Target Prim Path option, where you can specify which prim to use.
To reference another USD layer, leave Internal Reference disabled so that you can specify it as the Target File. You can optionally disable Use Default Prim to specify a prim to use as a reference within the Target Layer. Leaving Use Default Prim enabled uses the default prim of the Target Layer as the referenced prim.
You can use Clear References on the right-click context menu to remove all references used by this prim.
Adding Payloads
Any prims on the USD Stage Editor can contain a payload. Analogous to references, you can add new payloads by right-clicking the prim and picking Add Payload, where you can specify the payload details.
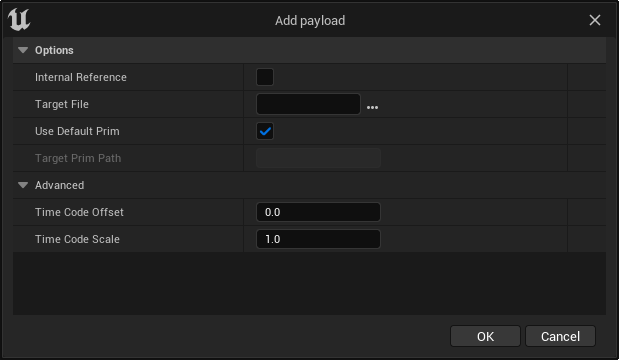
| Property | Description |
|---|---|
| Internal Reference | When enabled, the payload will target a prim on this stage. |
| Target File | Select the USD file to use as a payload. |
| Use Default Prim | Use the default prim of the target layer as the payload prim. |
| Target Prim Path | When Use Default Prim is disabled, select a specific prim of the target layer as the payload prim. |
| Advanced | |
| Time Code Offset | Applies an offset to the payload prim's timeline sampled attributes. For example, setting a value of 10 will delay the start of the payload animation by 10 time codes. |
| Time Code Scale | The time scaling factor to apply to the payload prim's time sampled attributes. |
To add a payload to a prim on the currently loaded USD Stage, enable Internal Reference and disable Use Default Prim. This disables the Target File option and enables the Target Prim Path option, where you can specify which prim to use.
To use another USD layer as a payload, leave Internal Reference disabled so you can specify a Target File. You can optionally disable Use Default Prim to specify a prim to use as a payload within the Target Layer. Leaving Use Default Prim enabled uses the default prim of the Target Layer as the payload prim.
You can use Clear Payloads on the right-click context menu to remove all payloads used by this prim.
Isolate Layers
The Isolate option is useful when you want to see a particular subtree of layers and not the entire USD Stage. Behind the scenes, while you're picking a particular layer to isolate, you're seeing that layer and all of its sublayers.
You can access this option by right-clicking on the layer you want to isolate in the Layers panel.
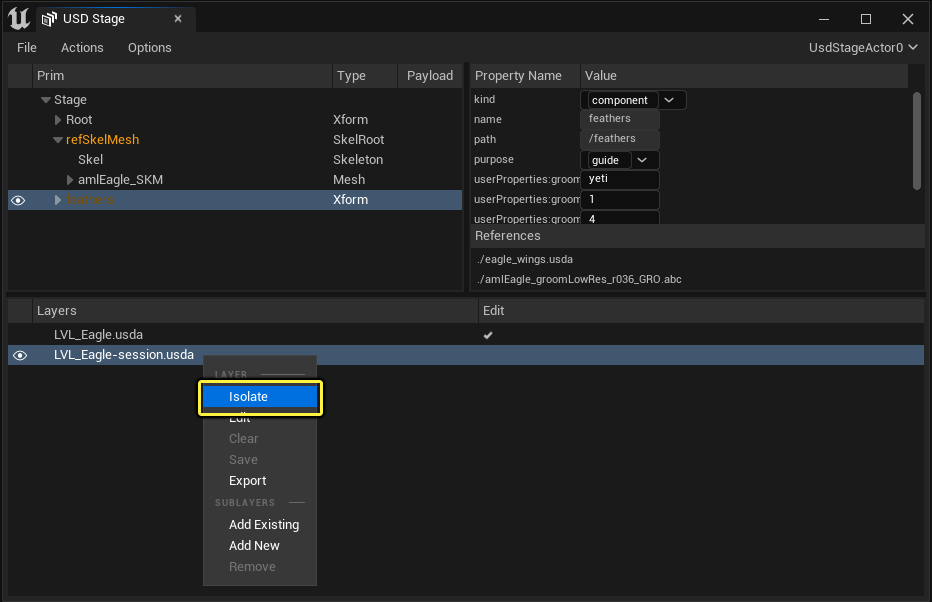
Isolating a layer only shows that layer and its sublayers. All other layers are grayed out to indicate they are present on the outer stage but not affecting the isolated stage.
To indicate a layer from the stage is isolated, the USD Stage window displays Isolated Mode in the top-right corner of the window. Clicking this message ends isolation mode and reverts back to the fully composed stage.

Alternatively, you can stop isolating a layer by right-clicking on the same layer and selecting Stop Isolating.